Wednesday, December 14, 2022

How to Fix Squeaking Carpeted Floors

Floors that become dried out can begin to squeak. The dried flooring can force the nails in the subfloor to loosen and pop out. The subfloor and the floor joist could then begin to separate and squeak whenever someone walks on the flooring. Carpeted floors that squeak require special help to fix the irritating sounds. Be sure to be careful as you work so as not to damage any of the wood below the carpet.

What You'll Need:

  • Rubber mallet
  •  Masking tape
  •  Drill
  •  Carpet repair kit


Step 1 - Locate the Squeaky Areas

Slowly walk over the flooring until you locate the areas where the squeaking sounds occur. If possible, have someone help you to make the job easier.

Step 2 - Mark the Squeaky Areas

Tear off strips of the masking tape. Use the strips of tape to mark off the squeaky floor areas you have found.

Step 3 - Locate the Floor Joist

Use the rubber mallet to tap the floor in the areas you have marked with the tape. As you tap the floor, listen for a dull sound. This will indicate the location of the floor joist.

Step 4 - Drill a Test Hole in the Floor

Use the drill to make a hole in the location of the floor joist. You will know whether you have located the joist by the movement of the drill bit. If the bit slides through the floor, you have not found the joist. If it gets stuck within the flooring, you have found the joist. You will need to continue until you are able to find the floor joist on both sides of the squeaky floor area. Most floor joists are installed sixteen inches apart.

Step 5 - Insert the Depth Control Device

The carpet repair kit should contain a depth control device and the necessary snap off screws. Insert the device into the carpet in the location of the floor joist near the squeaky floor area.

Step 6 - Insert the Drive Screw

Insert the screw into the depth control device. Push the screw until the stop guard is reached. Secure the screw through the device with your screwdriver. When you have reached the stop guard, the screw will be visible about the carpet.

Step 7 - Remove the Depth Control Device

Take the depth control device out of the floor. Slide the slotted edge of the device over the screw. Turn the device onto its side and then slide the slotted end of it over the screw.

Step 8 - Remove the Screw Head

Snap the depth control device toward the floor, breaking the head off of the screw. Snap the device again toward the floor. This will force the screw under the carpet.

Step 9 - Finish the Screw Installation

Continue forcing the screws, one foot apart, into the floor joists on both sides of the squeaky floor areas. You will need to continue to work about two feet beyond each of the squeaky areas.


Source: www.DoItYourself.com

How to Transition Wooden Floors to Tile Floors

With proper preparation, wooden floors can be transitioned to tile floors. Tile floors may be preferable to a wooden floor in cases where it would not be cost effective to refinish the wooden floor, or in cases where a tile floor is more durable to the type of traffic a floor receives, such as animals or children with wet and muddy feet.

What You'll Need:

  • An electric floor sander
  •  Wood putty or wood filler
  •  Putty knife
  •  Shop vacuum or vacuum cleaner
  •  1 1/2 inch long 3/8 inch wood screws
  •  Screwdriver


Step 1 - Determining if the Wooden Floor Will Work for Tile

Look to see if the wooden flooring is on top of sub flooring or laying directly on the floor joists. The combined thickness should be 1 to 1 ½ inches thick. If it isn’t at least 1 inch thick, you will have to add plywood to the flooring.


Step 2 - Preparing the Room

It is easier to lay tile with all the furniture out of the room. Baseboards should be removed so that tile can be installed up to the wall.


Step 3 - Preparing the Floor

If the wooden floor is directly on the floor joists, and is not at least 1 inch thick, you may have to add plywood before laying tile. If you have to lay plywood, make sure the floor is level and straight before installing the plywood. Fill in any holes or cracks with wood putty or filler.

Use an outdoor grade of 5/8 inch plywood and place each sheet 1/8 inch apart to allow for expansion of the wood. Screw the plywood into the wooden flooring and the floor joists.

If you are installing ceramic tile, you will also have to place cement backer board on top of the plywood or the wooden floor. This is a type of thin drywall specifically used for ceramic tile. Ceramic tile does not adhere well to wood. Cement backer board is installed 1/8 inch apart and the cracks are filled in with silicon before laying ceramic tile.


Step 4 - Sanding the Floor and Applying Adhesive

Whether laying plywood or using the wood flooring, you will have to sand the floor. The floor must be smooth, level and straight to keep tile from cracking. Vacuum the floor after sanding and make sure it is clean.

Be sure to check with the manufacturer on the type of adhesive that should be used with whatever type of tile you choose. Work in small areas at a time and finish in sections. That way, you can take breaks to relax your knees and back.


Monday, December 12, 2022

Edwardian Floor Restoration Tips from Birmingham Tiling Expert

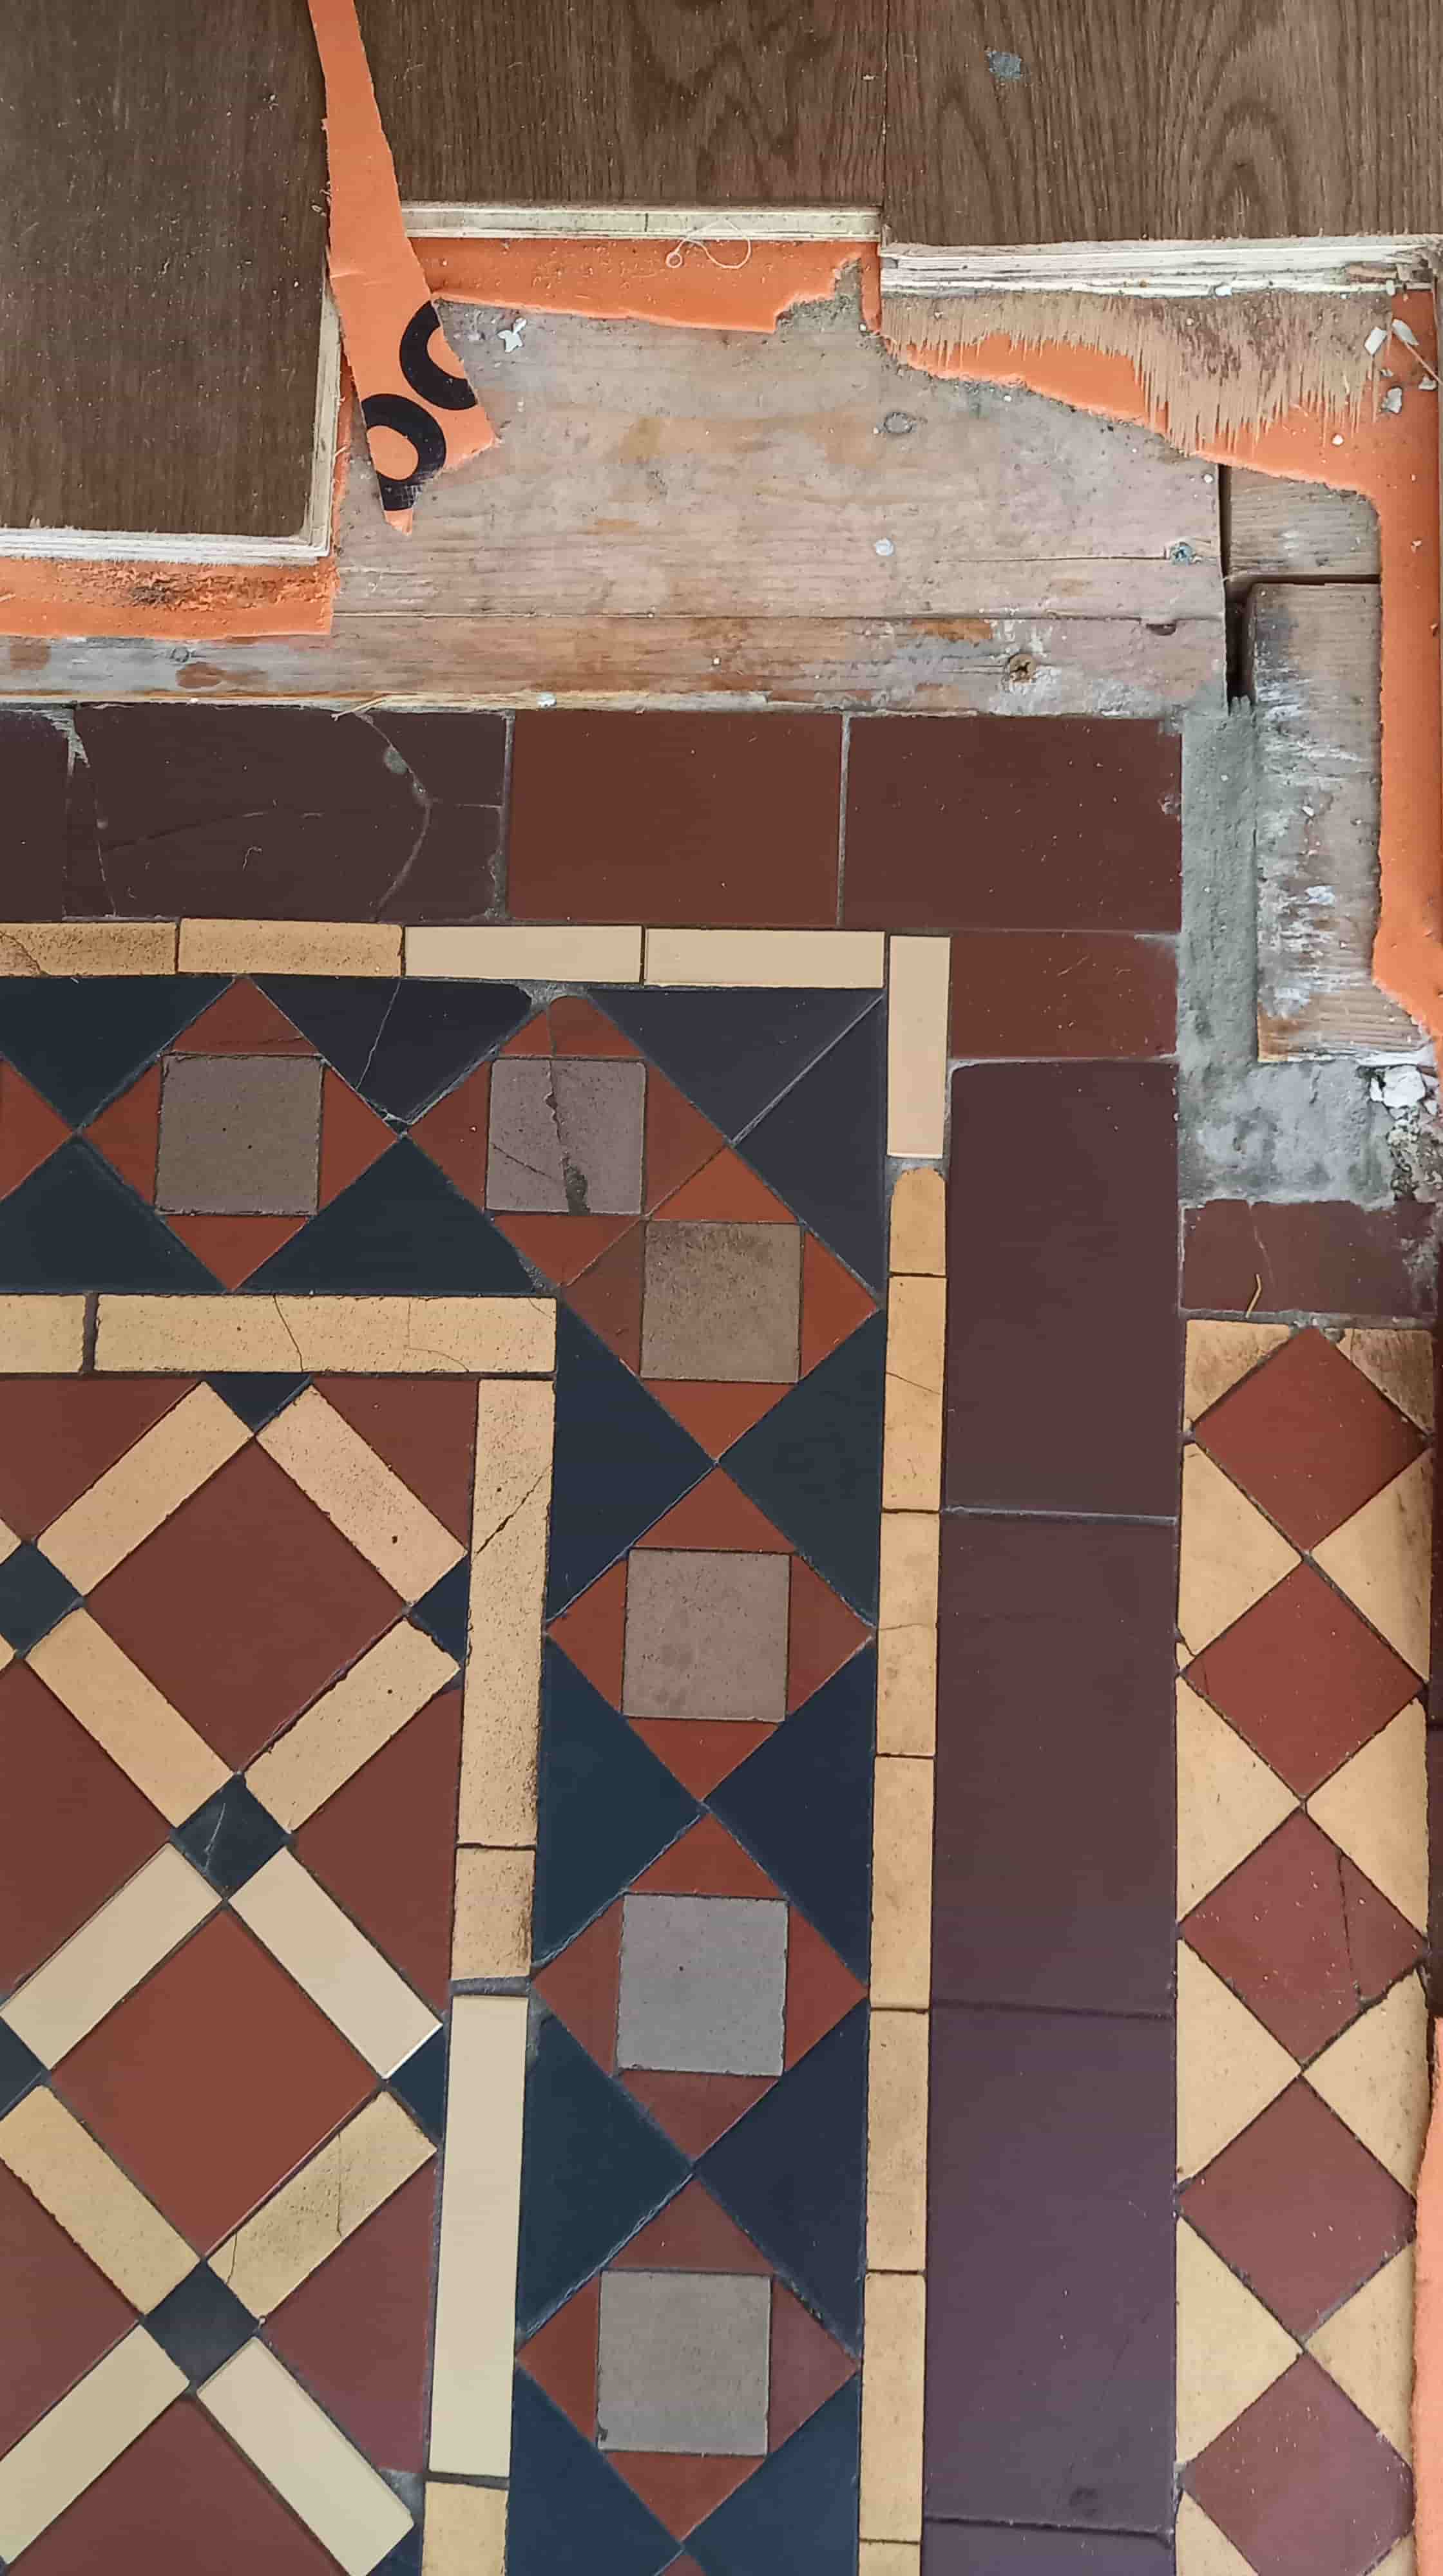
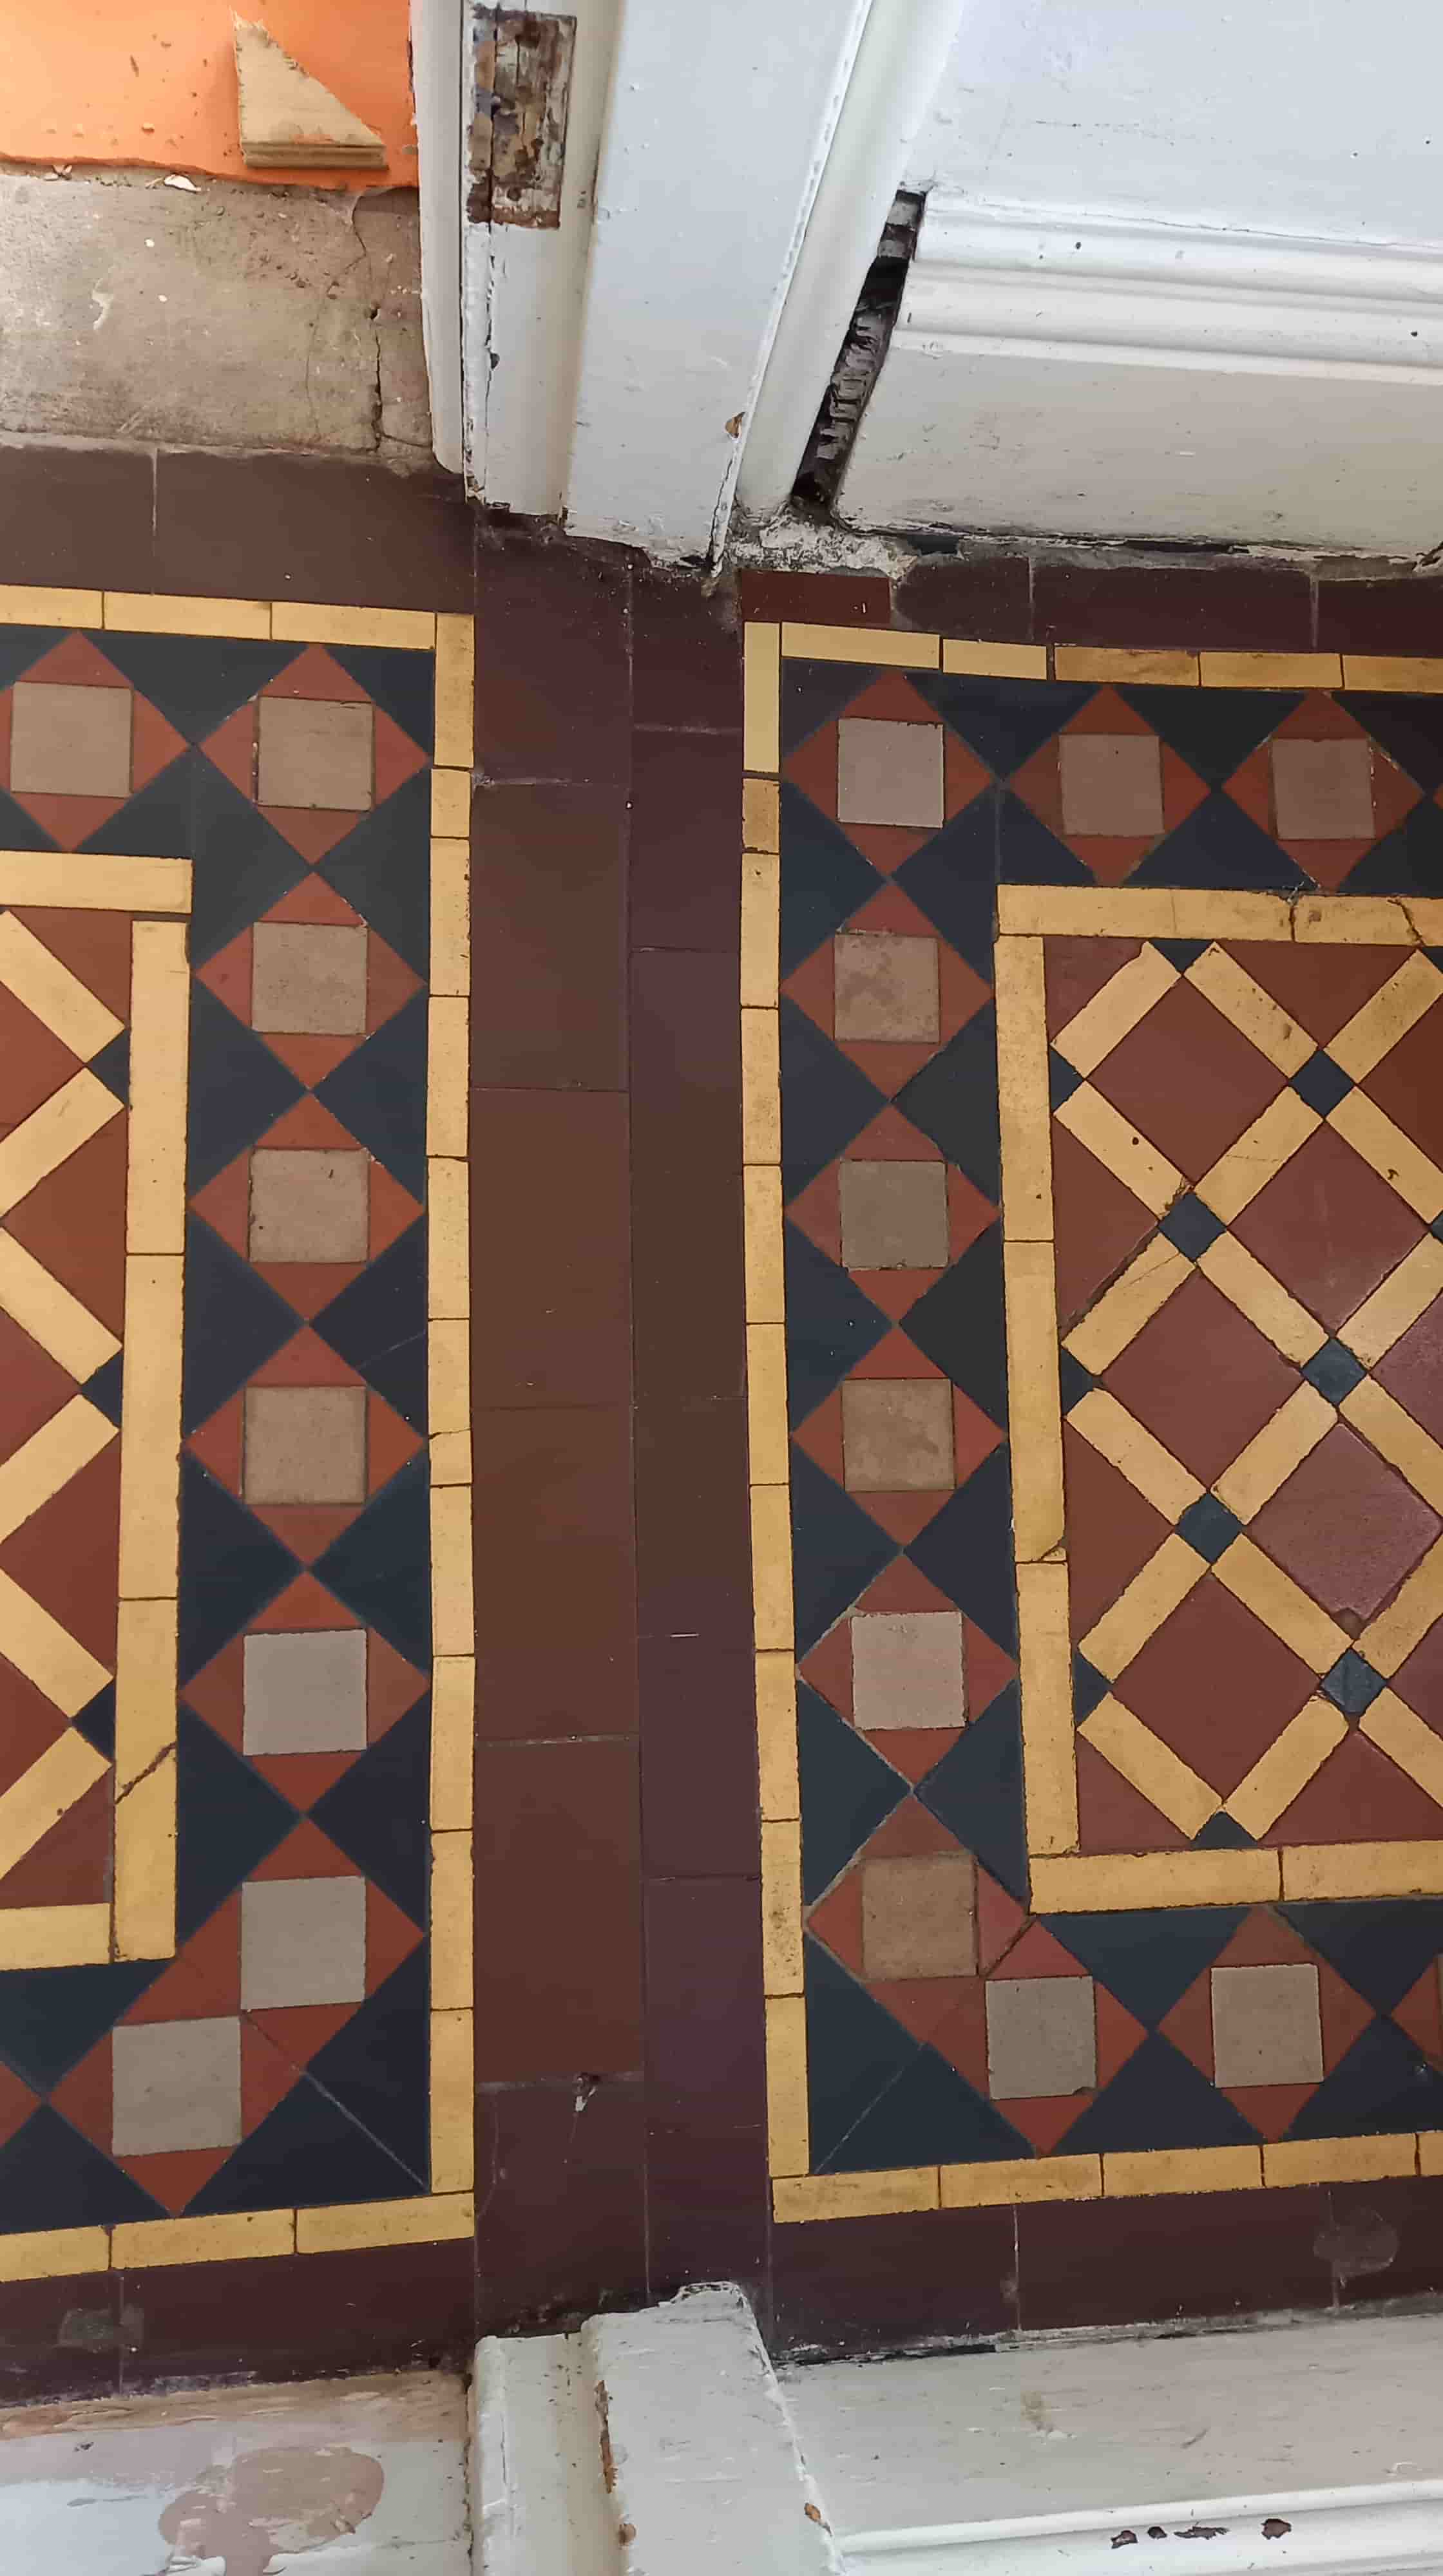
The customer from Bearwood, near Smethwick had recently moved in and during renovations discovered an original 100-year-old Edwardian tiled floor in the hallway which had covered under laminate. They were planning some structural changes to the hallway involving a new stud wall but decided to investigate having the tiled floor restored first and were keen to know if anything could be done to improve its condition.
   
Edwardian Tiled Floor Before Restoration Bearwood Edwardian Tiled Floor Before Restoration Bearwood

I visited the property to Survey the floor and could see given its age the floor was in good physical condition although there was a small amount of cracked tiles. Fortunately, laminate flooring is laid as a floating floor so there were no glue or screw holes to deal with. The Vestibule area however was in a worse state and had been covered in all sorts of cement screed, adhesive, grout, and God knows what. 

Confident I could resolve the problems I worked out a quote which was accepted and a date was set for the work to begin.
 

Cleaning and Repairing a Victorian Tiled Hallway

The first day was used to make repairs to the floor, in one of the corners the floor was sloping away and had some sort of silicon filler installed where tiles had once been. After resolving the sub floor problems, I managed to level it out and used matching replacement tiles to complete this and a couple of other repairs.
   
Edwardian Tiled Floor During Restoration Bearwood

This left the vestibule part of the floor which as mentioned earlier was in a quite a state. To remove the mess, it took a day of scraping using several Tile Doctor products including Grout Clean-up, Acid Gel, a steamer and a lot of effort.
     
Edwardian Tiled Floor During Restoration Bearwood

Once complete I moved onto the cleaning by spraying Tile Doctor Remove and Go onto the tiles and then scrubbing it in with a Silicon Carbide pad fitted to a weighted rotary floor machine. The floor was then rinsed with water and the soil extracted using a wet vacuum.

Old floors like this example were laid before the invention of damp proof membranes and so you can get a lot of moisture rising through the tiles. This can lead to efflorescence as the moisture evaporates at the surface. To counter this problem the whole floor was treated to an acid rinse using more Acid Gel scrubbed in with a 400-grit burnishing pad.

The floor was then rinsed, towel dried off and air movers put in place for an hour to help dry it out. Then before finishing for the day, I applied a coat of Tile Doctor Stone Oil to help bring the colour through in the tiles. I also left the air movers to run for a few hours to help dry the floor out.
   

Sealing a Victorian Tiled Hallway Floor

I returned the next day to seal the floor however when I tested to moisture reading beforehand, I found the reading to be higher than expected and after cleaning and drying the floor there were still traces of moisture. Because of this I recommended that we seal the floor using a fully breathable sealer that could cope with any excess moisture.

Happy to go with my advice the floor was sealed using two coats of Tile Doctor X-Tra seal allowing each coat to dry for thirty minutes before applying the next. X-Tra can be used internally and externally and provides excellent protection so was well suited. After drying I polished the floor with a very fine 3000-grit burnishing pad to add a natural sheen to the tiles.
   
Edwardian Tiled Floor After Restoration Bearwood Edwardian Tiled Floor After Restoration Bearwood

I think you will agree the pictures show the transformation the floor and as you can imagine my client was very happy with the result. Before leaving I left the customer with a bottle of pH neutral cleaner to maintain the floor, we recommend using a mild cleaning product for after cleaning as it helps preserve the life of the sealer. You need to be very careful with supermarket floor cleaning products, most are bleached based and simply too strong for use on a sealed floor.

Thursday, December 1, 2022

Maintaining Outdoor Polypropylene Rugs

 Polypropylene rugs may be used both indoors and outdoors and are a practical choice. Even if these types of rugs are more durable, the ones that are kept outdoors are prone to additional wear and tear and should be cleaned and maintained on a regular basis.

What You'll Need:

  • Vacuum
  •  Detergent
  •  Water
  •  Water hose
  •  Soft sponge or brush
  •  Pieces of cloth

Clean the Rugs

To maintain your polypropylene rugs, you should clean them regularly using a water hose. Vacuum the area first and then use detergent and water to wash the surface. For more resistant spots, scrub the area. Dry with pieces of cloth or allow to air dry.

Make sure you remove all detergent from the rug, as otherwise the area may become sticky and attract dirt.

Remove Dust and Debris

You may also remove dust and debris from the polypropylene rugs, without having to wash the rugs every time. Use a broom or simply shake the rugs.

Always Dry Rugs

If the carpets get wet, you will have to dry them or wash them first and then allow them to dry. If you have snow during winter, the rugs shouldn’t be kept outdoors.


Source: www.DoItYourself.com

Monday, November 28, 2022

How to Deep Cleaning and Sealing a Victorian Tiled Hallway Floor by Middlesex Floor Care Expert

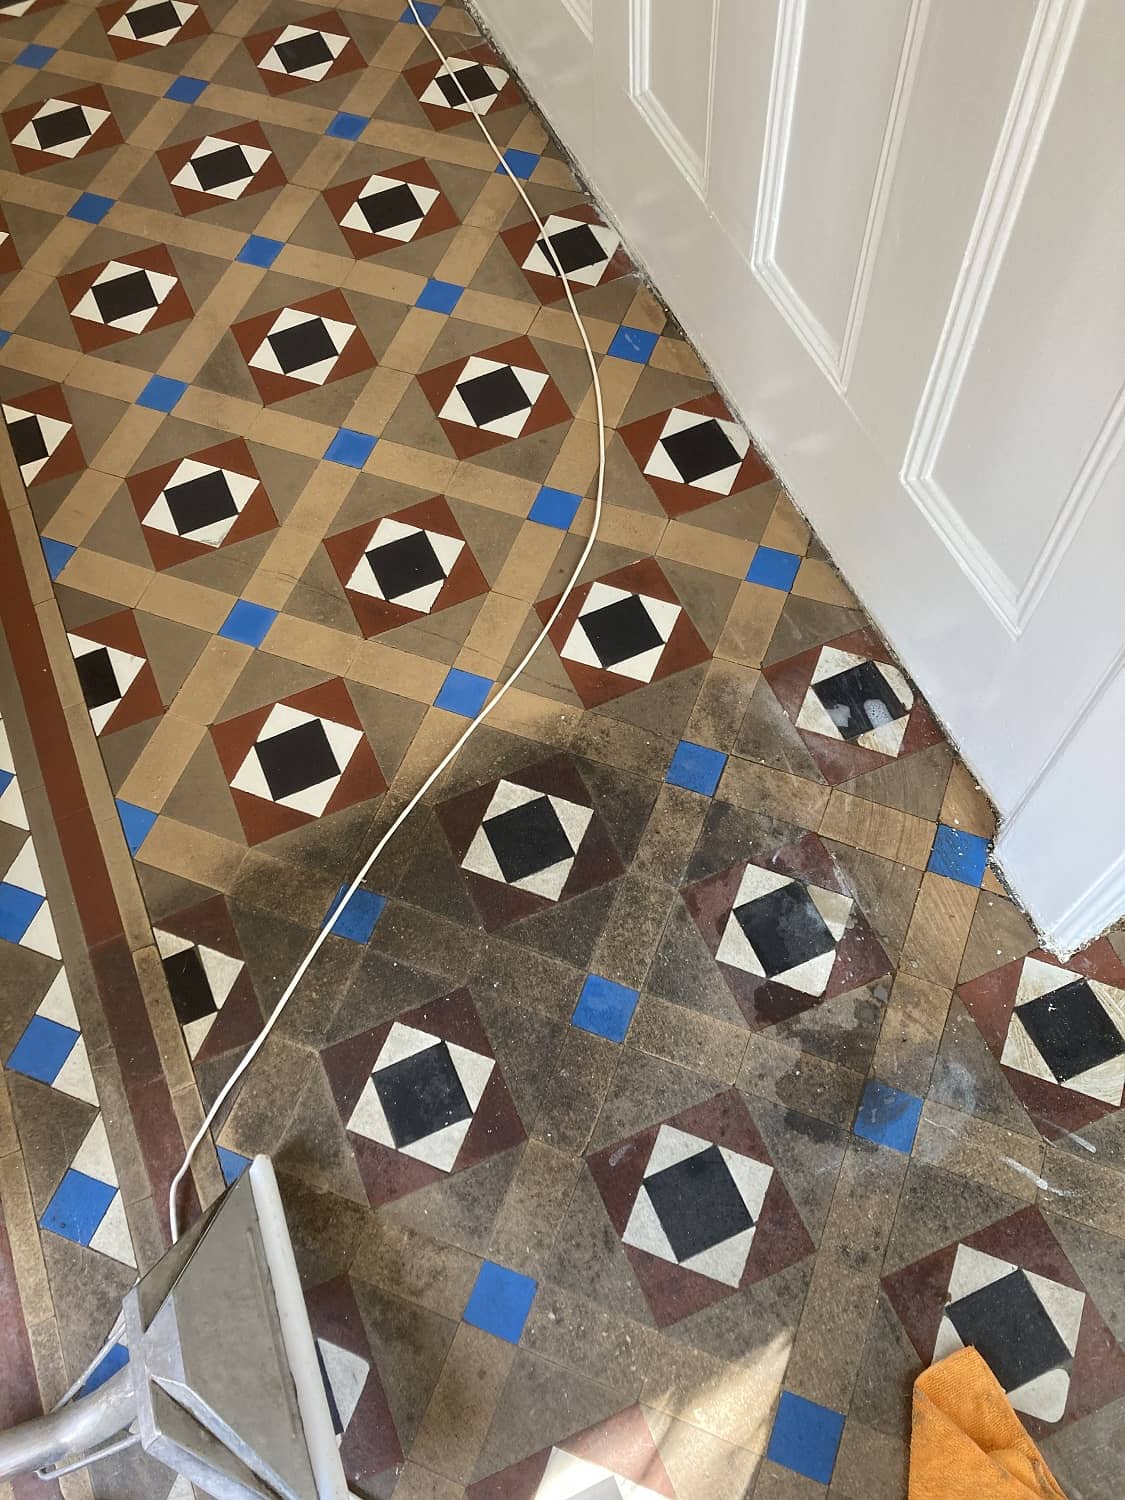
This lovely Victorian tiled hallway floor in Hampton had been covered with carpet for over 30 years. Having removed the carpet, the owner was keen to restore the floor back to its original appearance. As you can see from the pictures the tiles had some lovely traditional colours which have been hidden away. During that time the tiles had absorbed a lot of soil and were stained by rubber from the underlay causing the colours to fade.

Victorian Hallway Tiles Before Cleaning Hampton Victorian Hallway Tiles Before Cleaning Hampton

Fortunately, the gripper rods had only been lightly glued onto the tiles and not held down with nails, sometimes with older floors the rods are hammered in place right through the tile causing them to shatter, which makes for a much larger restoration job. I gave them a price for the work which they were happy with, and we arranged a time to return.
 
Victorian Hallway Tiles Before Cleaning Hampton

Cleaning a Victorian Tiled Hallway Floor

To remove the traces of rubber backing, adhesive and years of stubborn soiling from the tiles the whole floor was soaked in a strong dilution of Tile Doctor Remove and Go. After a short dwell time we then machine scrubbed with Tile Doctor Pro-Clean to restore the tiles to a very clean condition.

The soiling and products were pressure rinsed and vacuumed away, leaving the Victorian tiles much cleaner. I found the best method was to work in large sections of flooring at a time which allowed for the tiles to dry whilst I worked on another section. I was then able to go back and review my work and spot clean stubborn areas until I was satisfied with the result. The wet vacuum removes a lot of the moisture but it needs to be dry before sealing so the floor was then left to dry off overnight.
 
Victorian Hallway Tiles During Cleaning Hampton

Sealing a Victorian Tiled Hallway Floor

The following day we returned and using the damp meter tested the tiles were dry and ready to be sealed. For this we selected to use seven coats of Tile Doctor Seal and Go, these were applied leaving each coat to dry before the next one was administered. This left a nice sheen finish on the floor and does a lovely job of enhancing the colours making the tiles look vibrant again. The floor looks great and the hallway is now very inviting.
 
Victorian Hallway Tiles After Cleaning Hampton

Before leaving I took time to discuss aftercare with the owner and recommend the use of Tile Doctor Neutral Cleaner. Fact is most supermarket products are for cleaning Vinyl or Ceramic tiles contain bleach and are simply too strong for use on sealed surfaces such as this floor, using them can prematurely erode the sealer and once that’s gone the floor will have no protection and begin to accumulate dirt.

Sunday, November 27, 2022

3 Types of Hardwood Installation

Knowing what to expect before, during, and after hardwood installation takes place will help you have a floor that is both nice looking and long-lasting.

Whether you're thinking of installing a hardwood floor yourself or hiring a contractor, you will need to do some basic research first. For example, there are three types of installation methods used for hardwoods: floated, glued, and nailed or stapled.

Installation Methods

With the floated type there are layers of plywood or other types of wood beneath the main wood flooring. Many experts believe the easiest method of installing a hardwood floor is called a floating floor, as they are not secured but rather sit on top of the subfloor and can be installed over any surface. No special tools are required for this type of installation.

The glued method involves the use of adhesives. With this method, you use a high-quality flooring adhesive to attach each hardwood flooring plank to the subfloor. This method can be used for concrete or wood subfloors.

The third type of installation method, the nailed or stapled method, is used when installing engineered or solid woods. Specialized nail or staple guns are required for this method which can be used for concrete floors and can also be used above a sleeper system for radiant heating.

Another part of the research involves consulting your manufacturer's instructions before deciding on which installation method you want to use.

Some of the basics of hardwood installation include installing the hardwood parallel to incoming light; never storing your hardwood in direct sunlight or in the garage and keeping your hardwood flooring away from outside walls, doors, and windows.

You should gain knowledge of not just how to install but also the variety of types of hardwood flooring available, proper care of the flooring, and which type is best suited for your home.

In addition, you should research the market by identifying the material, rates, and other aspects of hardwood floors.

Trade Group Study

According to a study conducted by the not-for-profit trade group the National Association of Home Builders, called "How Long Things Last," hardwood floors are rated to last 100-plus years. No other flooring option available lasts as long.

Should you decide to hire a professional installer, be sure that references are provided and then check them out thoroughly. Look through the installer's portfolio to be sure whether he or she is knowledgeable in installing the type of floor that you have chosen and read the contract thoroughly. Check the time frame for installation and the final cost.

Experts recommend hiring a professional if the subfloor in your home is substandard or non-existent.

Source: www.DoItYourself.com

Tuesday, November 22, 2022

Basic Wood Floor Care

Wood floors should be protected with a sealer. Penetrating sealers go into the wood pores; worn spots can be resealed. Lacquer, shellac, varnish stay on top of the wood; if worn off in traffic areas, usually the whole floor has to be sanded and refinished. Prevent scratches when moving furniture by putting heavy socks over the legs.

Wood Floor Top Coat: Vegetable Oil and Vinegar. Mix a 1 to 1 ratio of oil and vinegar into a solution and apply a thin coat. Rub in well.

Painted Wooden Cleaner: Washing Soda. Mix 1 teaspoon washing soda into 1-gallon hot water and wash the floor with a mop, sponge, or soft-bristled brush. This solution can also be used to remove mildew.

Oil Soap: Use according to package directions.

Cleaning

Vacuum often to keep dirt from grinding into the floor finish or sticking to it. Wipe up spills immediately. A damp (not wet) cloth may be used on a well-sealed wood floor to wipe up food spills or mud. Wipe dry with cloth or paper towel. Clean when necessary with a solvent-based liquid wax for wood. Follow directions on the container. Solvent removes dirt and old wax and leaves a thin wax coating that must be buffed. Apply with:

A dry cloth, rubbing floor and refolding the clean part of the cloth as dirt is taken up; hard on knees

Cloth over long-handled wax applicator, rubbing and refolding cloth as above

Electric floor polishers can be rented at many supermarkets, changing to clean brushes or pads as dirt and wax are taken up.

Buff wax left on floor: immediately if by hand; or after 20-30 minutes if with an electric polisher.


Source: www.DoItYourself.com
Friday, November 18, 2022

Lancashire Tile Expert Reveals Travertine Renovation Secrets

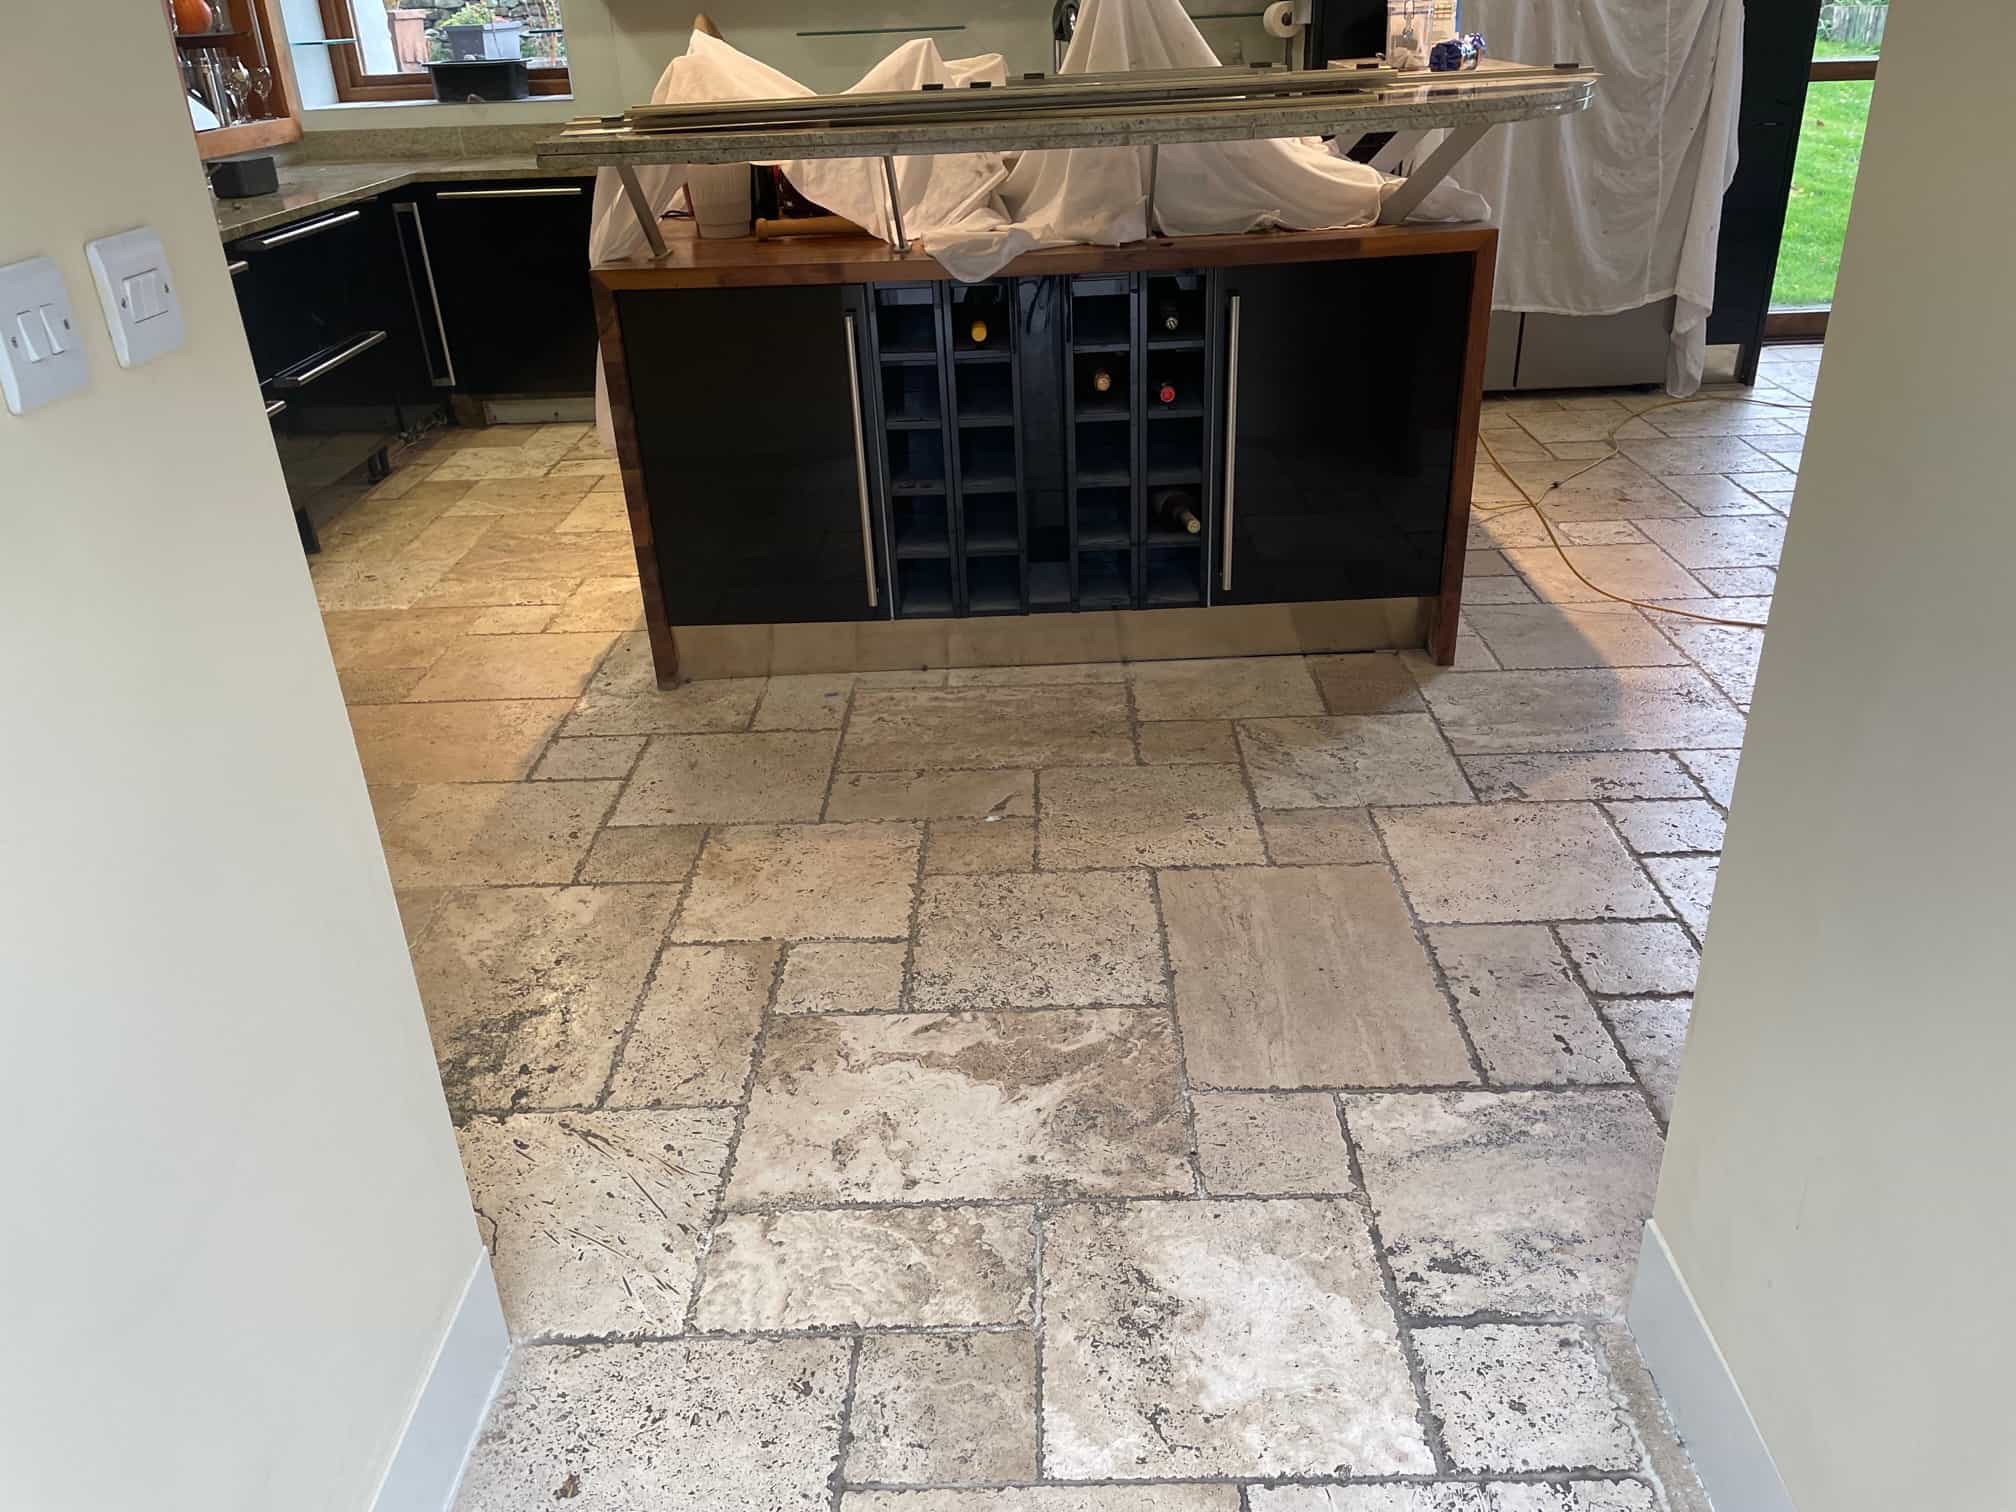
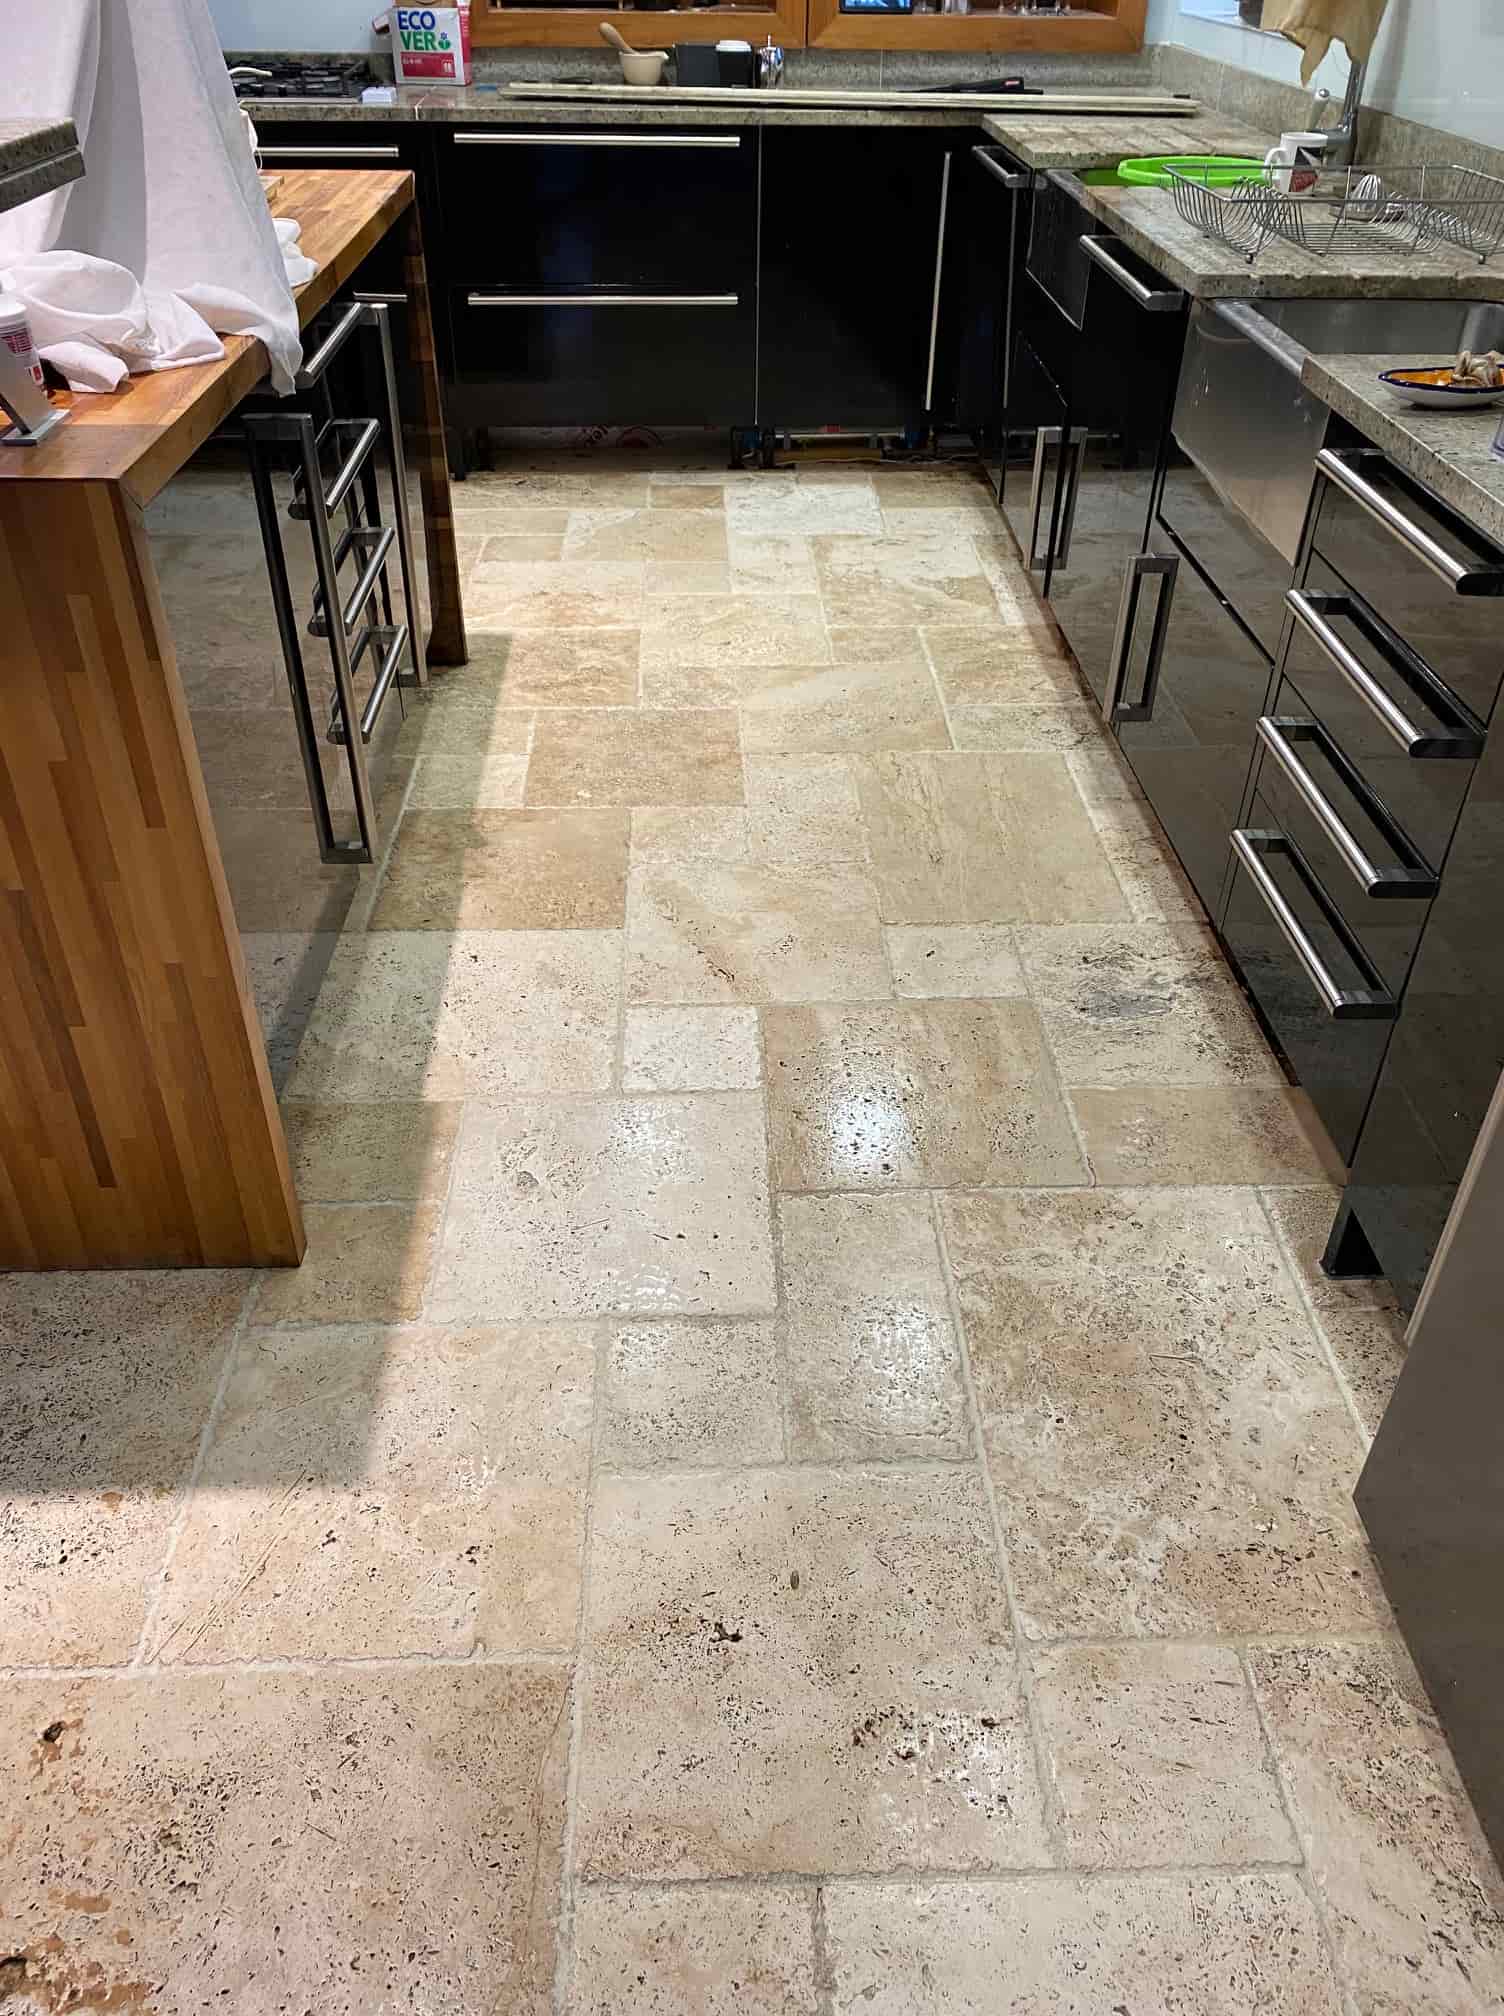
This customer in Preston in Lancashire had just moved into a house with a large 60m2 Travertine tiled floor that was installed throughout most of the ground floor. Travertine is a lovely stone but the previous owner had not maintained the sealer on the tiles and as a result it now looked grubby and there was a lot of dirt ingrained in the tiles leaving black staining, especially in the Kitchen.
   
Honed Unfilled Travertine Kitchen Floor Before Renovation Preston

This is a common problem with all natural stone floors, some are hardier than others but without a protective barrier in place they will attract dirt as the sealer become worn off. The new owner was seriously considering having the tiles ripped up, fortunately however they came across our service and decided to try having them renovated first.
   
Honed Unfilled Travertine Kitchen Floor Before Renovation Preston


Deep Cleaning a Travertine Tiled Floor

To get the stone clean and bring back the beautiful appearance of the Travertine I used several diamond burnishing pads which are run over the tiles with water for lubrication. The first was a coarse 200-grit pad which is fitted to a rotary floor machine and buffed into the stone in a circular motion. This process generates a lot of slurry which is then rinsed off afterwards and extracted with a wet vacuum.
 
Honed Unfilled Travertine Kitchen Floor During Renovation Preston

This process was then repeated using finer burnishing pads and continued with a 400-grit, 800-grit and finally a 1500-grit, again each pad was run over the tiles several times and then the slurry extracted as before. It’s a completely abrasive process with no other products needed and the result is a sealer and dirt-free tile.
 
Honed Unfilled Travertine Kitchen Floor During Renovation Preston

At this point I inspected the floor to see if the pads had been able to clean up the grout as well as the tile. Pads can struggle to reach down into the recess so I often find more work is needed on the grout. As suspected the Travertine had responded well to the treatment however it was clear the grout would need more work and was still stained black in places. Normally use a grout cleaning product called Tile Doctor Pro-Clean for the grout but on this occasion, I felt something stronger would be needed. So, on this occasion I applied undiluted Tile Doctor Remove and Go along the grout lines and left it to soak in for ten minutes. It was then scrubbed in by hand, rinsed off and the soil remove with the wet vacuum. The grout cleaning had worked a treat and happy with the condition of the floor it was left to dry off overnight.

Sealing a Travertine Tiled Kitchen Floor

The next morning time was spent filling in holes (aka pitting) in the Travertine with colour matching grout before running over the whole floor with a very fine 3000-grit polishing pad to further bring up the appearance of the stone. This is done using a little water sprayed onto the tile a process we call a spray burnish. Spray burnishing also leaves the floor dry and ready to be sealed. The owner wanted the Travertine to look as natural as possible so two coats of Tile Doctor Ultra Seal were applied. This is an impregnating sealer which is recommended for use on polished stone and for use in kitchens.
 
Honed Unfilled Travertine Kitchen Floor After Renovation Preston

Before leaving I took time to discuss aftercare cleaning and how important it is to avoid the use of strong cleaning products (especially bleach) on Travertine, not only will it degrade the sealer but can also harm the stone. For the regular cleaning of sealed Travertine, I recommend using Tile Doctor Stone Soap which is a gentle but effective cleaner that also helps maintain the patina.

Tuesday, November 15, 2022

Clean your Carpets the Green Way

 Taking care of the carpets in your home can be frustrating. When they’re fresh and clean, they’re a joy, but it sometimes it seems you just turn around and your carpet is looking dirty and not smelling so fresh either. So, how can you keep your carpets clean and looking good without using a bunch of chemicals. Here’s some ideas

Floor mats

Put floor mats at the entrances to your home. As people walk in, any dirt on their feet will come off on the mats and won’t make it to your carpets. Inexpensive and attractive floor mats are available at most department and home store and as an added bonus, many of them are washable, so you can easily keep them clean.

Use the carpet cleaners you’ve already got in your home

Regular vacuuming will prevent dirt and pet dander from settling in your carpet fibers. Experts suggest vacuuming twice a week will extend the life of a carpet and keep it looking good for years.

Freshen your carpets while vacuuming

Sprinkling some baking soda on your carpet before vacuuming will help eliminate potential odors before you even notice them. Want to add a little ‘spice’ to the air in your home, put some cinnamon or cloves in the baking soda before you spread it. Plain or scented, let the baking soda sit on your carpets for at least ten minutes before vacuuming and when you do, you carpets will be totally freshened.

Spill something? Here’s some environmentally safe ways to get that spot out

First use a clean dry cloth or paper towels to absorb as much of the spill as possible. Be sure to ‘blot’ the original stain, don’t rub it or you’ll just spread and fix the stain into the carpet fibers. Once you’ve blotted the stain, apply club soda or soda water to help bring out the stain then blot up the liquid. Alternatively, you can use hydrogen peroxide, vinegar mixed with water or rubbing alcohol in the same way to lift stains.

You can even make your own ‘spot cleaner’ be mixing a teaspoon of liquid dish detergent with one to two cups of water.

Candle wax spill on your carpet?

Wait for the wax to cool then pick as much as you can off the carpet fibers using your fingers and a sharp pointed object like a toothpick. Work carefully and be sure not to damage the fibers themselves. Next spread a clean, dry white cloth over the wax spill and rub your iron (set on low) over it. The heat of the iron will melt the wax and it will stick to the cloth. Alternatively, you can use a plain, brown grocery bag (be sure to use a bag with no markings) on the wax and do the same thing.

A word of warning

Carpet fibers aren’t all the same and unfortunately what works well to clean one type of carpet may not work as well with another. For example, natural fibers react differently to cleaners than do synthetics. Always follow the manufacturer's directions for cleaning your carpets and to be safe, try out any ‘green’ cleaning solution in an inconspicuous area before using it where it can be seen.


Source: www.DoItYourself.com

Tuesday, November 8, 2022

Cleaning Wood and Laminate Floors

Proper care of your floor prevents damage, extends its life, and keeps it looking new for years. How do you properly care for your flooring?

If you enjoy going barefoot or even if you don't, kick your shoes off at the door. Why remove your shoes? If you have a rough board that needs smoothing you grab a sheet of sandpaper for the job. Guess what's on the bottom of your shoes? Sand and dirt grind away at the fibers in your carpet causing them an early death.

A closer look at the bottoms of those shoes and you'll find oil, dirt, and heaven only knows how many tidbits of leftover dog deposits. Small wonder why your floor stubbornly refuses to come clean. Do wear slippers or socks inside. The oil from the bottom of your feet also dirties your floors.

Always vacuum or dust hard floor surfaces before mopping

Clean your wood floors with ½ cup vinegar in a gallon of water. If you have been using vegetable oil on your floor increase the vinegar to 1 cup per gallon of water. Go over your floor several times to remove the residue. Rinse with warm water and dry. Vegetable oil cleaners can leave a residue on wood floors that can deteriorate the sealant over time.

Laminated Floor Caution:

The manufacturers of some laminated wood floors now recommend cleaning them with ammonia. We prefer only vinegar and water. As you saw in the linoleum floor section, ammonia is used to strip the wax off floors. It may do the same to the sealant on most laminated floors.

Self-wringing mops can leave excess water on the floor, which works between the boards warping the edges. Then sanding and refinishing becomes necessary. Water also contains alkaline, the culprit behind water spot damage on glass shower doors. It leaves damaging water spots on your wood floors. Vinegar neutralizes the alkaline helping to eliminate the problem.

To clean hardwood or laminated floors mix ½ cup distilled white vinegar in a gallon of water. Dampen a towel in the mixture and wring out all the excess moisture. Use the towel as your mop. No need to rinse. Dry the floor if necessary.

Source: www.DoItYourself.com

Sunday, November 6, 2022

How to Deep Clean Slate Tile and Grout by Berkshire Stone Expert

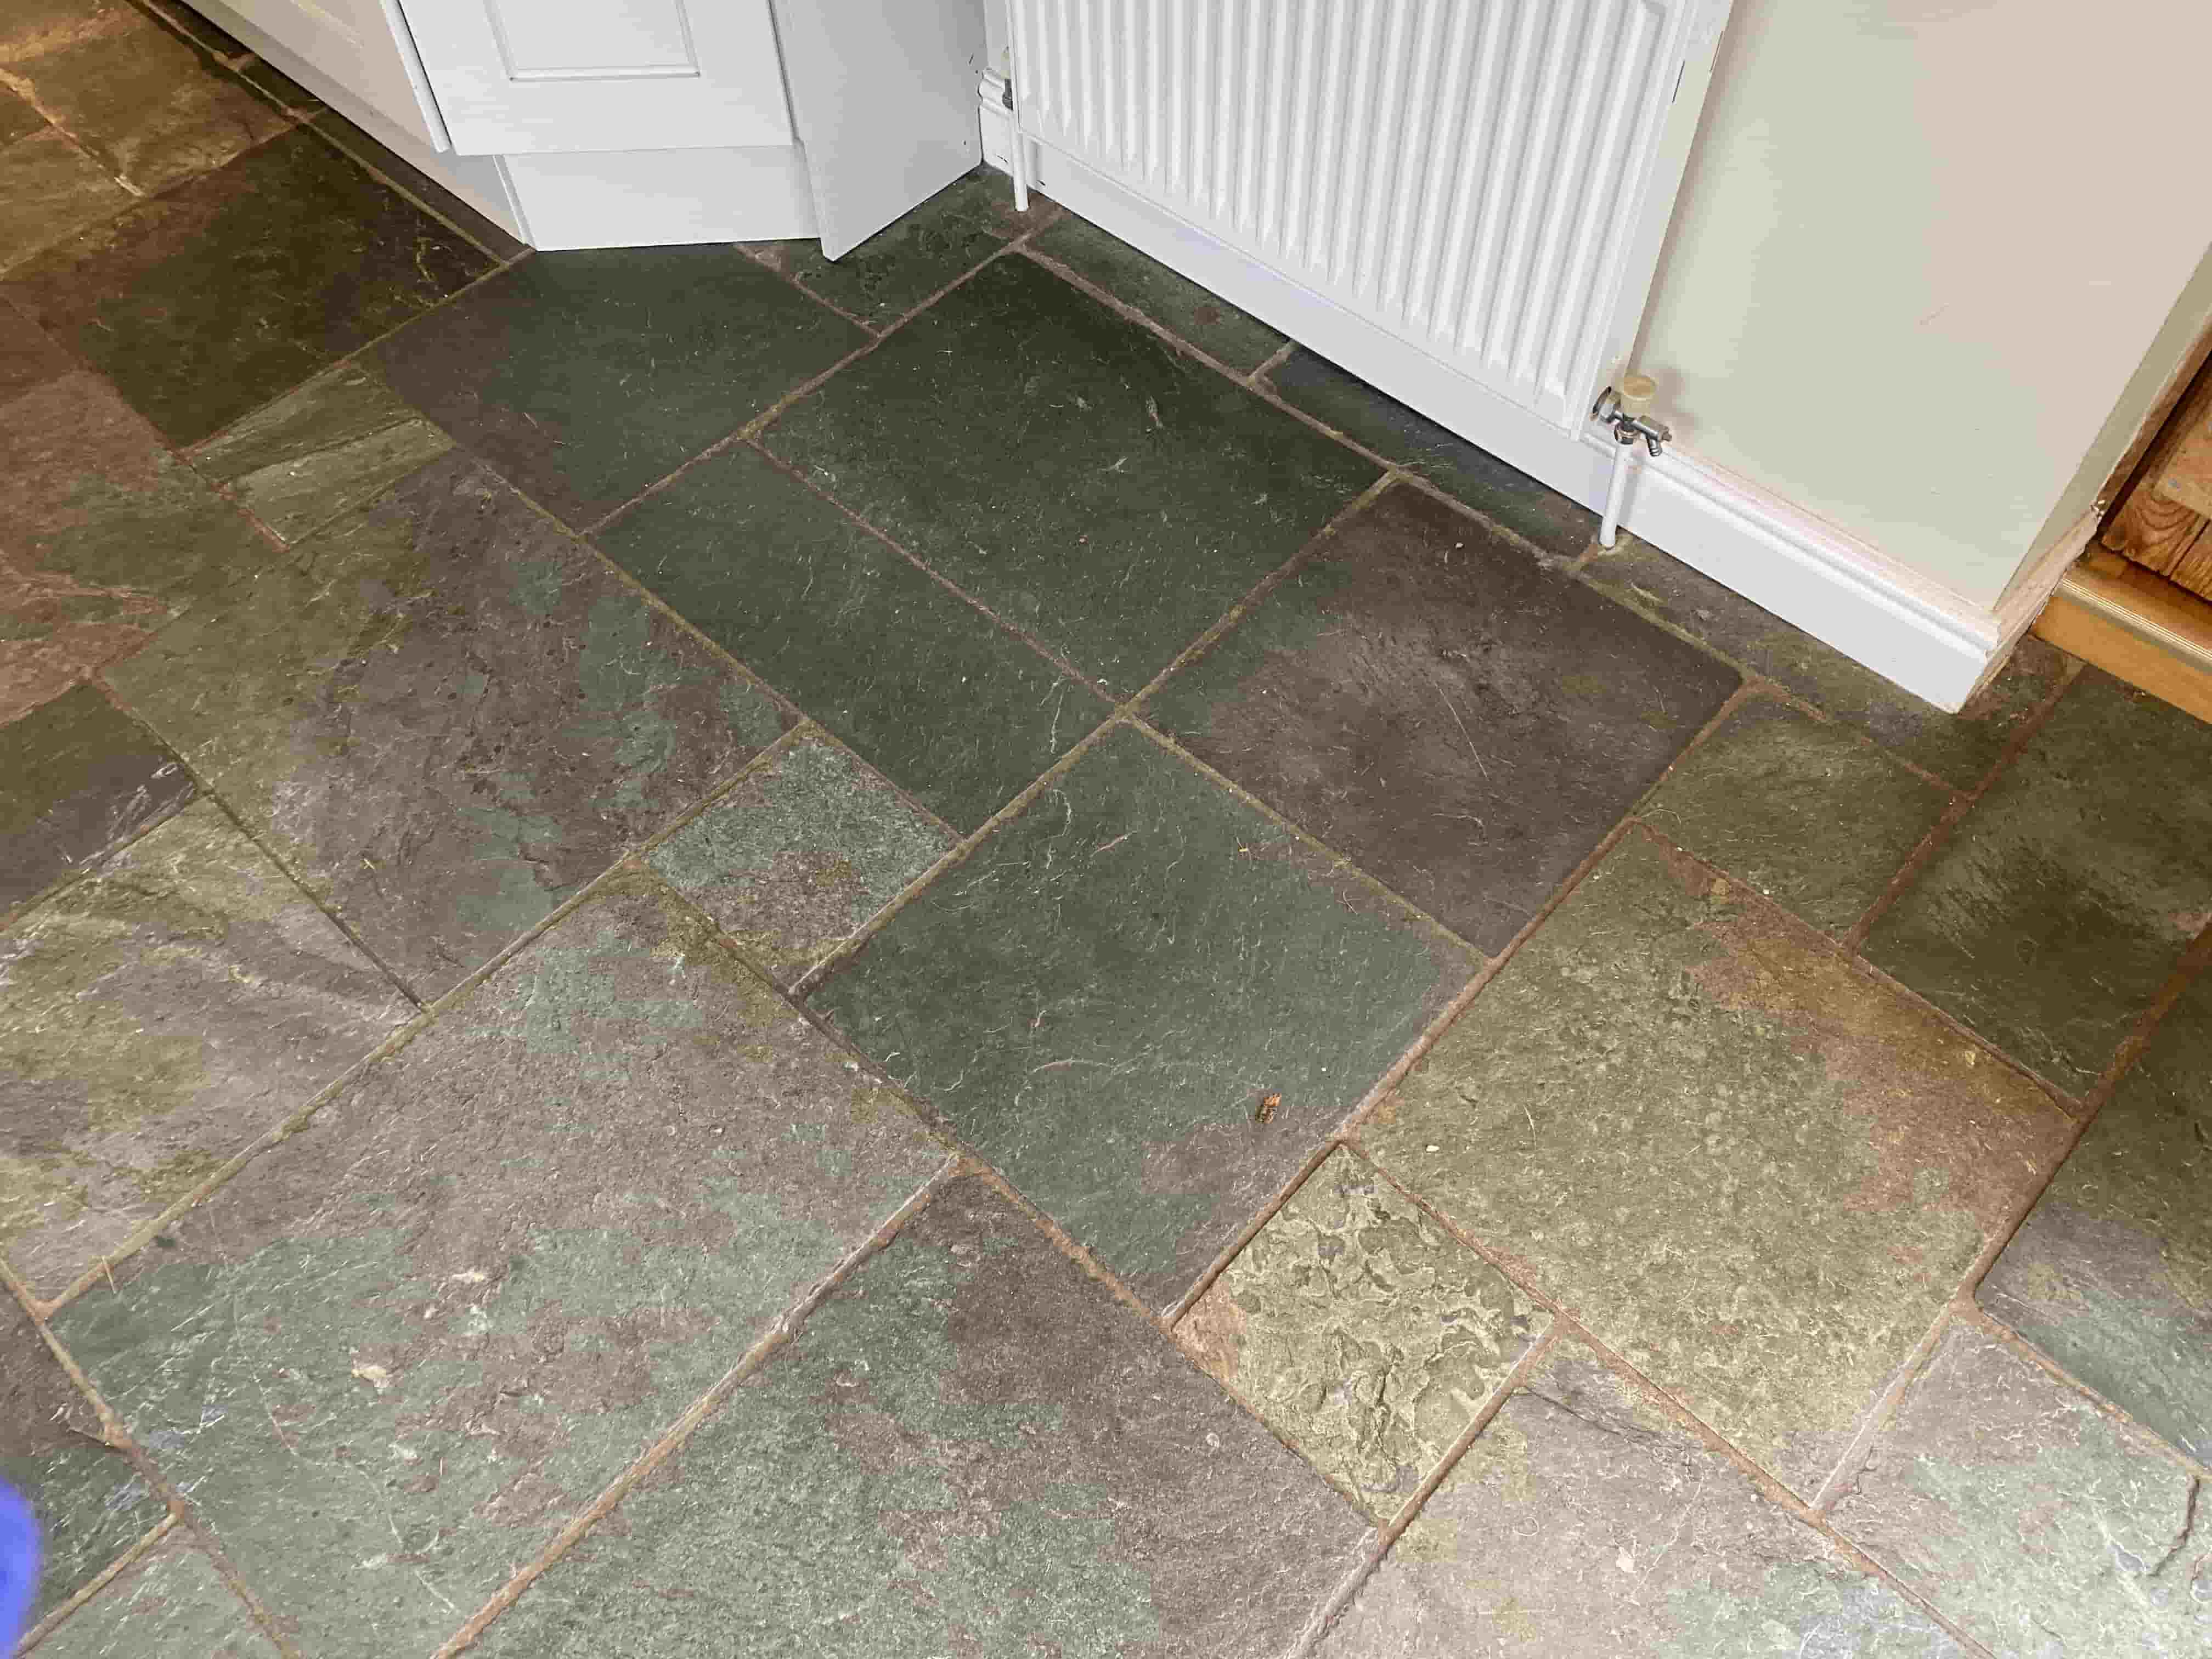
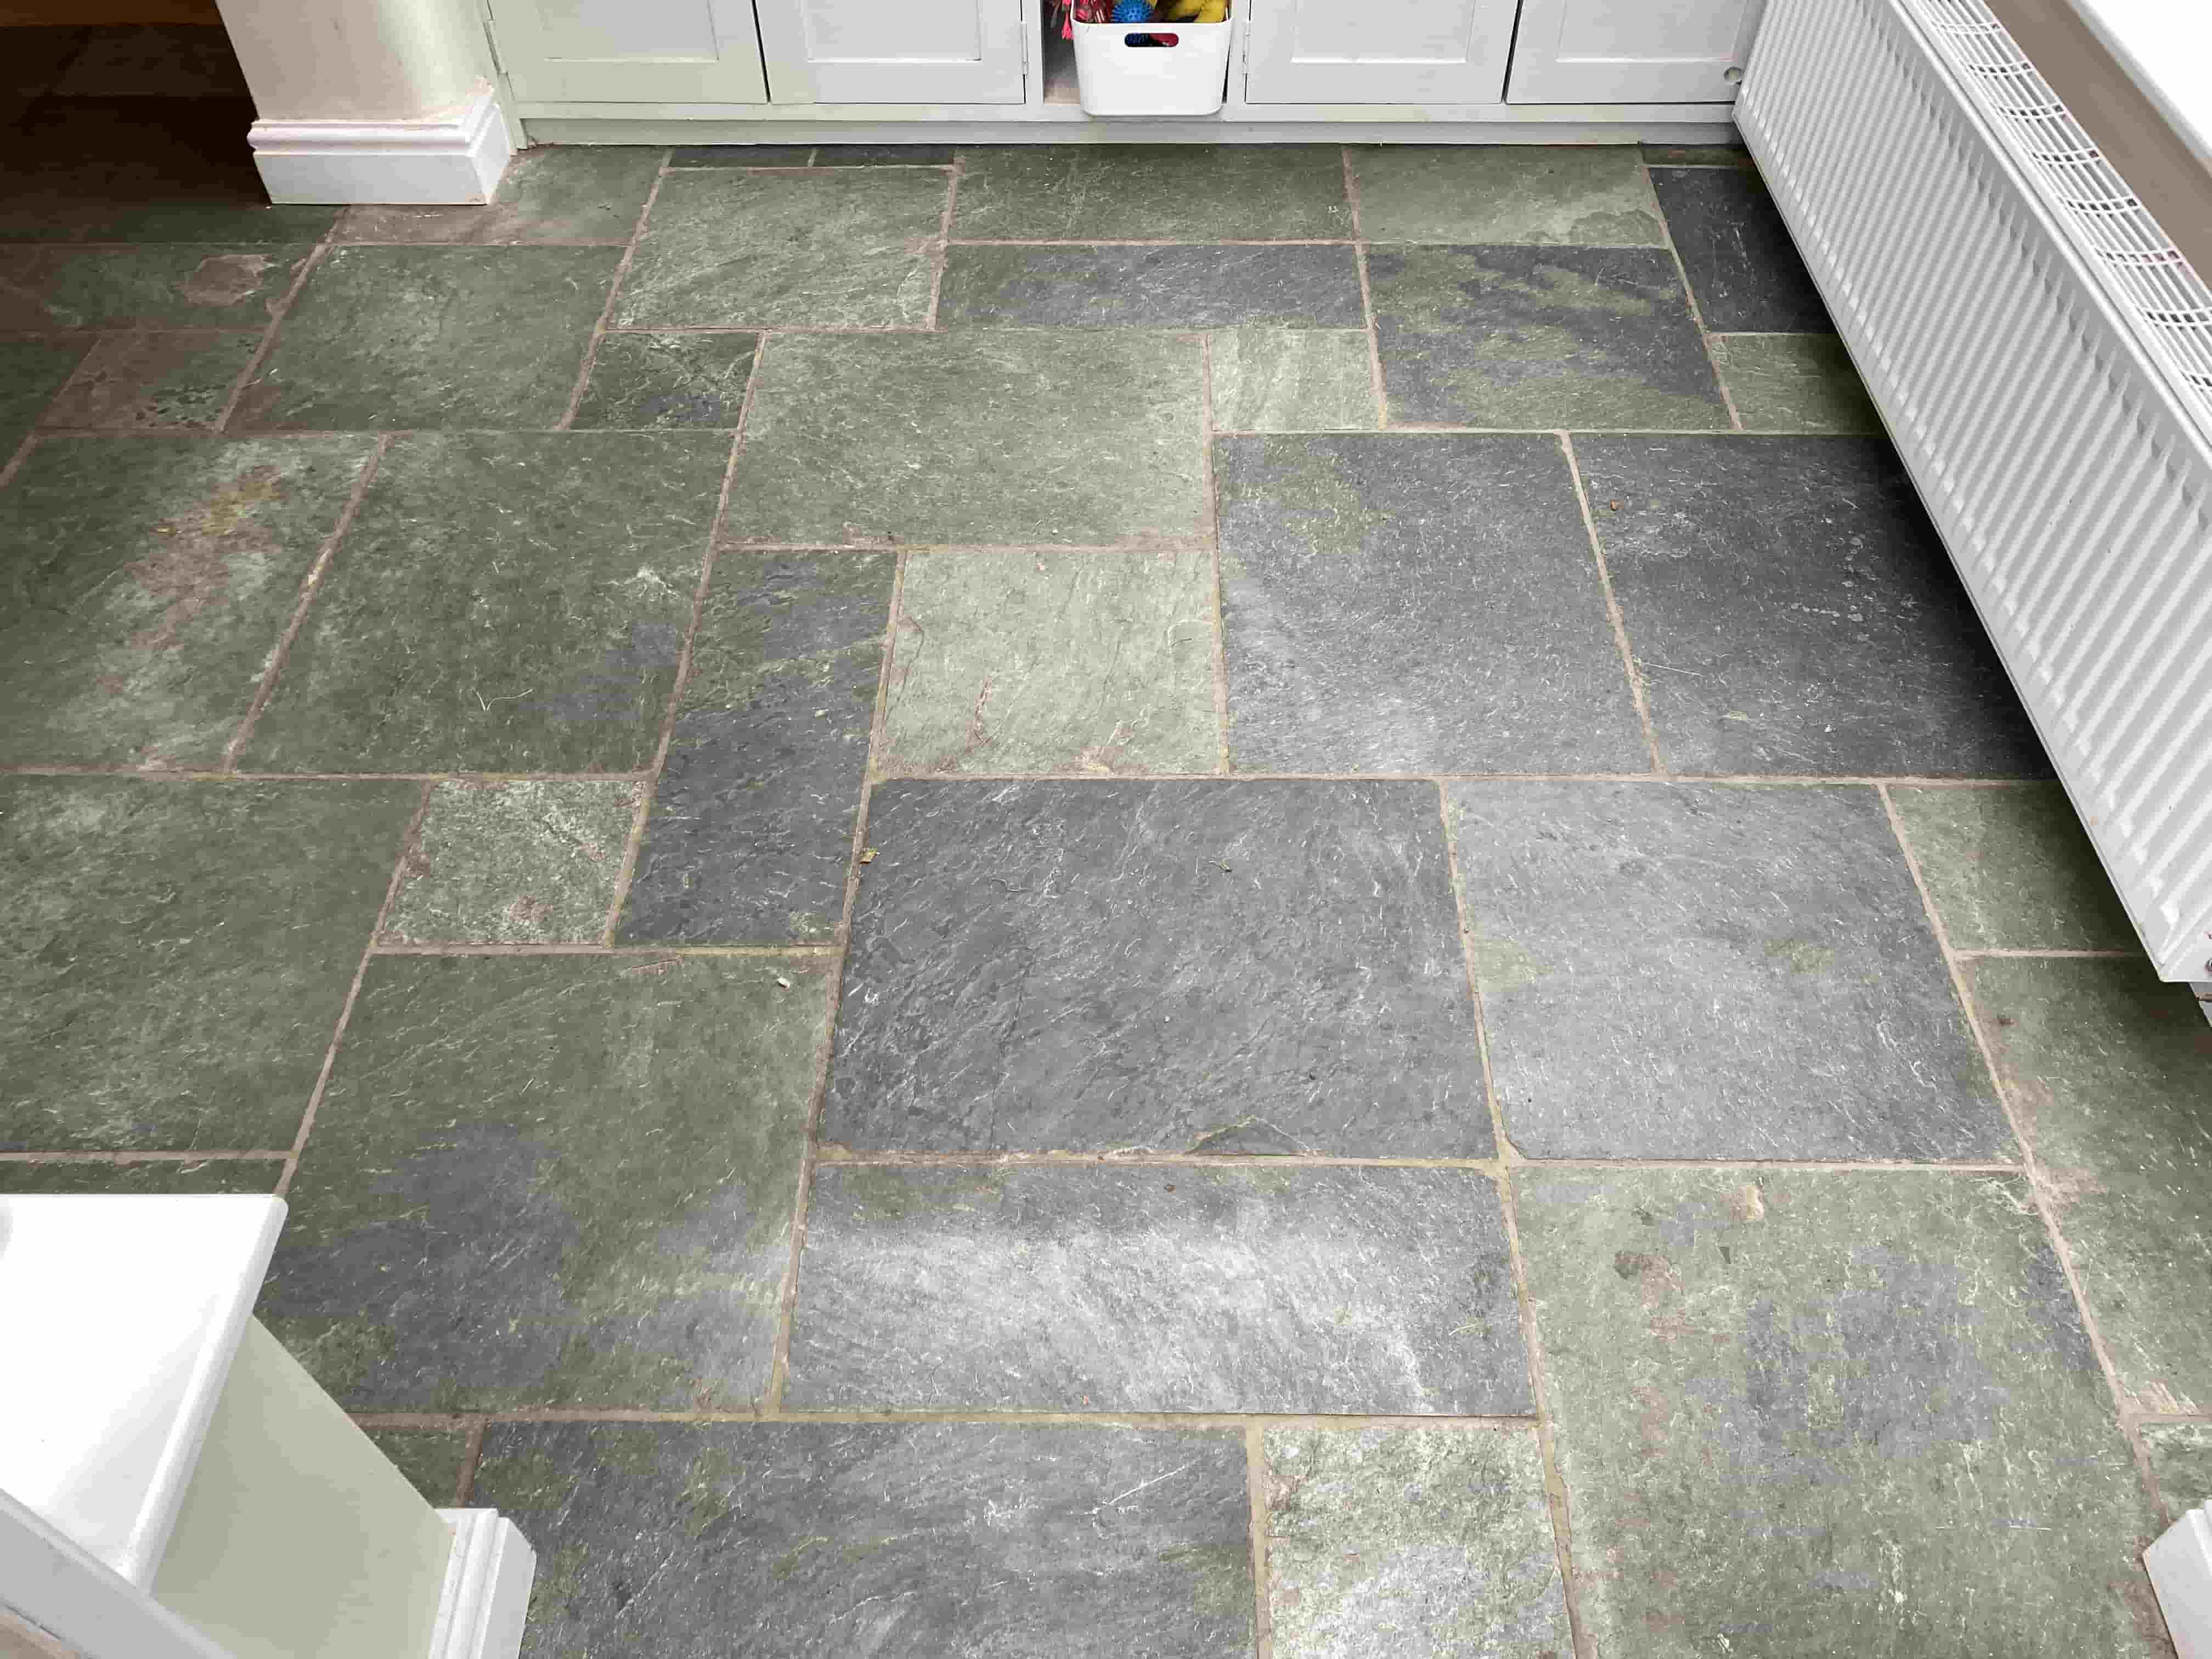
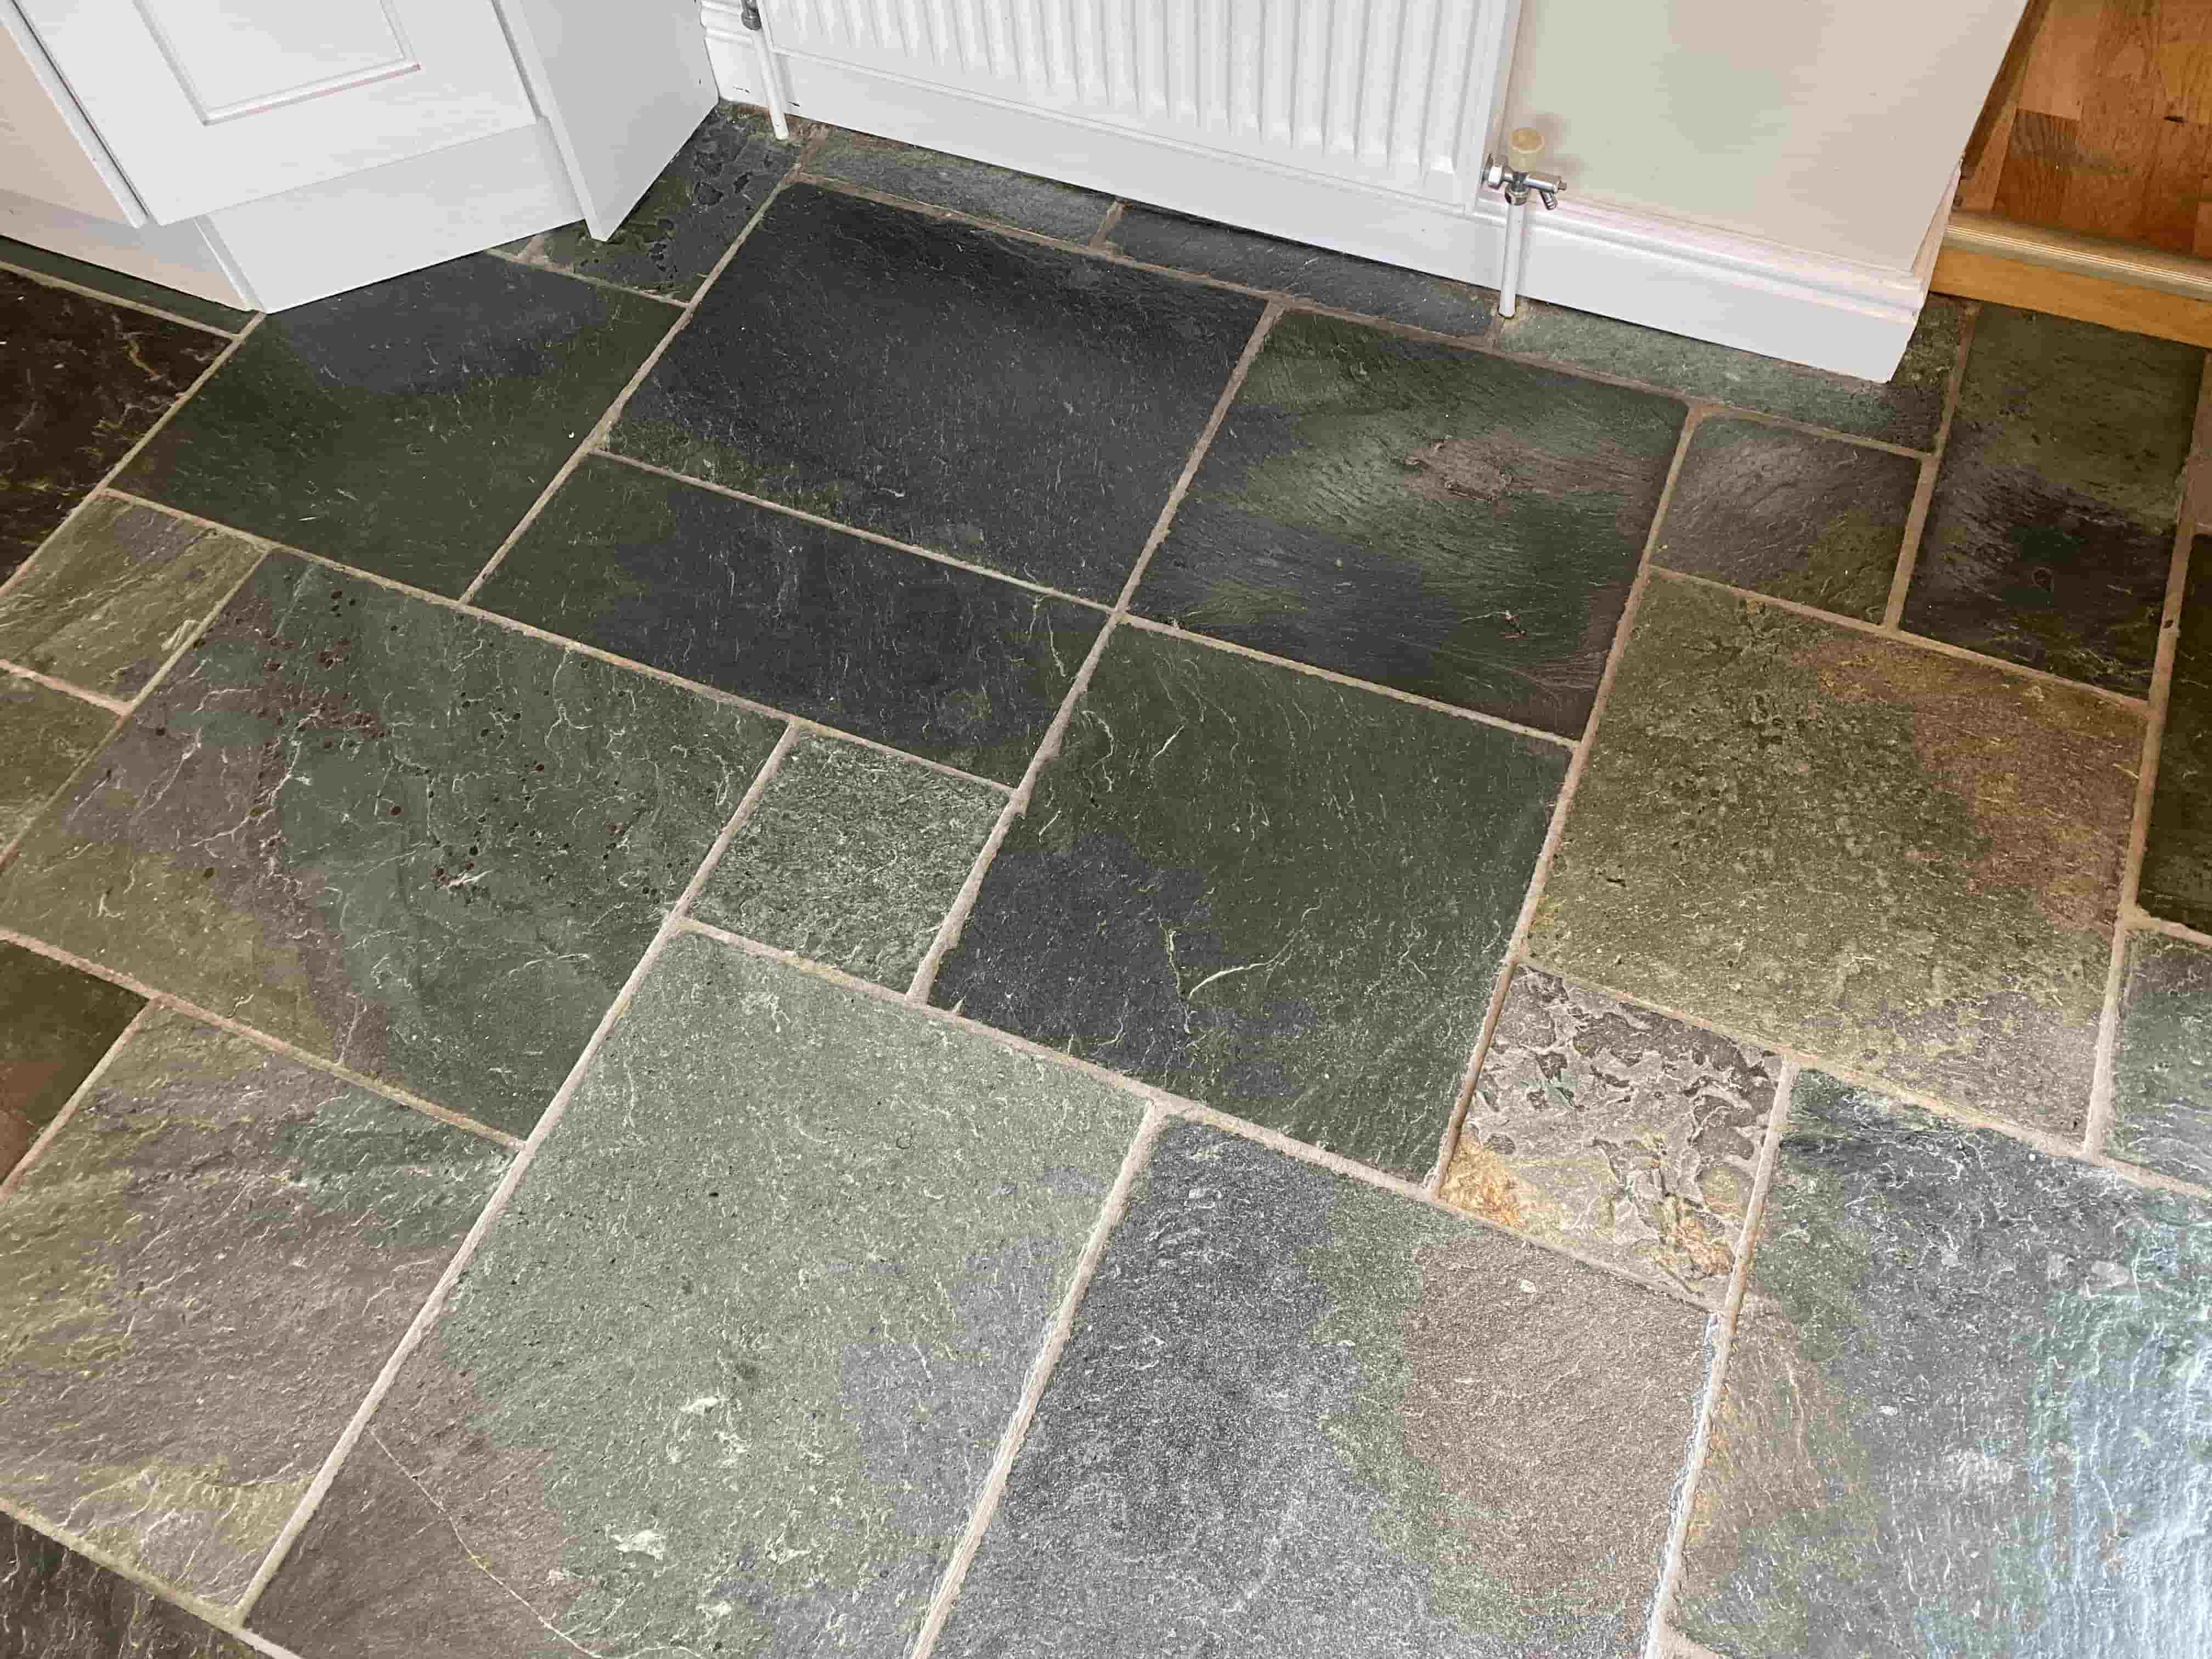
This customer in Thatcham, near Newbury in Berkshire had inherited a rare semi-riven Slate floor with their kitchen. However, years of dirt and contaminations had built up and left the Slate looking dull and the grout discoloured.

 
Semi-Riven Brazilian Slate Floor Before Renovation Thatcham

Slate is a very popular floor and wall tile due to its low porosity; there are many varieties and textures of slate available, it does need to be sealed though to keep the dirt from becoming ingrained in the stone. Unfortunately, the previous owners had not maintained the sealer and owning four dogs had probably used a strong acid cleaner on the floor which will have shortened its life. Inevitably time took its toll on the tiles and it was now overdue a deep clean and new sealer.

 
Semi-Riven Brazilian Slate Floor Before Renovation Thatcham

Cleaning a Semi-Riven Brazilian Slate Tiled Kitchen Floor

The first job was to apply a strong dilution of an alkaline detergent called Tile Doctor Pro-Clean which was applied and left to dwell for several minutes before agitating with a rotary floor buffer fitted with a scrubbing pad. A stiff brush was also run over the grout lines to get them clean.

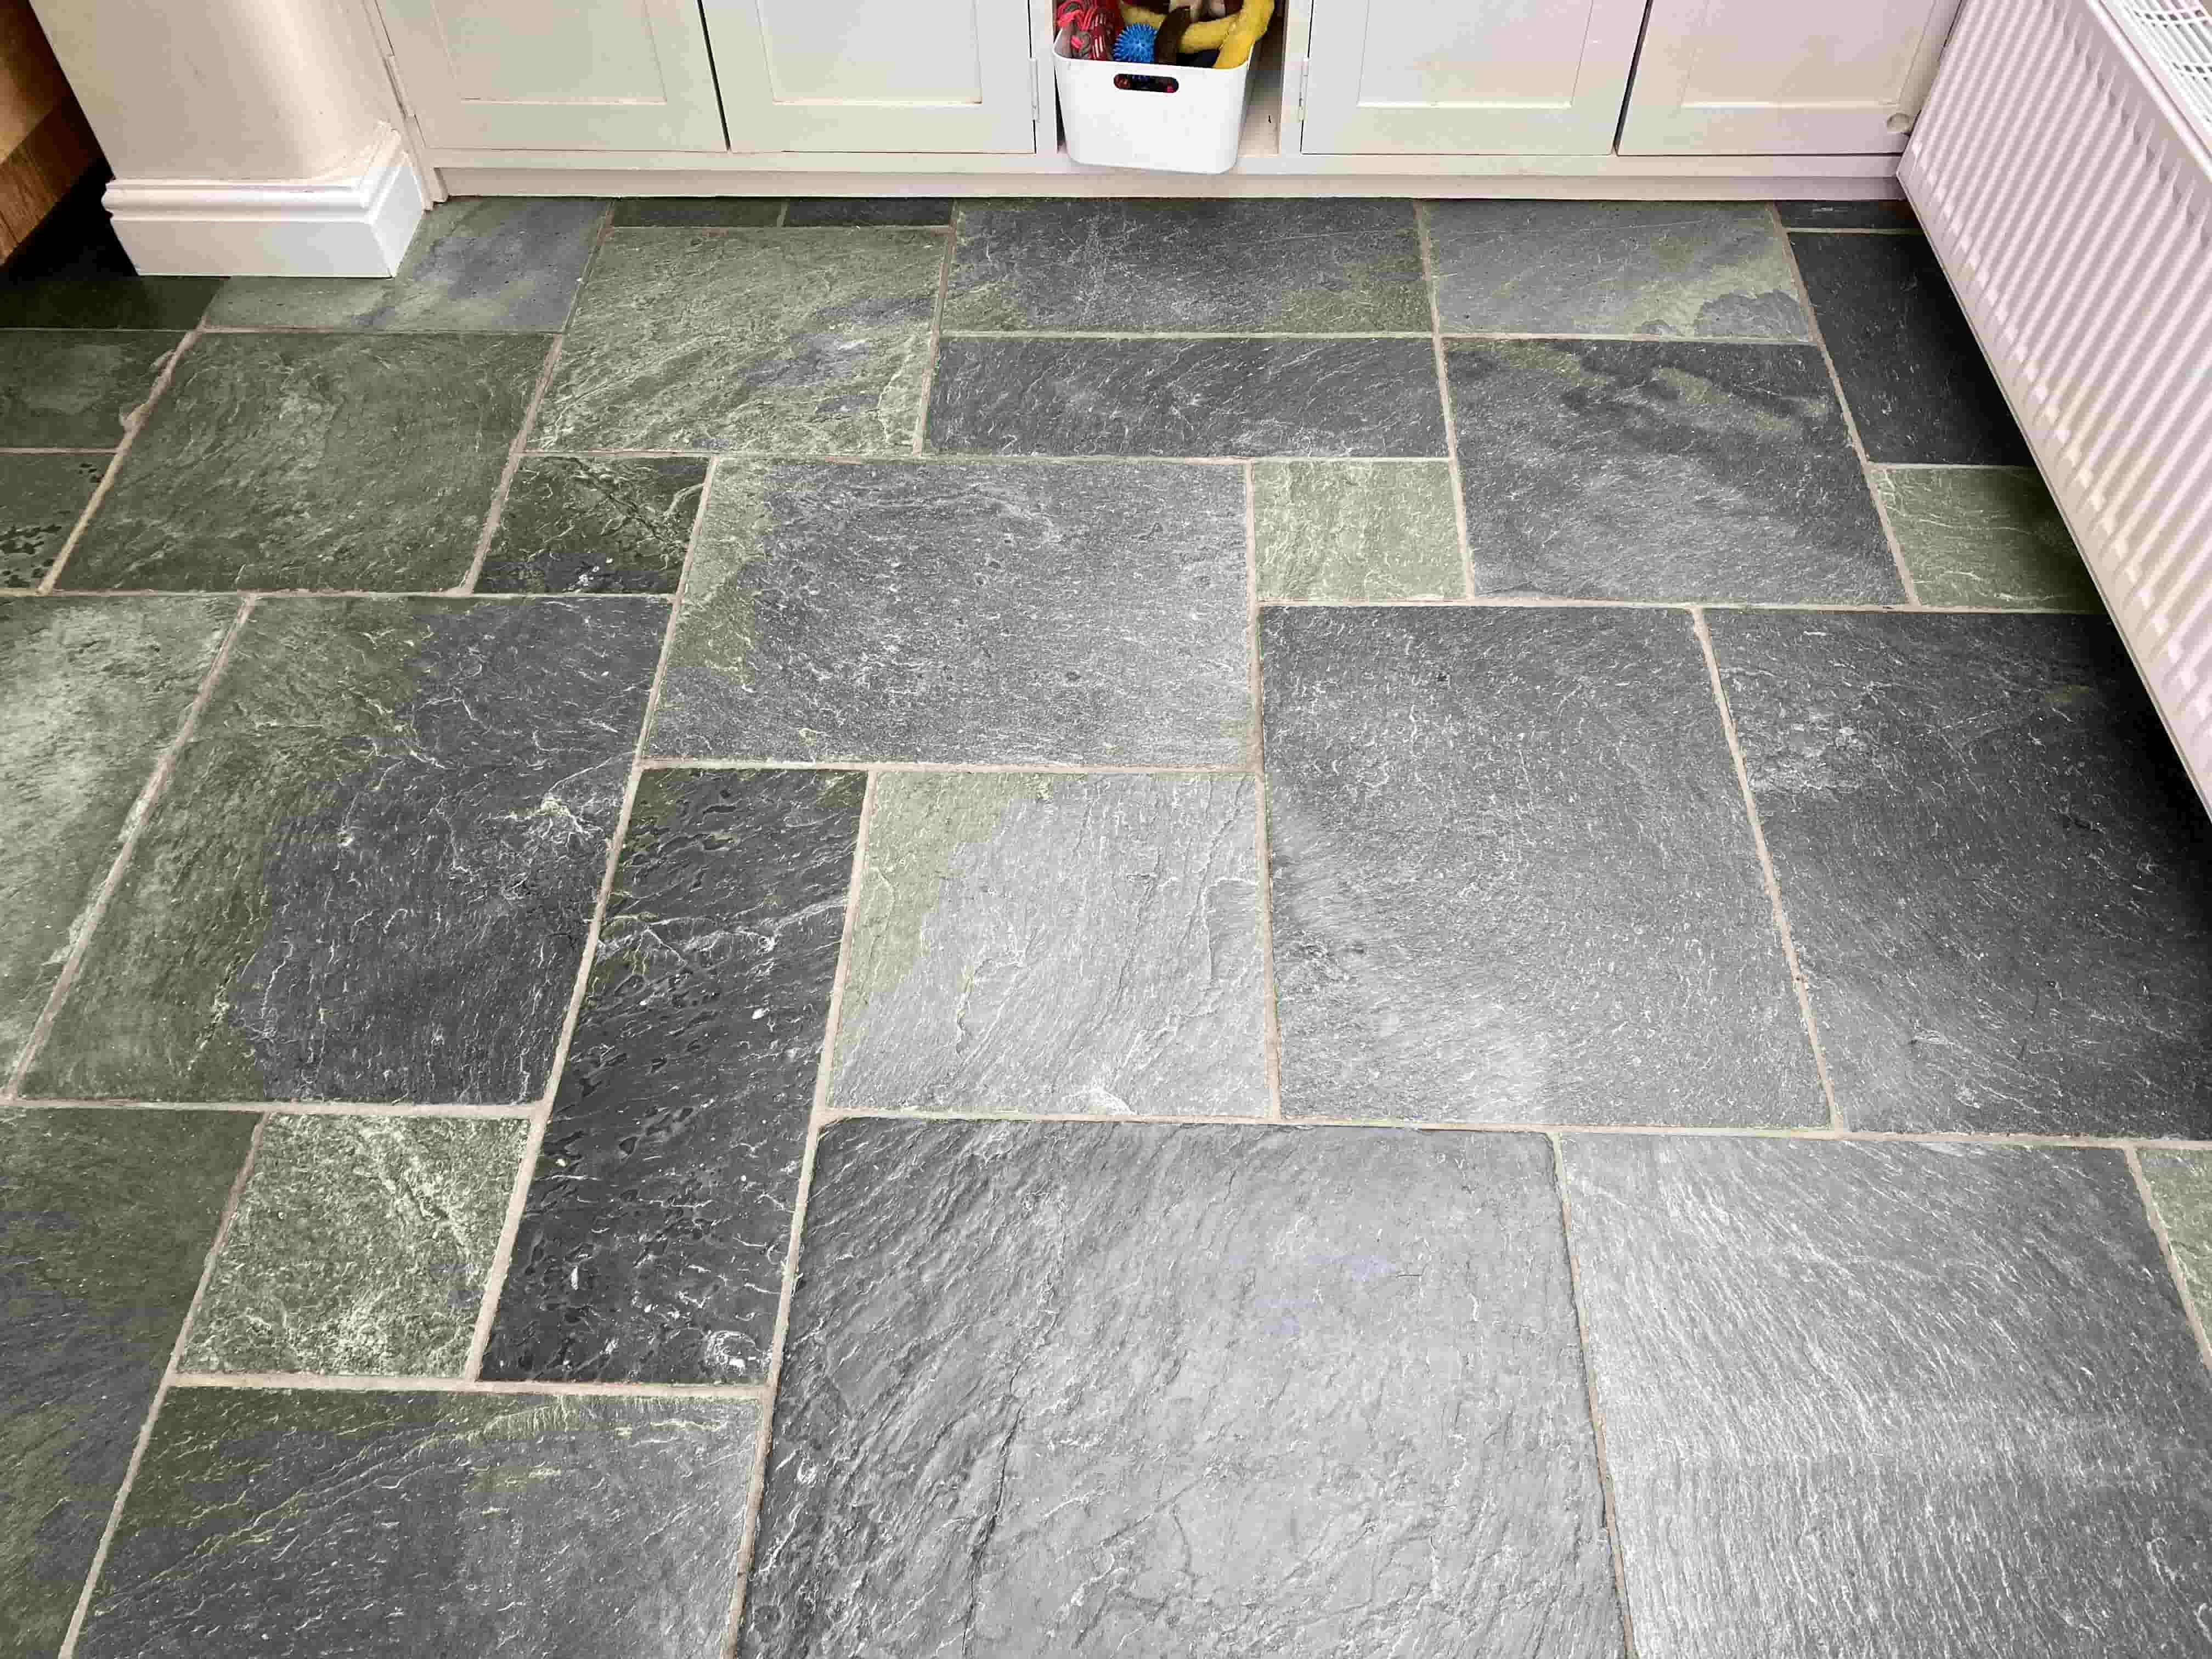
I worked in sections and then used a hot water encapsulation system that is used a lot by carpet cleaners to remove the slurry and get the floor as clean as possible. After inspecting the floor, I could see a few stubborn areas than needed more work, so the process was repeated until I was satisfied the Slate tile and grout was as clean as it could be. The floor was then left to dry overnight

Sealing a Semi-Riven Brazilian Slate Tiled Kitchen Floor

The following morning, we returned, the floor looked nice and dry but I took several moisture readings with a damp meter just to be sure. All was in order, and I was able to progress onto the next step of applying a fresh sealer to the floor.

For this type of tile and conditions I chose to apply Tile Doctor Seal and Go which is a water-based sealer (no smell as it dries) that works really well on Slate. Multiple coats were required and each coat is left to dry before applying the next. The seal is very hard wearing, perfect for high traffic areas such as the kitchen and it leaves a lovely sheen without making the floor appear too shiny.

 
Semi-Riven Brazilian Slate Floor After Renovation Thatcham

The customer was very happy with the outcome and left the following feedback on our website:

 
“Extremely professional from point of contact till completion of the job, Dennis has done a magnificent job of my tiles. And I would highly recommend his services”

Before leaving made sure to leave a complimentary bottle of Tile Doctor Neutral Floor Cleaner to help maintain the floor going forward. This is a pH neutral product which makes maintenance of the floor easy and ensures that the newly applied sealant will stay in place and not be compromised. As mentioned before most people, including I suspect the previous owner, tend to use supermarket products which are far too harsh and break down the sealer taking them back to square one.

Thursday, November 3, 2022

Laminate Flooring: Cheaper Options with Lasting Appeal

If you want the look of marble or bamboo flooring in your home, but cannot justify the cost, then laminate flooring is what you are looking for. Probably the biggest advantage of laminate flooring is its cost. Here, we discuss laminate flooring, both advantages and disadvantages, and what to look for in laminate flooring.

The Case For Laminate Flooring

For remodeling a kitchen on a budget, laminate flooring is often the best choice. It is durable, easy to clean, and the many styles and colors can almost duplicate more expensive floor treatments. Because of its versatility, it comes in different grades for the home. These grades, which are approved by The Association of European Producers of Laminate Flooring (ELPF), are guidelines for every area of the home. Called AC hardness ratings, they range in number from AC1, which is designed for low traffic areas such as a bedroom, to AC5, which can be used in heavy traffic areas such as a commercial enterprise. Your choice is determined by the area of the home in which you would install the flooring – for example an AC3, which is suitable for just about any high traffic area of the home. Here, price is the guideline.

Laminate flooring is made up of several layers of material, which include a moisture resistant layer under a layer of high density fiberboard. The process is finished with a high resolution photographic image of natural wood flooring, making it almost undetectable from actual hardwood flooring. The good thing about laminate flooring is that it does not need to be installed above grade, as hardwood or other types of flooring must.

Maintenance

Laminate flooring does not require special cleaners or polishes to maintain it. In fact, manufacturer’s recommend that you don’t use abrasive cleansers or soap based detergents on this flooring. A dust mop or a vacuum cleaner with a soft brush is sufficient to clean it, followed by a damp mop and drying with a soft cloth. Stubborn stains such as tar or oil can be cleaned with acetone, or fingernail polish, followed by wiping with a damp cloth.

Because of the nature of its design, manufacturers recommend that some caution be used on a laminate floor installation. You should not wear stiletto heels when walking on the floor. Tables and other objects with concentrated weight on the flooring should utilize felt pads to avoid denting of the surface. If heavy appliances must be moved, care should be taken to avoid damage, and a sheet of plywood placed on the floor to protect the laminate.

In Conclusion

Although this may sound like a lot of extra work in the home, the cost savings are well worth the extra effort to maintain a laminate floor. A beautiful floor is the key to the ambiance of a room, and laminate flooring fits the bill. In the next part of this series, we discuss the installation of laminate flooring.


Source: www.DoItYourself.com
Thursday, October 20, 2022

Pointers for Using Peel and Stick Linoleum Tiles

Installing peel-and-stick linoleum tiles is a relatively easy floor application, but even the simplest mistake will reduce the life and durability of your new floor. Be absolutely certain that the existing floor is level. Any imperfections will show on your new floor. If you are installing over an existing tile and it has a pattern, the new linoleum tiles will deform around the pattern.

If you don't remove the old floor, it is essential that you use a floor leveling compound before installing the new product. Once the floor is level, be sure to clean any remaining fragments and dust. If the floor is not sufficiently clean, the glue will not adhere properly.

Apply Additional Glue to Tiles

The glue on the peel and stick tiles can degrade quickly and cause the tiles to slide out of place. Place a little bit of glue on the bottom of each tile before installation. This will keep the tiles in place. Don’t use too much glue, because it will seep onto the tiles and damage the finish.

Placement of First Tile

Be extremely careful that your first tile is perfectly straight, plumb, and level. This is your starting point and all other tiles will have to maintain the line set. Start at the center of the room and work outward, so that cuts are at the walls, not in the main area.

Seal Seams Properly

Be sure that all seams around all tiles are sealed properly. You can use a clear silicone caulk and apply it with a caulk gun. Sealing the seams will prevent liquids from seeping into the sub-floor underneath the linoleum tiles.


Source: www.DoItYourself.com
Monday, October 10, 2022

Must-Have Tools for Refinishing Floors

 Hardwood floors give any home an elegant, classic appearance and can add thousands of dollars to the resale value of a home. Hardwoods are beautiful, and they're also long-lasting, easy to care for, ecologically responsible, and a healthy choice for a family. If you're thinking about installing hardwood floors in your home, here's some basic information to keep in mind.

Hardwoods are Ecologically Responsible

We all know that wood is a renewable resource, but may not be aware the North American hardwood used for floors today mainly comes from a highly managed woodland resource. US Forest Service statistics indicate that almost twice as much hardwood timber is added each year as is harvested, and there is more standing timber today than 50 years ago.

Hardwoods are Healthy

Unlike soft surfaces, hardwoods don't harbor dust mites or mold, so help provide a cleaner environment for your family. Since hardwood floors don’t give off any volatile organic compounds (VOC's) from synthetic components they won't cause breathing problems for anyone living in the house, particularly anyone suffering from Asthma.

Hardwood is Versatile

One of the great features about hardwood is its versatility. You can put hardwood on your floors in virtually any room — living rooms, family rooms, dining rooms, and even kitchens. It can be installed over concrete or directly onto conventions wood joist construction either on or above grade. Engineered hardwood can even be installed below grade (in basements).

All Hardwoods Aren't the Same

In the US we generally consider oak, maple, and cherry as the primary woods for floors, while other native woods like ash are popular and are also commonly used. "Exotic" hardwoods such as Tasmanian Oak or Brazilian Cherry from other parts of the world are also widely available. While exotic hardwoods can be beautiful and quite different in appearance from American hardwoods, keep in mind they didn't grow in North America's temperate climate so may react differently in our air-conditioned home environments.

Hardwood Grades

Hardwoods are graded based on their appearance. Grades range from clear (with virtually no eye-catching blemishes) through select (some burls and markings) to common (more grain differences to catch the eye). All are equally strong and serviceable and the choice of one grade over the other is essentially a personal choice based on appearance.

Engineered Hardwoods

Engineered hardwoods are a manufactured product. Planks are made using three to five layers of wood laminated in a cross-directional pattern then covered with a top layer of premium hardwood. This method of construction helps prevent the natural tendency of wood to expand and contract with changes in temperature or moisture content in the air.

Prefinished Versus Unfinished?

More and more hardwood is being sold already finished. Prefinished gives you the opportunity to see exactly what your floor will look like before it's ever installed. There's no dust from sanding the floors after installation and no objectionable fumes. As an added bonus, a prefinished floor can be installed in a shorter time than an unfinished floor since it's a one-phase project rather than two-phase.

However, since prefinished floors aren't sanded after installation, both your subfloor and installation need to be perfect. There's no opportunity to remove any minor imperfections that you get with the sanding step necessary as part of installing unfinished wood.

Maintaining Hardwood Floors

Hardwood floors are amazingly easy to keep clean. Keep them dust free and clean with a dust mop and regular vacuuming and have dirt-trapping walk-off mats at doors and entrances to pick up any grit or dirt.


Source: www.DoItYourself.com
Friday, October 7, 2022

Deep Cleaning Old Quarry Tiles in Devon with Tile Doctor Remove and Go

This client called us out to look at their grubby Quarry tiled lobby at the front of their property in Kenton near Exeter. Being the main entrance to the property it saw a lot of foot traffic so once the sealer had worn down it wasn’t long before the dirt started penetrating the pores of the tile and became difficult to keep clean.

 
Quarry Tiled Lobby Kenton Before Renovation

The property was originally a school and dated back over 200 years. The Quarry tiles in the entrance lobby were probably as old as the building and as mentioned earlier were looking worse for wear having been partially covered for years. They weren’t sure how old the tiled floor was, but they were keen to see it restored. They were therefore desperate to get the floor deep cleaned and a fresh seal applied. They agreed to my quotation, and we arranged a convenient date to carry out the work.


Cleaning a Quarry Tiled Hallway Floor

I started by taping up the skirting to protect it from the cleaning products we would be using. I then applied Tile Doctor Remove & Go to the floor and covered the area with plastic sheets to stop the evaporation of the products so that I could achieve a longer dwell time. This would really get to the deep-seated dirt and loosen it so it can be lifted from the pores of the tiles.

I then worked the floor with 200-grit carbide brush fitted to a rotary machine to remove the dirt ingrained in the clay pores of the tile. Some of the grout was loose and dislodged in the process, however my client was expecting this and had already arranged for his tiler to complete a full re-grout once we had finished cleaning. The soiling released by the cleaning process was rinsed off the floor with water and extracted with a wet vacuum.


Sealing a Quarry Tiled Lobby Floor

I wanted to seal the floor the next day so I left a couple of driers in place overnight to speed up the drying process. The next morning when I returned, I first checked the floor to make sure it was dry with a moisture meter.

The dryers had worked their magic so I was able to begin sealing the floor with Tile Doctor X-Tra Seal which is an effective interior and exterior sealer. With the lobby being a high traffic area, I applied four coats to ensure a durable seal. The benefit of this sealer is it gave the floor a nice sheen really bringing out the depth of colour in the tiles, and with the newly applied grout the floor looked great.

 
Quarry Tiled Lobby Kenton After Renovation

For aftercare I recommended the use of Tile Doctor Neutral Tile Cleaner. This is a pH neutral product which is gentle enough for daily use. It won’t compromise the newly applied sealer which can be a problem with the stronger bleach-based products you find in supermarket products.

The work completely transformed the Quarry tiles and my client was very happy with the completed job and told me they wished they had tackled it sooner.

Thursday, October 6, 2022

How do I remove porcelain tile grout haze?

You need porcelain tile grout to make your floors professional, but after installation, you may notice a haze from the grout that seems impossible to remove. There is a simple solution to the problem. Add a cup of white vinegar to very hot water, and saturate a heavy sponge with the solution. Rub hard and the haze will come right off. Be sure to rinse out the sponge often as you move to different areas to prevent putting the haze back on the floor. If you find an extremely stubborn area, pour some white vinegar directly to that spot and rub away with the sponge.


Source: www.DoItYourself.com
Sunday, October 2, 2022

How to Restore old Victorian Tiled Floors by South Yorkshire Expert

During renovations at this beautiful house in Sheffield the discovered an original Victorian tiled floor underneath the hallway carpet, incredibly they also uncovered access to a cellar, neither of which they knew idea existed and both were a massive bonus!
    
Victorian Tiled Hallway Before Restoration Sheffield

Once the floor had been fully uncovered it was in a pretty good condition, some repairs were needed but nothing too dramatic. There was damage around the radiators where the heating engineers have just chiselled through the tiles. Plus, the tiles were stained by adhesive where the carpet grippers had been glued to the tiles.
 
Victorian Tiled Hallway During Restoration Gripper Removal Sheffield

I discussed with the client the work needed to carry out a full restoration and gave them a quote. They were happy to accept and asked us to proceed as soon as possible.

 
Victorian Tiled Hallway Damaged Tiles Before Restoration Sheffield Victorian Tiled Hallway Before Restoration Showing Gripper Rod Sheffield

Cleaning and Repairing a Victorian Tiled Hallway Floor

Work started with the removal of the carpet grippers and scraping up as much of the glue as possible, it took some shifting, but it did come up. Any remaining glue was softened up with the application of neat Tile Doctor Remove and Go and then carefully scraped off. Tile Doctor Remove and Go is a multi-purpose stripper that is ideal for removing adhesives and other stubborn coatings such as sealers.

 
Victorian Tiled Hallway During Cleaning Sheffield

The repairs were done next which involved colour matching replacement tiles and cutting them to the right size. A fast-setting adhesive was used to fix them in place and once the floor had dried it was time to move onto the cleaning.

More Tile Doctor Remove and Go was applied, left to soak for ten minutes, and then worked in with a weighted 42kg buffer machine fitted with a very coarse diamond burnishing pad. This combination not only removed the old sealer but did a good job of removing ingrained dirt as well. The floor was rinsed with water and the soil extracted using a wet vacuum.

 
Victorian Tiled Hallway During Cleaning Sheffield

Once done the process was repeated using Tile Doctor Acid Gel, this removes stubborn staining and being an acidic product will counter any efflorescence which is a common problem with these old floors. Old floors like this one don’t have a damp proof membrane installed to prevent moisture underneath the tiles rising through the floor and depositing salt as it evaporates at the surface.

A wet vacuum was used to extract the soiling generated during the cleaning process and every tile was rubbed with microfibre cloths to remove the last of the residue.

 
Victorian Tiled Hallway During Remove Go Glue Removal Sheffield

A nice feature seen on a lot of Victorian floors is an upside tile left by the tiler on purpose, the picture shows the one on this floor. They believed it brought good luck.

 
Victorian Tiled Hallway Upside Down Tile Sheffield


Sealing a Victorian Tiled Hallway Floor

The floor was left to dry off overnight and I returned the following morning to continue with the final phase of the restoration. Before starting though, the first job was to check the floor was dry using a moisture meter. Once satisfied six coats of Tile Doctor Seal and Go Extra we applied leaving the floor with a beautiful sheen finish.

 
Victorian Tiled Hallway After Restoration Sheffield

The client was very pleased with the newly restored floor, and for ongoing cleaning I recommended the use of Tile Doctor Neutral Tile Cleaner. This product has a neutral Ph which is ideal for sealed surfaces; stronger bleach-based cleaners are simply too strong for use on sealed tiles and will erode the sealer prematurely.

Sunday, September 11, 2022

How to Remove Stains from an Oak Hardwood Floor

Oak hardwood floor can provide a rustic look that is unmatched by any other type of flooring surface. However, when this type of flooring gets stains on it, it can begin to look bad quickly. When you see stains forming on your oak flooring, there are some tricks you can use to try to remove them. While not every stain will come out of oak flooring, you can remove many of them with a few simple procedures.

What You'll Need:

  • Iron
  • Towel
  • Toothpaste
  • Baking soda
  • Dishwashing liquid
  • Hydrogen peroxide
  • Cotton
  • Plastic
  • Cloth
  • Water displacing spray

Follow the simple steps below to effectively remove some of the most common stains you will find in oak hardwood flooring.

Step 1 - Pet Stains

One of the most common stains you will find on hardwood flooring is pet urine (Fig. 1 & 2). If you have indoor pets, this will likely be a problem for you at some point. If you find urine on the floor, saturate a piece of cotton with hydrogen peroxide. Then rub the cotton into the wood, covering the entire stain but not completely saturating the area.

If you use too much hydrogen peroxide on the area, it could bleach out the color of the wood. Allow the hydrogen peroxide to dry, and then reapply as needed.

Step 2 - Water Spots

If you spill water on the floor and it soaks into the finish (Fig. 3), it can create unsightly water spots. If this is the case, you can remove most of them with a simple trick. First, lay a thin towel on top of the area. Then, program an iron on the medium setting. Rub your iron back and forth on top of the towel for a few minutes. You can lift up the towel periodically to check for progress in removing the water spots. You can do this for as long as it takes to remove the spots out of the wood.

Step 3 - Heat Stains

If you have heat marks on the oak hardwood flooring, mix together some toothpaste and some baking soda. Apply the paste to the entire area of the stain, and then use a cloth or a toothbrush to rub the paste around on top of the stain

Then use a different cloth to wipe up the paste. This should remove some of the stains. You can reapply the paste to the stain several times to help remove the stain from the wood. Make sure you remove all of the paste after this procedure.

Monday, August 22, 2022

Painting Pine Flooring

 Pine flooring is simple to deal with. Many people get bored of the look of plain pine planks. Fortunately, painting pine flooring is simple and can change the look of a room without much effort.

There are a few things that need to be done in order to create a flawless painted floor. You should also know that this process can take several days, so you should plan accordingly.

What You'll Need:

  •  Vacuum
  •  Floor enamel
  •  Soft paint rollers
  •  Masks
  •  Painter's tape
  •  Sponge brushes

Step 1 - Clean the Floor

Before you start taping or painting, you want to make sure the floor is completely clear of dirt and debris. Sweep, vacuum, and go over the floor with a lint-free cloth to ensure it's clear.

Step 2 - Turn Up the Thermostat

A warmer floor will take paint much easier, and it will allow for a quicker dry time. Make sure your thermostat is set on at least 70 degrees Fahrenheit, and keep it there for a full day before you start to paint.

Step 3 - Add Tape

Just as you would with painting a wall, you want to tape off the areas that you don't want paint to bleed through. Tape and cover the baseboards or floor molding to prevent the paint from accidentally getting on them.

Step 4 - Start in the Corners

It's best to start in the corners of the room and cut the paint in with an edger or small roller brush. You want to use a thin layer of paint for this. This way if you need to go back over the edges while you work on the rest of the floor, it doesn't become a darker color or stick out.

Step 5 - Paint the Rest of the Floor

Working in sections, start to roll the paint onto the rest of the floor. Use thin layers of paint and work slowly to reduce the risk of bubbles and wrinkles forming in the finish.

Step 6 - Add the 2nd Coat

After the paint has been applied, leave the area for at least 24 hours to allow the floor to dry. After this time you can begin to work with the second coat in the same manner in which you applied the first.

Depending on the color you choose and the condition of the floors, you may need to repeat this process several times.

Step 7 - Clean Up

Once the floor has dried and you have the finish you desired, you can remove the tape from the baseboards. Any areas around the edges that need to be touched up can be done with a sponge brush and a small amount of paint.

Clean up the area, and wait a full day before moving the furniture back into the room.

Tips

Painting on a rainy day, or during humid weather, can lead to wrinkles in the dry paint that are very hard to deal with. Try to paint during a time when the weather is clear and not humid.

Floor enamel is toxic. Be sure to wear painter's masks while working with it.


Tuesday, August 9, 2022

What You Should Know About Laminate Flooring

Laminate flooring imitates the aspect of traditional wood. Its biggest advantage is it’s very easy to install and very durable.

Laminate flooring is suitable for many of your rooms: hallways, family spaces, bathrooms, kitchens. It’s also perfect for an active home.

At first look, laminate flooring seems to be a natural wood floor, but in fact is a layer of paper under a tough protective film that is glued and pressed to a high-density backing board.

There are also types of laminate planks that are installed over a moisture barrier which levels any uneven areas of the floor.

You don't need any glue or nails for them because the planks snap together.

Before choosing a laminate flooring material you should think about the type of traffic in your house.

One other advantage for laminate flooring is the durability. So this type of floor is one of the best choices for households with heavy foot traffic, kids, or pets.

But, best of all, laminates will look like new for years.

Laminates are also highly resistant to stains, fading, and moisture.

Many laminate flooring manufacturers offer warranty protection against them for a long period of time (usually from 10 to 25 years).

Laminate flooring can be installed over floors like wood, tile, vinyl, or linoleum because most of them are floating, which means they do not fasten directly to the subfloor.

Also, at this moment, many manufacturers offer snap-together laminate flooring systems.

A typical laminate flooring is an extremely economical solution, if you take in consideration the costs of alternate flooring solutions.

Solid hardwood floors will require four or five refinishings, and carpets and vinyls will need to be replaced at least twice (depending on traffic loads), while laminates don't require anything.

Laminates come in different styles and types. You can find transition strips, end caps, stair nosings, moldings and baseboards.

Almost anything you need you can find at a laminate flooring manufacturer. There are companies that offer floor registers for heating and air vents.

Laminate flooring provides a much cleaner and healthier living environment when compared to other floorings such as carpets, with regular cleaning cycles.

It accumulates less dust, pet dander, allergens and it doesn't hold residual stain contaminants on the surface.

Allergic people will often be recommended to remove the carpets from the living space.

In conclusion laminate floors are a very good choice for your home because they are durable, resistant, economical and easy to install.


Source: www.DoItYourself.com
Saturday, August 6, 2022

Gel Cleaning a Victorian Hallway Floor in Surrey

It had been a while since this Victorian tiled hallway at a property in Reigate had received a deep clean and re-seal and it was now looking quite unloved. The sealer had almost worn off and dirt had become ingrained in the pores of the tile leaving it dull and lifeless. Hallways floors receive a lot of foot traffic so do need regular attention if they are to look their best and this example was no different. 

Fortunately, the floor was intact with no broken or loose tiles to deal with, there were a few chipped tiles in the floor but I think that adds character to a floor of this age. I worked out a quote to deep clean the tiles, flush out the dirt and add a fresh sealer to protect them. The quote was accepted and a date set for the work to commence.

 
Victorian Tiled Hallway Floor Before Restoration Reigate

Deep Cleaning a Victorian Tiled Hallway Floor

I started the work by applying a generous coating of Tile Doctor Oxy-Gel and left it to soak into the pores of the Victorian tiling for around 30 minutes. I used Oxy-Gel so as to minimise the use of water which can exacerbate efflorescence salt issues which is a typical problem of floors of this age that don’t have the benefit of a damp proof membrane.

Then using a very coarse 100-grit diamond encrusted pad attached to a rotary floor machine the tiles were given a good scrub. This process skims away a small layer off the surface of the tiles to remove the dirt and old coatings such as sealers. All the soil was extracted from the floor using a wet vacuum and I repeated this process twice for maximum effect.

At this point the tiles were already looking significantly better but I hadn’t finished yet. I still needed to deal with the edges and corners where the pad can struggle to reach. For this I use handheld burnishing blocks and more Oxy-Gel, you need a lot of elbow grease to do this but its an important step and can also be used to deal with any stubborn areas.

Once finished I used a little water to help rinse off the floor and the wet vacuum again to get the floor as dry as possible before leaving the floor to dry off completely overnight.

Sealing a Victorian Tiled Floor

The tiles need to be dry before sealing so the next day my first action was to test the floor for moisture using a damp meter. They passed and were ready to take a sealer which for this floor I used Tile Doctor seal and Go Extra. It's super tough and ideal for doorways and hallways and leaves a nice sheen without being too shiny.

 
Victorian Tiled Hallway Floor After Restoration Reigate

Before leaving I left advice on how to maintain the tiles using Tile Doctor Neutral Tile Cleaner which is a gentle tile cleaning product that will clean the floor without impacting the sealer which can be a problem with many of the strong products you find in supermarkets.

Wednesday, August 3, 2022

4 Options for a Carpet to Tile Transition

Finding the right flooring transition for a seamless look in your home can be tricky. When dealing with tiling and carpet, you have two completely different materials that have different dimensions and long-term wear differences.

You have to consider the height of the different flooring options, which could cause a person to trip if not accounted for. Plus, you want to make sure the transition is careful rather than clumsy; a lazy overlap just won't cut it. And, if the flooring is installed at different times, you've got even more of a challenge to make the transition look natural and flawless.

Here are a variety of options that can help you overcome some of the challenges of carpet-to-tile transitioning.

1. The Tuck-in Method

Pick up a simple transition piece on Amazon.

This is the method that is most often used for transitioning from carpet to tile. In this method, you make use of the often-used carpet helper, the tack strip.

It is highly recommended that you lay the tiling before you install the carpet if using this method. Carpet can easily be cut and positioned easily, or at least, it can be moved more easily than tile, especially after the tile has been set into place.

After the tile is installed, put in a tack strip 1/4 to 3/8 inches from the edge of the tile. The next step should be to cut at the direct edge of the tile. However, you can also pull the carpet across the space between the tack strip and the tile’s edging. Then use a knee kicker so that the carpet has extra edging, allowing it to be pushed into the space. After that, use the tack strip to hold it in place.

2. Z-Bar Transition

A Z-Bar transition is another great option for carpet-to-tile flooring. This option will not only deliver a seamless transition but also ensure your carpet has an added level of security, as it hides the carpet edging to keep it from getting pulled out.

Unlike the tuck-in method, this transition works best if you install the carpet before the tiling, that way you can secure the carpet to your preference first. The Z-bar can be nailed or screwed into the floor. Then, the tack strip is glued on top of the Z-bar.

3. Reducer Strips

Reducer strips can be found at most hardware or home improvement stores, and they can be found in a number of different shapes and styles to provide a seamless carpet-to-tile transition. The T-shaped reducer strips are popular and are used to bridge the space between the materials.

Unlike some of the other transition options, this one locks the two different kinds of flooring into place using either glue or screws. All you have to do is place the strips over the spot where the tile and the carpet edges meet, providing you with a simple and elegant way to bridge the gap between the two types of flooring.

4. Mount Tack Strips to Sub-Floor

If you have a strong-enough subfloor, this is a viable option. You can also proceed with this if you have cement underneath your tiling and carpeting. However, you should not nail down or use a general adhesive to do this.

Instead, visit your local home improvement or hardware store to find glue specifically designed to mount a tack strip to your subfloor or concrete. Many recommend using specialty glues that come in a hot-glue application style with a caulking gun, as these types will harden more thoroughly after cooling.

In this method, you mount the tack strip, pull the carpet to catch on the hooks and install the tile so that the height of both flooring materials are level. In this case, there is nothing covering the transition. However, it is a simple and easy way to make the transition look nice without having to worry about something ripping or breaking.


Source: www.DoItYourself.com
Tuesday, July 26, 2022

All about Brazilian Cherry Hardwood Flooring

Brazilian cherry hardwood flooring is one of the most beautiful and practical hardwood floors in the world today. It is also very popular and can be utilized in a variety of different applications.

Here are the basics of Brazilian cherry hardwood flooring and what you should expect from it. 

Brazilian Cherry Hardwood Flooring

Brazilian cherry hardwood flooring is not actually a cherry species. It is actually called Jatoba, but it is more commonly referred to as Brazilian cherry.

As the name suggests, this tree is native to South America. It has a variety of different uses, but it is most commonly used in hardwood flooring.

Hardness

One of the biggest benefits of Brazilian cherry hardwood flooring is that it is very hard. When you compare it to other common types of hardwood flooring, you are going to get a much harder product.

To the consumer, this means you will not have to worry about dents or scratches as much as you do with other hardwood products.

The industry standard test for measuring hardwood flooring hardness is the Janka scale. The value for Brazilian cherry on the Janka scale is 2350. By comparison, red oak has a rating of 1290.

This means it is much harder than red oak, white oak, and many of the other commonly used hardwood flooring species.

Durability

Most hardwood is considered to be a very durable flooring option. However, Brazilian cherry is going to be even more durable than your traditional hardwood floor.

This type of flooring is extremely durable and it can stand up to traffic for many years. It is not uncommon to see 50 year warranties on Brazilian cherry hardwood.

Therefore, this is considered to be a flooring you are going to have for the rest of your life unless you decide to change it for aesthetic reasons.

Looks

Brazilian cherry also has a look that is very sought after. The look it provides is one-of-a-kind and you really cannot get it from any other species.

Brazilian cherry is known for its deep red and brown tones throughout. The grain is unique and is extremely attractive. This is a look that is commonly utilized in high-end residences in today's society.

Advantages

This type of hardwood has several advantages when compared to other hardwood options. It is going to be much more durable than your average hardwood floor.

It also has a look many people prefer over anything else. Another advantage is that it is very versatile. You can use it in many different rooms in your house and applications.

Disadvantages

Although this wood has a lot going for it, there are also some drawbacks you will want to consider. The biggest disadvantage is going to be the price.

This type of hardwood is going to be more expensive than most of the other species of hardwood that are available. For reference, you could end up paying somewhere between $10 and $20 per square foot for this product.


Thursday, July 21, 2022

How to Remove and Ineffectual Sealer

We were asked to restore a large 70m2 riven Sandstone floor in the historic market town of Boston where the customer had been sealing with an impregnator sealer but the stone just kept absorbing the daily dirt despite repeated cleaning. The Sandstone was now very dull with ingrained dirt and mopping just seemed to make it worse. Unhappy with the appearance they decided to call us in to resolve the issues and add a resilient finish with a slight sheen.

 
Sandstone Floor Before Renovation Boston

Something clearly was not right so after discussing the issue on the phone I arranged to visit the property and survey their problematic stone floor. I concluded that the sealer the client was using was not effective at sealing the floor properly and had let dirt get into the stone. This could be because the floor had not been cleaned well enough prior to sealing, insufficient sealer had been applied or perhaps the sealer wasn’t suited to Sandstone. Either way to resolve the problem the solution would be to deep clean the Sandstone stripping off the old sealer in the process and then use something more suitable for Sandstone such as Tile Doctor Seal & Go which would also give the subtle shine appearance they were after.

I worked out a quote to renovate the floor, which was accepted and a date agreed to do the work which would take two days, one to deep clean the stone and the second to seal.

Deep Cleaning a Riven Sandstone Tiled Kitchen Floor

The first day started preparing the area which in this case was simply a case of removing the kickboards from under the kitchen units. Next, I created a strong cleaning, sealer stripper solution by combining Tile Doctor Pro-Clean with Remove and Go and then working in sections sprayed it on to the Sandstone and left it to soak in for ten minutes.

 
Sandstone Floor During Renovation Boston

The solution was then scrubbed into the stone using a brush pad fitted to a rotary buffer machine with added weight to improve contact. Using a brush pad is an important factor when cleaning riven stone as a normal flat pad would struggle getting into the grooves of the stone and works well on the grout lines as well.

The scrubbing action generated a lot of slurry which was extracted using a high pressure Rotovac system which is a great time saver. The Rotovac works by applying hot water under high pressure onto the floor to further force out ingrained dirt and muck from the stone whilst simultaneously extracting the soil back to a tank on our van.

 
Sandstone Floor During Renovation Boston

The results were amazing leaving the stone both clean and free of the old ineffectual sealer. After this the floor was inspected and stubborn stains were spot treated and the floor given a final rinse. Now satisfied the Sandstone was clean I left a couple of air movers in place to assist with drying overnight.

 
Sandstone Floor After Renovation Boston


Sealing a Riven Sandstone Tiled Kitchen Floor

The following day the moisture levels in the floor were checked with a damp meter, its important the stone is dry before sealing otherwise the results can be patchy. Fortunately, the air movers had done an excellent job and I was able to start applying the sealer.
 
Sandstone Floor After Renovation Boston
 
Seal and Go is a water-based sealer (so no smell as it dries) that works by protecting the stone with an impermeable layer. It takes multiple coats to fully protect the stone but does give the Sandstone a lovely appearance and will protect the floor from everyday wear and tear as well as making it easy to clean. 

The customer was over the moon and said it was better than when they first had it installed and mentioned they would definitely recommend our services going forward.


4 Common Laminate Floor Repairs

Laminate floor repair is not difficult, and will save you the time and expense of replacing the entire floor. Laminate floors can be damaged in a number of ways including scratches, mold,water damage, and warping.

What You'll Need:

  • Laminate floor repair kit
  •  Extra laminate floor boards
  •  Screwdriver
  •  Hammer
  •  Spacers

Step 1 - Fix Scratches

Scratches can be repaired without removing boards. If you have small children or pets you may want to keep a laminate floor repair kit on hand. Most repair kits come with a paste, a few pigments to match your color, and a spatula or putty knife. Just follow the directions on the kit to cover up the scratch.

Step 2 - Fix Warped Boards

Most warping occurs because the walls have expanded and there is no place for the flooring to go. The solution is to remove the spacers between the boards and replace them with smaller ones. This can usually be done without removing the floorboards, but the molding and trim will have to come up.

Once that is taken care of, swap out the spacers that were put in place during the original installation with smaller ones. Then, go around and press the warped boards back into place. Replace the molding.

Step 3 - Replace Cracked and Broken Boards

If you have a board that is cracked, broken, or in general disrepair, you will need to replace it. Fortunately, this isn’t a difficult job, either. Start by removing the molding or trim that is nearest the damaged board by prying it up with a screwdriver or back end of a hammer.

Be careful not to damage the molding as you will need to replace it.

Step 4 - Remove Damaged Boards

The next step is to remove the damaged boards. Since laminate floors are constructed of interlocking pieces, you will need to remove more than one board to replace any of them, unless the damaged board happens to be flush with the molding. Pull the boards up one at a time until you reach the damaged one.

Be sure to keep track of the order in which you removed them because you will want to return each board to its original position. Replace the damaged board with a new one and then work your way back replacing each board. Finish the job by replacing the molding.


Wednesday, July 6, 2022

How to Butt Floor Tile against Wall Tile

Putting floor tile and wall tile up against each other can seem like a difficult proposition. However, if you do it properly, you should not have any problems with this process. Here are the basics of how to butt floor tile up against wall tile.

What You'll Need

  •  Floor tile
  •  Wall tile
  •  Tile cove base
  •  Adhesive
  •  Grout
  •  Spacers
  •  Trowel
  •  Tape measure

Getting the Right Materials

For this job, you are going to need to get the right materials. Ideally, you would like to be able to install the wall tile and the floor tile around the same time. This way, you can get the tile that matches or complements each other. When you are purchasing your tile, you want to make sure that you get the tile cove base that is made for this application. This type of tile transition looks like a piece of wall tile with a curve on the bottom. The wall tile will fit directly on top of it and the floor tile will go up against it on the floor. This is the best way to butt wall tile and floor tile up against each other. It provides you with a finished look that is very professional.

Measuring the Job

Before you make a purchase, you need to measure out the room. Take your tape measure and get the dimensions of the wall and the floor. Multiply the length and the width of each space together to get the square footage. Add 10% to each value to give you enough for waste.

You will then need to measure the linear footage of the area where you are going to put the cove base. These are typically sold by the piece so you need to know how many to purchase.

Lay the Floor Tile

Start off by laying the floor tile. Apply the adhesive to the floor and then press the floor tile down into it. Using tile spacers, you will be able to space the tile appropriately. When you get up to the wall, you want to allow enough space in which to fit the tile cove base.

Install the Cove Base

At this point, you should install the tile cove base. Apply adhesive to the wall and then press the tile cove base into place. Make sure that the bottom of the cove base lines up with the floor tile nicely by using tile spacers here.

Apply the Grout

After letting the area dry overnight, you need to apply the grout. Use your grout float to install the grout in the grout joints. Then let the grout dry overnight before moving forward.

Install the Wall Tile

At this point, you can start installing the wall tile. You should be able to lay the tile directly on top of the tile cove base that is already installed. Lay the wall tile and then allow it to dry overnight. Grout the tile and then you should be ready to use the space.