Sunday, May 21, 2023

Putting the Shine Back on Encaustic Floor Tiles in Hemswell Cliff Lincolnshire

The photographs below are of an Encaustic Tiled Floor which had been installed some years prior in the kitchen of at a property in the village of Hemswell Cliff which is between Gainsborough and Market Rasen.

I paid a visit to the property initially to survey the floor and discuss the problem with the client. The main issue was the tiles had become dull and she couldn't keep them clean. I explained that Encaustic tiles are porous and need to be kept sealed to prevent the dirt from becoming ingrained in its pores; over the years since installation the sealer had simply worn down and now dirt was getting into the pores of the tile and once that happens it can be difficult to get it out. 

To prove my point, I carried out a demonstration on how I would clean them and explained the different sealer options available and how each sealer can have a different effect. She was pleased with the demonstration and was happy to accept my quote to deep clean the whole floor and then re-seal it.

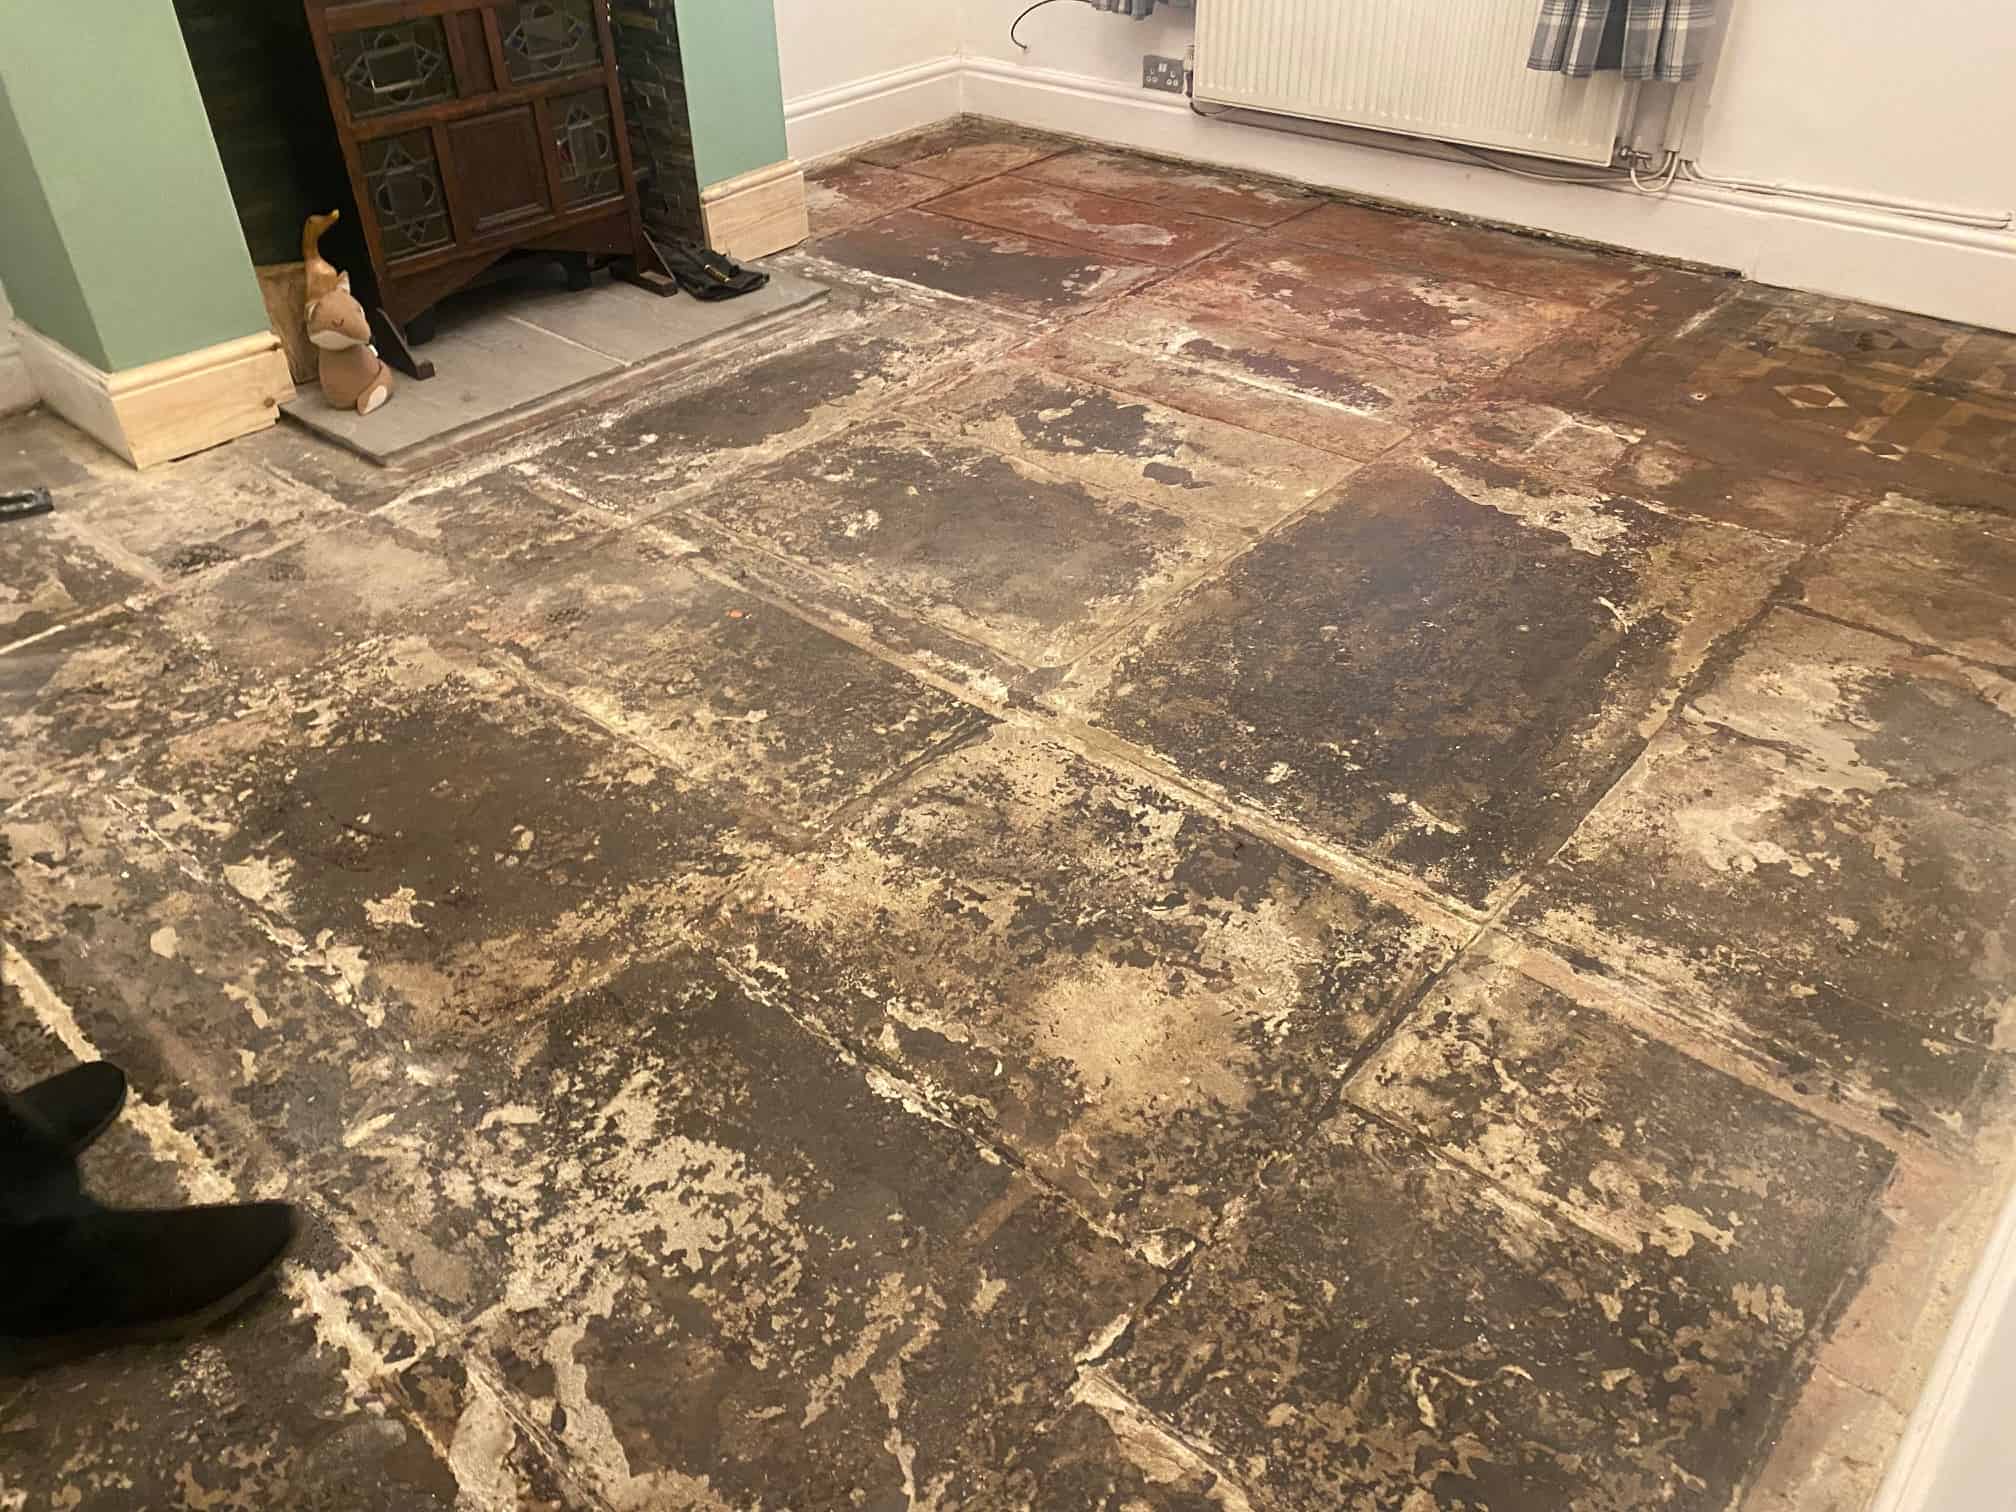
Deep Cleaning Encaustic Kitchen Floor Tiles

I set about scrubbing the floor using a hot water dilution of Tile Doctor Pro-Clean Tile and Grout cleaner combined 50:50 with NanoTech HBU Remover which adds tiny abrasive particles to the solution to make a more effective cleaning product. The solution was worked into the tiles by scrubbing with a rotary machine fitted with a Black scrubbing pad.

The pads struggle to reach into the recesses between the tiles so to get the grout clean I scrubbed them by hand using a stiff brush. Once done the soiled solution was removed using a wet vacuum and floor inspected to ensure it was as clean as possible. Any stubborn areas were spot treated by hand and then the whole area thoroughly rinsed down with clean water to remove any trace of cleaning product.

Finally, the wet vacuum was used to dry the floor as much as possible with assistance from a Turbo Air blower to help reduce the drying time.


Sealing Encaustic Floor Tiles

It wasn’t a particularly large floor and a warm day so I was able to complete the cleaning process by lunch time and after a few hours later with the assistance of the air blower the floor was dry and ready to be sealed.

Having discussed sealer choice with the client earlier a decision had been made to seal the encaustic tiles with Tile Doctor Seal and Go which adds a nice subtle sheen to the tile. Five coats of Tile Doctor Seal and Go were needed before the tiles were fully sealed, it’s a water based protective sealer so it doesn’t give off any odour whilst it dries and it provided the finish the customer was looking for.

Once completed the colours in the tiles were really vivid and resulted in one happy customer with a clean easy to maintain floor. On the subject of cleaning, I recommended the use of Tile Doctor Neutral Tile Cleaner which is a mild but effective tile cleaner. The problem with many of the tile cleaning products you find in supermarkets is they contain bleach which is simply too strong for use on a sealed tile as it will strip off the sealer.

Thursday, May 18, 2023

How to Finish Walnut Flooring

Walnut flooring is a great way to add beautiful detail to your home. The strongest type of walnut flooring is Brazilian flooring which is ideal for kitchen flooring. Brazilian walnut flooring is more durable compared to the standard black walnut flooring. It is also three times more durable than oak.

Applying finish to your walnut flooring will increase the lifespan of your walnut flooring as well as protect it from damaging elements such as water. Below are the materials that you need along with the instructions on how to finish walnut flooring.

What You'll Need:

  • Trisodium phosphate
  •  Wood putty
  •  #36-, 80-, 100-, 220-grit sandpapers
  •  Drum sander
  •  Edging sander
  •  Wet/dry vacuum
  •  Tact cloth
  •  Wood sealer
  •  Stain
  •  Polyurethane
  •  Orbital sander

Step 1—Floor Cleaning

Using warm water and trisodium phosphate, clean your floor well. Be sure to rid it of all grease, dirt, debris, and dust particles. Let the floor dry for a few minutes prior to sanding.

Step 2—Prepare the Wood Surface

Make sure to sink all protruding nails back into the wood of your floor. If you find any cracks or holes, use your wood putty to fill them in. Allow the wood putty to dry first before proceeding to Step 3.

Step 3—Sanding

Use a drum sander (such as a 36-inch drum sander) to sand the floor. If you encounter sections of the floor that were missed by the sander, you can manually fix that with your edger. Sanders can usually be rented at your local equipment rental store.

Step 4—Use a Vacuum Cleaner

Remove all residue of the sawdust generated from the sanding. Use either a wet or dry vacuum to clean up the floor.

Step 5—Second Sanding

Using 80-grit sandpaper, sand the floor a second time. Also, be sure to vacuum the floor to rid it of sawdust after sanding.

Step 6—Third Sanding

Using 100-grit sandpaper, sand the floor again as with the previous steps. Vacuum the area again. You can use a tack cloth to remove the dust found in between floorboards.

Step 7—Apply Sealer

Apply the wood sealer onto the floor to close the wood’s pores in order to avoid blotching or streaking when you apply the stain.

Step 8—Apply Stain

Coat your floor with the stain using a brush. You can also use clean pieces of cloth or rags to apply the stain. When applying the stain, make sure to follow the grain of the wood. Leave the stain on the wood for 30 seconds up to 15 minutes. Allow the stain to dry on the wood completely before proceeding to Step 9.

Step 9—Stir Polyurethane

Stir the polyurethane to equally distribute the solvents, all the particles, and the solids that are found at the bottom. Slowly stir so as to not create air bubbles in the polyurethane.

Step 10—Brush Polyurethane

Carefully brush the polyurethane to coat your walnut flooring. Brush the polyurethane in the wood grain’s direction. Allow it to dry.

Step 11—Fourth Sanding

Using an orbital sander with 220-grit sandpaper, sand the walnut flooring again and vacuum after. Repeat steps 10 and 11.

Step 12—Brush Another Coat Of Polyurethane

Coat the floor again with another layer of polyurethane. Make sure that this dries before you bring back your furniture into your room and onto your new walnut flooring.


Wednesday, May 10, 2023

Lancashire Stone Expert Details how to Resurface Old Flagstones using Coarse Milling Pads

 The client said when he moved into this house in Lytham St Annes late last year that this room had a really bad smell of damp. The Flagstone floor was covered in carpet and he had the impression that the previous owner’s cat had been known to use it as place to pee!

  Flagstone Floor Before Restoration Lytham St Annes 

The smell was rank and probably bad for your health so he decided to remove the carpet and the thick underlay underneath. Under that there was some old Vinyl flooring which all came out to reveal the original flagstone floor. As you can see from the pictures it was in a poor state covered in red and white paint, bits of bitumen here and there and the pointing had been lost in several areas of the floor. Additionally, all those layers over the stone would have prevented any moisture from naturally evaporating at the surface thereby resulting in damp.
 
Flagstone Floor Before Restoration Lytham St AnnesFlagstone Floor Before Restoration Lytham St Annes

The client had seen what we could do on our website and sent us some pictures of his floor which covered approximately 16m2. I priced for milling the flagstone as a deep clean would not resolve the shaling issues on its own and only a good mill of the stone would do that. Also, it needed all the pointing that was still in place knocking out and new flexible breathable pointing put back in place.
 

Cleaning and Repairing a Flagstone Tiled Hallway Floor

Milling stone is not a low-cost option, but it is a lot more cost effective than pulling up the whole floor and putting in a modern subfloor. Milling involves using a weighted buffing machine fitted with different grits and grades of coarse Diamond encrusted pads which cut into the surface of the stone to reveal new stone underneath, you then apply finer pads to hone and refine the surface.

In this case I used a set of Tile Doctor Milling Pads applied in sequence starting with 50-grit, 100-grit and then 200-grit. Water is used to lubricate the process and keep the dust down, it’s also important to rinse the stone off after each pad and extract the slurry that is generated with a wet vacuum.

The floor was then cleaned with Tile Doctor Remove and Go allowing the product to soak in for ten minutes to loosen deep seated paint staining. The Tile Doctor Remove and Go was then worked in with another 200-grit pad before another rinse and extract again with the wet vacuum.

Older floors like this were installed before the invention of the damp proof membrane so moisture is always a concern. To counter any issues that might develop later such as Efflorescence the last step in the cleaning process was to give the floor an acid rinse using Tile Doctor Grout Clean-up, this neutralises any latent salts trapped in the subfloor.
 

Sealing a Flagstone Tiled Hallway Floor

The milling, re-pointing and cleaning work took two days and we returned for a third day to apply a breathable sealer called Tile Doctor X-Tra Seal. This product is fully breathable and a great choice for any floors where damp can be a problem as it will allow for moisture to rise through the stone and evaporate at the surface. Being oil-based it also adds character to natural stone and adds an appealing low satin finish.
 
Flagstone Floor After Restoration Lytham St AnnesFlagstone Floor After Restoration Lytham St Annes

The whole process completely transformed the appearance of the flagstone floor and really suits the property which was a late Victorian four-story house with a basement. Original features like this are very sought after so it makes sense to restore them as it will add value.
 
Flagstone Floor After Restoration Lytham St Annes

An additional advantage of the milling process is it also reduces the roughness of the stone surface makes it smoother and easier to clean. On the topic of cleaning its worth mentioning that you should never use a strong bleach-based tile cleaning product on a sealed floor as it will erode the sealer prematurely. For a floor like this you need to use a product like Tile Doctor Neutral Cleaner which is a mild but effective cleaning product designed for use on sealed tile and stone.


Thursday, May 4, 2023

5 Tips to Protect Your Hardwood Floors and Plumbing From Winter

Winterizing your home is a necessary project to take on if you live in colder temperatures. Failing to do so puts home owners at risk of facing costly repairs and consequences come spring. In order to prepare your home for the dropping temperatures, we spoke to experts in the wood renewal and plumbing industries to learn essential tips.

Hardwood Floors - Dave Murphy, Training Director for N-Hance Wood Renewal, a national franchise that is the trusted partner of The Home Depot for the renewal of hardwood floors and kitchen cabinets, provided us with tips on how to protect wood floors:

Prevent Rock Salt Damage

Rock salt can cause severe damage to hardwood floors. Not only can it stain the floor, but the rough crystals can scratch it up. Some people say that salt stains can be cleaned with vinegar and water. However, this method should be avoided. Vinegar can leave residue and excess water can ruin hardwood floors.

To help prevent the problem in the first place, place a sturdy mat both inside and outside of every entrance of your home and have guests remove their shoes upon entering. Furthermore, homeowners should sweep frequently, and mop when needed with a neutral floor cleaner to help protect floors from salt buildup.

Prevent Shrinkage from Dry Air

During the winter, in the air dryness and temperature change can cause hardwood floors to shrink, which creates spaces between boards. If the humidity is not right, it can cause a lot of damage to the floors. Homeowners should have a humidifier on hand and keep the humidity level as constant as possible throughout the year. The same goes for temperature. Huge swings in temperature cause the wood to shrink and expand.

Drain Excess Water

In order to prevent your garden hoses and air conditioner pipes from freezing, be sure to always drain them before the cold temperatures arrive. A frozen garden hose can become the source of various issues, such as a decrease in water pressure or a weakening in the lining of the hose, while a frozen air conditioner line can cause leaks or breaks in the unit. Also, make sure you turn off the AC water shut-off valve.

Insulate Your Pipes

By insulting pipes, you will not only help prevent them from freezing, but it can potentially allow you to save money on bills. It will reduce the amount of time it takes for your water to heat up and will raise temperatures by a couple degrees. The most important pipes to insulate are ones located in areas of your house that aren’t heated, such as in the garage or attic.

Clean Your Gutters

It is essential to make sure your gutters are cleaned before freezing temperatures hit your area. If water can’t flow freely through your gutters, icicles can form causing damage to shingles and backing up the gutter. This leads to clogs, water leaks and various other unexpected issues.


Source: www.DoItYourself.com