Monday, August 31, 2015

Troublesome Slate Tiles Refreshed in East Sussex

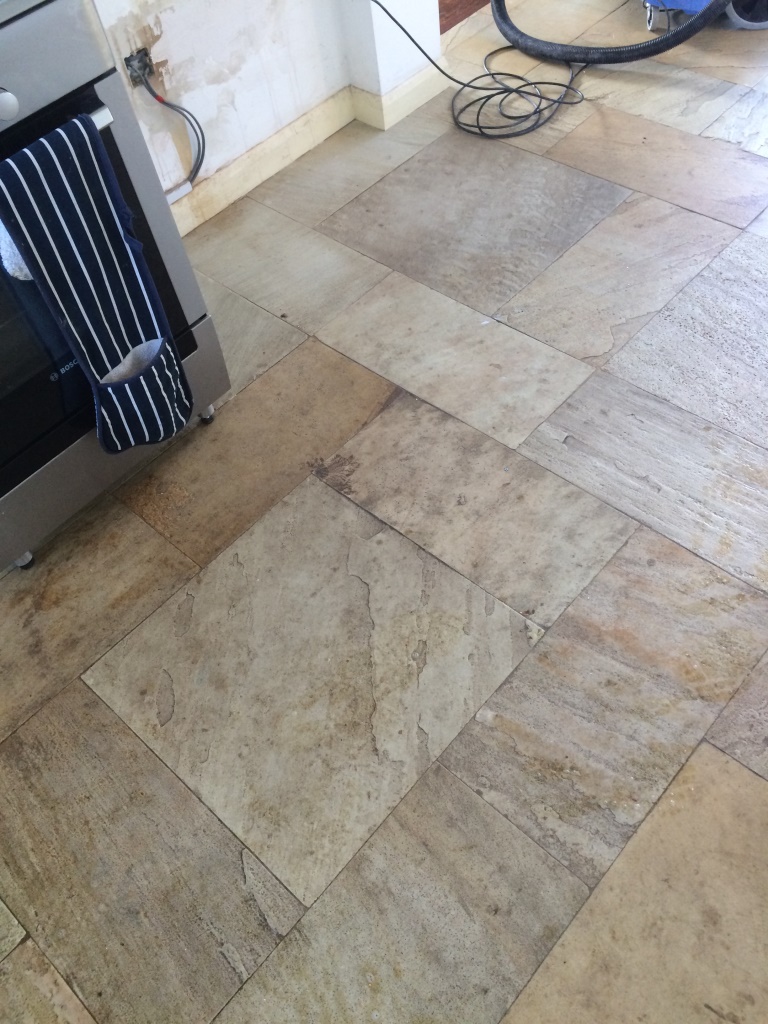
I was recently contacted by a client who had just moved into a house in Crowborough, a town in East Sussex which by the way was once home to Sir Arthur Conan Doyle, the author of the Sherlock Holmes novels and short stories. The riven Slate tiled floor in the kitchen had trapped bits of dirt and also food which had become ingrained in the tile. Needless to say, the new homeowner wanted to give the kitchen floor a thorough clean. However, she had tried every cleaning product she could find in the supermarket, but to no avail. Struggling to find a solution she sought out professional assistance and naturally I was happy to help.

Slate floor before cleaning Crowborough

Cleaning a Slate tiled floor

My first task was to mix up a strong solution of Tile Doctor Pro-Clean. The product was only slightly diluted with water, since the floor was quite heavily soiled and a higher concentration of Pro-Clean was needed to help remove several layers of dirt and food waste. Once applied to the floor, the solution was left to dwell for roughly five minutes before I began to work it into the stone with a deck brush. I did the best I could here to clean the floor without using my buffing machine as, since the floor was riven, my black buffing pad would have been ruined by the ridges. Making up for the lack of a buffing machine, I made sure to scrub the floor with Pro-Clean for several hours to remove as much grime as possible. One the cleaning was finally completed I rinsed the floor several times with clean, hot water. I then used a wet-dry vac machine to remove any excess moisture to clear the floor for sealing when I returned 48 hours later. Upon leaving, I left my client with instructions to avoid spilling anything on the floor as, again, any liquid left on the surface might affect the performance of the sealer.

Slate floor during cleaning Crowborough

Sealing a Slate tiled floor

After a period of two days, I returned to commence the sealing. My choice of sealer was Tile Doctor Seal & Go, which is suitable for use on internal, unsealed surfaces such as Slate, textured Quarry, Victorian tile, and others. Seal and Go is also a water based sealer so you there’s very little smell given off whilst it dries compares to solvent based sealers. In this case, the client did not want the surface of the floor to be too shiny, so I only used two coatings of Seal & Go, whereas for a shinier result I would have used a few more.

Slate floor after cleaning Crowborough

My client was exceptionally pleased with the results, which had not only cleaned the floor but brought out the beautiful colours in the stone that had once been hidden under several layers of muck.

Slate floor after cleaning Crowborough


Source: Professional Tile, Stone and Grout Cleaning service in East Sussex

Friday, August 28, 2015

Install a Floating Cork Floor over Radiant Heat Floor

floating cork floor is environmental-friendly and resilient. You can lay the floating cork floor over a radiant heat floor. Radiant heat flooring uses pipes or wires to carry hot water or electrical current through the floor, and thus radiate heat from the floor. Cork is an insulator made from natural materials, and installing it over a radiant heat floor helps slow down the time it takes for heat generation from your floor, once you turn on your heater system. This prevents the floor from getting too hot too suddenly. This type of flooring glues or snaps together, without being permanently affixed to your radiant heat floor. Installing the floating cork floor over radiant heat floor is not difficult. Simply follow the step-by-step instructions below.

What You'll Need
  • Floating cork floor
  • Back saw
  • Polyethylene sheet
  • Tape
  • Measuring tape
  • Half spacers
  • Hammer
  • Tapping block
  • Pry bar
  • Miter divider

Step 1 – Check the Density of Floating Cork Floor

Check to make sure that the floating cork floor has a density of 28 pounds per cubic foot minimum. The higher this density number is the better, if you want stronger flooring.

Step 2 – Let the Flooring Settle

Let the floating cork floor settle in, prior to installation, by placing it into the room where you are going to install it for a minimum of 72 hours. Set the heating system to 75-degrees Fahrenheit, to heat the radiant floor. Keep the system turned on until you have finished installing the floating cork floor.

Step 3 – Trim Door Stop

Remove the baseboard. Take a plank of the floating cork floor, and lay it onto the threshold under the door, and up against the door stops. The door stop is the piece of molding which runs on the jamb vertically, and stops the door from opening the other way.
Trim the door stops using a back saw, taking due care not to cut into jambs. You will be installing the floating cork floor under the threshold. Trimming the door stops allows you to raise up the threshold until it reaches the bottom cut of the door stops you have just made. The plank will thus fit perfectly under the threshold.  Remove the threshold.

Step 4 – Lay Polyethylene Sheet

Lay the polyethylene sheet over the radiant heat floor. It should cover the entire floor with an extra 3 inches going up the wall. Make the seams overlap by approximately 8 inches. Seal up the seams using tape. Laying the polyethylene sheet prevents moisture from building up between the floating cork floor and radiant heat floor. It also lessens squeaking sounds from the flooring.

Step 5 – Measure

Measure the distance starting from the longest wall without a door opening to the wall opposite. Subtract 1 inch from the number. This is the width to be covered by the floor. Then, divide this width by an individual plank’s width. This is how many planks to install. If the result is an uneven number, trim the first and the last planks equally, so that the floor is centered exactly.

Step 6 – Install the Floating Cork Floor

Set the half spacers placed against wall. Install the first row of plank with tongue facing towards the wall. Trim the tongue off with a back saw, to make the edge even, and fit against the half spacers. Install another plank of floating cork floor into the groove of the first row, and click them together. Do this for the other planks, as they will click and be locked into the planks in previous row. Before installing a new row, use a tapping block and hammer to ensure that every row is tight. Stagger the seams from one row to the next.
When installing the last row of planks, leave a ½ inch of space between the plank and the wall. Instead of using the tapping block, use a pry bar to go over the plank’s end and pull the tongue into the groove.

Step 7 – Finish the Floating Cork Floor

Replace the baseboard. Miter the ends of the baseboard at 45 degree angle with a miter divider, so that it will fit all corners. Do not nail the baseboards to floating cork floor, as the cork floor is prone to expansion and will destroy the baseboards. Nail them to the wall. Replace the threshold. It should fit nicely.

Wednesday, August 26, 2015

How to Lay a Floating Cork Floor

floating cork floor is an eco-friendly flooring option for home owners. The harvesting of the wood does not harm the tree. Cork floors are warm, luxurious and fairly simple to install. Floating cork floor planks are easily snapped together and require no fasteners or adhesive to secure them into place. This floor option can also be installed over most existing floors.

What You'll Need
  • A pry bar
  • A broom
  • Moisture barrier
  • Tape
  • Spacers
  • Cork flooring
  • A rubber mallet
  • A tapping block
  • A measuring tape
  • A power saw
  • A power nailer
  • Nails
  • Floor molding
  • Cork floor sealer

Step 1 – Preparing the Space

Use your pry bar to gently remove the floor molding from the wall. Slide the bar behind the trim. Gently loosen the molding. Use your hands to pull the molding away from the wall. Be careful not to do any damage to the molding or the wall. Use your broom to remove any dirt and residue from the floor surface. If the room has a concrete subfloor, lay a moisture barrier over the floor space. Read the instructions provided by the manufacturer of the moisture barrier before you begin. Roll the barrier out from one wall to the opposite wall. Continue laying the barrier, overlapping the roll by about six inches as you cover the floor. Use your tape to secure the barrier together. Unpack and lay your cork flooring in the room about three days before you begin the installation process.

Step 2 – Laying the First Planks

Position ½-inch spacers around the perimeter of the room. This will allow the necessary space for the wood to expand. Determine the longest wall in the room. Begin laying the cork flooring at that wall. Hold the first plank at an angle, with the tongue facing the wall. Lay the tile down. Secure the second tile to the first by snapping them together. Be sure the planks fit together tightly. Use a tapping block to push the planks together. Place the block at the end of the second plank. Tap the block with your rubber mallet. Continue laying the planks until the first row is complete. If necessary, use your power saw to cut any plank that needs to be shortened to fit into the row.

Step 3 – Laying the Remaining Rows of Flooring

Lay the second row of planks following the steps for the first row. Be sure to stagger the joints of each of the rows. Use planks from different boxes. This will create a varied floor color and pattern. Continue laying the planks until the entire floor space is covered.

Step 4 – Finishing the Installation

Remove all of the spacers between the flooring and the walls. Reattach your molding to the perimeter of the room. Secure the trim to the wall and not the floor planks. Read the instructions provided by the manufacturer of the floor sealer before you begin. Be sure you have a sealer that is specifically designed for cork flooring. Use your paint brush to apply the sealer to the floor. Allow the sealer enough time to dry completely.

Monday, August 24, 2015

Limestone Tile Refresh in London

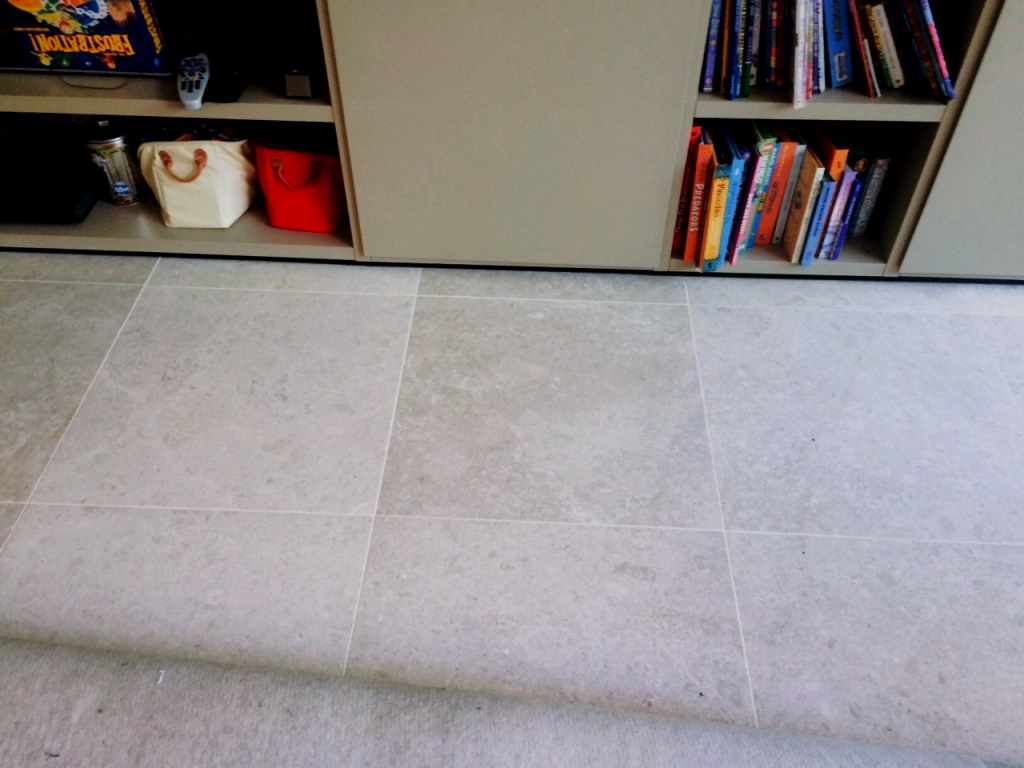
I was recently engaged to refresh the Limestone tiled floor at a house in St. John’s Wood, which is a very affluent area and apparently has the 5th most expensive postcode in London so as you can imagine this was a very expensive floor. The client had requested an improvement condition of the Limestone tiles in the living room and a thorough clean, polishing and seal was required. Over time, the floor in this busy living room - which was also used as a play area for young children - had become dirty and certainly worse for wear with all the use it had been getting. So, I set about my work to get this floor back to looking its best.

Cleaning and burnishing a Limestone floor

My initial task before beginning the cleaning process was to remove any furniture (as well as toys) from the room so I would have a clear area to work in. I then applied a layer of Tile Doctor Pro-Clean cleaner, diluted with water, to the floor. Pro-Clean is also suitable for use on other natural stone floors such as Slate, Granite and Travertine. After leaving the solution to dwell for a period of a few minutes, I began to scrub the floor with a stiff hand brush. Whilst helping to remove a lot of the built up dirt on the surface of the tiles, the product also stripped off the old sealer and polish. Following this, I paid special attention to the dirty grout lines, cleaning them with Tile Doctor Oxy-Pro, a powerful, high-alkaline cleaner.

Limestone Floor London NW8 After Cleaning Grout Lines with Oxy Pro Limestone Floor London NW8 After Cleaning Grout Lines with Oxy Pro

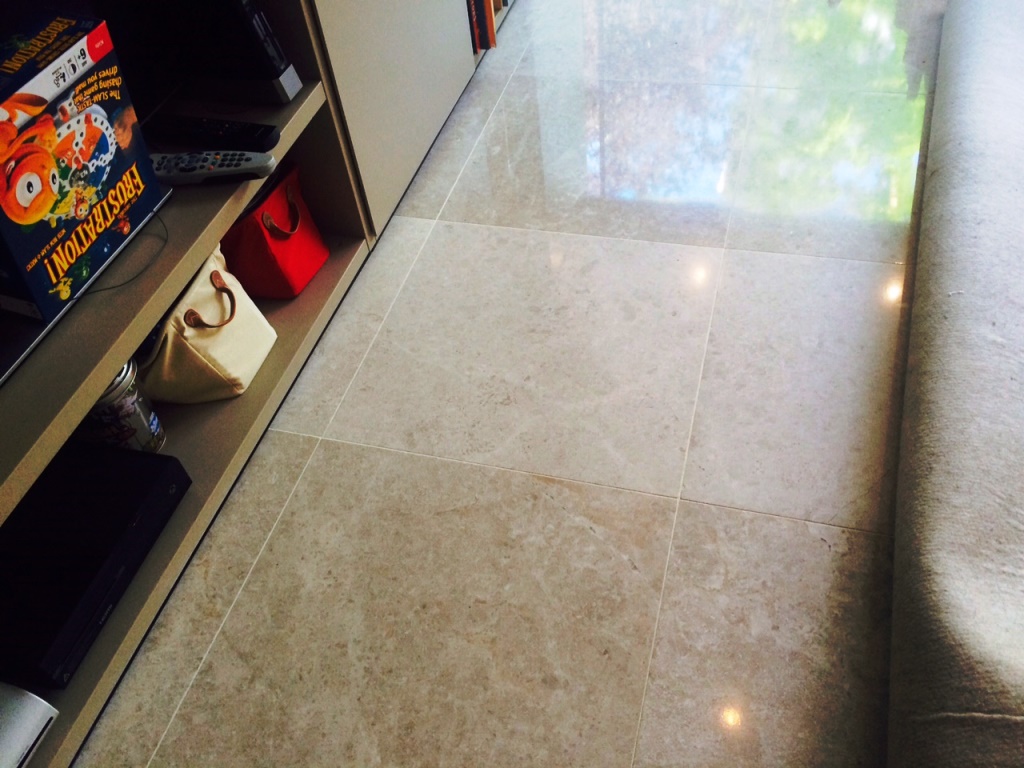
After completing the cleaning, I rinsed the floor with clean water to remove any excess cleaning products. I then began to burnish the floor using Tile Doctor Diamond encrusted burnishing pads. This was done in four steps, as I used four different pads (coarse, medium, fine and very fine) rinsing the floor with water between each pad. I would recommend using this setup of four pads for restoring the appearance of polished stone floors; you starting with a coarse pad and the gradually work your way up to the very fine pad achieving a high polish finish in the process. I finished of the process with a quick rinse and a buffing pad to give the floor a final polish before I commenced the sealing.

Sealing a Limestone floor

My choice of sealer was Tile Doctor Colour Grow, which is specifically designed to not only provide durable surface protection, but also to intensify the colour of the tiles. The sealer penetrates deep into the pores of the stone, providing water resistance and long-term protection from ingrained dirt and stains. As you can see from the photos, the sealer really helped to accentuate the fantastic natural colours in the Limestone.

Limestone Floor London NW8 After Burnishing Limestone Floor London NW8 After Burnishing

My client was very pleased with the final result, and was amazed by how quickly I had been able to improve the state of her floor which, with a colourful and shiny finish, has really brightened up the living room.


Source: Professional Tile, Stone and Grout Cleaning service in Central-London

Sunday, August 23, 2015

Installing Floating Cork Flooring

Installing floating cork flooring is the perfect choice for those who wish to have a floor similar to wood but would rather not have the expense. Although looking like cork, they are strong and durable which is perfect for households with a lot of traffic. They are also very easy to install as they are designed to fit together like a puzzle and can sit on any flooring other than carpet. 

What You'll Need
  • Cork floor planks (minimum density of 28 pounds per cubic foot)
  • Polyethylene sheet
  • Hammer
  • Tape
  • Hand saw
  • Polyurethane seal
  • Vacuum
  • Spacers
  • Floorboards or moulding
  • Levelling compound
  • 3/4 foam roller
  • Tapping block

Step One - Preparation

Clean the floor with a vacuum to remove any dirt and dust, then check to see if you need to use any floor levelling compound to fix any levelling issues you may have; remember to wait for the compound to dry before continuing with your project. When you begin you should work from the longest wall without a door. Gather all your tools and you are ready to begin. 

Step Two - Fit Polyethylene Cover

Fitting a polyethylene cover will act as a moisture barrier between the sub-floor and the new cork flooring and will also prevent a squeaky floor. Lay down the cover and make sure it covers the whole floor. You should overlap each seam by 6 inches and have 3 inches going up the wall base; all edges should be secured using tape. If your sub-floor is wooden you will not need to cover with a polyethylene cover. 

Step Three - Install the First Row

Begin fitting your first row of planks on the floor with the tongue side facing the wall, insert spacers between each plank and the wall to allow the planks room to expand; these will be covered by the floor trim later. When installing each plank, hold the ends at an angle to each other, line up the tongue and groove fittings and click into place. 

Step Four - Install the Second Row

For your second row, hold each plank at an angle to the first row and line up the tongue and groove edges on each plank, then firmly press the pieces together to fix. Use a tapping block and hammer to make sure the connections between the planks are tight. Repeat the process for each row until you have completed your floor. 

Step Five - Prepare Last Row

Insert spacers between the wall and the last row of planks to make room for expansion. Use different sized planks to stagger the joints in a row; this is to make sure that the ends of each plank do not line up along adjoining rows. Use a hand saw to cut the end pieces where necessary, and place the plank face down when cutting to protect the surface. 

Step Six - Finish

Clear the floor of any dirt and dust using a vacuum cleaner and then apply a sealant over the flooring. Apply the polyurethane seal over the cork using a 3/8 inch roller to evenly cover the floor. Leave to dry overnight before use. To cover the expansion gap, you could use a trim nailer to install a floor trim along the bottom of the walls; alternatively you could install moulding. Trim any visible excess polyethylene using a utility knife.


Saturday, August 22, 2015

Linoleum Vs. Marmoleum Flooring

Marmoleum is the brand name of linoleum manufactured by Forbo-Nairn. Linoleum is the generic name for the natural flooring material made of linseed oil, cork dust, pine resin and wood flour. It is considered a ‘green’ renewable resource. This type of floor is hypoallergenic and long lasting.

Marmoleum

SMaRT certified Marmoleum has earned the coveted certification “Asthma & Allergy Friendly.” The homeowner that opts for Marmoleum will achieve at least one additional LEED’s (Leadership in Energy and Environmental Design) credit because it is considered by USGBC (U.S. Green Building Council) Credit Interpretation to be “innovation in design.” Made with all natural products, the sheet goods are installed with adhesives free of solvents, and the style Marmoleum Click needs no adhesive at all.

Linoleum

Linoleum, as a general industry standard, is not certified completely natural. The adhesives used are definitely not natural. Although the term linoleum indicates natural, Marmoleum is the only brand that is LEED certified. For the additional cost of the brand name, the homeowner will receive more LEEDS points. The higher your LEED’s score, the healthier and more green your home is. The ultimate green construction reduces energy and water usage in addition to using sustainable materials such as linoleum. There are also tax incentive programs to encourage green building.

Sunday, August 16, 2015

Maintaining with Classic Office Floor Tiles

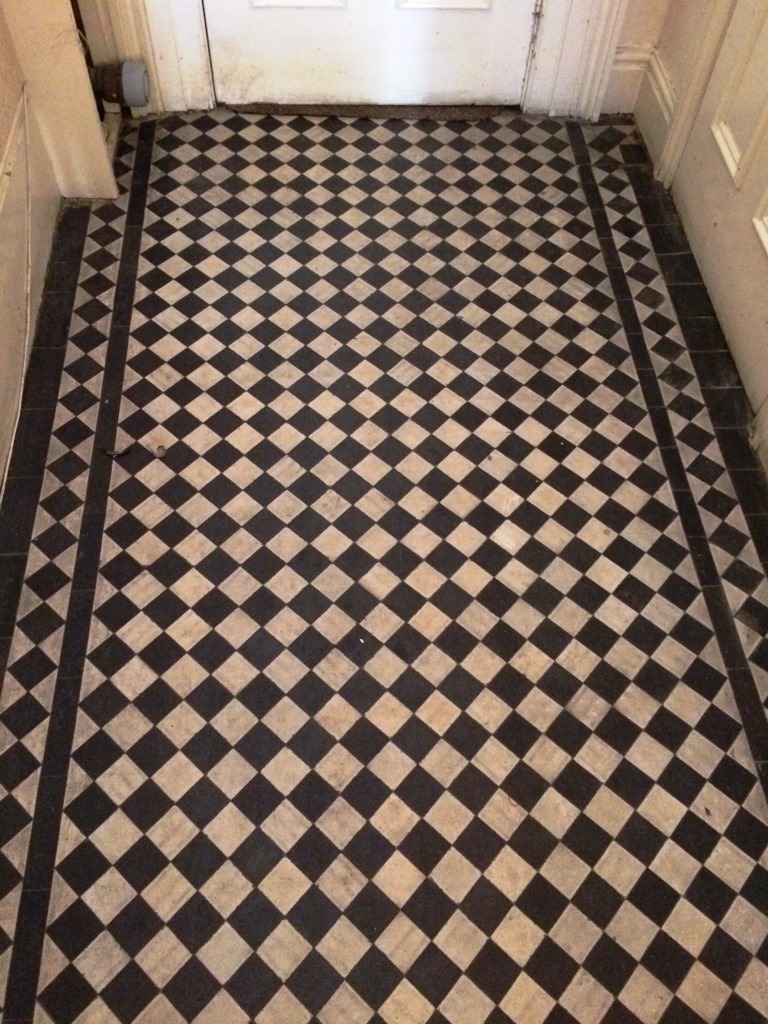
Recently, I was asked to do some Tile Doctoring at Palmeira Square, in the seaside city of Brighton and Hove, to restore the Victorian tiled floor of one of the downstairs offices. Palmeira Square is a residential area which was first developed in the mid-19th century during the reign of Queen Victoria, so many of the buildings feature some fantastic original Victorian tile floors. Although there are many large terraced houses and even mansions in the area, some of the buildings have been converted into offices for commercial use. My client, who leased the downstairs office, managed to persuade the other tenants to employ professional help to restore the tiles, and so I was asked to come in to clean and seal the floor to get it back to looking its best.

Victorian Tiled Office Floor Brighton Before Cleaning

Cleaning a Victorian tile floor

With Palmeira Square being quite a lively area, I made sure to fence off the front door area from the wandering public. My first job was to apply Tile Doctor Remove & Go to the floor, a heavy duty stripper, multi-purpose stripper that was able to remove the stubborn marks, stains and ingrained dirt on and between the tiles. In particular, Remove & Go helped to remove some rust stains I found near the door hinges.

Victorian Tiled Office Floor Brighton Before Cleaning

I left the product to sit and work its magic for twenty minutes, and during this time I began cleaning the floor using a buffing pad, which is suitable for use on all types of floor (except polished stone), and a solution of Tile Doctor Pro-Clean diluted with water. The combination of a buffing pad and Pro-Clean helped to remove the general dirt and grime that had built up over time in this high traffic area of the office. After the cleaning was complete, the black tiles appeared grey because any remaining sealer had been removed. However, the colour would return after resealing the tiles, which was my next job.

Victorian Tiled Office Floor Brighton After Cleaning

Sealing a Victorian tile floor

I returned to the office after two days to seal the Victorian tile floor. To do this, I needed to use Tile Doctor Seal & Go, which meant I had to ask the office workers to keep off the floor for most of the day. This is because I needed to apply six coats of Seal & Go to the floor, and each coat takes roughly fourty minutes to dry. Seal & Go provides a stain-resistant surface seal and a durable low-sheen finish, which will help keep this floor looking great for a long time, even with a high traffic of workers coming in and out of the office.

Victorian Tiled Office Floor Brighton After Cleaning

Luckily, it was a warm day outside, and the floor dried quickly, leaving a shiny, deep black surface. Both my client and I were very happy with the result. The client was also pleasantly surprised to see that I had been able to remove the rust stains near the door.


Source: Professional Tile, Stone and Grout Restoration service in East Sussex

Saturday, August 15, 2015

Types of Resilient Flooring

Resilient flooring is a classification of floors with qualities that make it 'bounce back.' Typically, a resilient floor will resist stains and water and is comfortable to stand on for long periods of time. Resilient floors are often seen in institutional structures such as schools and hospitals.

Rubber

The most expensive type of resilient flooring is rubber. However, all rubber floors are black, and so it is used in limited applications. Manufacturers of rubber floors will often provide the option of lock-in pieces to provide the consumer optional temporary placement.

Cork

A comparable material to rubber is cork. With a variety of colors and patterns, cork is a great option for homeowners.

Vinyl or Linoleum

The most common materials used for resilient flooring are vinyl or linoleum. Both products come in a variety of colors, patterns and sizes. Linoleum, a natural option made of linseed oil ('lin'-oleum), tree resin, cork dust and pigments, comes in sheets and tiles. Vinyl floors are very versatile and available in a wide range of applications. A popular vinyl option is the plank, which simulates expensive hardwood floors.
Sometimes, in a workplace, you will see a combination of flooring. For example, in a hair salon, while the floor is a resilient vinyl or linoleum, the workstations usually have additional padding for the hairdressers provided by areas of rubber resilient flooring mats laid on top.


Sunday, August 9, 2015

Advice for Cleaning Linoleum Floors Old and New

Cleaning linoleum floors, old or new, is key to keeping them looking their best for many years. To make your job easy, take the time to properly seal your linoleum after it is installed. To do this, simply apply floor polish to the area following the manufacturer’s instructions. It is also advisable that you polish your linoleum about once a year to maintain the gloss.

Cider Vinegar

The easiest way to clean linoleum floors is with cider vinegar. The slightly acidic pH of the vinegar will remove dirt without harming the material. An easy way to use vinegar is to pour it into a spray bottle. Working in small areas, spray the floor with vinegar and wipe dry with either rags or paper towels. Depending on how dirty the surface is, you may find that you have to go over it more than once. In heavy traffic areas, you may want to spray the vinegar on the area, let it set for a short time to loosen the dirt and then wipe up.

Baking Soda

To treat especially stubborn areas, make a paste of water and baking soda. Rub the paste onto the spot with your fingers to loosen the dirt, and wipe it clean with a damp rag. Additionally, if there are scuffmarks on your linoleum, apply a little jojoba oil with a clean rag. Rub out the scuffs, and wipe excess up with the rag. If you regularly clean linoleum floors, they'll stay looking good for years.


Saturday, August 8, 2015

Disadvantages of Sheet Linoleum Flooring

Sheet linoleum flooring is a common fixture in many houses. Though linoleum has many benefits, it has many drawbacks as well.

Cleaning

Linoleum flooring is made of a natural material linseed oil. In order for the flooring to retain its antibacterial properties, it can not be cleaned with most chemicals.

Water Damage

Water resistance is a selling point for linoleum flooring use in kitchens and bathrooms. However, the underside of the linoleum is high susceptible to water damage. Often, this issue is only recognized after significant damage has already been done and the problem magnified.

Installation

Installing sheet linoleum flooring requires an precisely sized piece be cut, adhered and snuggly fitted as one piece. The magnitude of this task makes it difficult for the average DIYer to tackle, which means it requires professional installation. The added expense is rarely calculated into the cost of what is otherwise known as an economical flooring.

Replacement

If something happens to discolor, mar or damage the flooring, it must be replaced as an entire sheet. A spot touch-up is rarely advised because it could allow water to get under the flooring and ruin the sub-flooring. The expense of a complete floor replacement can often be higher than other types of flooring that cost a bit more up front.

Friday, August 7, 2015

Clean Vinyl Plank Flooring

One of the advantages of vinyl plank flooring is the ease of maintenance. Keeping the vinyl clean is very simple. With all the look of hardwood and none of the headaches, vinyl plank flooring is much less expensive and easier to install.

What You'll Need
  • Broom
  • Mop or rags
  • Water
  • Micro-static fiber floor duster
  • Ammonia
  • Liquid dish soap

Step 1 - Sweep/Vacuum Floor

To remove dirt and dust from your vinyl plank flooring, vacuum or sweep it with a broom. This should be a daily chore to keep the finish shiny. Follow up with dry micro-static-fiber floor duster to catch remaining dust.

Step 2 - Clean Floor

Add 1 tbsp of ammonia (or liquid dish liquid) to 1 quart of water. Wash the floor using a clean rag or mop. Alternatively, you can use whichever self-cleaning (no rinse) floor cleaner is recommended by your floor's manufacturer.

Step 3 - Rinse Floor

If you decide to use liquid dish soap, rinse residue with clear water. If you don’t rinse, the floor will be sticky.

Step 4 - Yearly Maintenance

The manufacturer of your floor might recommended that you apply a new coat of floor polish to keep your floor glossy and provide additional protection against wear. Please note that using a vacuum with a beater bar can damage vinyl planks, so you should not use it on your flooring. Additionally, avoid using abrasive cleaners and scrubbing pads, which can scratch the surface of the vinyl.

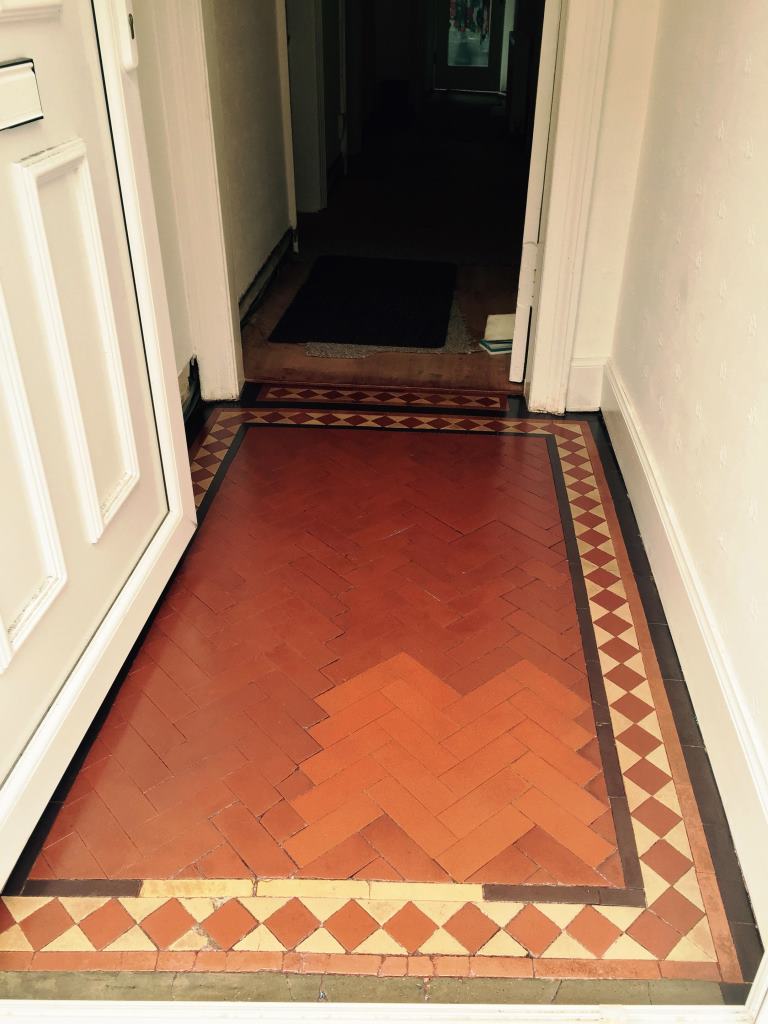
Old Victorian Enterance Hall Floor Restored

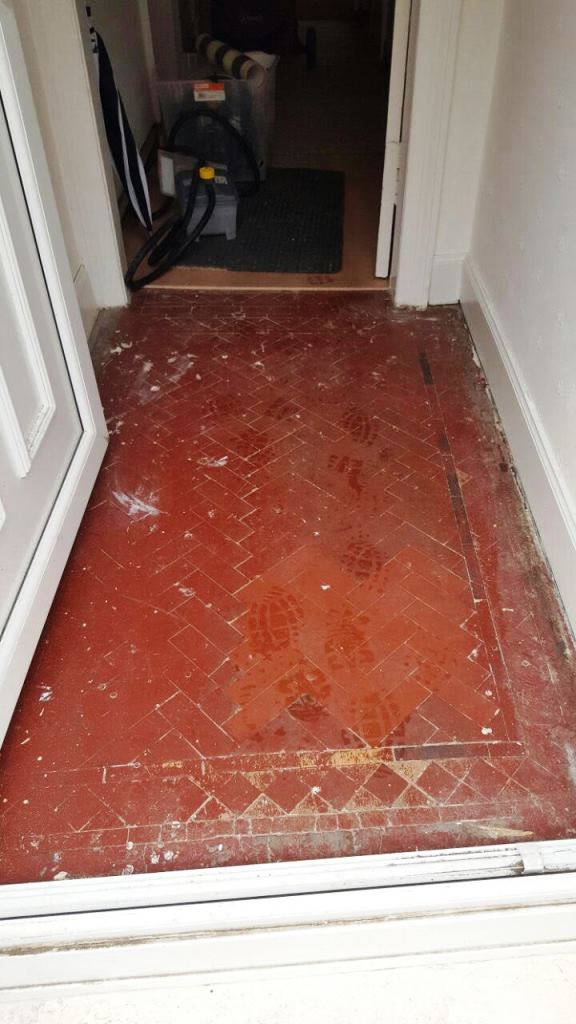
This job was at house in Polwarth, a small parish through which flows the Union Canal, running from Falkirk to Edinburgh. The client had requested a clean for a Victorian tiled hallway set in the narrow reception area of the house.
Victorian Tiled floor Polwarth before cleaning
The tiled floor had been painted over by the previous owners of the house using a thick, red paint. Painting a tile floor in such a way can affect its wash-ability, and the paint can peel off over time especially in a high-traffic area such as a reception area or hallway such as this. The red paint would have to be removed in order to restore the tile underneath and reveal its natural state, as well as provide a thorough and much-needed clean.
Victorian Tiled floor Polwarth before cleaning

Removing paint from a Victorian tiled floor

The first step in the paint removal process was to spray the floor with a strong solution of Tile Doctor Pro-Clean mixed with Remove & Go. Pro-Clean is a heavy duty cleaner and degreaser, suitable for use on tile, stone and grout. Pro-Clean combines well with Remove and Go, which is a multi-purpose stripper capable of removing most sealers, adhesives and, particularly important for this case, paint. The solution was left to dwell after application to allow it to soak into the tile and soften the paint and dirt. After 10 to 15 minutes we scrubbed the floor in order to remove as much of the paint as possible. The owner of the house was surprised to see the true colours of the tile appearing, which had been hidden beneath the paint for a significant period of time. As the red paint coating was particularly thick, we had to scrub the floor multiple times. In some areas the paint proved tricky to remove so it was necessary to use a steamer to steam clean the stubborn areas. Once all of the paint had been successfully removed, the unveiled tile floor was treated to another clean using Pro-Clean, before being given a wash down and neutralised using Concentrated Neutral Tile & Stone Cleaner. It’s important to ensure any trace of strong cleaning products are removed from floor before the next step of sealing as it can impact the sealer leading to un-even results.

Sealing Victorian floor tiles

The floor was left to dry off overnight and we came back the next day to seal the tiles using four coats of Tile Doctor Seal & Go which is an ideal sealer for Victorian tiles as it provides stain protection whilst also bringing out the colours resulting in a subtle sheen appearance.
Victorian Tiled floor Polwarth after cleaning
You can see from the photos that after a thorough cleaning and sealing the floor was back to looking its best. I do wonder why someone would want to paint over such a fantastic Victorian tiled floor!
Victorian Tiled floor Polwarth after cleaning
    Source: Professional Tile, Stone and Grout Restoration service in Edinburgh

Wednesday, August 5, 2015

Paint Linoleum Floor Tiles

You do not need to call an expert to paint linoleum floor. This is a project that any homeowners can do themselves easily over the weekends. It is an inexpensive and a great way to change the look and feel of a room without having to redo and reinstall the entire flooring. Follow the simple steps below to paint your linoleum floor tiles.

What You'll Need
  • Wire Brush or Light Sander
  • Broom or Vacuum Cleaner
  • Oil-Based Primer
  • Paint
  • Varnish or Clear Coat
  • Paint Brush

Step 1 – Clean the Linoleum Floor Tiles

Thoroughly sweep or vacuum the floor with a broom or vacuum cleaner. Make sure that it is free from any debris and dust.

Step 2 – Sand the Floor

Lightly sand the entire linoleum floor tiles with a wire brush or light sander. Sanding the floor ensures that the paint stick properly and last longer.

Step 3 – Clean the Floor

After sanding, sweep or vacuum the floor again with a broom or vacuum cleaner to remove any dust that results from sanding. Be sure to remove all the dust and that the surface of the floor is smooth before painting. Any dust left un-cleaned will be visible after painting and make the linoleum floor tiles look lumpy.

Step 4 – Apply Oil-Based Primer

Apply a thin layer of oil-based primer as a base coat on the linoleum floor tiles with a paint brush. This type of primer is more durable than water-based primer. Allow it to air dry.

Step 5 – Paint the Floor

After the base coat is dry, proceed to paint the floor with your desired color. Paint at least 2 layers. Allow the paint to dry after each layer before painting a new one.

Step 6 – Finish the Floor

After the paint is dry, paint the linoleum floor tiles with at least 2 layers of varnish or clear coat. Allow each layer to dry before painting a new layer.

Saturday, August 1, 2015

Restoring Slate Tiles On A Client's Patio

Wonders in cleaning slate made by Tile Doctor experts

A video below about a Slate Patio we recently restored. The customer had another company come in to clean and seal them but they used the wrong product and it turned white and the sealer went patchy.


Process of cleaning slate and its restoration

We stripped of all old sealer using Tile Doctor Remove and Go which is a great multi-purpose product that will remove most sealers and coatings.

After a thorough rinse and wash down with water the was resealed using Colour Grow which not being water based is ideal for external applications and ideal for bringing out the natural beauty in slate. The customer was so pleased with the work he is inviting back every 6 months to maintain it.

Caring of Slate Floor in Whepstead

Slate Flooring Care in Whepstead

A video below on cleaning and sealing job we we did on a 43m2 Slate Floor in a kitchen/utility room in Whepstead, Suffolk.


This beautiful slate floor had been sealed several years ago, the sealer had worn and it was in need of some slate flooring care. The floor was cleaned with Pro-clean, it was a reasonably large and it tool around 2 litres to get it clean. We then left it to dry overnight and came back the next morning to seal it using 6 x coats of Seal & Go consuming around 2 litres of the product.

Recently discovered Victorian Quarry Tiles restored

A customer called me out to take a look at restoring the Red and Black Victorian Quarry tiles floor they had discovered under linoleum In the kitchen of their house in the town of Rushden. I carried out a patch test to see which products would have the best results and although most of the old sealants had worn of over time there was still glue from the lino and patches of sealer that would have to be dealt with. A quote was given and accepted and the work was booked in to the customer’s convenience.

Black and Red Victorian Quarry Tiles Before Cleaning Rushden

Cleaning Victorian Quarry Tiles

After vacuuming and mopping the floor I decided my best course of action would be to spray Tile Doctor Remove and Go to 25% of the area, this was then scrubbed in by machine using a black stripping pad. This area was then rinsed off with an extraction machine and the process repeated over the rest of the floor. I then inspected the floor and noticed a few shiny patches where the sealant hadn't been fully removed so I then tackled these stubborn areas by hand with a second application of Remove & Go. A final rinse to the whole floor was given to make sure no trace of cleaning product remained before sealing. As much water as possible was removed using the extraction machine and a dehumidifier installed and left for seven days to assist the drying process.

Sealing Victorian Quarry Tiles

On my return I confirmed the floor had dried thoroughly by taking took damp meter readings in different parts of the floor. All was well and so I proceeded to seal the tiles using multiple coats of Tile Doctor Seal and Go which matched the customers’ requirements of gloss finish.

Black and Red Victorian Quarry Tiles After Cleaning Rushden

As the pictures show there was a vast improvement in the floor and the customer was very pleased with the results. They were also given information on maintenance of this type of floor to keep it looking its best for years to come.


Source: Professional Tile, Stone and Grout restoration service in Northamptonshire