Monday, July 31, 2017

3 Recipes for Homemade Linoleum Cleaners

There are a great many products available for cleaning a home, but sometimes it’s not easy to know how best to clean your linoleum. There are products you can buy in the shops, but do you really know how friendly they are to the environment? Not to mention, many industrially produced cleansers can be harmful to the skin.

Perhaps you’ve wondered whether some recipes for homemade cleaners might be effective as well. If so, we’ve got some for you to try.

1. Baking Soda, Vinegar, and Soap Recipe

Allow ¼ cup of baking soda to dissolve as you fill a container with two gallons of hot water, and when it’s almost full, add one tablespoon of dish soap. Adding the soap too early can lead to lathery water that will leave unwanted marks on floors. When these ingredients are thoroughly mixed, add ¼ cup of vinegar just before you’re ready to mop.

2. Baking Soda, Vinegar, and Oil Recipe

Mix ¼ cup of vinegar with three gallons of hot water and add ¼-cup of baking soda. Mix it well with a wooden spoon and add a few drops of essential oil to give your floor a fresh scent when the job is done.

3. Vinegar and Baby Oil Recipe

For this recipe, you’ll need to pour one cup of white vinegar into a container large enough for five gallons of hot water and add just a capful of baby oil. Heat the water you will need and fill the container after the other ingredients are added. Then, blend the contents with a wooden spoon to ensure that it’s mixed well before you use it.

For Best Results

To get the best results when using any of the above methods, there are some basic principles to follow. Always start in one corner of the room and use a broom or brush to sweep any dust or dirt from the floor. Sweep towards yourself and repeat until you’re confident that all debris has been collected in a neat pile. Do this for every section of the room until everything has been collected. Then, place a dustpan next to the pile. Use your brush to sweep the debris into the dustpan. To make sure you’ve collected it all, move the pan back a little every time you sweep up more.

Get a clean mop and soak its head in the hot solution you’ve prepared. Rinse the head and start at one corner of the floor, pushing the mop away from yourself and then bringing it back toward you. Dip the mop back into your solution every so often and rinse to ensure that you get good results. Do this for the entire floor and then give it some time to dry, or polish it with a suitable cloth.

Tuesday, July 25, 2017

Grout Cleaning and Sealing in a Warwickshire Hallway

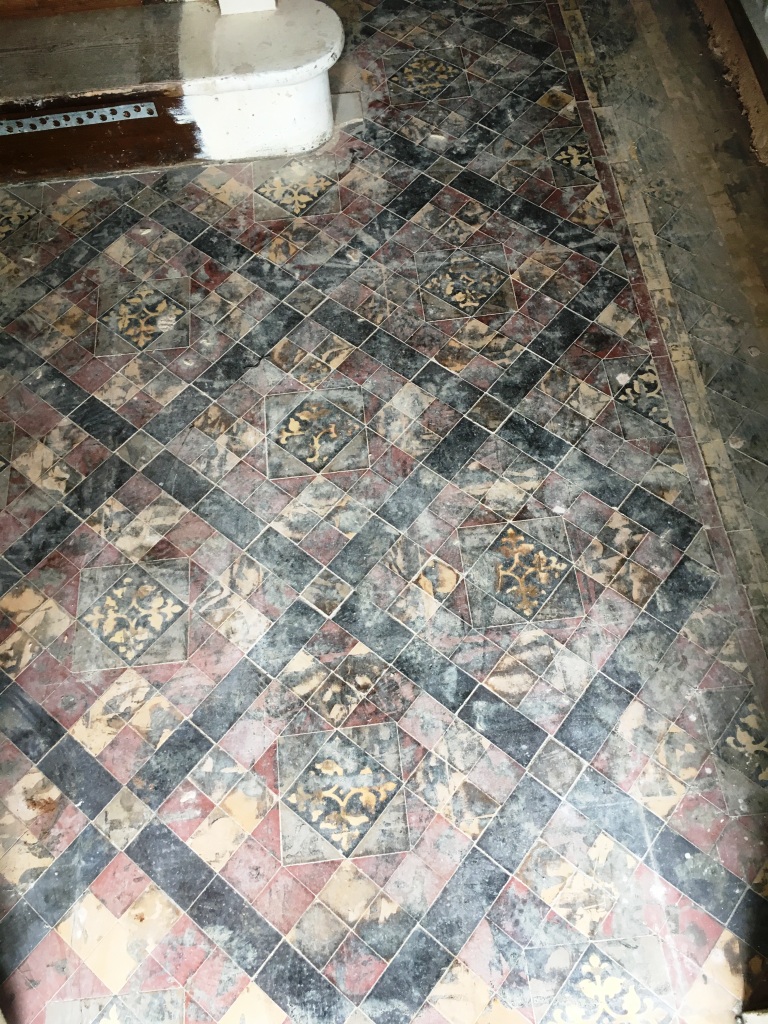
The owner of this house in Chaplefields near Coventry had bought this property as an investment and was keen to improve its appearance. As part of this work he had lifted the vinyl tiles in the hallway and discovered a lovely Edwardian tiled floor. Unfortunately, whoever had laid the Vinyl tiles had decided to use Tar as an adhesive and this had left a black mess all over the floor.

Edwardian Tiled Floor Covered In Tar Chaplefields Coventry Before Restoration

Realising the potential value an original feature such as this could add to the property he was keen to restore the tiles but not so keen to deal with the Tar, so we were asked to deal with the problem and restore the floor as close to its original condition as possible.

Repairing and Cleaning a Dirty Edwardian Tiled Floor

To get the tiles clean and remove the horrible tar I applied a strong dilution of Tile Doctor Remove and Go, which as its name suggest is great for removing coverings from tiles. I applied the Remove and Go with a mop, left it to soak in for a few minutes and then worked it in using a rotary machine fitted with a black scrubbing pad. The soil was extracted off the floor using a wet and dry vacuum and then the process repeated until I was happy all the tar was gone. I then gave the tiles an acid wash using Tile Doctor Acid Gel; this serves to break down alkaline mineral deposits such as cement and grout smears, it also counters any efflorescence problems which can be an issue with these old floors where no damp proof membrane has been installed. Finally, the floor was given a rinse with clean water and a steam clean to remove any trace of cleaning products and to neutralise the tiles in preparation for sealing.

Sealing a Edwardian Tiled Floor

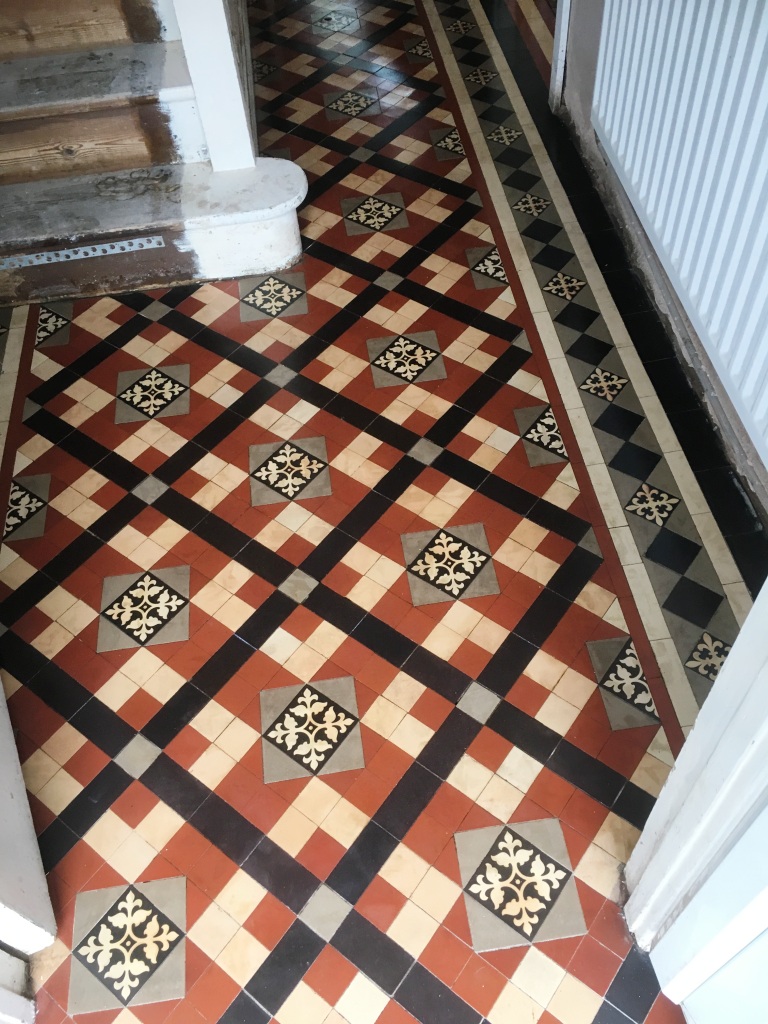
I left the floor to dry off overnight and returned to the property to seal the tiles the next day. To seal the tiles, I used three coats of Tile Doctor Seal and Go which is a water based sealer that leaves a subtle sheen finish and being water based doesn’t leave a smell as it dries. The sealer will provide durable protection going forward preventing dirt from becoming ingrained into the pores of the tile and ensuring it remains easy to clean and keeping its appearance for some time to come.

Edwardian Tiled Floor Covered In Tar Chaplefields Coventry After Restoration

The floor now looks fantastic and gives a great impression when you come into the property which is exactly what the owner wanted.


Source: Edwardian Tile Cleaning and Restoration Service in Warwickshire

Friday, July 21, 2017

How to Wax Vinyl Floors

Vinyl is often the choice for homeowners on a budget who still want a stylish floor. Besides being inexpensive to purchase, vinyl flooring offers several other perks that you won't find elsewhere; it is easy to install, it rarely stains, and it's easy to clean. However, even if your floor is spotless, a wax coat is usually welcome for a pristine shine. This needs to be applied correctly and maintained for your own safety, as slipping is often present when the coating becomes spotty in some areas. Do not worry because you can remedy this problem by learning what you need to do. This article will show you how to easily apply or reapply your vinyl floor wax.

What You'll Need:
  • Bucket
  • Water
  • Vinyl floor cleaner
  • Sponge mop
  • Heavy duty vinyl floor wax
  • Wax bucket
  • Wax tray
  • Microfiber wax applicator

Step 1 - Prepare the Area

You cannot possibly begin this task without starting on a bare surface. Depending where your vinyl floors are located, you will first need to remove everything sitting on them. This includes removing a dining room table and any chairs or end tables. Place everything outside of the space until you're finished.

Step 2 - Clean the Floors

Spreading new wax on a dirty floor is never a good idea since it will not adhere to oil or grime. So, it is important that you remove these obstacles. Fill a bucket about half full with warm water and add a cleaner specially formulated for vinyl floors. Make sure you have the right chemical so you do not accidentally remove any wax still on the floor with the wrong one.

Submerge your mop in the cleaning solution, and wring out the excess water. Push it over the vinyl using even pressure until you've gone over the entire floor. Wet the mop as needed while cleaning, and then let the surface air dry on its own afterward. Never dry the floor with rags.

Step 3 - Add Wax

After the vinyl floor has dried, you can begin applying wax. When you purchase the product you plan to use, make sure you read the label carefully. Some products require other chemicals to be added or certain precautions be taken prior to use.

Pour the wax into a bucket to begin the mixing process if that is required, and then place it into the wax tray for application. These trays are shallow and rectangular, and they make sure that your wax applicator gets maximum penetration. Start at the furthest section of the floor and mop the wax toward you. Brush it on in even, straight lines, overlapping every previous line by a couple inches as you progress. Do not apply too much wax; a little goes a long way.

Consult your product's label for a dry time, and keep all people, animals, and furniture out of the room until the proper amount has passed.


Sunday, July 16, 2017

Putting the shine back on a Slate floor in Gloucester

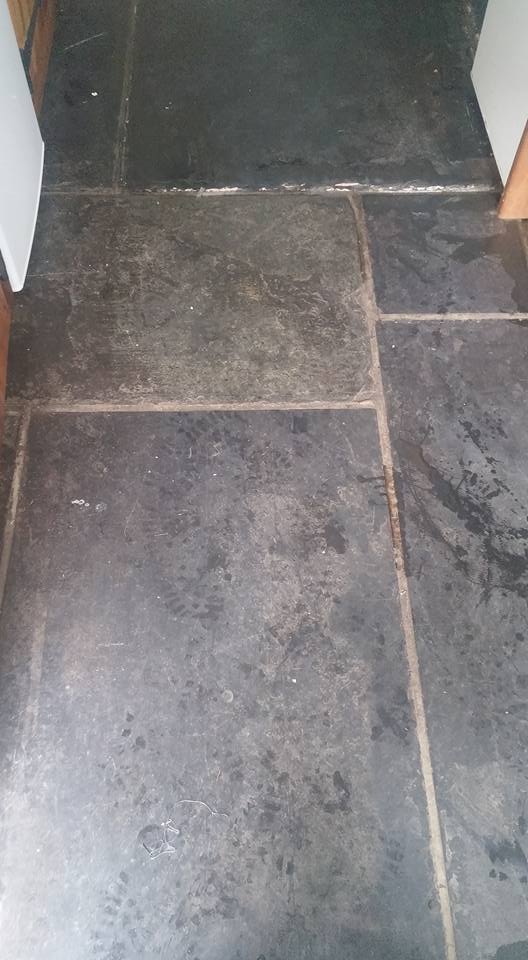
This Slate tiled floor in the hallway of a property in Gloucester had been laid 28 years ago, but during this time had received no proper maintenance. The property owner used to clean the tiles once a week using a steam cleaner to little effect.

Slate tiled hallway floor Before Cleaning Gloucester

In fact, we don’t normally recommend steam cleaning sealed surfaces as it will erode the sealer prematurely. After countless years of steam cleaning, I was confident that any traces of old sealer on this floor would be non-existent at this point. This is, of course, a problem because a lack of sealer exposes the stone to ingrained dirt and stains. The effects of this are shown in the photos below: as you can see, the Slate had completely lost its lustre and naturally colourful patina.

Slate tiled hallway floor Before Cleaning Gloucester

I was asked by the property owner to provide this Slate tiled hallway with the restoration that was so long overdue, so I travelled to the house in Gloucester, a city situated near the Welsh border and between the Cotswolds and the Forest of Dean.

Cleaning a Dirty Slate Tiled Hallway

I started the restoration by mixing a strong solution of Tile Doctor Remove and Go combined with Tile Doctor NanoTech HBU. These two products serve different purposes. Remove and Go is a stripper designed to break down any traces of old sealer that might still have existed, as well as any paints and adhesive markings; NanoTech HBU is a potent cleaner which contains nano-sized cleaning particles that penetrate deep into the stone to get underneath tough dirt and stains to dissolve and lift them out. This cleaning solution was spread over the floor and left to dwell for 30 minutes, before being scrubbed in using a black scrubbing pad fitted to a buffing machine. A thick black slurry resulted from this process and this needed to be removed using a wet vacuum.

Slate tiled hallway floor During Cleaning Gloucester

Next, I repeated this cleaning process using Tile Doctor Pro Clean, our reliable alkaline cleaner, to provide a more thorough clean for the tiles and grout. The slurry was once again removed using a wet vacuum, before I then rinsed the whole floor with fresh water to remove any traces of chemicals. When satisfied with outcome of the cleaning process, I left the floor to dry overnight.

Sealing a Slate Tiled Hallway

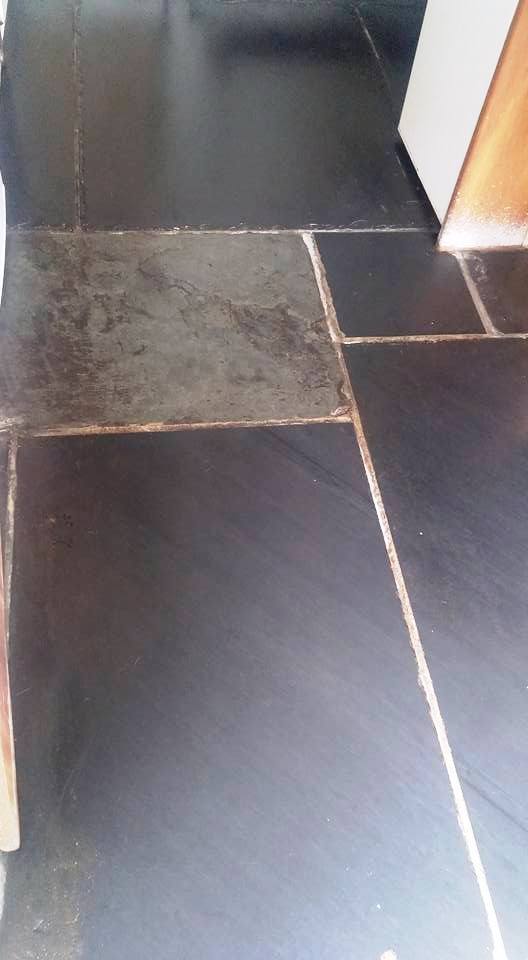
Upon arriving back at the property, the next day, I ran some quick moisture tests to check that the floor was dry. Thankfully, there were no damp issues and I was able to seal the tiles using four coats of Tile Doctor Seal and Go, leaving each coat to dry before applying the next. Seal and Go is a water based sealer (so no smell as it dries) which adds durable stain resistance and a low-sheen finish that brings out the best in the slate.

Slate tiled hallway floor After Cleaning Gloucester

The customer’s reaction to the outcome of the restoration was fantastic. She never expected the floor to turn out so beautifully and was very pleased.

Slate tiled hallway floor After Cleaning Gloucester


Source: Slate Tile Cleaning and Sealing Service in Gloucester

Friday, July 14, 2017

How to Keep Pebble Flooring in Your Shower Clean

Pebble flooring is an exceptional flooring structure and is a supple support for tiles. It has characteristics of a protected, resilient, eye-catching and flexible surface sheltered with smooth pebbles that massages exhausted feet and gives traction to avoid sliding. Using pebble flooring in your bathroom for interior home improvement and remodeling is extremely easy, however you need to constantly clean it as dirt and grime could easily get stuck in the crevices of the pebbles.

What You'll Need:
  • 1 gallon warm water
  • Container or pail
  • Antibacterial liquid detergent
  • Spray bottle
  • Nylon Brush
  • Rag

Step 1 – Put 1 gallon of Warm Water in a Container

The first step in cleaning your pebble tile is to use a container and fill it with 1 gallon of warm water then add antibacterial liquid detergent to it. Just add only a few drops. After, mix the solution well.

Step 2 – Put the Solution in a Spray Bottle

Using a spray bottle, fill it up with the solution and spray it all over your pebble flooring, inside your shower room. With the help of the solution, you dampen and kill the molds and mildew that have grown in your pebble flooring, for easy removal.

Step 3 – Use Nylon Bristle Brush

With the use of a nylon bristled brush, you can scrub your pebble flooring to remove the accrued dirt, body oils, soap scum, molds and mildew. After brushing it, thoroughly rinse the pebble tiles with warm water.

Step 4 – Dry the Pebble Flooring with a Rag

With the use of a rag, you can now dry your pebble flooring. Keeping your pebble flooring constantly dry will keep the mold and mildew from growing.


Tuesday, July 11, 2017

Restoring Old Flagstone Flooring in Lancashire

This customer in Great Harwood was so fedup with their Flagstone tiled flooring on the ground floor of their property. In fact they were ready to take up the floor, put a new concrete base in place and lay a wood floor down on top. However this is the original floor from when the house was built in 1894 so was not replaceable as such, and the customer really wanted to restore the floor back to its original condition, as well as other material's in the house, to recreate the Original Victorian feeling that had been missing for many years.

Flagstone Floor Before Restoration Great Harwood Flagstone Floor Before Restoration Great Harwood
We have completed quite a lot of this type of work for customers in the past and we publish all out work on our website and it was one job similar to this that convinced the customer that we had the answer to her problem.

Milling an Old Flagstone Floor

A few years ago Tile Doctor invented a system called Milling to deal with problematic stone floors like this one. The system uses very coarse Diamond pads fitted to heavy machinery to mill the stone until it is a smooth as possible. This action gets rid of years of traffic marks, ingrained dirt as well as old wax and sealers. There's nothing harder than Diamond so we find this system woks really well on an old damaged floor like this one. The process will leave the stone looking rough so once finished with the coarse pads we then apply a lighter Diamond grit pad to remove the scratch marks that the heavy diamond grits leave behind. The floor is rinsed between pads and a little water is also used to provide lubrication. After resolving the stone issues we re-grouted the whole floor and conduct one more final clean using Tile Doctor Neutral Clean before leaving it to dry out ready for sealing a few days later.

Sealing an Old Flagstone Floor

On our return the sealer we chose for these old flagstone was Tile Doctor Colour Grow, it penetrates into the pores of the stone protecting it from within and in the processes lift the natural colours in the Stone. Colour Grow is a breathable sealer which you need when sealing these old stone floors which won’t have a damp proof membrane installed. A wet look or polishing sealer will eventually spoil in damper wetter weather. Another advantage of Colour Grow is it leaves a Matt finish which is a more natural look for Sandstone Flagstones like these. They will also be easier to clean as the milling process made the stone much smoother to the touch, so it becomes a lot easier to maintain in the future.

Flagstone Floor Before Restoration Great Harwood Flagstone Floor Before Restoration Great Harwood

The results were fantastic, and the customer is really pleased that they will no longer have to replace the tiles. The appearance and condition of the Flagstone had been improved so much that most people would not believe it had been laid 123 years ago!


Source: Flagstone Tile Cleaning and Restoration Service in Lancashire

Wednesday, July 5, 2017

Restoring Old Reclaimed Slate Flagstones in Devon

These lovely old Slate flagstones were reclaimed form an old waterworks in Exeter about twenty years ago and had been laid in an old fisherman cottage in Dawlish during a sympathetic renovation, replacing an old floor that had been laid in the 1970s (which have a lot to answer for with old houses!). The flagstones really looked the part and were larger and thicker than usually available on the market new. Other than being dirty and a pain to clean because of the dogs living in the house, around the edges of some of the larger tiles there was some sort of fluorescent orange residue which was up to 10mm thick in places and as hard as the stone it was adhered to.

Dawlish is a lovely little fishing harbour village on the South-East Cornwall coast with lots of interesting history. For hundreds of years the practice of smuggling imported goods prospered in the area thanks to its convenient harbour. The village is home to only around 5,000 inhabitants.

As you can see from the photo below, the tiles – along with the grout lines - were very dirty and stained. No wonder the property owner was beginning to give up on salvaging them! However, I assured the customer that with the right cleaning products and techniques, I could make a significant improvement to the condition of the floor.

Slate Flagstones Before Cleaning in Dawlish

Burnishing and Cleaning Old Slate Flagstones

To tackle the orange residue staining I used a grout removal tool which allowed the natural texture of the stone to remain rather than smoothing off the whole edge. The dirt and staining in the slate flagstones however was so deeply ingrained I felt it best to strip back the affected layer of stone using a process known as burnishing. This involves the application of diamond encrusted burnishing pads to the floor, effectively grinding away the muck to reveal a cleaner surface beneath. When dealing with polished stone such as Limestone, Marble and Travertine, we will normally use a system of four burnishing pads – each with a different level of grit – to gradually restore the shine to the tiles.

However, in the case of these rustic, unpolished Slate Flagstones, I opted only to use only the Coarse and Medium grit burnishing pads to cut back the affected layer of stone, leaving a surface that could subsequently be scrubbed using Tile Doctor Remove and Go. This is a multi-purpose product that strips away any old sealer, adhesive marks and paint stains, while also cleaning the stone and grout.

This process ensured all traces of old sealer were removed and that the whole floor was left fresh and clean. The resulting soiled solution was extracted from the floor using a wet vacuum and the whole area rinsed with fresh water to remove any traces of cleaning product. To end the first day of work, the floor was left to dry overnight.

The village the cottage is situated in is very isolated to traffic; there is a car park at the top of the town and the only option is to walk the nearly half a mile each way to the cottage on the harbour so streamlining the kit used was a necessity! In the end two trips each way go the kit required there and back with the biggest machines being a wet vac and a rotary scrubber.

Sealing Old Slate Flagstones

Returning to the property the next day, I ran some damp tests to check if the floor was dry and ready to be sealed. This is particularly important in older properties like this, as it’s quite likely that there is no damp proof course present and moisture issues are far from uncommon.

Thankfully, the tiles proved dry and I could seal them using Tile Doctor Colour Grow. This impregnating, colour-enhancing sealer provides a robust seal, as well as a natural-look matte finish which really matches the character of these original Flagstones. It also really lifted the natural shades in the stone.

Slate Flagstones After Cleaning in Dawlish

The customer was ecstatic with the result. To make sure the floor can be kept looking great for many years to come, I recommended that the customer clean it regularly using a product called Tile Doctor Stone Soap. It’s specially formulated for the routine maintenance of natural stone floors; not only will it clean the floor very well, it will also continue to add to the natural patina of the stone.


Source: Slate Flagstone Floor Cleaning and Renovation Service in Devon

Tuesday, July 4, 2017

How to Repair Cracks in Laminate Slate Flooring

Laminate slate flooring is made of sturdy synthetic material that has an elegant appearance and is easy to maintain. However, scratches and cracks may appear on the surface of the flooring, and these can be fixed using repair putty or wax crayons.

What You'll Need:
  • Vacuum cleaner
  • Detergent or vinegar
  • Water
  • Mop
  • Wax crayon
  • 220 grit sandpaper
  • Laminate floor repair putty
  • Plastic scraper
  • Putty knife
  • Sponges
  • Pieces of cloth
  • Razor blade

Step 1—Clean the Floor

Remove the dirt and dust from the laminate slate flooring using a vacuum cleaner or a broom. Mop the flooring with a solution that contains 1 cup of dish detergent and 3 gallons of water. Alternatively, use half a cup of vinegar in 3 gallons of water. Rinse the floor and wait for it to dry.

Step 2 – Identify the Cracks

Check your laminate slate flooring and identify all cracks and chips. Even the superficial chips should be repaired to prevent additional damage. Mark the areas that need repair. Establish what color of putty you need to purchase. Certain scratches may not need putty and may be repaired with a special wax crayon. Make sure the crayon has a shade that is similar to the color of the flooring.
Step 3 – Sand the Area

Sand the inside of the cracks to make the area smoother and remove any dirt that has accumulated. This will make sure the putty will bond well with the flooring. Remove the dust with a moist sponge.
Step 4 – Prepare the Putty

Purchase the putty from a hardware store. Make sure that the color you choose is similar to your flooring. Use the available swatch books to find a color that is closest to your laminate slate flooring. Prepare the putty by mixing it with the hardener that is provided in the kit you buy. Use a plastic scraper or a putty knife when mixing, and make sure the putty is homogenously mixed with the hardener.

Step 5 – Apply the Putty

The putty hardens quickly, so you only have a few minutes to apply it. Fill the cracks in your laminate flooring using a putty knife. If your cracks are smaller, use a smaller putty knife, which will allow you to control the amount of putty you apply and avoid putting an excess of filler. Apply several thin layers of filler rather than a large amount of putty at once.
Step 6 – Remove Excess Putty

Remove the excess of putty by employing a damp piece of cloth, but do this before the putty hardens. If the putty is already dry, remove the excess with a putty knife or a razor blade. Use the razor blade with caution to avoid scratching the laminate surface.
Step 7 – Allow to Dry

The putty hardens within minutes, but allow two to three hours for the filler to dry completely before you step on the repaired floor.