Wednesday, August 23, 2023

How to Install Bamboo Click Flooring

 The beauty and efficiency ofbamboo click flooringmay depend on the installation process on some levels. At the onset of the development of bamboo floors, staples and glues were used to keep the floor in place. However, because of the evolution of technology, it is now very easy to install bamboo click flooring like a pro. Your flooring receives a professional touch without the professional price. All you have to consider is the space for the expansion in the bamboo planks.

As observed and attested by those who have already triedbamboo click flooring, installing them is quite easy and the following steps can help you further.

Step one

The area of the house where you would like to install yourbamboo click flooringshould be free from dust and debris. It should be meticulously cleaned with a broom or a vacuum cleaner. You should also remove nails, screws, pins, and other materials that might have stuck in the corners or side edges of the room. If there are noticeable gaps on the floor, it is necessary to fill these gaps with leveling compounds to even out the surface.

Step two

There should be a moisture barrier on the concrete sub-floors. This structure is needed to thwart the water from leaking and damaging the bamboo. It is advisable to have at least a six-millimeter layer of plastic. On the other hand, it is no longer necessary to use this layer of plastic if you have wooden sub-floors.

Step three

Check the moisture barrier. It should be evened out. After checking, spread a sheet of foam padding if you have a concrete sub-floor.

Step four

It is always good to start at the corner of your room. When you place thebamboo click flooring, make sure to use tile spacers so that they are placed close to the wall. After the measurement, place the first cut of bamboo flooring in the angle. A point that you should remember with bamboo flooring is that it expands more than the standard laminate so the gap between the bamboo tiles should be a little bit bigger.

Step five

Take the second piece of bamboo flooring and place its smaller end next to the head of the first piece. Glide the second piece carefully into the furrow on the next board. As you vigilantly place it, wait until you hear it click into place. Again, be reminded to make use of spacers to keep enough distance from the wall.

Step six

Cut your third tile using the table saw. This will help you create a staggered but beautiful natural look on yourbamboo click flooring. If you are done cutting, place the cut end of the tile in front of the wall. It should be lengthwise next to the first board. Then place the tongue into the furrow and gently lower it until it fits into place. Use a mallet or hammer to fasten the tile in place.

Step seven

Place the fourth tile beside the second board. Gently lower it in place as you slot the tongue into the furrow on the second board. Slip it along the groove until it runs a bit against the third board. The fourth tile should slip into the head of the third board. Then pat it in place using a mallet.

Step eight

Repeat the same process interchanging tiles from one row to the other until you arrive at the next wall. Cut the boards and shape them if needed. Do the tiling row by row until you reach the last part of the room. Always be mindful of the spaces between the tiles for expansion.


Source: www.DoItYourself.com

Thursday, August 17, 2023

How To Install Laminate Flooring On Stairs

Installing new laminate flooring on stairs is a good idea when covering stairs making them easier to maintain and keep clean than stairs covered in carpet. You should be warned though that laminating steps can make them more dangerous as they can be quite slippery (especially when wet) if you choose laminates of lower grade rating meant for lesser traffic areas.

There are a few ways to get around the slip and fall hazards by using a higher and more abrasive grade, another being the installation of an additional anti-slip device onto the threads. This being said, your laminate stair threads will hold up well and will not need to be replaced as frequently as carpet stairs.

What You'll Need:

  • Laminate
  • Construction adhesive
  • Measuring tape
  • Pencil
  • Square
  • Electric circular saw


Step 1 - Prepare the Stairs

If the stairs you want to refinish are carpeted, remove all of the carpet and the adhesive below. Clean the stairs completely to make sure your new laminate flooring will adhere well to the surface. Smooth out the surface of the stairs and pound down any nails that stick up.


Step 2 - Set the First Tile

Measure the top thread to determine its exact center and mark that point with a pencil. Put the first laminate tile over the mark, making sure that the center of the tile is exactly over the mark.


Step 3 - Work Your Way Outward

Installing laminate flooring on stairs will require much more stability than provided by a floating floor system, so don't use underlayment. On such installations, you should instead always glue the laminates down to the treads and risers with a good grade construction adhesive.

Moving your way from the center to the left and then the center to the right, cover the entire thread. Move to the riser face and continue the same process.

When you have completed the first thread and riser, move down to the next step and repeat the process. Continue all the way down the stairs until they are all covered.

Maintaining Your Stairs

Keep your new laminate stairs free from debris that can scuff or scratch the tiles when the stairs are in use. Stairs outside of a home should never be covered with laminate as this would leave them extremely slippery when getting wet from snow or from rain, and they should always be covered instead with a much more abrasive and safe alternative.

Laminate flooring has become one of the most popular choices in flooring because of its durability, ease of installation, and low price. It is a great way for homeowners to bring the look of hardwood into their home without the added expense and maintenance concerns.

Laminate floor tiles, such as the ones that are used on stairs, are resistant to many problems, but they still must be kept clean and free of loose debris. Keep the floors from becoming excessively wet to prevent water and moisture damage.

Sunday, August 13, 2023

How to Remove Excess Grout from Brick Slip Bathroom Flooring in Saxilby Lincoln

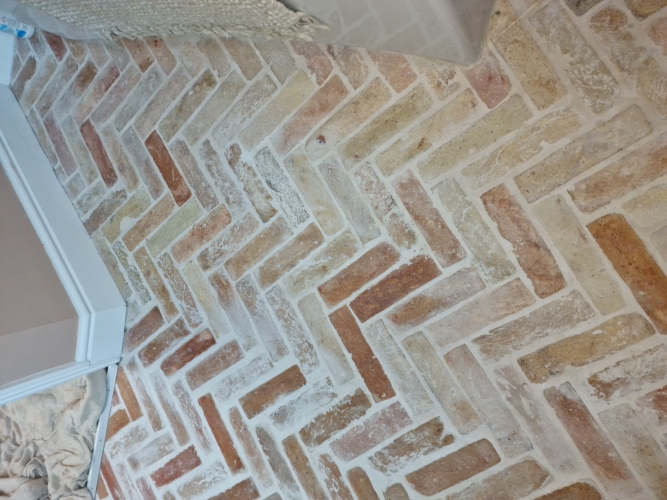
I was asked if I could improve the look of this new bathroom floor that had been laid with brick slips in a herringbone pattern at a property in Saxilby near Lincoln. The builder had done a solid job of laying the bricks but had been overzealous on the grouting and was unable to remove all of it resulting in a whitening of the red bricks due to grout haze. Unhappy with the appearance of their new bathroom floor and with little chance of resolution with the builder they contacted Tile Doctor to see what could be done to improve their appearance.
 
Brick Slip Tiled Bathroom Floor Before Cleaning Saxilby

Brick Slip tiles are basically a very thin brick which allows it to be laid like a tile, normally they are cut from an actual clay brick although there are other types. Thin like a tile and light weight they can be used to quickly create authentic looking brick walls and floors.

I visited the property to understand the problems and whilst I was there, I carried out a test clean to show the client what could be achieved. They were happy with what I showed them and booked me in to have the work done.
 
Brick Slip Tiled Bathroom Floor Before Cleaning Saxilby Brick Slip Tiled Bathroom Floor Before Cleaning Saxilby


Removing Grout Haze from Brick Slip Flooring

To remove the grout haze, I started off with an application of Grout Clean-up which contains phosphoric acid and is designed exactly for this purpose. It was a small space to work in so the product was scrubbed into the tile by hand until I got them as clean as possible. This was followed by a quick rinse and extraction with a wet vacuum.

I then inspected the floor and could see more work was required so this time I laid down Acid Gel which is a blend of Phosphoric and Hydrochloric acids and left it to dwell for ten minutes. After another scrub I was pleased to see I had managed to remove all the grout haze and the red brick was really starting to come through. I then gave the floor a thorough rinse with water and then removed the soiling and as much moisture as possible with the wet vacuum. I left the floor to dry off whilst I went to lunch leaving an air mover in place to assist with the drying.


Sealing Brick Slip Flooring

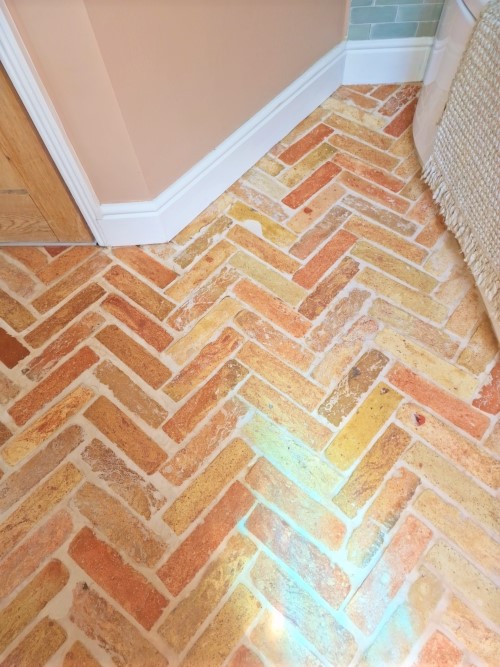
Once it had dried the floor was then sealed using Tile Doctor Colour Grow which is a colour enhancing product that as the name suggests improves colour in the tile, it’s also an impregnator which works by occupying the pores in the brick protecting it from within.
 
Brick Slip Tiled Bathroom Floor After Cleaning Saxilby Brick Slip Tiled Bathroom Floor After Cleaning Saxilby

The client was over the moon and said that is how they wanted it to look originally. For cleaning I made the client aware of the problem of using harsh cleaning products on sealed tiles and advised them to use Neutral Tile Cleaner which is a mild but effective cleaner that won’t erode the sealer with regular use.