Wednesday, December 27, 2017

Sprucing up a Victorian Tiled Hall in West Yorkshire

Most stone and tile benefit from the protection that a sealer provides to stop dirt becoming ingrained into its pores. However, the act of walking on the tile causes wear and this over time will lead to the sealer wearing off and dirt reaching the pores; the worse thing is you rarely notice it happening because it takes a long time to wear down a sealer. Most of my customers have this problem and call on me to clean and reseal the floors every few years when it becomes difficult to clean effectively. The alternative which I do for a number of my clients is to have the floor lightly cleaned and a new layer of sealer added every six to twelve months. This Victorian tiled entrance at a period house in Ilkley was not in too bad a shape just a little dirty and dull and the owner was keen to have is renovated in the run up to the Christmas holidays. Ilkley is a lovely town in West Yorkshire which became very fashionable in the Victorian era due to the health benefits of the local water, this led to a lot of Victorian architecture and tiled entrance floors like this one are very typical in the area.

Victorian Tiled Entrance Ilkley Before Cleaning Victorian Tiled Entrance Ilkley Before Cleaning


Cleaning a Victorian Tiled Entranceway

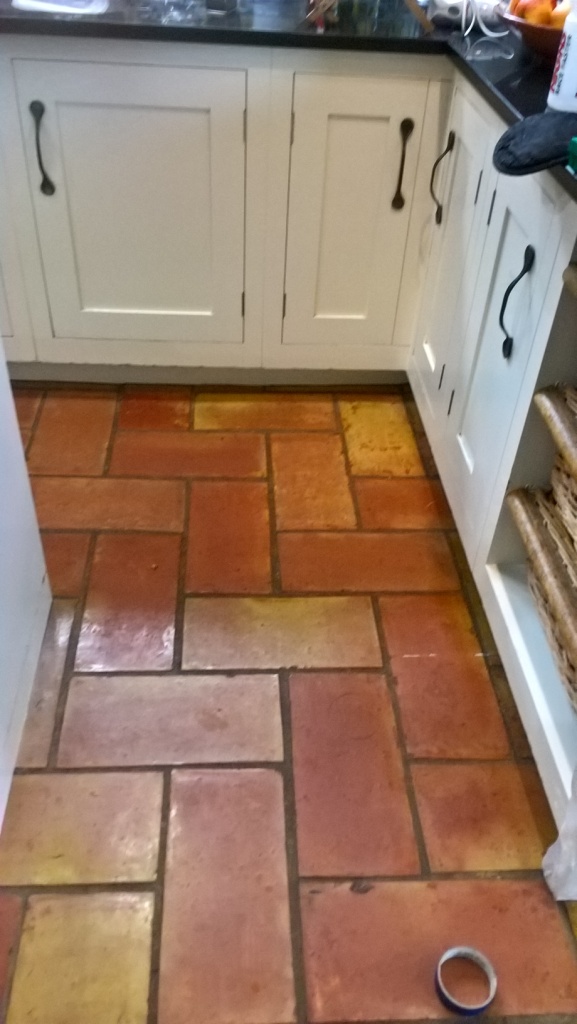
To get the dirt out of the tile and grout I applied a strong dilution of Tile Doctor Pro-Clean to the tiles and left it to soak in for fifteen minutes. Pro-Clean is a very reliable cleaner for all types of tile and grout including natural stone, Limestone, Slate and Travertine, amongst others; additionally, when used in a strong dilution it will strip off old sealers. The solution was then worked into the tile using a black scrubbing pad fitted to a rotary machine and the soil extracted using a wet vacuum. I gave the floor a light rinse with water to remove any trace of cleaning products and then inspected the floor to ensure it was up to standard. At this point I could see there were flecks of paint on the tile around the edges of the floor from previous decorating work and, so I removed carefully removed these with a scrapper and a hand-held diamond block. The floor was given a final rinse and the wet vacuum used to extract as much moisture from the floor as possible before leaving it to dry for the evening.


Sealing a Victorian Tiled Entrance with a Matt Finish

I returned the next day to seal the floor first discussing the finish that the customer wanted for the tiles. Typically, I recommend using a satin sealer for Victorian tiles as it adds a nice sheen to the tile however surprisingly the owner wanted a matt finish. Tile Doctor has a full range of sealers available to cater for all requirements so for this floor I applied three coats of Tile Doctor Colour Grow which leaves a matt finish whilst enriching the colours in the tile.

Victorian Tiled Entrance Ilkley After Cleaning

The tiles are now full of life and with the paint specs removed there is now a crisp black edge between the floor and the skirting which the customer also picked up on.

Victorian Tiled Entrance Ilkley Before Cleaning


Source: Victorian Tile Cleaning and Restoration Service in West Yorkshire

Friday, December 22, 2017

How to Prepare Uneven Subfloors for Laminate Flooring

Before installing a laminate floor, you must make sure the subfloor is completely level. Not only is trying to install laminate over an uneven subfloor difficult, but also it can be dangerous. To make a subfloor suitable for installing laminate, check out this basic guide, first.

What You'll Need:
  • Nails
  • Hammer or nail gun
  • Plywood
  • Self-leveling compound
  • Trowel
  • Laminate pad
  • Moisture barrier
Assessing the Subfloor

First, assess the severity of the uneven subfloor. If you have a concrete floor, you must use a self-leveling compound to level the floor out. If you have a wood floor, you can follow the same process. However, if the wooden floor is severely uneven, you should consider installing plywood over the top of the floor to create a smooth, level surface. Decide which leveling method suits your needs, and follow the directions for your chosen process below.

Applying Self-Leveling Compound

If you have a concrete subfloor, or a wood subfloor with only minor leveling issues, you can apply self-leveling compound to even it out.

Step 1 – Mix the Compound

Mix up the self-leveling compound in a bucket. Follow the directions provided on the bag to mix it properly.

Step 2 – Use a Trowel

Next, use a trowel to apply the self-leveling compound to the problematic areas. The compound will move into the valleys in the floor that need to be brought back up.

Step 3 – Allow to Dry

Give the compound adequate time to dry before proceeding to install laminate. If you need to, you can follow the above process again to apply a second coat of self-leveling compound to make the floor more level. Then, follow the directions below to install the pad.

Installing Plywood

If you are working with wood subfloor, and you find that there are some extremely uneven surfaces, you may want to apply new plywood over the top of the subfloor.

Step 1 – Lay the Plywood

First, take the plywood and lay it down on the floor. Plywood will be big enough to span the distance of any imperfections in the floor, making it level.

Step 2 – Use Nails

Then, hammer or use a nail gun to drive nails into the plywood. Make sure the nails are long enough to go through the plywood and into the subfloor.

Installing the Pad

Once you’ve leveled your floor, you can install the pad. If you’re on a concrete subfloor, you will need to lay down a moisture barrier before applying the pad. To help level out the floor even more, select the thickest pad you can. Then, place the pad and get ready to install your laminate flooring.


Monday, December 18, 2017

Restoring an Old Victorian Tiled Floor in the West Midlands

Sandwell forms part of an area in the West Midlands which is popularly referred to as the ‘Black Country’. This area industrialised rapidly during the Victorian period and, with the building of many new factories came the building of many new houses for workers.

A good number of these Victorian properties survive, complete with original Victorian tiled floors. However, homeowners aren’t always aware that these tiled floors exist, since they have often been covered up by carpet or linoleum. We find that when new homeowners discover these original tiles, they are usually keen to restore them to their best possible appearance. This requires professional assistance.

Victorian Tiled Floor Before Renovation Warley

A customer who lives in the Warley district of Sandwell recently contacted me about the restoration of a 120-year old Victorian tiled hallway that they had discovered underneath an existing carpet. As expected, the tiles were caked in deposits of adhesive, cement and paint which had accumulated over several years. Making matters worse, the customer had also spilt more paint on the tiles during decoration work.

Victorian Tiled Floor Before Renovation Warley


Cleaning an Original Victorian Tiled Hallway

I began the restoration by cleaning the tiles with Tile Doctor Pro-Clean, a strong alkaline cleaner which is perfect for removing grime from heavily soiled and neglected natural stone. The product was applied liberally across the area and left to dwell for a short period. It was then worked into the tiles using a specialised rotary cleaning machine fitted with a black scrubbing pad.

The now soiled cleaning solution was subsequently rinsed away and the floor then rinsed with clean water. Stubborn paint marks and cement were carefully scraped off the tiles by hand. A solution which combined more Pro-Clean and Tile Doctor Remove and Go (a stripping agent) was applied to the tiles to help remove any old and now ineffectual sealer, as well to fully remove any of the particularly stubborn marks.

After being worked in again with a scrubbing pad fitted to a rotary machine, the excess cleaning product was rinsed away using water and the floor was dried off with a wet vacuum.

As tiles of this age were usually laid without a damp membrane in place underneath them, they can be especially prone to efflorescence (salt) deposits. To help prevent this, Tile Doctor Acid Gel, which is a combination of phosphoric and hydrochloric acids, was applied. This will help to neutralise any alkaline salts that might threaten to penetrate up through the tiles to leave unsightly white marks. 

After the floor was rinsed once again, I proceeded to re-grout a few areas of the floor where the grout had worn away over the years. Once I was happy with the clean tiles and fresh grout, I left the floor to dry off overnight.


Sealing an Original Victorian Tiled Hallway

The next day the tiles had thankfully dried completely and were ready to be sealed. Since the customer had requested a sheen finish, as opposed to be a natural matte finish, I opted to use a combination of two different sealants.

The first to be applied – to bring out the colour in the tiles – was Tile Doctor Colour Grow. This product impregnates the tiles to protect them against ingrained dirt, but it leaves a matte finish. Therefore, I added five coats of Tile Doctor Seal and Go to provide not only extra protection, but also a high-quality sheen finish.

Victorian Tiled Floor After Renovation Warley Victorian Tiled Floor After Renovation Warley

I left the customer, who was delighted with the results, with a bottle of Tile Doctor Neutral Tile Cleaner. This product will serve as a reliable cleaning product for the routine maintenance of the tiles, ensuring they continue to look fantastic.


Source: Victorian Tiled Hallway Floor Restored in Birmingham

Wednesday, December 13, 2017

Deep Cleaning a Slate Tiled Floor after Building Work in Surrey

Converting a barn into a property can be an exciting project, but it certainly doesn’t come without a range of challenges. If done correctly, they can look amazing and are well worth the effort. A recent customer of mine had spent the last six months converting a barn into a residential property in the West Surrey town of Farnham. While the project had been a big success, the house had been subjected to high traffic from dozens of carpenters, electricians and builders. This had taken its toll on the newly installed Slate tiled floor – so the property owner asked me to restore it to its peak condition to complete the conversion once and for all.

Slate Tiled Floor Before Cleaning Farnham

Before accepting the job, I strongly advised the customer that I should be the last workman out of the door. In my experience few tradesmen are known to take care of other peoples work and any further work being done in the property could potentially spoil the appearance of the Slate tiles.

Slate Tiled Floor Before Cleaning Farnham


Cleaning a Slate Tiled Floor

The customer was happy for me to proceed, so on the agreed date I returned and started the work by laying down a strong dilution of Tile Doctor Pro-Clean across the floor. Pro-Clean is an alkaline-based cleaner which breaks down all manner of dirt and grime. This was a large area of tiles, so I worked on individual sections of 3m2, first soaking the Slate in Pro-Clean and then waiting ten minutes for it to soak in and then following with a nylon black scrubbing pad fitted to a 17-inch rotary buffing machine to work the cleaning product into the stone. The tiles immediately came up looking much cleaner. Any excess water and chemical slurry was vacuumed up promptly with a wet vacuum. The tiler had done a good job of laying the floor and removing any excess grout as normally my next step at this point would be to give the floor an acid wash, but it wasn’t necessary. Once the tiles had been cleaned to the best of my abilities and given a thorough rinse, I left the property for 48 hours to allow any water that had seeped into the tiles to evaporate. This is important as excess moisture problems can prevent the tiles from being sealed correctly.


Sealing a Slate Tiled Floor

On returning to the property a couple of days later, I swept away any bits of dust and debris and then proceeded to seal the tiles with Tile Doctor Colour Grow.

Slate Tiled Floor After Cleaning Farnham

This impregnating, colour-intensifying sealer enhanced the stunning natural brown, gold and orange shades in the stone. Two coats of the sealer were applied to achieve a brilliant natural-look finish and robust protection against future wear and tear. Restoring the appearance of these Slate tiles put the finishing touches on this fantastic barn conversion. Needless to say, the customer was very pleased with the results.

Slate Tiled Floor After Cleaning Farnham


Source: Slate Floor Cleaning and Sealing in West Surrey

Thursday, December 7, 2017

What Are the Drawbacks of Using a Self-Leveling Compound?

A self-leveling compound is ideal in smoothing out un-leveled wood floors and concrete floors. Concrete floors may have bumps, especially if poured incorrectly; wood floors often have problems with dips and bumps. It is important that the floor is leveled and smoothed when planning to do a ceramic floor tiling. When a floor that is to be placed with ceramic tile is uneven, there is a greater chance that the floor tiles will crack and not last over time; a self-leveling compound will prevent this, although it's not always a perfect solution.

Disadvantages
A self-leveling compound can dry extremely fast. You may only have about 20 minutes to mix, pour and even out the self-leveling compound. Therefore it's important for a person to have all the tools and materials needed in mixing, pouring and spreading the self-leveling compound.

self-leveling compounds do not provide stability on the subfloor or the surface where the tiles are to be placed. If the wood subfloor loosens, the self-leveling compound may break up, causing the loosening and eventual damage of the ceramic floor tiles. It is therefore important that the stability of the subfloor should be ensured first, before applying any self-leveling compound on it.

Another disadvantage of using a self-leveling compound is that it does not stick well to a subfloor with dust and grime. The subfloor needs to be cleaned from dust and grime before a self-leveling compound is applied; it needs to be spotless.

Preparation Concerns

self-leveling compound needs to be carefully mixed to the right consistency before it's poured in the subfloor. The self-leveling compound does not even itself out, so using a squeegee or trowel is essential in smoothing it out. Again, since there's only about 10 to 20 minutes before the self-leveling compound dries out, you have to move quickly to spread and even out the mixture.

Problems
A self-leveling compound can also break up easily when it's mixed with extra water. Never try to put additional water in the self-leveling compound mixture to try to loosen it up. Instead, focus on quickly working and spreading the material to the subfloor surface.

A self-leveling compound will be set after half an hour or so. In two to four hours, the surface that was applied with self-leveling compound can be walked on. Ceramic floor tiles, however, can be used 24 hours after the self-leveling compound was put on the subfloor.

self-leveling compounds can also remain glued on tools like the trowel and the bucket. It's important to immediately wash the tools used in applying and smoothing out the self-leveling compound, otherwise these tools will permanently have the compound affixed to them.

Health Hazards
Before using a self-leveling compound, read the directions first. Always ensure that safety procedures are followed while working with the it. Breathing in dust that comes from the application of the self-leveling compound can pose health risks.

You should know the drawbacks of using a self-leveling compound. Knowing these will ensure that you are better prepared when handling and using it.


Monday, December 4, 2017

Renovating a Dull and Dirty Victorian Tiled Floor in Yorkshire

As promised below are the photographs from the second floor I cleaned recently at a house in historic city of York. If you recall the first floor was Mexican Terracotta which proved pretty tough to clean as the rotary floor scrubber I use struggled to cope with the bull nose edges. You can find the article I created for that floor via the link below: Mexican Terracotta Tiles Deep Cleaned in York. The second floor was a Victorian tiled hallway which like its neighbour was dull, lifeless and now overdue a deep clean to remove ingrained dirt, part worn sealer and then reseal.

Victorian Tiled Hallway Floor Before Cleaning York


Cleaning Victorian Tiles Tiles

As with the Terracotta tiles I cleaned the floor using a strong 1:3 dilution of Tile Doctor Pro-Clean with water. This is a strong dilution ratio which will not only clean the tile but also strip off what was left of the original sealer. You need to do this as the sealer will wear off first in the most commonly used part of the floor first which in this case is down the middle of the hallway. I left the solution it to soak into the tile for about ten minutes before scrubbing it in with a black scrubbing pad fitted to a rotary floor machine. I the scrubbed along the grout lines with more pro-clean and a stiff narrow brush by hand to ensure the grout was also clean. The floor was rinsed with water and the soiled cleaning solution was extracted using a wet vacuum. I could then see those area’s that needed more work and re-treated them with more Pro-Clean until I was satisfied all the previous sealer was gone and the tile and grout was as clean as it could be. The tiles were given a final rinse with water and the wet vacuum used again to extract as much moisture off the floor as possible. The next step would be to seal, however the Terracotta floor tiles needed a longer drying time so I left both floors to dry out for two days before returning.


Sealing Victorian Tiles Tiles

Upon my return to the property I ran some quick damp tests, which revealed the tiles were ready to be sealed. I then applied four coats of Tile Doctor Seal and Go which provided a beautiful satin finish that really improved the look of Victorian Tile.

Victorian Tiled Hallway Floor After Cleaning York

The hallway tiles now looked clean and much brigher, needless to say my customer was very happy with the transformation.


Source: Victorian Floor Cleaning and Renovation Service in Yorkshire

Sunday, December 3, 2017

Install Commercial Floor Tile

Q. Does anyone have any instructions or opinions commercial tile? I'm planning on 1/4 plywood over a very old linoleum floor that has only two "bad" spots - one from old coal stove "foot" other 4"'x4" area that looks like it cracked.

A. Directions for tile installation are usually found on the back of the box. Vinyl composition tile (VCT) requires a very smooth surface for installation because tile will show every imperfection. Check to see if you will need to undercut your door jambs so tile can slide beneath. You will want to undercut to accommodate the thickness of tile plus new underlayment if installing over wood subfloor. You will need to remove shoe mold from baseboards. If you plan on reusing it, number the pieces so you will know where they go back. Remove transition strips in doorways.

If installing over a wood subfloor, you should install 1/4" plywood underlayment for vinyl floors. Staple it rough side down. Nail or staple every 5-6 inches in the middle of the boards and every three inches on edges. Remember if you choose not to install new underlayment, tiles will show every flaw. If installing over concrete, it will need to be very smooth, clean, and dry. A leveling compound may be necessary if it is not flat and smooth.

Stagger seams of underlayment and leave a 1/4" expansion gap between boards. Set all nails or staples below surface of wood. Sand all seams between boards to make them smooth. Vacuum all dust from boards.

Mark the center of the room. Mark the center along walls. Snap a chalk line across the width and length of the room. Where the chalk line crosses in the middle of the room, check with framing square to make sure the marks are square. Then, test fit tiles. It's best if you don't end up with less than half a tile along walls. You can adjust your reference point if necessary.

Nail a scrap piece of wood to make sure your first row of tiles will be straight. Use 1/16" notched trowel to apply adhesive. (Read and follow manufacturer's instructions.) Don't spread more adhesive than you can cover with tiles in 15 minutes. Wear gloves to keep adhesive off hands. Make sure the area is well ventilated. The first tile is placed in the center of the floor in line with the marks on the floor. Lay tile down the length of the room. Align tile carefully and wipe away adhesive if it oozes out. Check for arrows on back of tile and make sure they all point in the same direction.

Once all the tiles are laid, go back and install edge tiles. These will probably need to be cut. Lay a tile on top the last full tile near the wall. Line up edges and pattern lines very carefully. Place a tile against the wall and let it overlap the loose tile you placed on top of the installed tile. Use a pencil to mark along edge of overlapping tile. This is where you will cut with a utility knife. It may take several times to cut through tile. Place cut tile in position in adhesive. Continue along edge of room making your cuts and installing edge tiles. Then, the floor is best rolled with a 100 lb roller to make sure tiles are well adhered to floor. Reinstall shoe mold or install new. Reinstall transition pieces in doorways.

Note: Tile and adhesive should acclimate for at least 24 hours in room where it is going to be installed before installation.


Friday, December 1, 2017

New Life for Old and Yellowed Linoleum

Linoleum, or 'sheet flooring', is made by pressing various fillers, such as ground-up cork and wood dust, along with pigments, into a binding material, usually linseed oil and resins. This composition is applied to a canvas or felt backing. Unknown to most homeowners, linoleum is easily affected or damaged by hot water and strong alkaline cleaners, especially ammoniated ones in addition to the obvious factors like solvents and oils. According to experts, linoleum must be protected with a water-based sealer/finish.

Please follow these easy steps to upkeep a linoleum floor:
  1. Strip floor with a mild solution of a non-ammoniated stripper diluted in lukewarm water according to directions. Test any chosen stripper in a corner of the room to make certain that it doesn't affect the floor in any way before using.
  2. Rinse and neutralize with a new, clean mop and a white vinegar rinse (1 cup vinegar into 1 gallon of cool water)
  3. Rinse again with a clean mop and just plain cool water.
  4. Allow floor to dry.
  5. Using fresh, clean rayon mop, apply MEDIUM coat of sealer/floor finish. Do not allow puddling or dripping of floor product onto floor.
  6. Allow floor to thoroughly dry.
  7. (Optional) Only if necessary, apply a second, THIN coat of sealer/finish. Allow floor to thoroughly dry.
  8. Sweep the floor daily.
  9. Damp mop weekly with a "neutral" floor cleaner diluted according to direction.
CAUTION: "HOT" water and/or any harsh ammoniated ( like "Mr.Clean ) or solvent-based ( like "Lestoil" ) will turn the linoleum "yellow" (or create "yellow spots") and degrade the bonding oils. If yours has yellowed it must be either lightened or removed through a bleaching action. You must "bleach" the floor, perhaps, back over several times. Dilute 1 part chlorine bleach with 3 parts cool water. Apply liberally and evenly onto floor and allow to stay for 30-45 minutes. If stain appears to be lightening, repeat process. If not, wet floor with bleach solution again and sprinkle scouring powder containing "chlorine bleach" onto it. Then scour floor. Immediately, rinse floor thoroughly with cool water. Neutralize floor with a vinegar rinse (1 cup of vinegar to 1 gallon of water). Then damp mop rinse with water one last time. You may have to repeat this process several times before a visible change is noticed. If nothing happens, you may have to get use to looking at yellowed linoleum.

Before attempting this suggestion on entire floor test an inconspicuous yellowed area with same procedure. If successful without harming floor, then proceed onto rest of flooring.


Friday, November 24, 2017

Getting the Dirt out of Paving in East Sussex

So, I had an enquiry from a very nice lady in Eastbourne who wanted to know if I could use some old tiles she had dug up from her garden. It seems her house was the last one to be built in the street many years ago and the builders threw all the tiles into her garden. Since then some were recovered to make a mosaic front pathway but there were four buckets of tiles she couldn't use.

I’m based in Eastbourne, so it was no trouble to go around and take a look. I popped round and in my profession you never know when they might come in handy so I bought them off her for £20 which was a bargain really. Well I was very grateful to her and after seeing her front pathway and garden I offered to clean the paving and tiles up for free.

Buff Patio Paving Before Cleaning in Eastbourne Mosaic Pathway Before Cleaning in Eastbourne

There were two sections of paving that needed cleaning including the mosaic tiles and with my van being parked right in front of the house I was able to reach them with my van mounted high-pressure cleaning system.

Mosaic Pathway Before Cleaning in Eastbourne

Cleaning Dirty Paving

The first job was to use low pressure jet wash to the paving to remove surface dirt and then apply a medium dilution of Tile Doctor Pro-Clean and let it soak into the tile for about ten minutes. The solution was then scrubbed into the tile using a stiff brush to release the ingrained dirt.

The last step was to finish the process using our high-powered state of the art truck mount extraction system. These machines are a big investment but well worth the cost in the amount of time they save. They work by applying hot water under pressure to the surface via a special spinner tool whilst simultaneously extracting the soiled water back to a collection tank on the van. You can set the pressure of the machine and in the case of paving I use a lower pressure to ensure the mortar between the paving isn’t dislodged.

Buff Patio Paving After Cleaning in Eastbourne Mosaic Pathway After Cleaning in Eastbourne

The paving came out remarkably well as you can see from the photographs.

Mosaic Pathway After Cleaning in Eastbourne

Thank you Joy for your enthusiasm in the finished product, for the opportunity to reveal your lovely pathway, for the buckets of tiles you recovered and for the copious amounts of tea you served to me.


Source: Pavement and Patio Tile Cleaning and Renovation Service in East Sussex

Thursday, November 23, 2017

Installing Self Adhesive Vinyl Tiles Over Concrete

Installing self adhesive vinyl tiles over concrete is not always easy, especially if you remove carpets from the concrete base. If you want to install the tiles properly, you should prepare the floor, making sure that the surface is clean, without any remains of sealers, adhesive, or anything else. Self adhesive tiles can reduce the installation time, offering you a fully professional look.

Vinyl tiles can be a very convenient and attractive option for most people, especially for those who want to do the task on their own. They are also a rather affordable solution, and a cost effective solution in flooring. However, you need to be very careful before installing the vinyl tiles over concrete because there might be moisture problems. Here is a short list of steps and tips on how to install self adhesive vinyl tiles over concrete.

What You'll Need:
  • Floor scraper
  • Bags
  • Sponges
  • Alcohol
  • Measuring tape
  • Chalk
  • Self adhesive vinyl tiles
Step 1 – Preparation

Preparation is the most important part of any installation process. Use the scraper to remove any glued materials or adhesive remaining on the floor. Once you are done you should sweep the remains and throw them away. If the scraper doesn’t do the job properly, you can use the alcohol to remove the any stains. Make sure that the concrete base is clean and does not have any cracks or remains from older flooring.

Step 2 – Test the Area

One of the first things you need to do after you clean the concrete floor is to test it; if you don’t do so, you might find out a few months later that the adhesive gets loose because the floor is very moist and unsafe. Taking precautions is absolutely necessary; the most reliable test you can run is the calcium chloride test which is easy to find at any local store. You must follow the instructions on the test. You should have the results within 18-24 hours. This test checks the amount of moisture and water that comes up from the concrete base. If the levels are too high, you will need to de-moisturize the floor before installing the tiles. If the number shown from the test is not high, you can start with your project and lay the tiles directly on the concrete floor. 

Step 3 – Measuring the Room

Measure the room and mark the center of each wall in the room using the chalk. Draw a line towards the center of the room. You do the same thing with all four walls until you draw 2 bisecting lines that divide the room in quarters.

Step 4 – Install the Tiles

Make sure that the concrete surface is clean and will adhere to the tile. Take the vinyl tiles and place them in the center of the room where the lines bisect. You can install them removing the back paper to expose the sticky part of the tiles. You can keep installing the tiles working from the center towards the walls. Make sure that you press them flat and firmly on the floor to ensure proper placement so that you finish the task in a totally professional way.


Saturday, November 18, 2017

Rebuidling and Cleaning a Victorian Tiled Hallway in the English Lake District

A customer who lives in Kendal recently called us out to examine their Victorian tiled hallway which when walked upon, sounded like it was a making a crunching noise. This may seem like an odd phenomenon, but it can be reasonably easily explained. These tiles, being made of Victorian-style encaustic cement, are very hard-wearing. However, the cement screed upon which they were laid had lost its bond with the tiles and the tiles were now loose.

Most other types of tile would crack under the pressure of being walked upon, but since Victorian tiles are quite small and hard-wearing, they don’t seem to suffer this problem. Instead, they just make this crunching noise when walked upon.

So, what would we need to do to resolve the situation? In theory, it should be the simple matter of taking up the loose tiles and relaying them. Yet this takes a lot of preparation, including removing the old cement from the back and sides of the individual tiles and then smoothening the floor so that the tiles can be re-laid flat. This is easier said than done with a floor of this age.

Victorian Tiled Hallway Being Relaid in Kendal


Repairing and Cleaning Loose Victorian Tiles

We began the restoration by lifting the loose tiles, cleaning the old cement off and then re-laying them using a suitable tile adhesive. Once the adhesive had set, we grouted the tiles with a grout that matched the original.

Victorian Tiled Hallway After Being Relaid and Grouted in Kendal

The floor was left to set overnight, and we returned to the property the next day. The floor was checked and then we carried out a full deep clean of tiles using Tile Doctor Pro Clean, our go-to cleaning product for tile, stone and grout. The product, which is alkaline-based, was worked into the tiles using a black buffing pad fitted to a rotary machine.

In some of the harder to reach areas and corners of the room – those which the buffing rotary machine struggles to reach – we used diamond-encrusted handheld blocks to grind away the stubborn dirt and stains.

The soiled cleaning solution was rinsed off the tiles with water and extracted using a wet vacuum to get the as much moisture off the tiles as possible.

Sealing Victorian Tiles

After the cleaning process was complete, we left the floor for another few days to dry off completely. A suitable drying period is especially important for Victorian tiles, since most of these old properties do not have a damp proof membrane installed.

We then returned to seal the tiles with several coats of a breathable, impregnating sealer called Tile Doctor Colour Grow that not only protects it also enhances the natural colours in the tile. Now, much to the customer’s pleasure the tiles are fully functional again with there’s no crunching noise when you walk on them. They also look amazing as well.

You will see in the photos below the level of work that goes into a job like this but, as this is an original Victorian floor, a restoration will add great value to the house upon re-sale.

Victorian Tiled Hallway After Full Restoration in Kendal


Source: Victorian Tile Cleaning and Restoration Service in South-Cumbria

Thursday, November 16, 2017

How to Patch a Vinyl Tile Floor

If your vinyl tile floor is damaged, it is a good idea to repair it as quickly as possible. If your floor is in poor condition, a small liquid spill can end up causing big problems by seeping into a crack. Fortunately, getting your vinyl floor back into good working order does not necessarily involve paying for expensive repairs. If you know where to begin, you can repair your own vinyl floor without any trouble, saving yourself money both in the short term and in the long term. What follows should give you enough information to fix any damage to your vinyl floor on your own.

What You'll Need:
  • New Matching Vinyl Tile
  • Aluminum Foil
  • Iron
  • Stiff Putty Knife
  • Adhesive
  • Rolling Pin
  • 1/8 Inch Trowel
Step 1 - Match a Tile

If you can buy a tile identical to the one that is damaged, this step should be very easy. However, you may not be this lucky. In this situation, simply try your best to come close. However, if the results are not satisfactory, you can use the steps listed below to remove a tile in a less visible location, and use that tile to replace your damaged one. If you do this, use the unsatisfactory match you found to replace the tile you removed from your floor, so that it is not very visible.

Step 2 - Preparing the Damaged Section

Before you install your new vinyl tile, you must remove the damaged section. Doing this is straightforward, but you must do it carefully and correctly to avoid causing further damage.

To begin, heat up your iron as if you were going to use it normally. While it is heating up, place aluminum foil flat on top of the damaged tile, being sure to cover it completely with extra room to spare.

Finally, use your heated iron on the aluminum foil to heat up the tile and adhesive.

Step 3 - Removing the Damaged Section
Use your stiff putty knife to lever the damaged tile away from the floor. It should be loose enough to remove now that you have heated it. Once it is completely separated from the floor, discard it and begin scraping away at the substrate that is left behind. Continue once you have all of it removed.

Step 4 - Replacing the Tile


Using the adhesive according to the manufacturer's instructions, spread it in the empty space on your floor. Use a 1/8 inch trowel to do this. Next, place your new tile in the correct position. Finally, use your rolling pin to flatten the tile once it is placed. This will also ensure that the adhesive is spread evenly.

Step 5 - Finishing Up

Be sure that you do not leave any of the adhesive behind to dry on your floor. If there is adhesive left behind in a visible place when you are finished installing the tile, the manufacturer's instructions should tell you how to get it off. Usually wet adhesives can be removed with ordinary water and a sponge, but many will require a specific solvent, which the manufacturers instructions should list.


Tuesday, November 7, 2017

Stripping and Resealing a Terracotta Tiled Kitchen Floor in Bristol

Terracotta tiles are always a popular choice for Kitchens but being made from clay they are porous and need to be sealed to prevent dirt from becoming ingrained in the tile. Once sealed though you need to remember Kitchens are high traffic areas, so you can expect the sealer to wear off quicker than it would elsewhere.

I mention this as a customer from Bristol asked me to do a survey on her Varnish Sealed Terracotta Kitchen Tiles where the seal had worn down and were now dull, and the grout had darkened. I surveyed the floor and completed a test clean on a section of the floor which came out well impressing the customer who was happy for me to proceed with cleaning and sealing the floor.

Terracotta Kitchen Floor Tiles in Bristol Before Cleaning Terracotta Kitchen Floor Tiles in Bristol Before Cleaning

Traditionally Terracotta tiled floors have been sealed with a number of products over the years including Wax, Linseed Oil and on this occasion Varnish however all these products have their disadvantages and don’t compare to modern sealers which are designed for the job.

Terracotta Kitchen Floor Tiles Bristol Before Cleaning

Cleaning a Dirty Terracotta Tiled Kitchen Floor

The first day was spent trying to get the Varnish off the floor which somebody had used on the floor as a sealer; Varnish is easily scratched by furniture, so I certainly wouldn’t recommend it. I worked out however that it could be scrubbed off once coated in a combination or Tile Doctor products Pro-Clean, Remove and Go and Nano-Tech HBU which would be left to soak in for a while and then softened with steam.

Mechanical assistance from a buffing machine fitted with a large black scrubbing pad helped reduce the amount of elbow grease that was required and once I was happy the tiles were clean the now soiled solution was rinsed off with water and extracted using a wet vacuum.

The next day and with the floor now clear I was able to see those areas that needed further re-treatment and also turn my attention to the grout which was cleaned using more cleaning solution worked in with a stiff narrow grout brush that gets into the grout lines. Once I was completely happy with the floor its was given a final rinse with water to remove any trace of cleaning products and then dried with a wet vacuum to remove as much moisture as possible.

Terracotta Kitchen Floor Tiles in Bristol After Cleaning

Sealing a Dirty Terracotta Tiled Kitchen Floor

It’s important that the tiles are dry before sealing so I left the floor to dry out for three days before returning to seal them. No Varnish this time of course, Tile Doctor has a range of sealers for every type of situation and what I find works best on Terracotta tiles is a single coat of Tile Doctor Colour Grow topped off with multiple coats of Tile Doctor Seal and Go.

Terracotta Kitchen Floor Tiles in Bristol During Cleaning

Tile Doctor Colour Grow is an impregnating sealer that penetrates into the pores of the clay protecting it from within whilst enhancing colour whilst Seal and Go completes the sealing process and adds a nice sheen to the look of the tile.

Terracotta Kitchen Floor Tiles in Bristol After Cleaning and Sealing Terracotta Kitchen Floor Tiles in Bristol After Cleaning and Sealing

As you can see from the final photographs the floor looked really good and the customer gave me top marks for feedback.

Terracotta Kitchen Floor Tiles in Bristol After Cleaning and Sealing


Source: Terracotta Tile Cleaning and Restoration Service in Bristol

Thursday, November 2, 2017

How to Strip Wax off Linoleum Floors

Linoleum is the material of choice for flooring when you are on a tight budget but still wish to have flooring that is stylish and up to date. Linoleum floors are very easy to install, clean and will last a long time when properly taken care of. Dirt and grime always can find a way to penetrate the protective wax coating on top of the linoleum flooring. When this happens you will need to strip the linoleum floor's wax. This is a process that can be messy and can take a lot of time but it is a necessity if you want a clean floor. Many people confuse linoleum for vinyl floors but they are actually different as linoleum has completely different properties than vinyl even though vinyl is often referred to as linoleum. You can strip a vinyl floor with pretty much any type of floor stripper but linoleum requires specific chemicals to strip it. The article that follows will show you how to strip linoleum floors properly.

What You'll Need:
  • Floor stripper
  • Old mop
  • Buckets
  • Scrub brush
  • Wet and dry vacuum
  • Push broom
  • Dust pan

Step 1 – Sweep the Floor

Linoleum is a very forgiving material, like vinyl, and in order to be able to strip the linoleum floor you will need to clean it first. There is no need to really mop the linoleum floor but you should clean off as much of the dust and debris that is sitting on the surface of the floor. A vacuum does not do the proper job needed to get up all of the dirt. A push broom will be able to get the job done correctly.

Step 2 – Apply the Linoleum Floor Stripper

Linoleum stripper tends to be concentrated and it needs to be mixed in order for it to do its job correctly. Read the back of the bottle and mix the stripper according to the directions found there. Before applying it to the entire floor test it out on a small obscure section. You want to make sure it will not damage the linoleum. Use an old mop to apply the mixed linoleum stripper to the floor in a 3-foot section. You want to keep it to a minimal area because the stripper could dry too fast and you may have to reapply the stripper for a second time.

Step 3 – Remove the Finish

Steps 2 and 3 will have to be repeated for each section of the linoleum floor. Always follow the instructions on the back of the bottle when it comes time to remove the polish and wax. Wait for the floor to turn a milky white. This will indicate that the polish is ready to be removed as it has been softened. Use the scrub brush and scrub the section down to remove the polish. Using a stiff brush or automatic scrubbing pad can easily damage the linoleum. When the polish is ready to be removed do so with a fresh mop and clean water. You may have to change the water several times.


Wednesday, November 1, 2017

Restoring Colour to Limestone Patio Pavers in North Yorkshire

Jura Limestone is is a high-quality stone mined in quarries in the Bavaria region of Germany. It is perhaps the best-known stone mined in the country, and it is in strong demand throughout Europe and the rest of the world.

It’s not difficult to see why – this Limestone has some fantastic aesthetic qualities while also being durable and hard. This makes it a popular material for floor tiles in residential properties. I recently encountered a wonderful coffee-coloured Jura Limestone tiled floor at a property in Beckwithshaw, a small village of around 400 people near Harrogate. Harrogate is well known as one of Britain’s best-known spa towns, and attracts many tourists each year to visit its baths.

Unfortunately, the property owner had accidentally spilt a bottle of bleach over some of the tiles. Exposure to the bleach had caused unsightly white marks to appear on the stone and, upon seeing the floor in person, I noticed that the tiles had, in any case, not been polished correctly. They had, however, been sealed with many coatings of satin sealer which would need to be removed to facilitate the polishing of the floor.

Large Jura Limestone Floor Before Cleaning Beckwithshaw Near Harrogate

The floor was 150m2 and it would have been quite expensive to strip the whole floor of sealer and start again so I decided the best thing to do would be to spot treat the damaged areas.

Polishing Damaged Jura Limestone Tiles

To remove the stains, I needed to use a system we have developed at Tile Doctor, which is known as burnishing. This is a style of stone polishing that involves the application of Diamond encrusted pads. Each pad in the system has its own level of grit and is applied in sequence from coarse to fine in order to re-hone the finish on the stone.

To start I used two small handheld diamond blocks (the 200 grit and 400 grit) to carefully take off the old sealer in the affected areas. This would not be enough to remove the stains on the stone, so I followed this up with the application of the Tile Doctor burnishing system which consists of four 6-inch pads of different grits fitted to a handheld buffer. 

This involved starting with the Coarse 400 grit pad and then moving on to the Medium 800 grit pad, Fine 1500 grit pad and finally the Very Fine 3000 grit pad to achieve a refined polished finish.

The process of burnishing removed not only the white marks, but also the very top layer of stone which had suffered from pitting. Pitting is a natural form of corrosion that causes small holes to appear in Limestone, encouraging dirt and general muck to become ingrained.

Finally, the floor was rinsed and then left to dry and buffed a last time using a soft white pad. I don’t think my photographs really show the difference that well however I can tell you the result was far better than the customer had hoped for. I had managed to successfully blend the new polished finish on the affected tiles with the satin sealer which already existed across the rest of the floor.

Large Jura Limestone Floor After Cleaning Beckwithshaw Near Harrogate Large Jura Limestone Floor After Cleaning Beckwithshaw Near Harrogate


Source: Limestone Patio Cleaning and Restoration Service in North Yorkshire

Monday, October 30, 2017

How to Mop Vinyl Floors without Leaving a Sticky Residue

Low cost vinyl floors are a great way to get a decent look to your kitchen, bathroom, or entryway while staying within a tight budget. While vinyl floors are relatively inexpensive, they do require a lot of cleaning to keep them free from stains and dirt. After several years of use, cleaning on a consistent basis will still leave the floor looking slightly dirty. One of the problems with mopping a vinyl floor is that the water, soap, and vinyl work to create a sticky residue. Here are some steps to take in order to mop without leaving a sticky residue.

What You'll Need:
  • Sponge Mop
  • Bucket
  • Warm Water
  • Bleach
  • Wax
  • Broom
Step 1: Sweep Floor Clear of Dirt
The sticky residue is a combination of the vinyl coating, the dirt, and the water. When all three are combined together then what is left over is a sticky residue that causes the floor to look like it is still dirty. Anyone who walks across the vinyl floors after they have been mopped will leave dirt tracks as it sticks to the floor. To help to get rid of this you will need to sweep the floor before doing any mopping. 

Step 2: Use Adhesive Broom
A new innovation in floor cleaning products is a type of broom that has a static pad that dust and dirt clings to. After sweeping the floor of most of the dirt, go over the floor with one of these brooms. Make sure to use a clean pad and possibly changing it in the middle of the process if the vinyl floors are large.

Step 3: Mix Water and Bleach
Vinyl floors need to have some bleach added to the cleaning solution to get rid of the stains, embedded dirt, and break down any residue that can build up. Mix warm water and bleach solution into a pail. The water must be warm, and even a little hot, in order for the dark stains to be lifted off the vinyl.

Step 4: Use Sponge Mop
A mop that has stringy cloths are only going to trail dirt behind it. A sponge type mop, that has a built in strainer, is the best option for cleaning vinyl floors. Dip the mop into the cleaning solution and strain the excess water out. Push the mop in a back and forth motion and then dip into the water again. Using a mop that has dirty water on it can scratch the vinyl flooring or leave dirt streaks.

Step 5: Use Rags to Dry Floor
The sticky residue can also be avoided with the use of clean rags. Wipe the floor until it is dry so that none of the water can settle on the vinyl flooring.

Step 6: Strip and Wax

Another way to keep your floor from having a sticky residue is to periodically strip the wax coating off the vinyl and then apply new wax. Use some ammonia and use a mop to apply it to the floor. This will remove the old wax. Make sure to keep the room well ventilated. After the floor is dry, then apply new wax with a small floor buffer, or through a hand buffer.


Wednesday, October 25, 2017

Deep Cleaning a Small Travertine Tiled Hallway in Bedfordshire

Travertine floor tiles are very appealing but without the protection of a sealer they will soon suffer, fortunately this can be remedied as demonstrated in these pictures of a Tumbled Travertine floor at a house in the Village of Clophill in the Flit River Valley South of Bedford. This customer had called me out as her ten year old floor was looking very sorry for itself and she was concerned that a lot of holes were appearing which was making cleaning of the floor difficult as dirt was getting trapped in the holes. I went over and carried out a test clean on two separate tiles in the kitchen and the customer was amazed at how clean they came up and especially the grout. An appointment was made for the next month and work commenced.

Tumbled Travertine Kitchen Floor Before Cleaning Clophill Village

Cleaning a stained Tumbled Travertine tiled floor

The first thing we do is to protect the lovely Oak kitchen units by removing plinths, covering base units and appliances with a protective film. We then commenced work by burnishing the stone with a set of Tile Doctor Diamond encrusted burnishing pads. The pads are applied individually to each tile in sequence starting with a coarse pad and finishing with the fine pad which brings up the polish. A little waster is used to lubricate the process along the way and the floor is rinsed in-between each pad with the resulting residue extracted from the floor using a wet vacuum. The process takes quite some time but the results are well worth the effort.

Tumbled Travertine Kitchen Floor Before Cleaning Clophill Village Tumbled Travertine Kitchen Floor Before Cleaning Clophill Village

Once this was done our attention was turned to the grout which being recessed is difficult to reach by with pads. So for the grout a medium dilution of Tile Doctor Pro-Clean is applied to the grout lines and scrubbed in with stiff brushes by hand. The floor was rinsed again and fans were used to assist drying before filling the holes with the same filler the customer had used previously to match the colour of the stone as much as possible.

Sealing a Travertine tiled floor

When we returned the next day the floor had dried and we were able to give the floor a final polish with a very fine burnishing pad. The floor was then sealed with two coats of Tile Doctor Ultra Seal which provides excellent protection without changing the colour of the stone to provide a natural look.

Tumbled Travertine Kitchen Floor After Cleaning Clophill Village

My customer was delighted with the results and kindly left the following testimonial on the Tile Doctor Feedback system. "We had several rooms of very dirty travertine tiles that were deep cleaned, filled and re sealed. The floor now looks amazing. Fantastic job by a professional and friendly team.”

Tumbled Travertine Kitchen Floor After Cleaning Clophill Village Tumbled Travertine Kitchen Floor After Cleaning Clophill Village


Source: Travertine Tile Cleaning and Renovation Service in Bedfordshire

Monday, October 23, 2017

Vinyl vs Linoleum: Which Is Better for the Bathroom?

Vinyl tiles and linoleum tiles have their own advantages when considering them as materials for bathroom floors. With the improvement in technology, both linoleum and vinyl have been re-invented and improved upon. The following article discusses the need for careful consideration when putting down a bathroom floor and the differences in vinyl and linoleum flooring.

What You Need in a Bathroom Floor

The bathroom needs special flooring as compared to the rest of the house. This is because the floor is constantly splashed with water, making normal tiles and floorings slippery. The water can also cause damage very easily, and materials like wood can swell up or rot over a period of time. Rubber floors available are not very nice to look at, and stone floors can be cold and stain easily. Apart from slipping, fire hazard and stains the other important thing to keep in mind when considering bathroom floors is the sound since bathrooms are the most private rooms of the house, and you need flooring that is soundproof to an extent. The solution to this is choosing between vinyl and linoleum.

Why Choose Linoleum for Bathrooms
Discovered almost a hundred years ago, the material has proved itself again and again. It is still competing with most of the latest creations in flooring. The main reason is that it is made of solidified linseed oil and is considered the more environment friendly option. It is durable, and dents and scrapes can be easily buffed. The material is non-slippery, fire resistant, waterproof and easy to clean.

The disadvantage of this type of flooring is that it yellows with age in areas where it remains out of sunlight. The material may be less expensive than most, but the installation should be done by a professional and that can be expensive. The linoleum tiles are also limited in colors as compared to vinyl. Another big drawback is that it is not very soundproof.

Why Choose Vinyl Tiles for Bathrooms
Vinyl tiles or sheets are very hygienic and waterproof. Vinyl is a synthetic, petroleum based material and has been competing against linoleum since its discovery. Vinyl is extremely durable and, with a protective layer on top, can retain its freshly laid look for a long time. It does not fade with age and is available in more styles and designs than any other material. It can also mimic other materials in terms of looks, like stone or wood while, at the same time, being easier to clean, non-slippery and low cost Another advantage of vinyl tiles or sheets is that they are very easy to install, and you will not need a professional to help you. This would reduce the cost of laying down the bathroom floor considerably.

Conclusion
Vinyl tiles and linoleum floors have similar advantages over other materials. When considering either of the two, it would, in the end, depend on your budget, style, color and design of your bathroom.


Wednesday, October 18, 2017

Slate Tiled Floor Renovation Service in Hertfordshire

Slate is a very popular choice for floor tiles due to it being hard wearing with a relatively low porosity making it more stain resistant. Some property owners opt for darker Slate, while others prefer wonderful multi-coloured Slate, such as that used in this kitchen in Datchworth, a small village in between the towns of Herford, Stevenage and Welwyn Garden City.

Multi Coloured Sawn Slate Play Room Floor Datchworth Before Cleaning

What can be said for certain is that no-one likes a dull looking and dirty floor! Unfortunately, Slate tiles can easily lose their lustre if not treated to routine maintenance. This customer felt that her Slate tiles, which covered the kitchen, utility room and a child’s playroom, were well overdue a refresh. Here’s what we did.

Cleaning a Slate Tiled Kitchen and Utility Room

We followed our tried-and-tested process for restoring the natural lustre and appearance of Slate tiles. To begin, we removed any old sealant on the tiles using Tile Doctor Remove & Go, which is both a coatings stripper and cleaning product. The product was applied liberally across the floor and worked into the tiles using a buffing machine fitted with a black buffing pad. Hand-held brushes were used to tackle the fine grout lines. This process removed old sealers and gave the tile and grout an initial clean.

Multi-Coloured Sawn Slate Kitchen Floor Datchworth Before Cleaning Multi-Coloured Sawn Slate Utility Floor Datchworth Before Cleaning

Next, we applied Tile Doctor Pro-Clean, which is our industrial strength tile and grout cleaner which was scrubbed into the Tile and Grout as before to remove remaining ingrained dirt. The resultant slurry was promptly removed using a wet vacuum. To complete the cleaning process, we steam cleaned the Slate to remove any further residue trapped in the pores of the stone and any trace of cleaning product. The floor was then left to dry off overnight so it would be ready for sealing in the morning.

Sealing a Slate Tiled Kitchen and Utility Room

Upon returning to the property, we ran some quick damp tests, since even a small quantity of moisture can cloud the sealant and damage its performance. Thankfully, the tiles proved dry and we were able to seal the Slate using three applications of Tile Doctor Colour Grow. This impregnating sealer helps to enrich the natural colours in the stone, while offering a natural-looking matte finish and robust protection. Between each application of sealant, we machine-buffed the surface of the floor to help dry the stone naturally while maintaining the matte finish.

Multi-Coloured Sawn Slate Kitchen Floor Datchworth After Cleaning Multi-Coloured Sawn Slate Utility Floor Datchworth After Cleaning

This two-day job was truly transformative for these Slate tiles. Just compare the before and after photos above – the customer was certainly very impressed with the speed and quality of the work. Another satisfied customer.

Multi Coloured Sawn Slate Play Room Floor Datchworth After Cleaning


Source: Slate Tile Cleaning and Renovation Service in Hertfordshire

Friday, October 13, 2017

Removing Old Grout Smears from Concrete Tiles is South Cumbria

The stone floor in these pictures are in fact pre-cast concrete tiles created to emulate Limestone flagstones laid in a Kitchen in Arnside. You can’t beat the natural beauty of Limestone but these concrete tiles do give the Kitchen that rustic look the customer sought. The odd thing is, it’s actually less expensive to buy real Limestone these days as Pre-cast concrete is not a cheap product.

Stone Effect Concrete Kitchen Flooring Before Cleaning Arnside Stone Effect Concrete Kitchen Flooring Before Cleaning Arnside

Unfortunately, in this case, the concrete had been smeared with Ivory Grout during installation and the tiler had failed to remove it after grouting and this had dulled the look of the tile. The customer was led to believe by the Tiler that the off-white colour was indeed part of the stone and had put up with it for several years before we were called out.

Cleaning a Damaged Flagstone Tiled Floor

First of all we conducted a test clean to make sure our usual cleaning system would work as well on pre-cast concrete. I was aware that this type of product has a colour dye added to it which does seem to lose colour over the years and also can lose quite a bit of this dye once we start cleaning with strong chemical's. Not wanting to risk any depreciation in the colouring I opted instead for the application of a set of Tile Doctor Burnishing pads. The pads are encrusted with industrial Diamonds and come in different grits from coarse to fine and I found that not only did the process remove a lot of the of White grout haze left by the tiler but also gave us a good start to the cleaning process without losing any more of the colour Dye. The customer has specified they were keen for the floor to have more of a sheen finish, so we finished the cleaning with the rest of the Diamond pads finally ending on the super fine pad. We had to do some edging work where the circular pads could not reach but apart from that the pre-cast concrete responded well to this treatment as you will see on the before and after pictures.

Sealing a Flagstone Tiled Floor

The next day we called back to seal the Kitchen floor to protect it from staining, something that is more than likely in a Kitchen. For this we used a couple of coats of Tile Doctor Colour Grow which not only protects by soaking into the pores of the tile but also restores a lot of the colour that had previously been lost.

Stone Effect Concrete Kitchen Flooring Before Cleaning Arnside Stone Effect Concrete Kitchen Flooring Before Cleaning Arnside

For aftercare I explained to the customer that sealers do wear off over time and so to get maximum life out of the sealer they should clean the floor with a pH Neutral Cleaner like Tile Doctor Neutral cleaner. It’s designed for cleaning sealed tiled floors and it won’t affect the colour dye or the Sealer we have applied unlike stronger products will eat away at the sealer over time. Additionally, pre-cast concrete like Limestone is Acid Sensitive and as such products like certain types of the Cillit-Bang range cannot be used on a floor like this as it will cause surface damage.


Source: Tile Cleaning and Renovation Service in South Cumbria