Monday, June 30, 2014

Mistakes to Avoid when Applying Liquid Membrane to Plaster Walls

A liquid membrane allows a wall to be waterproof. You will typically find liquid membrane applied to the outside concrete wall. A waterproof liquid membrane can also be applied to plaster walls. Though this process is not very common, many mistakes can occur. The article below will highlight the most common mistakes when applying a liquid membrane to a plaster wall.

Less is More

If you use too much liquid membrane the plaster can begin to soften and become damaged. Apply thin coats of liquid membrane. Once the first coat is dry, you can add another coat until you have 3 coats.

Clean the Wall

A plaster wall that is not clean will not be good for liquid membrane. You can get areas where the liquid membrane will not properly set. Wipe down the plaster wall with a damp sponge and mild oil-free soap.

Damage Repair

Start with a flat and smooth surface. Use plaster and a putty knife to fill in any cracks or holes. Smooth and feather the plaster and then sand it down flush when it is dry.

Waterproof Tape

Apply waterproof tape in the corners of plaster walls. This will allow the liquid membrane to be more effective.


Source: www.DoItYourself.com

How to Put Nails Into Concrete Blocks Under a Wood Floor

Putting nails into concrete blocks under a wood floor can be quite tricky. Using the wrong nails can cause the concrete to crack or chip so you need to be extra careful when it comes to the kind of nails that you use. To help you put nails into concrete blocks under a wood floor, here is what you need to do.

What You'll Need

Concrete nails
Hammer
Power drill
Drill bits
Screwdriver
Protective Eyeglasses
Working gloves

Step 1 – Observe Safety

Before you start hammering nails into your floor, you need to wear your protective eyeglasses and working gloves first.

Step 2 – Drill Holes into the Concrete

Drill small holes into the concrete and on the wood to accommodate concrete nails. Make sure that the holes must be smaller than the size of your nails.

Step 3 – Insert the Anchors

Insert the metal anchors into the holes and push the anchors all the way through the holes using a screwdriver. Make sure that the anchors are securely lodged into the concrete floor before you insert the nails.

Step 4 – Put in the Nails

Put the wood over your concrete floor and align the holes on the wood with the holes on the concrete. With the use of a hammer, push the concrete nails through the holes on the wood and make sure that the nails go all the way down to the anchors.


Source: www.DoItYourself.com

Sunday, June 29, 2014

Large Limestone tiles cleaned and polished

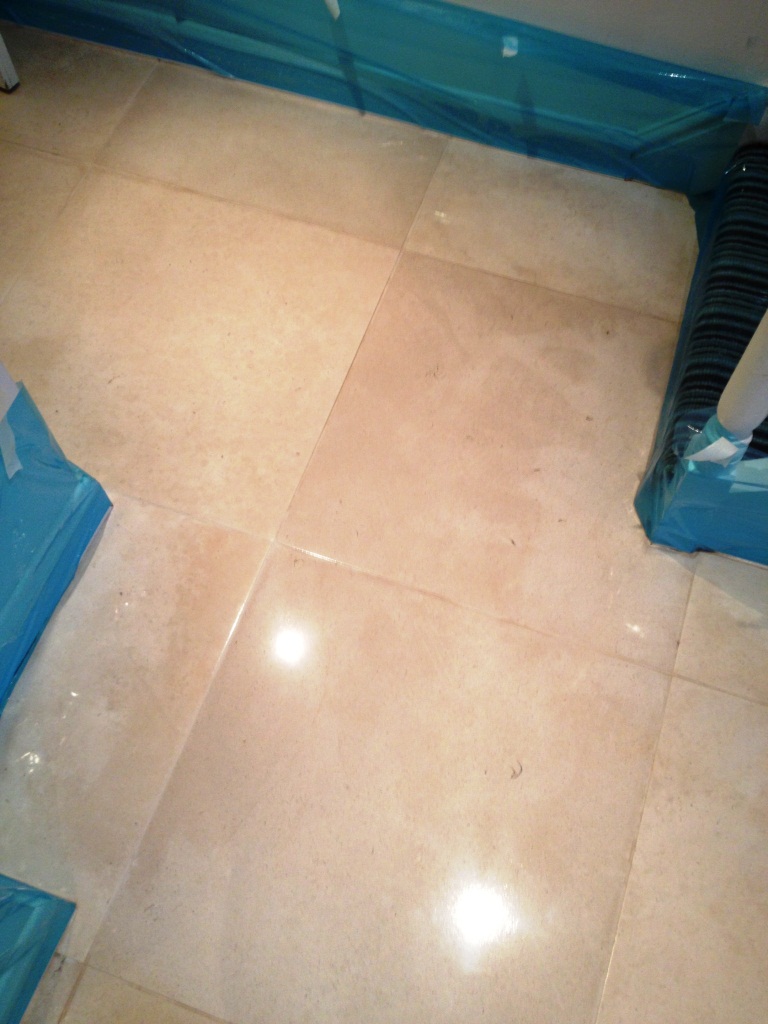
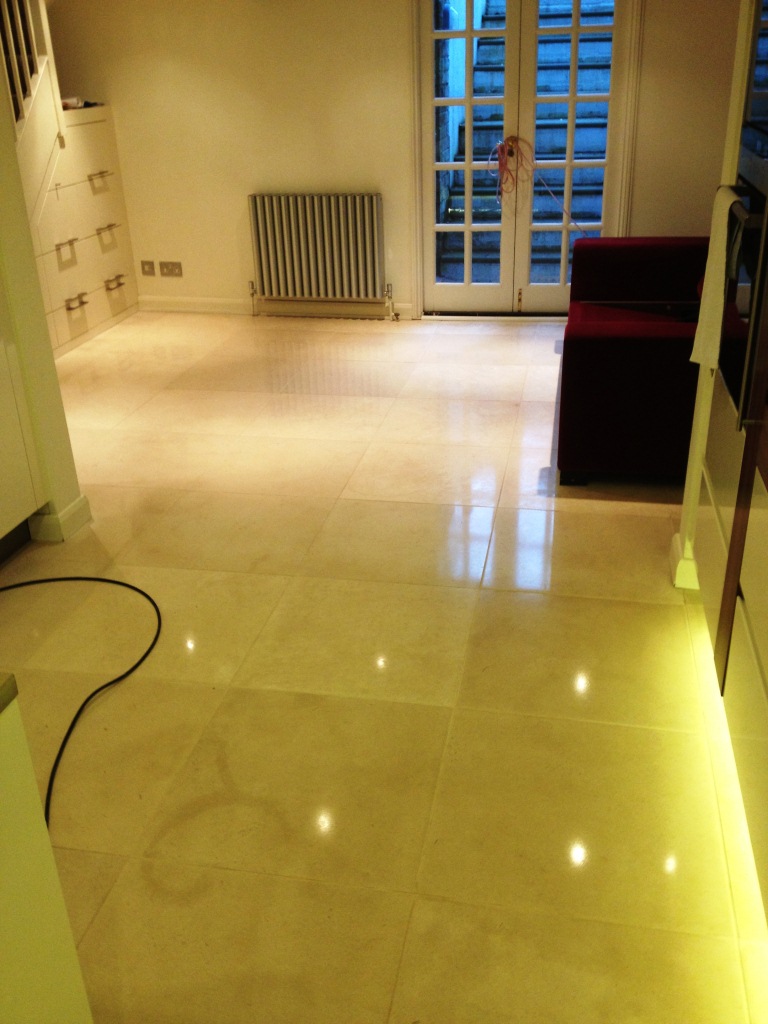
These photographs are from a Limestone tiled floor installed at a residence in Cambridge. The tiles were in good condition but the shine on the Limestone had worn off leaving them looking dull and the owner wanted them re-polishing.
Polishing Limestone Tiles in Cambridge During Cleaning Polishing Limestone Tiles in Cambridge During Cleaning

Stripping and Polishing Limestone Floor Tiles

To restore the shine on polished stone we use a set of four diamond encrusted pads however before starting we gave the floor tiles a general clean with a dilution of Tile Doctor Pro-Clean mainly to clean-up the grout but also to remove any loose surface grit. The cleaning solution was rinsed away and removed with a wet vacuum before starting the burnishing process using a rotary scrubbing machine fitted with a coarse diamond encrusted burnishing pad and a little water. The coarse pad strips off dirt and old sealers from the tile and the resulting slurry is then removed using a wet vacuum. The next pad after coarse is a medium grit which you apply in the same way followed by the fine pad again with a little water until the floor is polished. The final step to bring up the polish on the Limestone is to apply the last “Very Fine” pad which is fitted to the rotary machine and run over the floor tiles until they are buffed to a nice shine.

Sealing Limestone Floor Tiles

Once the floor was dry we set about sealing it using two coats of Tile Doctor Colour Grow Sealer which is a penetrating sealer that soaks into the pores of the stone filling them so dirt can’t penetrate below the surface. As well as offering excellent protection Colour Grow lifts the colours in the stone enhancing it’s natural beauty. Once sealing was complete and dry the Limestone tiles were given a final buff with a soft white pad.
Polishing Limestone Tiles in Cambridge After Cleaning Polishing Limestone Tiles in Cambridge After Cleaning
    Source: Expert Limestone Tile Maintenance Site

Friday, June 27, 2014

How to Put Nails Into Concrete Blocks Under a Wood Floor

Putting nails into concrete blocks under a wood floor can be quite tricky. Using the wrong nails can cause the concrete to crack or chip so you need to be extra careful when it comes to the kind of nails that you use. To help you put nails into concrete blocks under a wood floor, here is what you need to do.

What You'll Need
Concrete nails
Hammer
Power drill
Drill bits
Screwdriver
Protective Eyeglasses
Working gloves

Step 1 – Observe Safety

Before you start hammering nails into your floor, you need to wear your protective eyeglasses and working gloves first.

Step 2 – Drill Holes into the Concrete

Drill small holes into the concrete and on the wood to accommodate concrete nails. Make sure that the holes must be smaller than the size of your nails.

Step 3 – Insert the Anchors

Insert the metal anchors into the holes and push the anchors all the way through the holes using a screwdriver. Make sure that the anchors are securely lodged into the concrete floor before you insert the nails.

Step 4 – Put in the Nails

Put the wood over your concrete floor and align the holes on the wood with the holes on the concrete. With the use of a hammer, push the concrete nails through the holes on the wood and make sure that the nails go all the way down to the anchors.


Source: www.DoItYourself.com

Tuesday, June 24, 2014

How to Put Nails Into Concrete Blocks Under a Wood Floor

Putting nails into concrete blocks under a wood floor can be quite tricky. Using the wrong nails can cause the concrete to crack or chip so you need to be extra careful when it comes to the kind of nails that you use. To help you put nails into concrete blocks under a wood floor, here is what you need to do.


What You'll Need
  • Concrete nails
  • Hammer
  • Power drill
  • Drill bits
  • Screwdriver
  • Protective Eyeglasses
  • Working gloves

Step 1 – Observe Safety

Before you start hammering nails into your floor, you need to wear your protective eyeglasses and working gloves first.

Step 2 – Drill Holes into the Concrete

Drill small holes into the concrete and on the wood to accommodate concrete nails. Make sure that the holes must be smaller than the size of your nails.

Step 3 – Insert the Anchors

Insert the metal anchors into the holes and push the anchors all the way through the holes using a screwdriver. Make sure that the anchors are securely lodged into the concrete floor before you insert the nails.

Step 4 – Put in the Nails

Put the wood over your concrete floor and align the holes on the wood with the holes on the concrete. With the use of a hammer, push the concrete nails through the holes on the wood and make sure that the nails go all the way down to the anchors.


Monday, June 23, 2014

Polishing Travertines in Hampshire

Travertine floor tiles look amazing when they have just been installed but after a few years the polish wears down, dirt starts to become ingrained in the stone and they start to lose their appearance. They do need regular maintenance and potentially re-polishing and these tiles installed in kitchen in Havant were no different.

Cleaning Travertine Floor Tiles in Havant Before

Cleaning Travertine Kitchen Tiles

First job was to remove the kickboards under the kitchen units and cover the free standing fridge with a wrap of plastic, this is a necessary precaution to stop fluids soaking into the wooden kicker boards and splashing the fridge. A dilution of Tile Doctor Pro-Clean was applied to the floor with a mop and left to soak in for around fifteen minutes. The grout lines were then given a good scrub and we ran a scrubbing pad fitted to a rotary machine over the tiled floor to give it a good clean and remove any lose debris.

Cleaning Travertine Floor Tiles in Havant During

To restore the polished appearance of the Travertine it was burnished using a set of diamond encrusted pads which come in four grades and are applied to the stone floor with a little water in sequence from Coarse through to finally Super Fine which provides the final polish leaving a high shine finish.

Sealing Travertine Tiled Floor

The floor was given another wash and left to dry off overnight and we came back the next day to seal it. We check the floor was dry first and then proceeded to seal the Travertine tiles using two coats of Tile Doctor Colour Grow which really enhances the colours in natural stone as well providing excellent stain protection.

Cleaning Travertine Floor Tiles in Havant Finished Cleaning Travertine Floor Tiles in Havant Finished

I think you will agree from the photographs above that the Travertine tiles looks so much better and the natural brown and gold colours in the stone have really come through.


Source: Expert Travertine Tile Maintenance Site

Sunday, June 22, 2014

7 Tips for Painting a Floor Joist

When painting a basement floor joist it's important to do the job correctly. The correct paint needs to be selected, as well as providing yourself with the proper protection for your body and eyes. A clean clear area is far easier to work in as you will be working overhead. Moving the stepladder is easier if the floor area is open.

1: Body, Eye, and Breathing Protection

Purchase disposable plastic coveralls, masks, goggles, petroleum jelly, covers for your shoes and some gloves. Cover yourself totally before getting started by using the disposable clothing and include a mask, hair covering and goggles. The paint you will be using will be extremely difficult to get off if it gets on your skin and hair. Any area of skin not covered should be protected with petroleum jelly.

2: Clear the Decks

It is best to cover the entire area of floor and any immovable objects before starting to spray. By clearing the area as much as possible, you will make your job of spraying the floor joists a lot easier. Using a sprayer makes the task of painting easier but tends to make a fine spray throughout the area, whichever paint you decide on. The paint you will be spraying will cover everything with a fine dusting. Its better to invest in some throw away plastic sheeting than to use fabric to cover items.

3: Types of Paint to Use

The best paint for painting floor joists is a non-shiny or matte paint. You do not want the ceiling to be obtrusive. A flat finish with a water-based paint is a better option.

4: Apparatus to Use

Because you will be painting a large area over your head, it will be easier to use a spray painter. If you don’t already have one, rent one for the project. If however, you intend to do further projects, purchasing a sprayer would be a better solution. Check on the sprayer as to what consistency the paint should be mixed to and stick strictly to the directions.

5: Mask the Outlets

Make sure all wires and outlets are masked off. There could well be loose wires along the floor joists. Make sure you mask them off completely. You do not want the paint entering or adhering to these items. If possible, cover them with ducting for cables.

6: Primer

Use a primer first. Although you might be tempted just to paint, a proper primer will make the job last longer. Primer helps paint adhere to the surface better and will provide a more professional look.

7: Paint

Paint over the entire area. Make certain no part of the ceiling or the joists remains uncovered. It could well require two coats. When spraying, spray lightly and move on to the next area. You do not want globs of paint appearing. If you leave the sprayer for a while, you will have to clean the nozzles or they will clog up. Clean the whole sprayer if you intend on leaving it over night. Paint should not be left in it for long periods.
It is not a difficult job to do and the basement will look far better once the floor joists are painted.

Source: www.DoItYourself.com

Thursday, June 19, 2014

How to Remove Mold from Floor Joists

If you live in a humid and moist climate, it is important that you regularly remove mold from your floor joists. When left without being removed, mold in joists can eventually become such a problem that it can only be removed by professionals. This can apply not only to homes with basements, but also to those with crawl spaces. The best course of action will always be to remove the mold in the earliest stages of its development. Follow the simple steps below to effectively remove mold from the floor joists in your home.

What You'll Need
  • Water
  • Spray bottle
  • White vinegar or liquid bleach
  • Clean rags
  • Plastic bag
  • Step ladder

Step 1 -  Mix a Solution of Water and Vinegar

In a spray bottle, mix a solution of 10 parts water and 1 part white vinegar or liquid bleach. If you use bleach, make sure to use a container that will allow you to pour the solution without spilling it where it can damage clothes or other belongings.

Step 2 – Apply the Anti-Mold Solution

Use a spray bottle adjusted to spray a mist. If you use a more forceful stream of water, you might scatter mold spores when you spray them. For areas you are treating in your basement, you will likely need a ladder to reach higher levels of joists where you will find mold. You'll need to get the spray bottle within inches of the mold for it to be effective. To kill the mold, spray the solution directly onto the mold. When applying the solution, be sure to avoid spraying directly over your head to so as not to get the solution or mold spores from dripping on your face or head.

Step 3 – Wipe Down the Sprayed Area

Use a clean, absorbent rag to wipe down the area you've sprayed with the solution. Use each rag on only a single mold area. This will help avoid spreading the spores. Discard into a plastic bag all rags used to wipe down each of the mold areas.

Step 4 – Spray Additional Applications of Your Solution

After wiping down the mold area, apply a second application of the solution you've made, allowing it to remain on the mold for 24 hours. After the waiting period has passed, use the same process of spraying and wiping for 3 more consecutive 24-hour periods. Wait for a week, and then repeat your spraying and wiping process for another 3 days, discarding your used rags in the plastic bag each time they are used.

Step 5 – Treating Floor Joists in Crawl Spaces

In crawl spaces where light is more dim, take an extension cord and drop light with you as you inspect the floor joists for mold. Using a helper who can direct the light while you spray and wipe will ensure your doing a more thorough and safe treatment.


Tuesday, June 17, 2014

Cleaning old Quarry Tiles

This Red Quarry Tiled floor had been laid when the house was built back in 1910 so it was over 100 years old and had years of wear and tear to show for it including old cement and paint from some decorating work that had been done some years prior. The house was located in the town of Treharris just outside of Cardiff and being an original feature of the house the owner wanted it looking as good as it could be.

Red Quarry Tiles Floor in Treharris Before Cleaning

Cleaning a Quarry Tiled Floor

I first checked for any moisture as these old floors were often laid without damp proofing and a damp floor can impact sealing later. Fortunately the reading was nice and dry, I then set about carefully scrapping off as much old paint and cement as possible. I then swept up as much of the dust as I could and caught the rest with a hoover. The next step was to cover the whole floor in Tile Doctor Remove and Go mixed with a little NanoTech Ultra Clean which basically adds tiny abrasive particles to a powerful coatings remover. I left this on to soak into the tile for about an hour knowing that using this combination would not only remove any old surface coatings such as sealers it would also clean the floor as well. The solution was then worked into the floor using a rotating scrubbing brush attachment on a floor machine effectively letting the machinery do all the hard work. The floor was then rinsed twice with clean water which was then removed using a wet vacuum.

Red Quarry Tiles Floor in Treharris Scrubbed

It was clear at this point that the cement I could see on the surface of the tile was basically grout from an appalling tiling job when the floor was laid 100 years earlier. Fortunately Tile Doctor has a solution for that problem called Grout Remove and Go which is an acid based product that will remove grout and mineral deposits such as efflorescence. Being an acid I had to be careful so it was applied to the tile working one square metre at a time cleaning and scraping as I went along. After each section the floor was given a good rinsing again using the wet vacuum to remove the liquids from the floor. The last step of the cleaning process which I always do for Quarry and Victorian floor tiles was to finish off the rinsing process with a steam clean which brings out any remaining dirt and brings the tile back to its raw state.

Red Quarry Tiles Floor in Treharris Cleaning

Sealing a Quarry Tiled Floor

I cleaned the floor on the Friday and then left it to try for two days coming back on the Sunday to damp test the floor once again to ensure it was ready for sealing. The moisture reading was fine for sealing and as the customer had asked for a mild shine finish I sealed the floor using Tile Doctor Seal and Go which brought out the black and red colours in the tile back to life.

Red Quarry Tiles Floor in Treharris Sealed


Source: Expert Tile Cleaning Site

Sunday, June 15, 2014

How to Keep Your Plywood Subfloor Heathy

Keep your plywood subfloor healthy by taking care of little problems before they become big problems.
Squeaks and Creaks
You can often fix squeaks and creaks from underneath the subfloor, without having to pull up carpeting or hardwood floors. While you're below, have someone step on the squeaky area. You'll probably see that there's a small gap. Use a shim to fill it, then use a long woodscrew to anchor the layers of wood together. If the squeak occurs between joists, cross bracing will help eliminate the noise.
Stains and Odors
Pets and wall-to-wall carpeting are not always the best combination. If you notice that an ammonia smell remains even after you've shampooed the carpet, chances are that the subfloor has been soaked with urine. You can pull back the carpet and scrub small areas with household cleanser. Avoid bleach or lime, as both give off dangerous fumes. For larger areas, you'll need to plane or sand the wood to actually remove the stained material. When you've neutralized the odor and the affected area is dry, seal with two coats of polyurethane or a primer/sealer such as Kilz. Allow to dry and cure for several days before replacing the carpet.


Source: www.DoItYourself.com

Monday, June 9, 2014

Common Problems Installing a Subfloor Over Concrete

If you are installing a subfloor over concrete, there are several problems that you could run into. This process is commonly done to provide a subfloor to attach hardwood flooring. Consider the following common problems that may arise when you attempt to add a subfloor over concrete.

Choosing the Adhesive

When you attach plywood to a concrete subfloor, you will need to make sure that you get the right type of adhesive. Many people purchase the wrong kind of adhesive for this project, and the plywood ends up coming off the floor.

Spreading the Adhesive

When it comes time to apply the adhesive to the floor, you must take care to do it properly. The adhesive is very thick, so you have to use a trowel to apply it to the floor. Take your time to ensure that the adhesive is adequately spread.

Doors

Another problem that many people have is going through a door with the subfloor. If you have connecting rooms, you will need to cut the plywood to fit in the doorways. This can be difficult for many people, and it takes some patience and skill to cut it properly. 


Source: www.DoItYourself.com

Sunday, June 8, 2014

Restoring Quarry Tiles

This floor was another case of builders failing to protect the Quarry Tiled Floor when they were working at this house in Bedford, this is certainly not un-typical of plasters considering the number of messy floors we have had to clean up previously. I guess in some ways we shouldn’t complain as they are keeping us busy but it was my floor I would be quite upset.

Deep Cleaning Quarry Tiles

To get rid of the plaster I applied a solution of Tile Doctor Grout Clean-up which is an acid based product designed to remove grout from the surface of tiles but works equally well on cement, plaster and other mineral deposits such as effloresce and rust. Working in sections the Grout Clean-up was applied, scrubbed in and then washed off, being an acid it’s not advised to leave it on the tile for too long. Once the plaster was dealt with the whole floor including the tiles and grout was given a good clean using Tile Doctor Pro-Clean which is a strong alkaline product that’s safe to use on Tile, Stone and Grout. For best results leave it to soak into the tile for twenty minutes before giving the tiles a good scrub. Once the tiles were clean the floor was given a good rinse with clean water to remove any remaining chemical and neutralise the floor before sealing; a wet vacuum was used to remove as much water from the floor as possible so it could dry faster.

Deep Cleaning Quarry Tiles in Bedford Before Deep Cleaning Quarry Tiles in Bedford After

Sealing Quarry Tiles

We left the floor to dry overnight and came back the next day to seal it using four coats of Tile Doctor Seal and Go sealer which adds a nice sheen to the floor as well as providing long term stain protection. The photographs above show the transformation of the floor and certainly the customer was very happy with the result.


Source: Help Maintaining Quarry Tiles

Thursday, June 5, 2014

How to Avoid Cracks and Top Layer Bubbling When Using Self Leveling Compound

When working with self leveling compound material you can eliminate and avoid cracks and top layer bubbling by following completely the instructions for using the material. The self leveling compound is a type of quick setting cement that is placed on subfloors prior to laying a tile or wood floor. The self leveling compound provides a barrier that makes it possible to lay the floor, which is never advised to placed on top of a plywood subfloor directly. 

Become Familiar with the Use of the Self Leveling Compound

The best way to avoid cracks and bubbling is to familiarize yourself with the packaging material and any instructions provided by the manufacturer. The manufacturer's information can help you avoid these problems by informing you how the compound should be mixed, what consistency should be achieved and when to best use the self leveling compound. Additional information can be found at the manufacturer's website or any advice or helpline that they maintain for their customers. The more information that you can obtain prior to the use of the product, the better positioned you will be when it comes time to use the self leveling compound.

Once you make yourself completely familiar with using the self leveling compound as instructed by the manufacturer, practice coming up with a mixture that meets the recommended consistence. Typically when working with a self leveling compound, the desired consistency is that of a watery pea soup. Unlike concrete, if you mix the self leveling compound to a consistency of peanut butter or toothpaste, you have over mixed it. This will cause the self leveling compound not to be poured out and work as it is suppose to work.
Pour the Compound Evenly and Carefully

When you achieve the desired consistency of the self leveling compound, you should pour it out over the floor carefully and slowly. the solution will spread over the floor, filling in any low spots in order to make the entire floor surface level. Working slowly and carefully will reduce the number of air pockets created which will produce the bubbling effect. Pouring the self leveling compound out quickly will increase the possibility that air will get into the compound and that it will in fact bubble up.

Check the Temperature of the Room

Make sure that the room's temperature is consistent with what the manufacturer recommends when working with the self leveling compound. A room that is too hot or too cold may cause the self leveling compound not to set up properly or if it is laid to crack when it dries. The use of heaters or fans to bring the room to the desired temperature may be necessary in order to avoid this from happening. You may also need to wait a day or 2 prior to the application of the self leveling compound in order to ensure a climate that is conducive for its use.


How to Repair a Bouncy or Sagging Floor in the Middle of the Room

A sagging or bouncy floor is can be the source of much aggravation for homeowners. It can also pose a roadblock to new floor installations such as laminate, hardwood, or tile. If the sagging floor is in the middle of the room, it can be repaired using the following steps.

What You'll Need
  • Hammer
  • Nails (various sizes)
  • Saw
  • 3/8 or 1/2-inch plywood
  • 2x12 board(s)
  • Hydraulic jack
  • Floor supports
  • Level
  • Flashlight
  • Ladder

Step 1: Inspect the Floor

Before the floor can be repaired, it's important to know what is causing it to sag or bounce. In some cases the problem may be obvious from the surface (loose nails, cracked boards, and so on). But most likely, the problem lies below. This means you will need access to the underside of the floor. Use a ladder and flashlight to look at the sagging area. Examine any joists or beams running underneath the floor. It is not uncommon for these to sink over time from supporting the weight above. Remember, most floor joists and timbers not only hold the floor, but also share in supporting some of the weight above it.

Step 2: Level the Floor

If the problem is a support issue from underneath, you will need to reinforce the existing joists and other supports. To do this, you must first level the floor. Using a hydraulic jack, place it under the sagging joist(s). Lift the jack up until the floor is level. Place a level on the joist to determine where level is. You may need more than one jack if the floor joist is really long. Placing floor supports under the joist will help hold the floor and add safety.

Step 3: Floor Joist Reinforcement

With the floor level, you must now reinforce the joists. To do this, cut a 3/8-inch (or greater if added support is needed) plywood the width of the floor joist. You may need to cut several small pieces to run the length of the joist. Attach them using a hammer and nails. Now cut the 2x12 board. As with the plywood, run the board the length of the floor joist. Hammer it to the plywood. Now using longer nails, hammer into the 2x12 board from the joist end. This will fasten the joist, plywood, and 2x12 board together. By running the boards together along the same length, they share in the above weight load.
Step 4: Checking Strength

After the joist(s) have been reinforced, it's time to check your work. Remove any floor supports used. Slowly release the pressure on hydraulic jack and let it down. Now check to see if the floor joist remains level. Using the level, run it along the length of the joist. If it looks level, you're done. If not, find those areas where the joist is still sinking or uneven. Check to see if there is any noticeable change. If so, the supports are helping, but may need added strength. You can attach more plywood and board or a metal plate may need to be installed.