Tuesday, June 30, 2020

How to Polish Absolute Black Granite

When granite is clean and polished it has a brilliant shine that can make your floors, counters or backsplashes look pristine and luxurious. Absolute black granite is a very dark and pure black color that can look very glossy when you polish it correctly. If the surface of your granite is cracked, chipped or etched you will need to take it to be automatically and professionally polished. If the surface is dull but otherwise intact, you can polish it yourself at home.

  1. Wet a clean cloth with clear water.
  2. Rub the cloth over the surface of the granite. This will wipe up any crumbs, dust or pieces of dirt. It will also remove any food or cleaning solution residue.
  3. Add just enough liquid dish soap to 2 tbsp. flour to make a thick paste.
  4. Spread the paste over any stains on the granite counter. Stained counters will not shine.
  5. Let the flour paste sit on the area overnight until it dries.
  6. Wet another clean cloth and rub it over the flour paste on the black granite.
  7. Immediately dry the counters with a microfiber cloth. One common reason why granite counters do not shine is that water air dried on it and has made a watermark. Continue drying the granite in circular motions until the granite is polished and bright.
  8. Spray stone polish on the surface of the granite if it still does not appear polished.
  9. Buff the polish by rubbing it with a circular motion until the granite shines.


Monday, June 29, 2020

Improving a Balcony With Encaustic Cement Tiles in East London

This client from Hackney had started a DIY tiling job using modern Encaustic Cement tiles on an external balcony. The COVID-19 lockdown had just taken effect and it seemed like a great opportunity to get a few DIY projects done. Although it started off well, she began to struggle when having to cut the edging tiles and corners so was forced to leave the tiling incomplete and un-grouted. Furthermore, she had attempted to seal the tiles, but this had somehow caused the tiles to go milky white. Encaustic tiles date back to medieval times and have been popular in the UK since the nineteenth century and have become extremely popular here in the last few years.

Encaustic Cement Balcony Tiling Project in Hackney Before

Concerned the whole project would need ripping up and starting again she contact Tile Doctor and I arranged a visit to the property to assess the tiling and see if the project it could be rescued. Since the COVID-19 epidemic began we have adopted new working practices such as more PPE and Social Distancing to allow us to continue working.

Encaustic Cement Balcony Tiling Project in Hackney Before

We test cleaned the sealer and found the application of a 400-grit diamond pad was the best way to clean off the sealer and renovate the tile. Additionally, we had been asked to complete the tiling project which was approx. 24m2. The job would therefore entail tiling, cleaning, and sealing so it took a little while to calculate the quote which was accepted.

Cleaning/Repairing an Encaustic Cement Tiled Balcony

There was a lot of work to do and so I teamed up with fellow Tile Doctor Andrew Newstead for this job working as a two-man team. It took three days to complete the tiling and the grouting, then we returned the following week to allow the adhesive and grout to fully dry over the weekend. The next step was to clean the area the customer had previously laid and sealed to remove the old sealer that had damaged the colour and look of the tiles. For this we used water and a series of 400, 800 and 1500-grit diamond pads. This gradually removed the sealer and brought the tiles back to a more natural finish. We suspect the reason her tiles went milky was she hadn’t buffed off the excess sealer but luckily, we were able to fix it.

Sealing an Encaustic Cement Tiled Balcony

We then returned for one more morning, buffed tiles with a 3000-grit pad to further enhance their appearance and then seal with two coats of Tile Doctor Colour Grow. Colour Grow is an impregnating sealer that improves colour and works by soaking into the pores of the tile preventing dirt from becoming ingrained there.

Encaustic Cement Balcony Tiling Project in Hackney After Encaustic Cement Balcony Tiling Project in Hackney After

I’m pleased to say the whole job went smoothly and our client was pleased (see feedback below) that they could finally use their balcony which I’m sure has been in constant use since.

Plenty of problems to solve with my half-finished roof terrace, which were solved cheerfully and carefully. By Gemma M, Hackney, 27 May 2020


Source: Patio Tile Cleaning and Renovation Service in East-London

Friday, June 26, 2020

How to Seal Granite Floor Tiles

Granite floor tiles are an elegant and durable addition to any home. Granite is harder and more durable than marble or limestone, but still brings the look and beauty of natural stone to an area. While granite is extremely dense, it can be damaged by repeated exposure to dirt, spills and stains. To help protect the stone, and give you time to wipe these substances up, seal granite floor tiles on a yearly basis.

Things You'll Need

  • Broom
  • Granite cleaner
  • Clean sponge mop with refill
  • Granite sealer
  • Absorbent cotton cloths

Step 1
Sweep the floor thoroughly to remove any dirt or debris resting on the surface. Spray granite cleaner on the tiles once surface dirt has been removed, and mop with a clean sponge attachment to remove any spills or other substances from the tiles. Allow the floor to dry completely.

Step 2
Pour a silicone-based, impregnating sealer onto the floor. Use a mop with a new sponge attachment to spread the sealer over the floor. Saturate the tiles in sealer so that the granite appears wet; look for and cover dry spots to ensure you cover the entire floor. Wait 10 minutes for the sealer to soak into the stone.

Step 3
Dry the granite with absorbent, cotton cloths to remove excess sealer that has not been absorbed. Buff in a circular motion until the stone is dry. Change cloths whenever the cotton stops absorbing sealer to ensure an even finish on the floor.

Tip: Well-sealed granite will bead water up off of its surface. When your floor no longer beads water, it is time to reseal it.


Source: www.eHow.com

Sunday, June 21, 2020

How to Restore Victorian Minton Floor Tiles

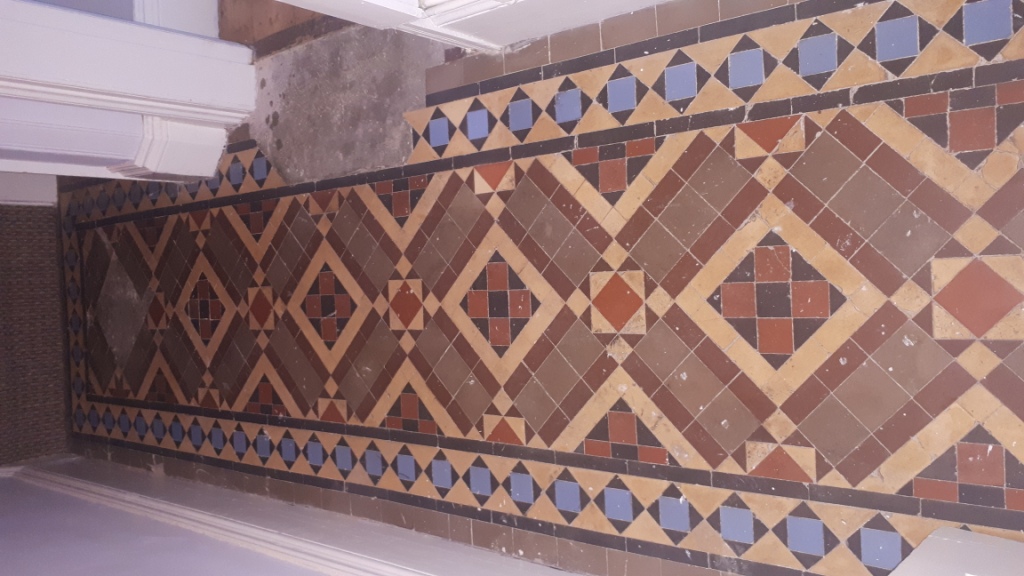
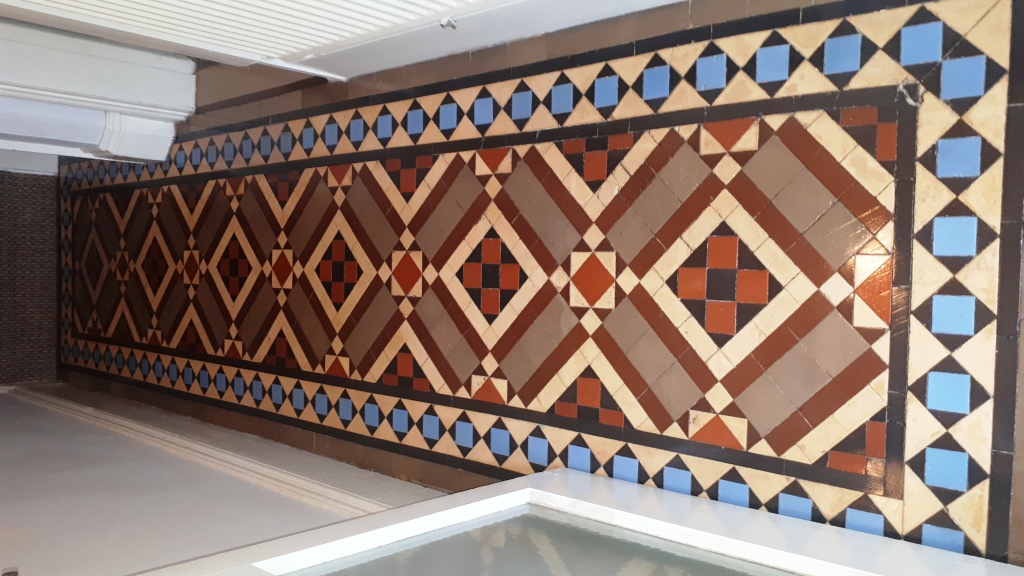
Details below of the full restoration of a Victorian Minton tiled hallway floor that I restored earlier this year in the South Birmingham suburb of Kings Heath. The owner had recently purchased the property and discovered a Victorian tiled floor underneath an old carpet in the hallway.

Victorian Tiled Hallway Before Restoration Kings Heath Victorian Tiled Hallway Before Restoration Kings Heath

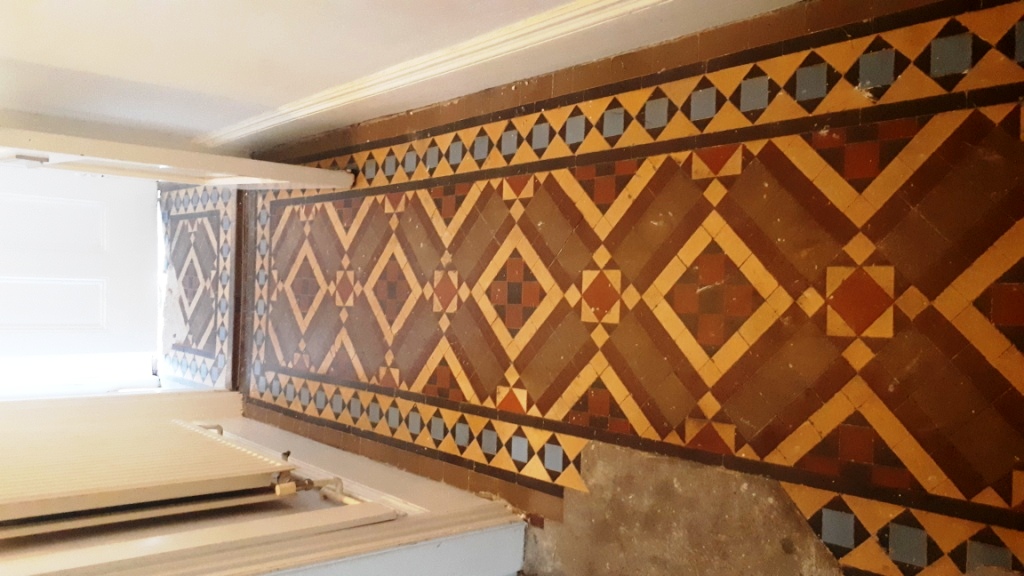
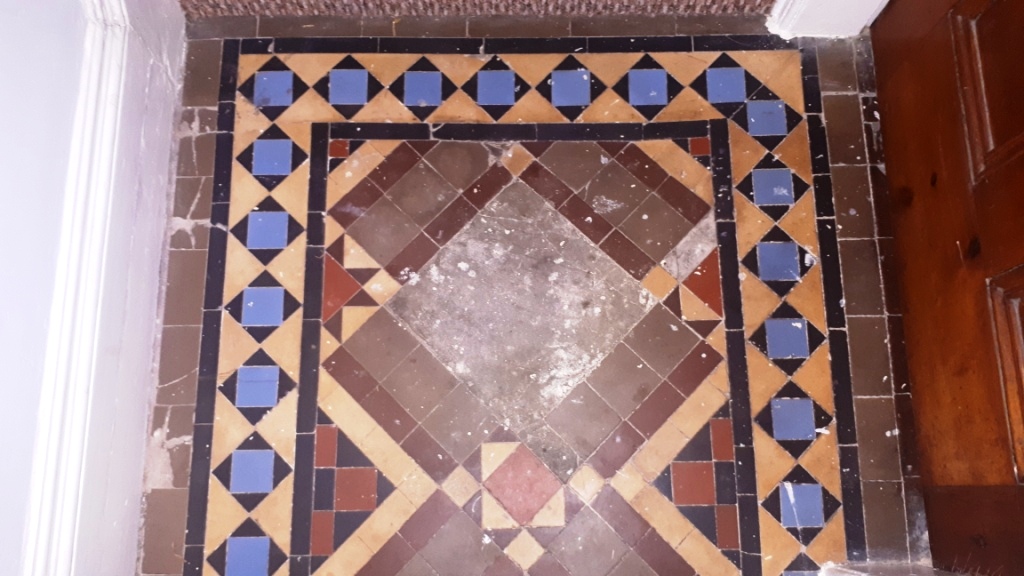
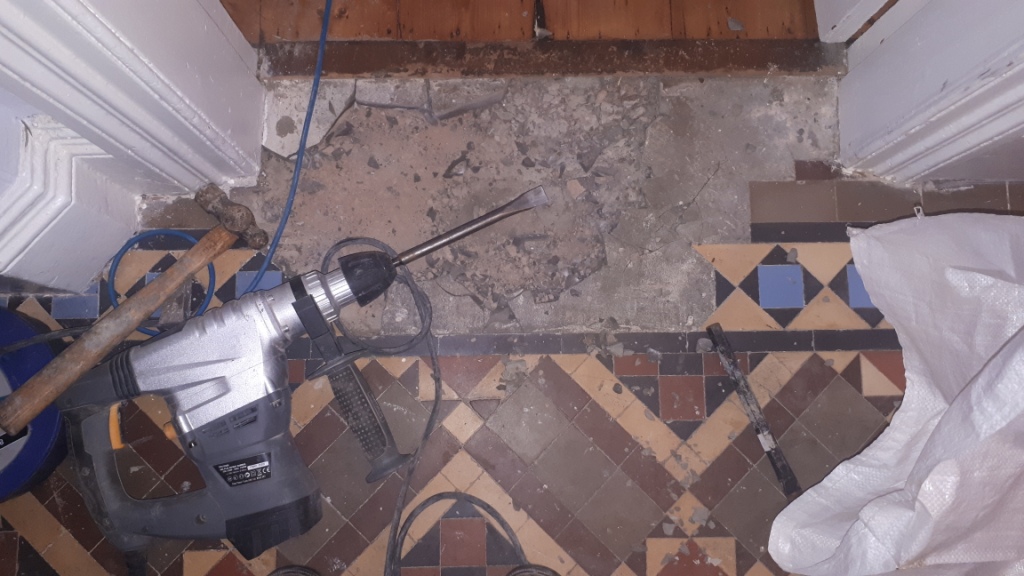
The floor was in a very poor state with areas where tiles were missing and had been backfilled with a cement levelling compound. The adjacent vestibule also had a large area of tiling missing. My client was delighted when they had found some of the missing original tiles and now wanted to investigate having the floor returned to its former glory.

Victorian Tiled Hallway Before Restoration Kings Heath

I went along to quote and give a demonstration of the restoration process and provide an indication of the expected results. The test area responded well to the treatment and they were happy with my quote to repair and renovate the floor, so were booked in to restore the whole floor and I set about sourcing matching replacement tiles.

Victorian Tiled Hallway Before Restoration Kings Heath


Repairing a Victorian Tiled Hallway Floor

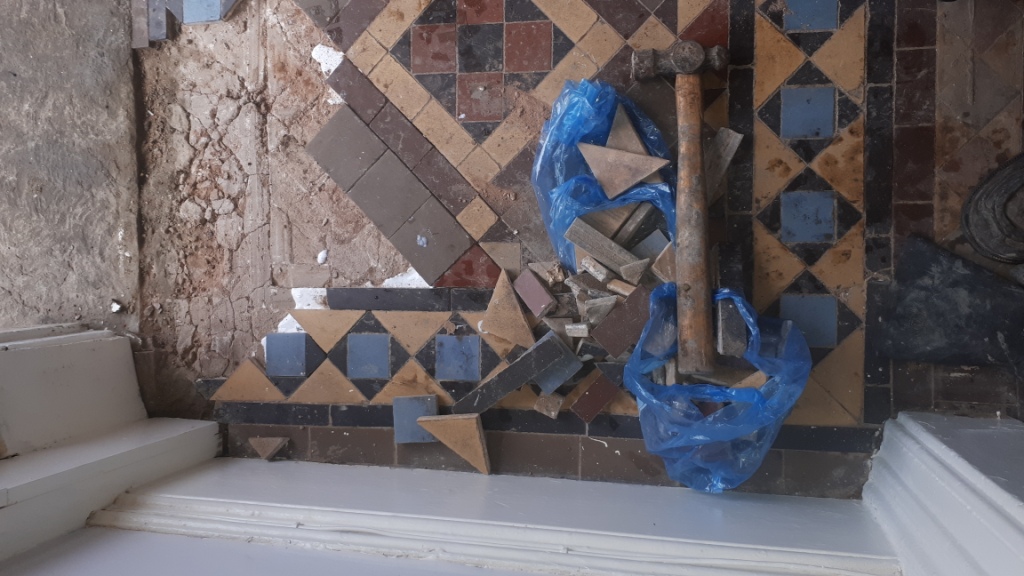
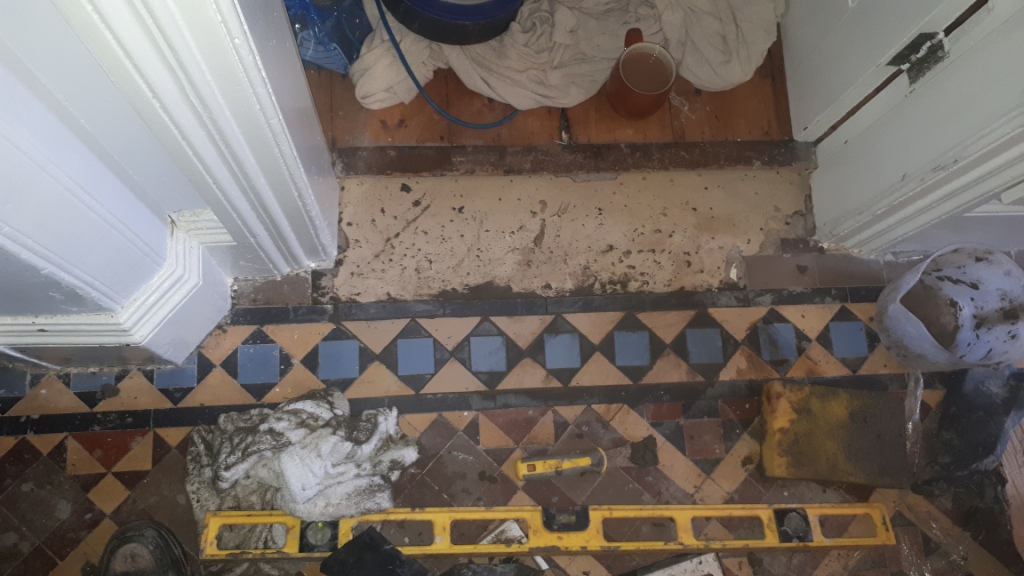
The first two days were spent carefully removing the leveller, cleaning up the exposed subfloor then cutting and fitting replacement tiles. One of the areas that needed extra work was a doorway which required a sub-floor installing before being able to tile with a matching pattern.

Victorian Tiled Hallway During Restoration Kings Heath

With the main hallway tiling completed I started on the tiling in the adjacent vestibule. I had been given a couple of bags of original tiles to sort out by the owner and fortunately most of them were in good condition, so I was able to repair the vestibule with approximately 90% original tiles. The rest were made up of reproduction tiles that I had managed to source. Additionally, the floor had numerous loose tiles which needed resetting and finishing with replacements. Due to so many of the tiles being original the appearance between the newly replaced area did not look too much different however I was confident the following deep clean and seal would blend them in well.

Victorian Tiled Hallway During Restoration Kings Heath


Deep Cleaning a Victorian Tiled Hallway Floor

With the tiling now repaired my next focus was the cleaning which I started on day three with an application of neat Tile Doctor Pro-Clean to help loosen the carpet adhesive and paint splashes that were staining the floor. The Pro-Clean was mopped onto the floor and then worked in with a 200-grit diamond pad fitted to a weighted rotary buffing machine. The extra weight, cleaning agent and coarse pad gets into the pores of the tile releasing years of ingrained dirt and removing old sealers and coatings. The floor was then rinsed with water and the waste extracted with a wet vacuum.

Victorian Tiled Hallway During Restoration Kings Heath Victorian Tiled Hallway During Restoration Kings Heath

The next step was to give the floor an acid rinse using another Tile Doctor product called Grout Clean-up which is designed to remove grout smears and mineral salts that will have been trapped into the pores of the tile after years of being covered in carpet. The grout clean-up was worked into the tiles using a 400-grit burnishing pad to refine the tile surface and close up the pores. The floor was rinsed and extracted again and left to dry out for two nights.


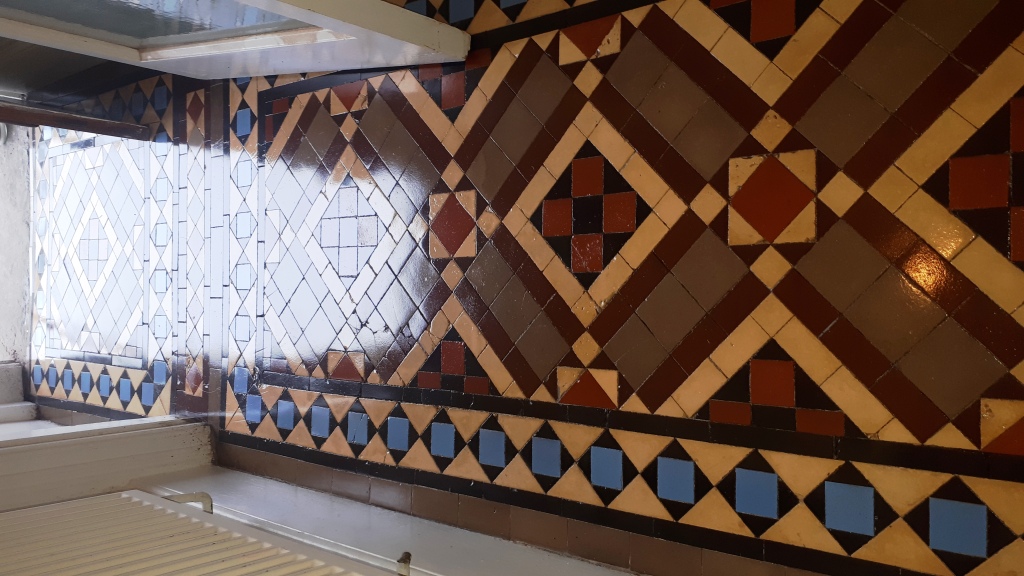
 Sealing a Victorian Tiled Hallway Floor

I returned a few days later and after testing the floor was dry set about applying a sealer. For this floor I chose to apply six coats of Tile Doctor Seal and Go which gives a lovely sheen finish and really brought out the character in the beautiful tiles. It’s also water based so it doesn’t leave a smell as it dries.

Victorian Tiled Hallway After Restoration Kings Heath Victorian Tiled Hallway After Restoration Kings Heath

By the time I had finished the floor was looking transformed and the client was delighted, so much so they left this fantastic review:

Kieron was fantastic. He brought our Minton flooring back to life and kept us informed every step of the way. He really knew what he was talking about and has done a fantastic job. Not to mention he was a really really lovely guy and great value for the incredible workmanship he offers."

I left the customer with a bottle of Tile Doctor Neutral Tile Cleaner to help maintain the tiles appearance. It is important to use a neutral pH cleaner when maintaining sealed floors as stronger tile cleaning products that you find in supermarkets are too strong and will prematurely strip the protective sealer off a floor.

Victorian Tiled Hallway After Restoration Kings Heath


Source: Minton Tile Cleaning and Restoration Service in Birmingham

Thursday, June 18, 2020

What Causes Cracked Grout?

Cracked grout is something that many homeowners have to deal with at some point. When your grout cracks it can be a very frustrating experience, and prompt you to make some repairs. Here are a few possible causes of cracked grout and what it means to you as a homeowner.

Cracked Grout Causes

Cracked grout can be caused by a number of different things. One of the most common reasons that grout cracks is because of settling in the foundation. When tile is installed on a concrete subfloor, there is always a chance that the foundation could settle a bit. The earth below your house could move and if it does, this can cause the grout to crack. Grout is more flexible than the tile and therefore has a higher likelihood of cracking in this situation.

Another common reason that grout cracks is because the floor below the tile is not structurally sound. For example, if you install tile directly onto a wood subfloor, this will not be strong enough to protect the tile and grout. Using concrete board is essential in this situation and it will help prevent grout cracking in the future. When you walk on tile that does not have concrete or concrete board below it, there is a good chance that the grout or tile will crack.


Tuesday, June 16, 2020

How to Remove Carpet Glue from Edwardian Floor Tiles

This Edwardian tiled hallway floor was a real hidden feature of this 1940s house in Coundon Coventry. I say hidden as it had spent years under the carpet which had protected it but had also left it ingrained with dirt. The owners decided to lift the carpet and had left the floor to dry over a few months, old floors like these do not have a damp proof membrane installed and so moisture in the subfloor was being trapped underneath. Now it was dry they were now keen to get the floor fully restored and late later last year they got in touch to have it renovated.

Edwardian Floor Before Renovation Coundon Coventry Edwardian Floor Before Renovation Coundon Coventry

I popped in to survey the floor and unusually for a floor of its age could find no damage or loose tiles, there was some adhesive tape to deal with along the edges but generally the floor just needed a good clean and seal. I gave them my quote which they readily accepted, and we arranged a date.

Edwardian Floor Before Renovation Coundon Coventry


Cleaning an Edwardian Tiled Hallway Floor

The first part of the clean which involved removing the old adhesive tape and paint on the edges and corners was carefully done by hand with a scraper. The whole floor was then given a deep clean using a 45kg floor buffer fitted with a scrubbing brush to work in different products. First, I applied Tile Doctor Remove and Go to remove the old wax polish. I find it works best if you leave products to soak in for ten minutes before scrubbing it into the tiles, this gives it time to activate and breakdown the coatings. The slurry is then rinsed off with a little water and extracted with a wet vacuum.

I repeated the process, but this time using Tile Doctors Acid Gel using as little water as possible. The Tile Doctor Acid Gel will remove old grout and other mineral deposits from the tiles and it also counters any alkaline salts which can be a problem in floors of this age. This is important as the lack of a damp proof membrane will allow salts to rise through the floor as moisture evaporates on the surface resulting in white deposits, a process known as efflorescence. Again, this was rinsed off with a little water and extracted with the wet vacuum.

This work was carried out over the winter and I was careful not to over wet the tiles as they can take a long time to dry out naturally at this time of year. The moisture levels in the tiles are always a concern as my next task would be to apply a sealer and the tiles would need to be dry for the best result.


Sealing an Edwardian Tiled Hallway Floor

Conscious of the damp issue I arranged to return to seal the floor seven days later, checking the moisture levels of the tiles with a damp meter in numerous places before starting. Fortunately, seven days had been plenty of time and the floor was dry.

The floor was then sealed with five coats of Tile Doctor Seal and Go Extra which allows for moisture to rise through the tile, again an important feature for a floor with no damp proof membrane. To use a sealer that was not breathable would lead to a build-up of damp under the floor where it can cause damage to the tiles and potentially work its way into the walls causing rising damp.

Edwardian Floor After Renovation Coundon Coventry Edwardian Floor After Renovation Coundon Coventry

The client was very happy with the newly revived floor, it was nice to have an additional period feature revealed. Going forward I suggested the use of Tile Doctor Neutral Tile Cleaner which is ideal for the regular cleaning of sealing floors and will ensure the tiles remain in this lovely condition for a long time.


Source: Edwardian Floor Cleaning and Restoration Service in Warwickshire

How to Clean Mold and Mildew in the House From High Humidity

Mold and mildew in the home can grow into a serious health hazard if left untreated. These fungi thrive in bathrooms, laundry rooms or wherever heat and moisture mix. They can cause health issues for the home's inhabitants, especially people with allergies or respiratory problems. While combating mold and mildew is just a fact of life for people who live in humid climates, once you know how to clean and remove mold and mildew, you can address the problem at its source.

A Quick Clean
If furnishings and household items become damp or wet, you must clean them within in the first 24 to 48 hours. Waiting more than 48 hours promotes mold and mildew growth. Clean moldy surfaces using detergent and rinse thoroughly with water before allowing to dry completely. The sun's ultraviolet rays also kill mold spore, so allow items to dry outdoors when possible. You may need to throw out porous materials, such as some woods, ceiling tiles and fabrics when they have severe infestations. As you easily ingest or inhale mold and mildew spores during cleaning, take steps to limit your exposure. Wear gloves, goggles and a N95-rated face mask when working with mold and mildew. Select gloves made from polyurethane, natural rubber and other heavy duty materials to keep your hands protected

A Stronger Solution
For more challenging infestations, use a beach solution consisting of 1 cup of bleach and one gallon of water. A stiff-bristle brush effectively removes fungi growth from the hard surfaces found in tubs and showers. Refrain from mixing bleach with household cleaners containing ammonia as it produces harmful, toxic fumes. Avoid working in enclosed spaces; keep doors and windows open to encourage the circulation of fresh air. Do not use bleach for routine mold and mildew clean-ups -- reserve it for severe cases. Call in a professional mold remediation team for infestations larger than 10 square feet.

Carpets and Floors
Carpets offer an ideal environment for mold and mildew to thrive as moisture collects in the rug fibers and can lead to rampant growth. Frequently launder area or throw rugs to get rid of mold and prevent new growth. Immediately spot clean carpet stains and spills as they occur to prevent the moisture absorption. Blot dry after cleaning to remove excess dampness. Any leftover moisture from the cleaning process exacerbates mold and mildew growth.

Air It Out
Excess moisture combined with heat causes mildew and mold growth. Dealing with mold and mildew becomes an endless cycle of cleaning, unless you treat the problem at its source. Fix drafty windows and leaky pipes in bathrooms, basements and kitchens where moisture accumulates. Open up doors and windows to let in fresh air or ventilate the moisture by turning on exhaust fans in kitchen and bath areas. When temperatures climb -- or if you live in a particularly humid area -- use air conditioners and dehumidifiers to promote dry conditions. Vent clothes dryers to redirect moisture outside the home.


Source: HomeGuides.sfgate.com

Monday, June 1, 2020

How to Remove Glued Down Carpet Tiles From Concrete

Carpet tiles are a do-it-yourself home improvement project, but removing them from concrete can be challenging. If the tiles are newer, they may lift with little effort and leave almost no glue behind. A good scrubbing afterward is all you’ll need. If the tiles are older, or if spreadable adhesive was used, removing the tiles is an arduous process that requires at least a day, possibly a weekend. Remove a few tiles to determine whether the glue is stubborn.

Things You Will Need
  • Knee pads
  • Work gloves
  • Putty knife or metal scraper
  • Pliers
  • Trisodium phosphate
  • Long-handle floor scraper
  • Broom
  • Carpet tile adhesive remover
  • Painter’s tape
  • Chemical-resistant gloves
  • Eye protection
  • Respirator-style face mask
  • Sponge or paintbrush
  • Paint scraper
  • 2 buckets
  • Stiff scrub brush
  • Wide floor squeegee
  • Wet / dry utility vacuum

Pull Up Tiles
  1. Put on knee pads and work gloves.
  2. Pull up one corner of a carpet tile. The first tile is often the most difficult to lift. If you can’t lift any corner, push the edge of a putty knife or metal scraper under the edge to pry the tile loose.
  3. Peel the tile off the floor with gloved hands or pliers.
  4. Assess the adhesive. If it is clear and sticky with little remaining on the concrete, peel off the remainder of the tiles and scrub the concrete afterward with trisodium phosphate diluted in warm water according to the manufacturer’s directions. If the glue is hard and stuck to the concrete, peel off the tiles and proceed to scraping the floor.
Scrape the Concrete
  1. Push a long-handled floor scraper along the floor at an angle with the blade pointed away from you, removing as much glue as possible.
  2. Sweep the floor to remove the particles.
  3. Inspect the floor for stubborn glue. If you cannot scrape it off, proceed to dissolving it with carpet tile adhesive remover.
Remove Adhesive
  1. Apply painter’s tape across the baseboards.
  2. Put on chemical-resistant gloves, eye protection and a respirator-style face mask. If you took off the knee pads to scrape the floor, put them back on.
  3. Apply carpet tile adhesive remover to a 12-inch square area of the floor with a sponge or paintbrush.
  4. Let the adhesive remover sit on the concrete until the adhesive softens, then scrape it off the floor with a handheld paint scraper.
  5. Drop glue scrapings into an old bucket for disposal. Continue around the room until the glue is removed.
  6. Sweep the floor and proceed to cleaning it.
Clean
  1. Fill a bucket with warm water and trisodium phosphate, known as TSP, in a dilution that the TSP manufacturer recommends to clean floors.
  2. Dip a stiff scrub brush into the bucket to wet it, and scrub the floor with the solution. Mix more solution as necessary to scrub the whole floor.
  3. Pull a squeegee across the floor and deposit the residue in one location in the room.
  4. Vacuum up the liquid and residue with a wet / dry utility vacuum.
  5. Fill a bucket with plain warm water. Wet a sponge in the bucket and wipe the floor to remove the last traces of cleaning solution. Empty the bucket and refill it with clean water frequently until the floor is fully rinsed.
Warnings
  • Aggressive scraping can break the floor scraper and chip the concrete.
  • Some flooring adhesive removers require a well-ventilated room.