Friday, June 29, 2018

7 Tips for Painting a Floor Joist

When painting a basement floor joist it's important to do the job correctly. The correct paint needs to be selected, as well as providing yourself with the proper protection for your body and eyes. A clean clear area is far easier to work in as you will be working overhead. Moving the stepladder is easier if the floor area is open.

1: Body, Eye, and Breathing Protection

Purchase disposable plastic coveralls, masks, goggles, petroleum jelly, covers for your shoes and some gloves. Cover yourself totally before getting started by using the disposable clothing and include a mask, hair covering and goggles. The paint you will be using will be extremely difficult to get off if it gets on your skin and hair. Any area of skin not covered should be protected with petroleum jelly.

2: Clear the Decks

It is best to cover the entire area of floor and any immovable objects before starting to spray. By clearing the area as much as possible, you will make your job of spraying the floor joists a lot easier. Using a sprayer makes the task of painting easier but tends to make a fine spray throughout the area, whichever paint you decide on. The paint you will be spraying will cover everything with a fine dusting. Its better to invest in some throw away plastic sheeting than to use fabric to cover items.
3: Types of Paint to Use

The best paint for painting floor joists is a non-shiny or matte paint. You do not want the ceiling to be obtrusive. A flat finish with a water-based paint is a better option.
4: Apparatus to Use

Because you will be painting a large area over your head, it will be easier to use a spray painter. If you don’t already have one, rent one for the project. If however, you intend to do further projects, purchasing a sprayer would be a better solution. Check on the sprayer as to what consistency the paint should be mixed to and stick strictly to the directions.
5: Mask the Outlets

Make sure all wires and outlets are masked off. There could well be loose wires along the floor joists. Make sure you mask them off completely. You do not want the paint entering or adhering to these items. If possible, cover them with ducting for cables.
6: Primer

Use a primer first. Although you might be tempted just to paint, a proper primer will make the job last longer. Primer helps paint adhere to the surface better and will provide a more professional look.
7: Paint

Paint over the entire area. Make certain no part of the ceiling or the joists remains uncovered. It could well require two coats. When spraying, spray lightly and move on to the next area. You do not want globs of paint appearing. If you leave the sprayer for a while, you will have to clean the nozzles or they will clog up. Clean the whole sprayer if you intend on leaving it over night. Paint should not be left in it for long periods.

It is not a difficult job to do and the basement will look far better once the floor joists are painted.


Tuesday, June 26, 2018

Deep Cleaning Terracotta Kitchen Tiles in Devon

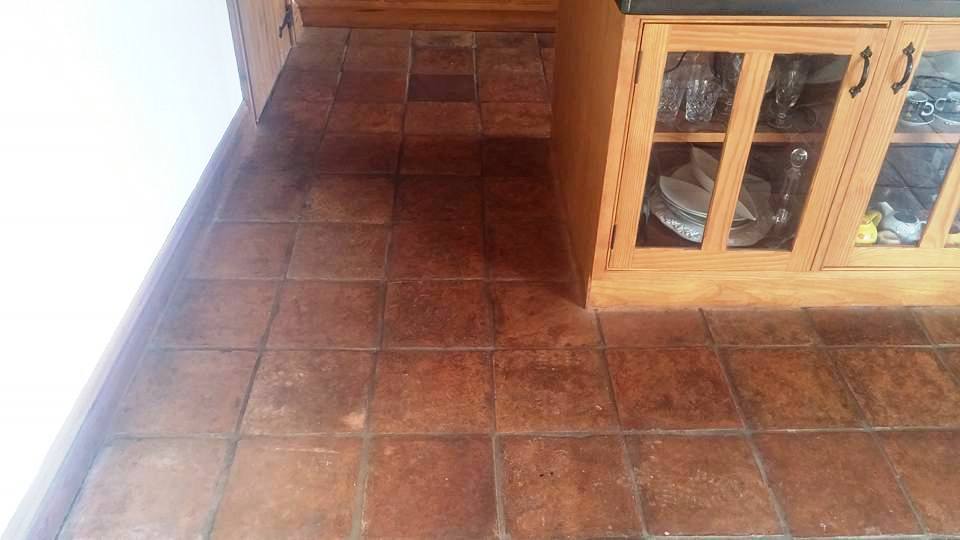
Earlier this year I was called to the Dartmoor town of Moretonhampstead in order to take a look at a large Terracotta tiled kitchen/dining room which the owners had ‘lived with’ for over a decade but were finding it harder and harder to keep clean. Upon arrival, I could see that any sealer that had been used previously was well beyond its best and the floor was holding in the dirt and grime because of how porous unsealed terracotta is.

  Terracotta Tiled Kitchen Floor Before Cleaning Moretonhampstead

I conducted a test on a small area of the floor which not only helped me to identify the most suitable product to clean the floor with but also to show the customer how much of an impact a professional clean and seal of a floor is likely to have. The first product I tried was Tile Doctor Pro-Clean which although cleaned the tiles very well I could tell was going to be a problem when it came to rinsing because the floor was absorbing it almost as quickly as I was able to put it down! My solution came in the form of Tile Doctor Oxy-Gel which is a very similar product to Pro-Clean and is a very powerful stripper/degreaser but has the added benefit of being in gel form, so it sits on the tiles rather than becomes absorbed into them. It is also a very good option for riven stone, uneven tiles or undulating floors because unlike a liquid it will not run off the high spots.

The clients were thrilled with the test area and couldn’t believe how much lighter the tiles were and as soon as I sent them my quote they booked me in at my next availability.


Deep Cleaning Terracotta Tiles

When I returned to the property my first task was to protect the woodwork from splashing by dressing the skirting boards and kitchen plinths in a blue plastic covering. I then set to work applying Oxy-Gel to the tiles and allowing it to dwell for about five minutes before scrubbing it in with a stiff bristled brush fitted to a rotary buffer.

The scrubbing action released the dirt form the Terracotta and I was then able to extract it from the floor using a wet vacuum. I worked methodically in small areas at a time and when the whole floor was done it was given a thorough rinse to remove any trace of cleaning products from the floor. I also checked the floor carefully and spot treated any stubborn staining and used the wet vacuum to get the floor as dry as possible before leaving for the day.

Terracotta Tiled Kitchen Floor Before Sealing Moretonhampstead


Sealing Terracotta Tiles

After I was satisfied that the tiles were all clean I then needed to wait for the floor to dry before I could seal. As I mentioned these tiles were very porous and so took longer than usual to dry out but once the moisture levels were at an acceptable level I returned to finish the job.

Once terracotta has been stripped it can reveal historic damage such as acid stains or from inappropriate cleaning products which look like lighter patches on the tiles. Upon my return I spent a while improving any areas like this by using diamond encrusted burnishing pads to resurface the tiles. In general, it is not recommended on terracotta because you lose the natural texture of the tiles and create a smooth finish but in this instance the customer decided that this was preferable to the stains remaining visible.

After both the customer and I were happy with the condition of the tiles I began to seal the floor with Tile Doctor Seal and Go, an acrylic based sealer which would give the tiles a slightly glazed or freshly mopped appearance. Because of the porosity of this particular batch of terracotta tile it took eleven coats before the floor was fully sealed!

The customer was very happy, and the tiles lit the room up, transforming it.

Terracotta Tiled Kitchen Floor After Cleaning and Sealing Moretonhampstead


Source: Terracotta Tile Cleaning and Renovation Service in Devon

Monday, June 25, 2018

How to Install Steel Floor Joists

Commercial buildings, and larger homes, use steel floor joists in order to handle the load of the structure. These steel floor joists are especially important for the ground floor of the structure as they have the most load upon them. Many homeowners are finding that they can eliminate sagging and bouncing floor problems by replacing their wood joists with steel floor joists. Even though this might seem like a large project, it is easily done with the right instruction, the right tools, plenty of help, and taking your time.

What You'll Need:
  • Steel floor joists
  • Hydraulic jack
  • Joist brackets
  • Level
  • Drill
  • Bolts

Step 1 - Measure Joists for Length

Making sure you have the right size floor joists is the most important part of the installation. Steel floor joists are thick steel and are not easily cut without specialized equipment. Before ordering the steel floor joists make sure you take accurate measurements. It is highly recommended that you take several measurements along the floor area to ensure accurate lengths of the steel floor joists.

Step 2 - Purchase Correct Steel Floor Joists

There are different grades to steel floor joists that give the amount of load they can handle. When ordering the floor joists, make sure that you purchase the joists that are strong enough for your home.
Step 3 - Install Joist Brackets

In order for the steel floor joists to be installed properly, you will need to first install the joist brackets on the ledger boards. Hold the joist bracket up to the ledger boards and predrill the holes for the bolts. Drive in carriage bolts to secure the joist brackets to the ledger board. Continue to install the joist brackets beside each of the wooden joists.
Step 4: Install First Steel Floor Joist

The steel floor joists are going to be heavy. In order to install them without any injury or damage to your home you will need to have some help carrying them in your home. Also, have some hydraulic jacks ready to lift the steel floor joists into position to negate the need to hold them for a long period of time. Line up the first steel floor joist with the joist brackets. Secure the joist to the bracket with the use of nuts and bolts. Tighten the bolts with a ratchet wrench.
Step 5 - Remove Wood Joist

Once the steel floor joist is installed next to the wood joist, you can remove the old joist. Keep the hydraulic jacks under the steel joist for added support while the wood joist is removed.
Step 6 - Continue Installing Steel Floor Joists

Following the same installation method, continue to install the individual steel joists. It is important to keep a hydraulic jack under each new joist while you complete the installation process. This will allow the home to settle on the steel joists without causing a lot of stress.
Step 7 - Remove Jacks

To finish off the installation of the steel floor joists you will need to wait a few weeks. After 2 or 3 weeks have passed, remove the hydraulic jacks slowly to make sure that the house has settled upon the joists. Remove every other jack first, then go back and remove the rest.


Wednesday, June 20, 2018

How to Repair Floor Joist Termite Damage

Are your floor joists in danger from termites? If they are and the damage is very minimal, you may be able to do the repairs yourself. You can save yourself a lot of money by doing the work yourself. Making repairs like this is quite a job. There won’t be much in the way of supplies that you would need. Time will be the biggest factor here. If this is your first attempt at repairing a floor joist with termite damage, you might consider having a friend who knows how to do work like this to come lend you a hand. There are some steps to follow that will hopefully get you going in the right direction.

What You'll Need:
  • A couple of 2-by-4 wooden floor joists
  • A hammer
  • Plenty of Nails

Step 1 - Preparation

You will need to look for the damaged area that will need to be repaired. Once you find it, remove any of the top floorboards above the damaged area to look at the subfloor. Then you must attempt the repairs from the crawl space or basement so that you can save the interior flooring. You will also need to be able to see the damaged area well enough from underneath it to be able to fix it properly.
Step 2 - Disconnect Utilities

You will now need to disconnect your utilities temporarily because you could run into some wires near the damaged area. If they are live wires, you could get electrocuted. Be sure to clear all the wires away from the area if there are any.
Step 3 - Placing the New 2-by-4

Now that you have the utilities cut off, you can set the new 2-by-4. Place it as close to the termite damaged one as possible. You need to secure it by nailing it to the crossbeam on the base of the floor. This will help to provide the structural support needed for the damaged beam. Then you can remove the damaged portion and replace it with a good sturdy wooden beam.
Extra Tip
  • Removing termite infested lumber from your floor without replacing any kind of support: you might do some significant damage to the foundation and put yourself as well as others in harm’s way. If you don’t know what to do or you are unsure, seek the help of a professional.
  • Now that you have learned how to replace a termite infested floor joist, you can see that it is not an easy job. One way to be sure that you can prevent this kind of a situation is to have your home termite treated. A once a year inspection can save you from having to tear up your floors to repair damage that could have been prevented. Should you ever have to tackle a job like this, Ask for help and play it safe? It might also be a good idea to get the opinion and advice from a professional. They will be able to give you the best advice possible.

Monday, June 11, 2018

How to Brace Your Floor Joints

When you lay a floor in a home, it is placed on top of the joists that act as a bracing for the floor. These joists can sometimes become loose and the result will be a floor that squeaks when you walk on it. There is not much that is more annoying than creaky floor boards. If the joists fail completely, they can create a potentially dangerous situation. You can hire someone to come out to fix the problem, but that can cost you quite a bit of money. Instead, follow the simple steps below to effectively brace floor joists on your own.

What You'll Need:
  • Power screwdriver
  • Wood screws
  • 2x4-inch lumber
  • Saw
  • Tape measure
  • Tape
  • Level
  • Shims
Step 1 – Find the Bad Areas

When you are walking on the floor, you will be able to hear where a squeak is, but you can also feel it. As you walk, the floor should be sturdy. If there is movement under your feet, then this can be a loose floor joist. Since it is sometimes hard to orient yourself under the floor, it is a good idea to count your steps from a familiar spot. This way, when you are under the floor, you can easily find your way to the troubled areas.

Step 2 – Sagging Floor Joists

When you reach the underside of the floor, you will be able to see several things. You will have the floor joists which cross one another to form a grid. On top of the floor joists is the subfloor, which is typically a sheer or sheets of plywood. On top of that will be your main floor. The floor joists are to be level and any that are not level are sagging. You can also tell because you will see a gap between the joists and the subflooring. To fix this problem, add several screws to the area where the joists are sagging. When you add the new screws do so at an angle and make sure they attach to the subfloor. As you add the screws, the gap between the subfloor and the joist will close up. You can also slide several shims between the subfloor and the joist and then add the screws to brace the joists.

Step 3 – Bowing

Over time, your floor joists can bow or bend from years of use. When this happens, the joists will not be level but they also may not be away from the subfloor but instead curving away from them. This lack of support in certain areas of the floor can be trouble. Use the tape measure to determine the space between joists. Cut the 2x4-inch board to this size. You want one piece for each side of the warped joist. Place the cut board between the joists and hammer in place, and then nail it to the joist and the subfloor. Repeat with the other side of the joist. This will brace the joist and push it back in place.


Tuesday, June 5, 2018

Quarry Tiled Kitchen Floor Renovation in Warwickshire

I took the photographs below at an old 1920’s house in Nuneaton where the owner was interested in restoring the original Quarry tiled floor in their Kitchen. Interestingly Nuneaton has a rich manufacturing history that included brick and tile making so it’s entirely possible these tiles were made locally at the Haunchwood Brick and Tile company.

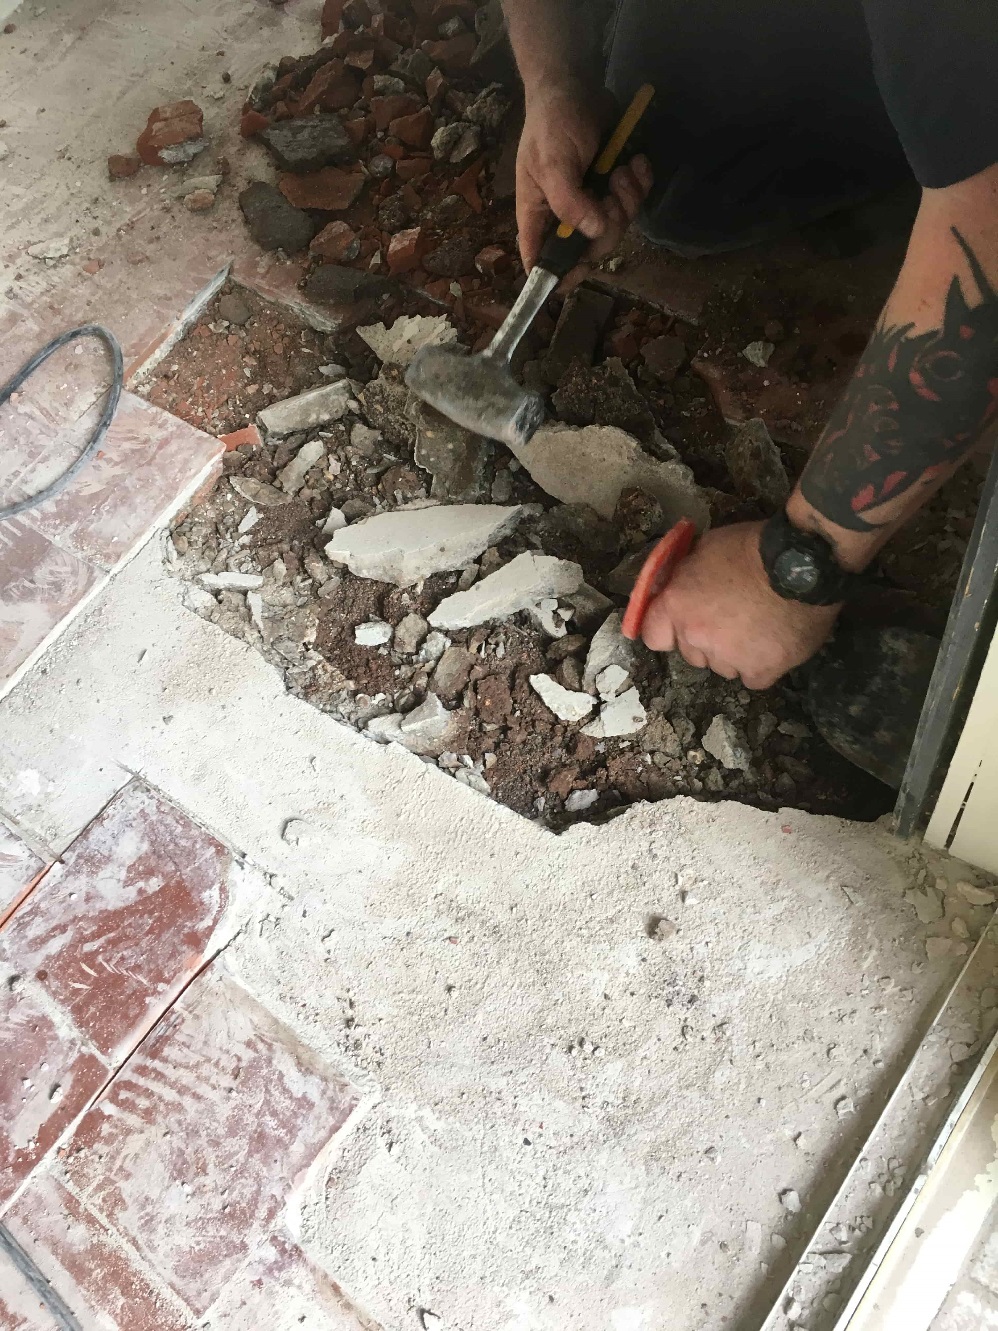
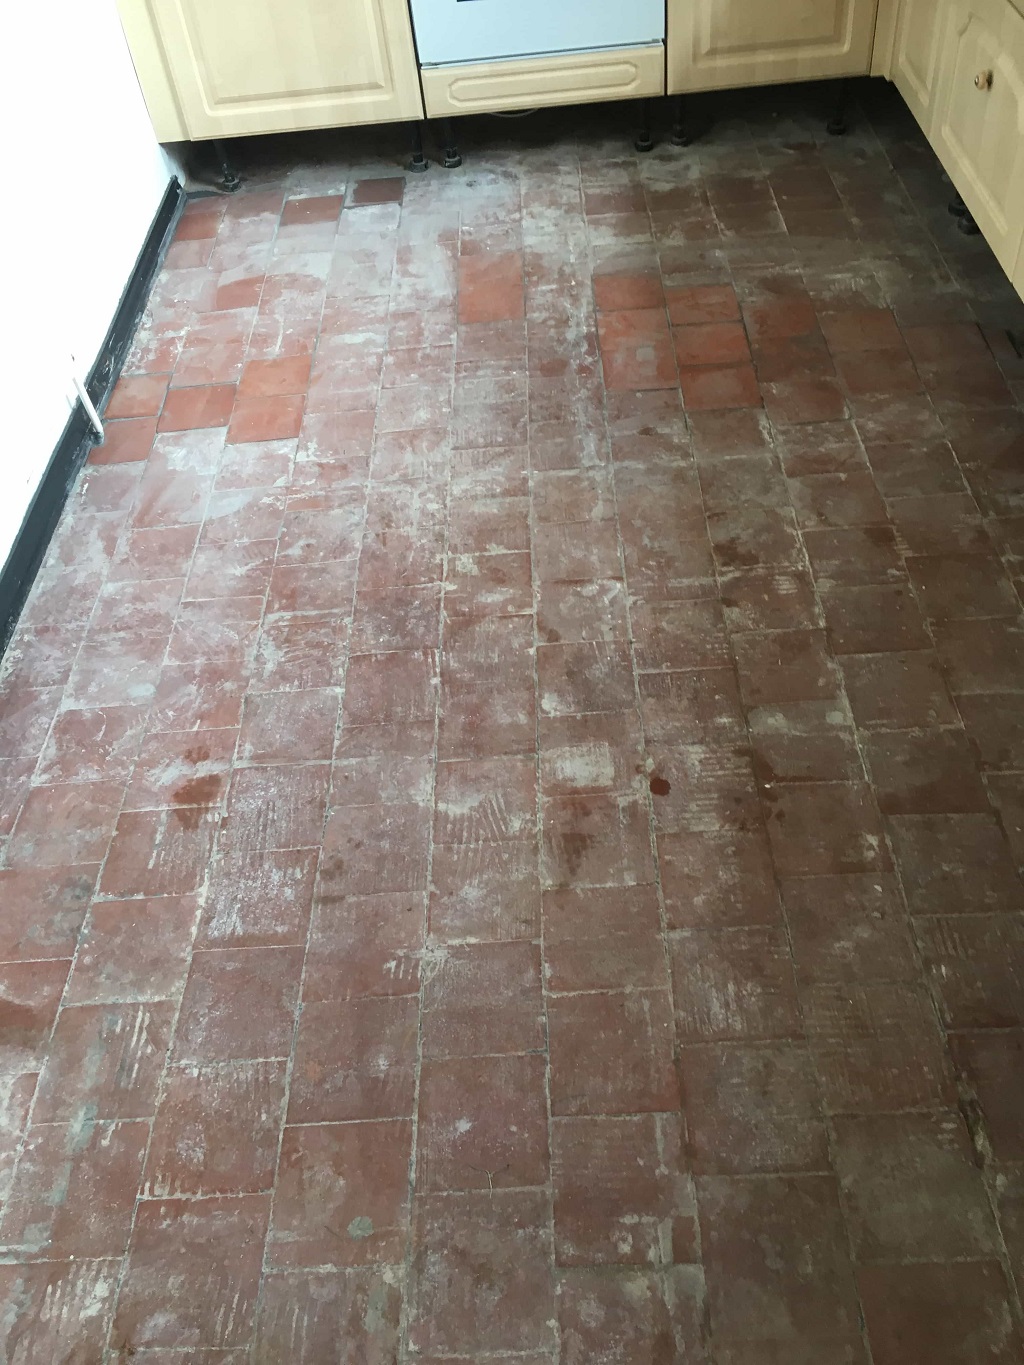
Tastes change over the years and at some point in the past the Quarry tiles had been covered with a levelling compound so that linoleum could be installed on top. This meant that the first part of the job would be to remove the screed before I could clean up the tiles. On top of that It was clear as well that many of the tiles were damaged and would need replacing.

Quarry Tiled Floor Before Restoration Nuneaton

I worked out a quote which was agreed by the customer and started looking around for matching replacement tiles, fortunately I was able to track some down at Warwick Reclamation who stock thousands of quarry tiles in many of the common period sizes.


Restoring an Original Quarry Tiled Kitchen Floor

On day one I set about carefully removing the screed with a hammer and chisel and also the damaged tiles, so they could be replaced. With the tiles removed we it was clear some parts of the subfloor were cracked and needed to be rebuild with fresh cement.

Quarry Tiled Floor During Restoration Nuneaton Quarry Tiled Floor During Restoration Nuneaton

Once the floor was ready the replacement Quarry tiles were fixed in place and once the adhesive was dry they were grouted in.

To remove the remaining screed and salt damage from the surface of the tiles I used a set of coarse milling pads which are applied with water for lubrication. The process generates a lot of soil, so the floor needs to be rinsed with water and the soil extracted with a wet vacuum after each pad.

The next step was to pre-treat the tiles with Tile Doctor Remove and Go in order to remove old contaminants such as old oils and then treat the floor to a deep clean with Tile Doctor Pro-Clean which was scrubbed in with black scrubbing pad.

Old floors like these don’t have a damp proof membrane so the last step in the restoration process was to counter any inherent salt issues in the floor that might reappear later as white efflorescence salt deposits. This is done by giving the floor an acid rinse using Tile Doctor Grout Clean-up which is scrubbed into the tiles, neutralising the salts, this product also removes old mineral deposits and grout smears.

The floor was given a final rinse with water to remove any traces of products used and then as much water and moisture as possible was extracted using a wet vacuum. The floor was then left to dry out for a few days.

Sealing a Quarry tiled floor

When I returned my first job was to take multiple readings around the floor using a damp meter to verify the floor was dry and ready for sealing. The extra drying time had done the trick and I was able to seal the floor using multiple coats of Tile Doctor Seal and Go Extra which is a fully breathable sealer that can cope with any potential moisture problems, it also leaves a nice sheen finish that brings the best out of Quarry tiles.
Quarry Tiled Floor During Restoration Nuneaton Quarry Tiled Floor During Restoration Nuneaton
In total the restoration took 4 days to complete and had completely restored the Quarry tiled floor close to what they must have looked like back when they were installed nearly a hundred years ago. Source: Quarry Tile Cleaning and Restoration Service in Warwickshire

Installing Floating Laminate Floor: How to Work Around Obstacles

A floating laminate floor looks very good in a room, and in most cases is quite easy to install. The problem comes when there are obstacles such as pipes or poles in the room. There are ways around this that are quite simple. It’s a matter of knowing the correct technique and putting it into practice. Do it each time and your floor will look perfect when you finish.

What You'll Need:
  • Tape measure
  • Pencil
  • Drill
  • Saw
  • Adhesive
Step 1 - Measuring

Begin by taking the tape measure and measuring the obstacle’s diameter, where it’s a post or pipes. In other instances you’ll need to measure it’s size if it come out from a wall. Having done this, measure the distance you’ll need to cut on the piece of floating laminate floor as you put it on the floor. This will tell you where you have to drill. Mark the laminate to show where you’ll need to drill and saw.
Step 2 - Pipes

If the obstacle is a pipe, or pair of pipes, you’ll need to dill out holes in the floating laminate floor where the pipes will sit. The hole needs to be 5/16 inch larger that the pipe.

Step 3 - Cutting

Having created the hole to accommodate the pipe, you need to be able to fit the floor. That means cutting so the flooring can fit around the pipe. If the hole you’ve drilled is close to the edge of the piece of flooring then you’ll need to make cuts on each side at an angle of 45 degrees, being careful to reach the hole at a place there you can fit it around the pipe.

If the hole you’ve drilled is in the middle of the flooring, the cuts need to be straight, that is 90 degrees. Again, be certain that the cuts you make will allow you to fit the flooring around the pipe. What you’re doing in both cases is creating two pieces of flooring to put properly around the pipe.

Step 4 - Larger Obstacles

Where you have bigger obstacles, such as pillars, you’ll need to cut on two pieces of flooring. After measuring, put the 2 pieces together to mark out how much you’ll need to cut. Again, allow and extra 5/16 inch around each obstacle for expansion. In this case you’ll be cutting, not drilling.

Step 5 - Fitting

To fit the pieces in place, begin by fitting the piece of floating laminate floor that butts up to the obstacle. Use the pull bar, then the rubber mallet and block to tap it firmly into place.

Now you’ll have a small piece of wood flooring to fit around the obstacle. To secure it in place, apply adhesive to the edges where it meets the rest of the flooring. Push completely into place by either using your hands or a pull bar. Allow to dry before putting in the next piece of flooring. If the obstacle is a door jamb, the best looking solution is to cut out a small section at the bottom of the jamb and put the flooring under it.


Source: www.DoItYourself.com
Friday, June 1, 2018

Renovating Ceramic Bathroom Tiles in St Albans

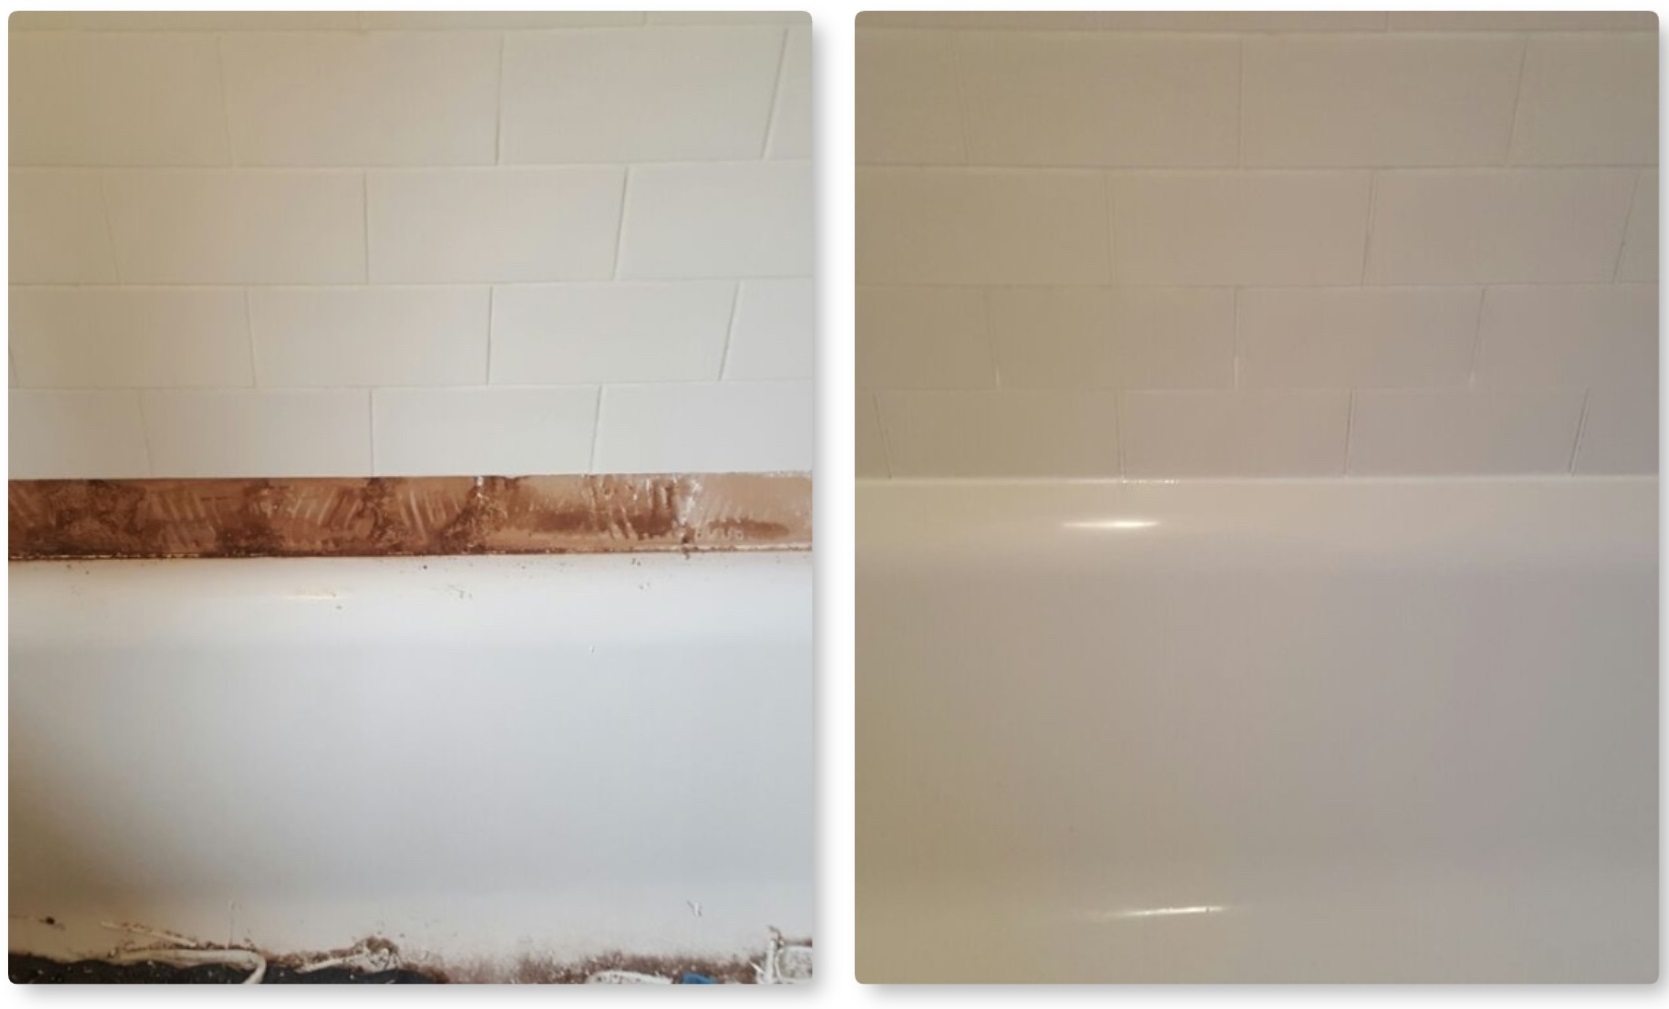
This was a small family bathroom at a house in St Albans with white ceramic glazed tiles and what was once white grout. The grout was now stained and proving difficult to keep clean, additionally the silicone seal between the tile and the bathtub was perishing. The bathroom needed cleaning and restoring to give it a new lease of life as well as making it easier to maintain for the busy family.

Bathroom Tiles Before Cleaning St Albans

Were actually based in St Albans so always a pleasure to pop round and meet fellow residents. The city dates to the Romans when it was known as Verulamium and these days its popular with commuters working in London.

Cleaning a Ceramic Bathroom Tile and Grout

On arrival I inspected the tiles around the bath and could see they were going to be problematic, the silicone sealant was starting to perish, and I was concerned that the bottom row may be not be watertight. I like to do a job right the first time round so I decided the best thing to do would be to remove the row around the bathroom edge, clean them up and refit them with fresh adhesive, grout and reseal with silicone.

With that in mind my first job was to give the ceramic tile and grout a deep clean by spaying on Tile Doctor Aqua-Pro and then scrubbing it in with polypropylene brushes and pads. This product is designed for the regular cleaning of bathroom tiles as is Tile Doctor Duo-Clean which is a stronger product that can tackle mould as well. The tile and grout were then given a high-pressure steam clean using a special machine we usually use on floor tiles and then let to dry off over lunch.


Ensuring a Tight Bath Seal

After lunch the old silicone was stripped off between the bathtub and wall tile and this was followed by the careful removal of the bottom row of ceramic tiles. This is done by removing the grout first with an oscillating hand tool and then carefully prising the tiles off the wall without damaging them.

Bathroom Tiles Replacement St Albans

The old adhesive was then scrapped off the exposed area to prepare the wall for re-tiling and the tiles were re-installed with fresh. Once the adhesive and gone off the tiles were re-grouted and the grout left to dry before applying a fresh silicone sealant between the tile and bathtub. During the various drying phases, the ceramic bathroom tiles were buffed using a soft white buffing pad to give them an as new appearance.

Bathroom Tiles After Cleaning St Albans

The job was completed in one day and the bathroom now looks like it was recently installed.


Source: Ceramic Tile Cleaning and Restoration Service in Hertfordshire