Wednesday, January 29, 2020

How to Maintain Your Concrete Driveway

One of the best attributes of a decorative concrete driveway is how little maintenance and routine care it will need over its lifetime. But no driveway paving material—including concrete—is truly maintenance-free. Here are some tips for preserving the life and appearance of your investment.

Clean and reapply sealer as needed
Cleaning your concrete driveway on occasion and keeping it sealed are the best measures you can take to keep it looking its best. How often you clean and reseal will depend on the weather conditions the concrete is exposed to and the amount of vehicle traffic it receives. Generally, you should reseal a concrete driveway every two years or so, or when the finish begins to show wear. Good commercial sealers are available from concrete material suppliers and hardware stores. Or ask your contractor for recommendations. Always apply the sealer according to the manufacturer’s recommendations.

Remove stains immediately
While a sealer will help to protect concrete from stain absorption, it’s still a good idea to remove oil, gasoline, grease and other spills as soon as possible. If the concrete does discolor, pressure washing and certain cleaning chemicals will remove most stains.

Avoid using deicing chemicals
Using deicers on your concrete driveway in the winter can cause surface damage—primarily scaling and spalling—by forcing the thawing and refreezing of moisture. Products containing ammonium nitrates and ammonium sulphates are especially harmful because they will actually attack the concrete chemically. Rock salt (sodium chloride) or calcium chloride will do less damage, but they can harm vegetation and corrode metal. Avoid the use of any deicers the first winter after driveway placement, since new concrete is more susceptible to the harmful effects of salt. As an alternative, use sand for traction.

Treat it with care
Although concrete is one of the most durable paving materials for driveway construction, the typical residential driveway isn’t engineered to support heavy vehicles (like a huge moving van) and large construction equipment. Also use care when plowing or shoveling your driveway. Avoid the use of metal blades that might scrape or scratch the surface.


Monday, January 27, 2020

How to Seal Before Grouting Travertine Stone

Travertine stone tiles are more complicated to seal and grout than are most types of tiles, because of the trademark holes that are all over the travertine surface. Those holes are generally filled with grout of a different shade than the tile, so the patterns of the holes are highlighted, but they aren't left open to collect dirt and moisture. You have to seal the stone before grouting (so the grout doesn't stain the stone), and then afterward, to seal in the grout.

  1. Brush over your newly installed travertine with a dry paintbrush to take off all dust and debris, from the tile surface as well as from the gaps between the tiles.
  2. Use the paintbrush to apply penetrating tile sealant to the surface with a paintbrush. Apply it in a thin, smooth coat. Don't brush into the holes that are on the face of the tiles or in the gaps between them. Let the sealant dry for four to six hours.
  3. Spread unsanded grout over the tile using your grout squeegee to scrape it over the surface and force it into the spaces and holes. Make sure the grout is flat over the holes and spaces.
  4. Let the grout sit in the holes and spaces for about 10 minutes. Wipe down the surface of the tile with a damp sponge, running it flat over the surface to avoid pulling the grout out of the holes and spaces.
  5. Allow the grout to set for five to seven days. Apply two more layers of tile sealant, brushing it over both the tile and grout.

Source: HomeSteady.com

Thursday, January 23, 2020

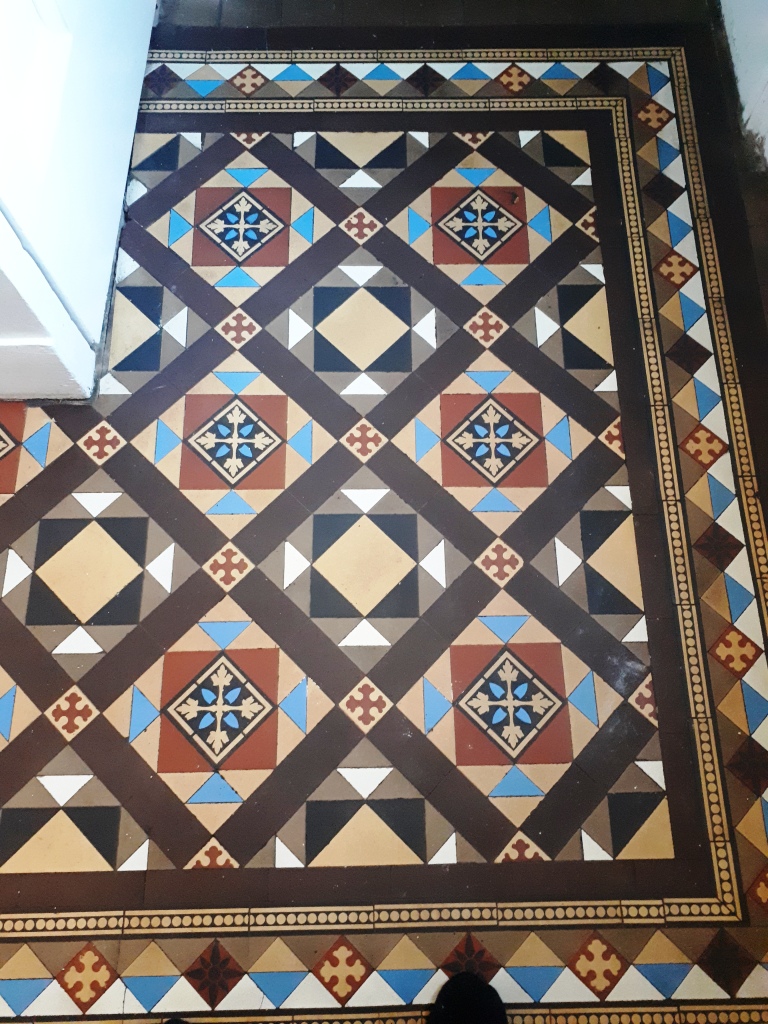
How to Renovate a Victorian Tiled Hallway

Here’s the 2nd part of the floor restoration work I did for a property developer last year in Harborne, this time detailing the renovation of the Victorian tiled hallway floor. I must credit the builder for engaging me on this project as many builders would attempt this work themselves, rather call in a professional, which often leads to a less than desirable result.

Victorian Tile Hallway Before Renovation Harborne

The house dated from the 1800's and contained two old floors that needed restoration. I didn’t want to trample over a recently renovated hallway floor whilst rebuilding the old Quarry tiled floor in the front room so naturally I addressed that first. If you missed the first post detailing its restoration you can find it here: Victorian Quarry Tiled Floor Restoration in Harborne

Victorian Tile Hallway Before Renovation Harborne Victorian Tile Hallway Before Renovation Harborne

Once the front room restoration was complete, I moved onto the original Victorian Hallway which was dull, dirty and needed some tiling work around one of the door thresholds.

Victorian Tile Hallway During Renovation Harborne


Cleaning and Repairing a Victorian Tiled Hallway Floor

The Victorian Hallway needed to have a threshold restoring, luckily the builders had kept the original tiles. Firstly, the space below the tiles needed to be filled with quick drying cement. The tiles were then re set and grouted.

Victorian Tile Hallway After Renovation Harborne

Next issue was to tackle the paint spots and carpet adhesive. I did this by spraying the surface of the tile with a strong solution of Tile Doctor Remove and Go and after leaving to for ten minutes to soak in and soften the glue and paint. I was then able to carefully scrape of the glue and paint with hand scrapers. The floor was then deep cleaned with a 200-grit diamond pad on a weighted rotary machine. The edges and corners were done by hand with diamond blocks. The floor was then rinsed with water and the soil extracted with a wet vacuum. Last stage of the cleaning process was to give the floor an Acid Wash with Tile Doctor Grout Clean-Up to further clean up the floor and neutralise any efflorescent salts that may have been present in the tiles. Efflorescence can be a big problem for old floors like these which don’t have a damp-proof membrane. I gave the floor another rinse and extraction before leaving for the day and left the floor to dry out overnight.


Sealing a Victorian Tiled Hallway

On return both the floors were checked for moisture with a damp meter to ensure they were dry. The readings were good, so I proceeded to start the long process of applying the sealer. On this occasion I chose Tile Doctor Colour Grow sealer, main reasons being its fully breathable so will cope well with any moisture evaporation due to there being no damp-proof membrane also its really good at bringing out the colours in the tiles. Three coats were applied, allowing each coat to dry before applying the next. I then buffed off any excess with a white pad.

Victorian Tile Hallway After Renovation Harborne Victorian Tile Hallway After Renovation Harborne

The new sealer really brought the Victorian tiles to life and allowed the colour and geometric patterns in the Victorian hallway floor to shine through.

Victorian Tile Hallway After Renovation Harborne


Source: Victorian Floor Cleaning and Sealing Service in Birmingham

Tuesday, January 21, 2020

How to Seal Marble Floors

Although marble is a stone, it is actually porous and absorbs liquids. When a darker liquid is spilled onto marble, the surface will stain. On decorative marble, such as fireplace mantels, this isn't a serious problem.

THINGS YOU WILL NEED
  • Dish soap
  • Sponge
  • Painter's masking tape
  • Marble sealer
  • Shop towels
  • Cloth

But on working marble surfaces, including kitchen or bathroom countertops, a stain will ruin the appearance unless it can be sanded off. Fortunately, marble can be sealed to prevent staining so that the beauty will never be compromised.

  1. Clean the marble surface with a soapy water solution and a sponge. Any type of dish-washing soap will work well, but if this is a marble countertop in a kitchen that has been exposed to cooking oils, a soap formulated to remove grease is the best choice. After the surface has been cleaned, rinse the marble with fresh water and allow it to dry thoroughly.
  2. Tape off any areas around the marble that you don't intend to seal. This will include all chrome, stainless steel or wood that is directly adjacent to the marble surface. Use a high-quality painter's masking tape for this task.
  3. Spray the marble surface liberally with sealer. Sealer for marble is available at hardware stores. Make sure the surface is completely wet and allow the sealer to remain on the marble for approximately 15 minutes to 30 minutes.This will give the liquid time to soak into the marble surface. If in doubt about the time needed, check the sealant manufacturer's instructions.
  4. Wipe the surface off after the required saturation time using a clean, dry, cotton shop towel or shop cloth. If this is a large surface, you may need to use several shop towels. Make sure the surface feels dry after the sealer has been removed.
  5. Apply another coat of sealer for added durability, especially if this is a working marble countertop. Wait until the first coat is completely absorbed, which will take about 30 to 40 minutes. Apply the second coat of sealer liberally, wait 15 to 30 minutes and wipe the excess off with your shop towels.
  6. Allow the surface to cure for about six to eight hours before use. A full cure will take place, depending upon humidity and usage, between 24 hours and 72 hours. Avoid heavy use until then.

Source: HomeSteady.com

Friday, January 17, 2020

How to Renovate Old Flagstone Flooring

I was contacted by the owner of this property in Leeds about renovating their old Flagstone floor. The couple who owned the house both worked long hours so after discussing the floor at length over the phone and after reviewing several photographs they emailed me to ask me to go ahead and start work. I normally prefer to do a site visit beforehand so I can provide an accurate quote, clearly however this wasn’t going to possible in this case.


The owner had arranged for his father in law to let me into the property so I could start work. I was aware from the phone calls we had that there was an issue with the pointing, and I was prepared for this, but it was worse than I had anticipated with most of the grout missing or loose. Interestingly the stone was quite yellow and so probably came from the Salts Mill area near Leeds. Sir Titus Salt was a 19th century industrialist and philanthropist built a large textile mill out of the stone. The mill is now a centre for art, dining and shopping and well worth a visit if your passing.


Cleaning and restoring a Flagstone Tiled Kitchen Floor

I decided to deal with the floor cleaning first and began by scrubbing the flagstones with a strong dilution of Tile Doctor Pro Clean using a rotary floor machine fitted with a scrubbing pad. The soil was then extracted using a wet vacuum and flagstones re-inspected. The remaining stubborn stains were spot treated using a repeat of the previous process until I was happy they were as clean as they could be. As the floor dried I took out all the loose pointing and re grouted the whole floor with a mid grey grout which matched the old flagstones quite well. The floor was now looking vastly improved. The floor was then left to dry fully overnight to ensure the seal could be applied.


Sealing a Flagstone Tiled Kitchen Floor

I returned the following morning and tested the floor with the moisture meter, I was satisfied the floor was within the accepted parameters and we could now apply the sealant. I selected to use a couple of coats of Tile Doctor Colour Grow, allowing each coat to dry before applying the next one. This product enhances the colour but leaves a matt finish. It will form a durable protective seal to the floor which will ensure the floor is easier to maintain.


I heard from the later that they were over the moon with the result and as part of the conversation we discussed the best way to maintain the floor going forward. Basically, this involves being careful with what you use to clean it as strong products can weaker the sealer. I recommend they use Tile Doctor Neutral Tile Cleaner which is pH neural and designed for the regular cleaning of sealed tiles.


Source: Flagstone Floor Cleaning, Sealing and Renovation Service in North Yorkshire

Thursday, January 16, 2020

How to Remove Glue From Self-Stick Floor Tiles

After removing self-stick tiles from the floor, there is often a glue residue remaining on the floor that is hard to remove with just a putty knife and warm, soapy water. The industrial glue used on self-stick tiles is an adhesive made at cement-bonding strength to prevent tiles from moving when walked on or cleaned. This strength level requires a special adhesive remover because it is not easily removed with simple cleaning or scraping.

Mineral Spirits
Step 1
Pour a capful of mineral spirits into a rag to get the rag wet but not dripping.

Step 2
Rub the wet cloth over the adhesive in circular motions until the mineral spirits dissolve the adhesive.

Step 3
Scrape any remaining adhesive with a putty knife. This will not require much strength if the mineral spirit-covered rag had been wet enough to soak the adhesive without soaking the floor.

Step 4
Wet the rag again with mineral spirits if the adhesive is difficult to remove with a few passes of the putty knife and rub the adhesive longer.

Step 5
Wash the floor with warm, soapy water to remove mineral spirits before beginning the new floor placement.

Dry Ice
Step 1
Place a block of dry ice on the tile adhesive while wearing gloves to protect your hands from damage.

Step 2
Allow the dry ice to freeze the adhesive for five minutes.

Step 3
Place the dry ice on another section of adhesive and scrape the frozen adhesive off the floor with a putty knife. The adhesive should lift from the floor in frozen chunks after some strong scraping.

Step 4
Continue this pattern until the entire floor is clear of adhesive.


Source: www.Hunker.com

Tuesday, January 14, 2020

7 Limestone Floor Tile Maintenance Tips

Limestone floor tile creates some of the most attractive residential floors. The tiles are made from limestone, a sedimentary rock composed of minerals or organic matter. Limestone tiles are bavailable in honed, semi-polished and highly polished finishes. Various colors and textures are available which enables highly attractive floor designs. Limestone is also one of the most hygienic materials for flooring due to its unique anti-bacterial properties. To help you maintain your limestone floor tiles, 7 tips are given below.

1. Sealing

It is a good idea to seal your limestone floor periodically since it is highly porous. This will help reduce stains and other wear and tear effects. Use a stone sealer that is especially suitable for limestone. Apply a sealant every 1 to 2 years to keep your limestone tiles in good condition.
2. Vacuum

You need to vacuum your limestone floor regularly to clear the dust and grit. If left on the floor, the abrasive action when walked upon results in scratches on your tiles. This causes the floor to loose its shine. You may want to place mats at the main entryways so that dust and dirt are captured by the mat. This will limit the transfer of dirt into the room. You can also sweep the floor with a soft broom.
3. Cleaners

Limestone is a calcium carbonate rock and reacts easily to acids. It is best to avoid acidic and citrus cleaners when you clean your limestone tiles. These can etch your limestone floor. Stick to neutral cleaners. However, some neutral cleaners contain additives that can damage your limestone. To be on the safe side, obtain a neutral stone cleaner that is especially suited for limestone. Avoid household detergents as these tend to leave build-ups and will your floor with a scummy appearance.
4. Wet Mop

Use a wet mop at least every 2 days to clean your limestone floor. Mix a neutral cleaner with warm water to create a mild yet effective cleaning solution for your floor. Limestone needs to be cleaned with minimal water since it is a porous material. Too much water tends to infiltrate the limestone and creates discoloration and stains. Wring the mop firmly before you mop the floor. Rinse sparingly with plain water. Be sure to change the water frequently so that you don’t leave dirt on the floor.
5. Spills

Wipe all spills as soon as they occur. If left unattended, they seep into the floor and create stains. These can be difficult to clear especially when they set deeply into the floor.
6. Stains

Obtain stone and grout cleaners that are suitable for limestone to remove stubborn stains. Poultice products can also be used to remove stains on limestone. These may require up to 48 hours for complete stain removal.
7. Steam

Occasionally, you may want to steam your limestone floor. You can rent a steamer from a home improvement store. Even when sealed, it is possible for tiny pockets of dirt and water to form on the floor. These gradually blacken and discolor the floor. A steamer helps to loosen and dissolve such dirt. Dry the tiles thoroughly after you steam.


Monday, January 6, 2020

Pros and Cons of a Travertine Floor

It is important to know the pros and cons of a travertine floor before determining the suitability of using it for any specific application. Travertine is a type of sedimentary stone, and is made of carbonate compounds. Because of its marble like look, it is very famous as flooring materials.

Pros:

Travertine comes with wide range of beautiful colors. You can choose from cream, gold, ivory, walnut and many more. Travertine is easy to cut and shape, and allows you to form various patterns. You can go for different finishing options like brushed, shiny, matte with travertine. Travertine tiles do not crack easily; it is both beautiful and durable like marble. Polished travertine tiles allow easy removal of dirt.

Cons:

There are some disadvantages to be kept in mind. Travertine is naturally porous and susceptible to acids. Even spillage of orange juice and vinegar can cause it to be discolored and etched, which is why many times people do not go for travertine tiles in kitchens and bathrooms. Normally the pores are filled in the factory for a smooth look, and maintenance of the tiles involves filling the pores whenever needed. Keep in mind that wet travertine tiles are slippery.