Monday, December 23, 2019

How to Achieve a Deep Polish on Marble Floor Tiles

The pictures below are of a Polished Marble floor installed at a property in the village of Callow End which is a few miles South of Worcester. The owner of the house had attempted to clean and seal the floor by themselves and as you can see from the photographs, they ended up dulling its appearance. The physical nature of Marble and natural stone floors in general make them a difficult project to attempt without expert knowledge and the right equipment.

Marble Tiled Kitchen Floor Before Polishing Callowend Marble Tiled Floor Before Polishing Callowend

I arranged to survey the floor and explained to the client how I intended to restore the appearance of the Marble to how it should look. I demonstrated the process on a small test area so they could get an idea of the result and explained that the floor could look even better than the day it was installed. Tile Doctor has developed a system called burnishing for natural stone floors which involve the application of a set of diamond pads which are used in sequence to clean and restore the polish to the stone. My quote was accepted, and a date set for the work to begin which should take two days.


Cleaning and Polishing a Marble Tiled Floor

I arrived on the agreed date and started by sealing up the bases of the kitchen kickboards and skirting with silicone to protect against any damage from water ingress. I then vacuumed the floor to remove any debris and grit. Tile Doctor Stone Soap was then worked into the floor with the first of a set of diamond encrusted Burnishing Pads. The first pad is a coarse 400-grit pad and is run over each Marble tile four times. The floor is then rinsed with water and the soil extracted with a wet vacuum. This process was then repeated with an 800-grit, 1500-grit and then finally a 3000-grit pad which is applied dry with only a little water spayed onto the floor. Tile Doctor Stone Soap is a stone cleaning product designed for maintaining the patina on polished stone. Additionally, it has a sealer friendly pH Neutral formula which is ideal for floors like these. Many floor cleaning products you find in supermarkets are too harsh for use on natural stone and can cause damage over time (always read the label).


Sealing a Polished Marble Floor

Once the burnishing was complete the floor needed to be sealed to protect its’ final finish. Tile Doctor have a whole range of sealing products available but for a really durable shiny finish on Marble I recommend the application of Tile Doctor Shine Powder. This is a crystallising powder that provides a very high shine and tough durable finish, it’s worked into the stone using a white pad fitted to a rotary machine.

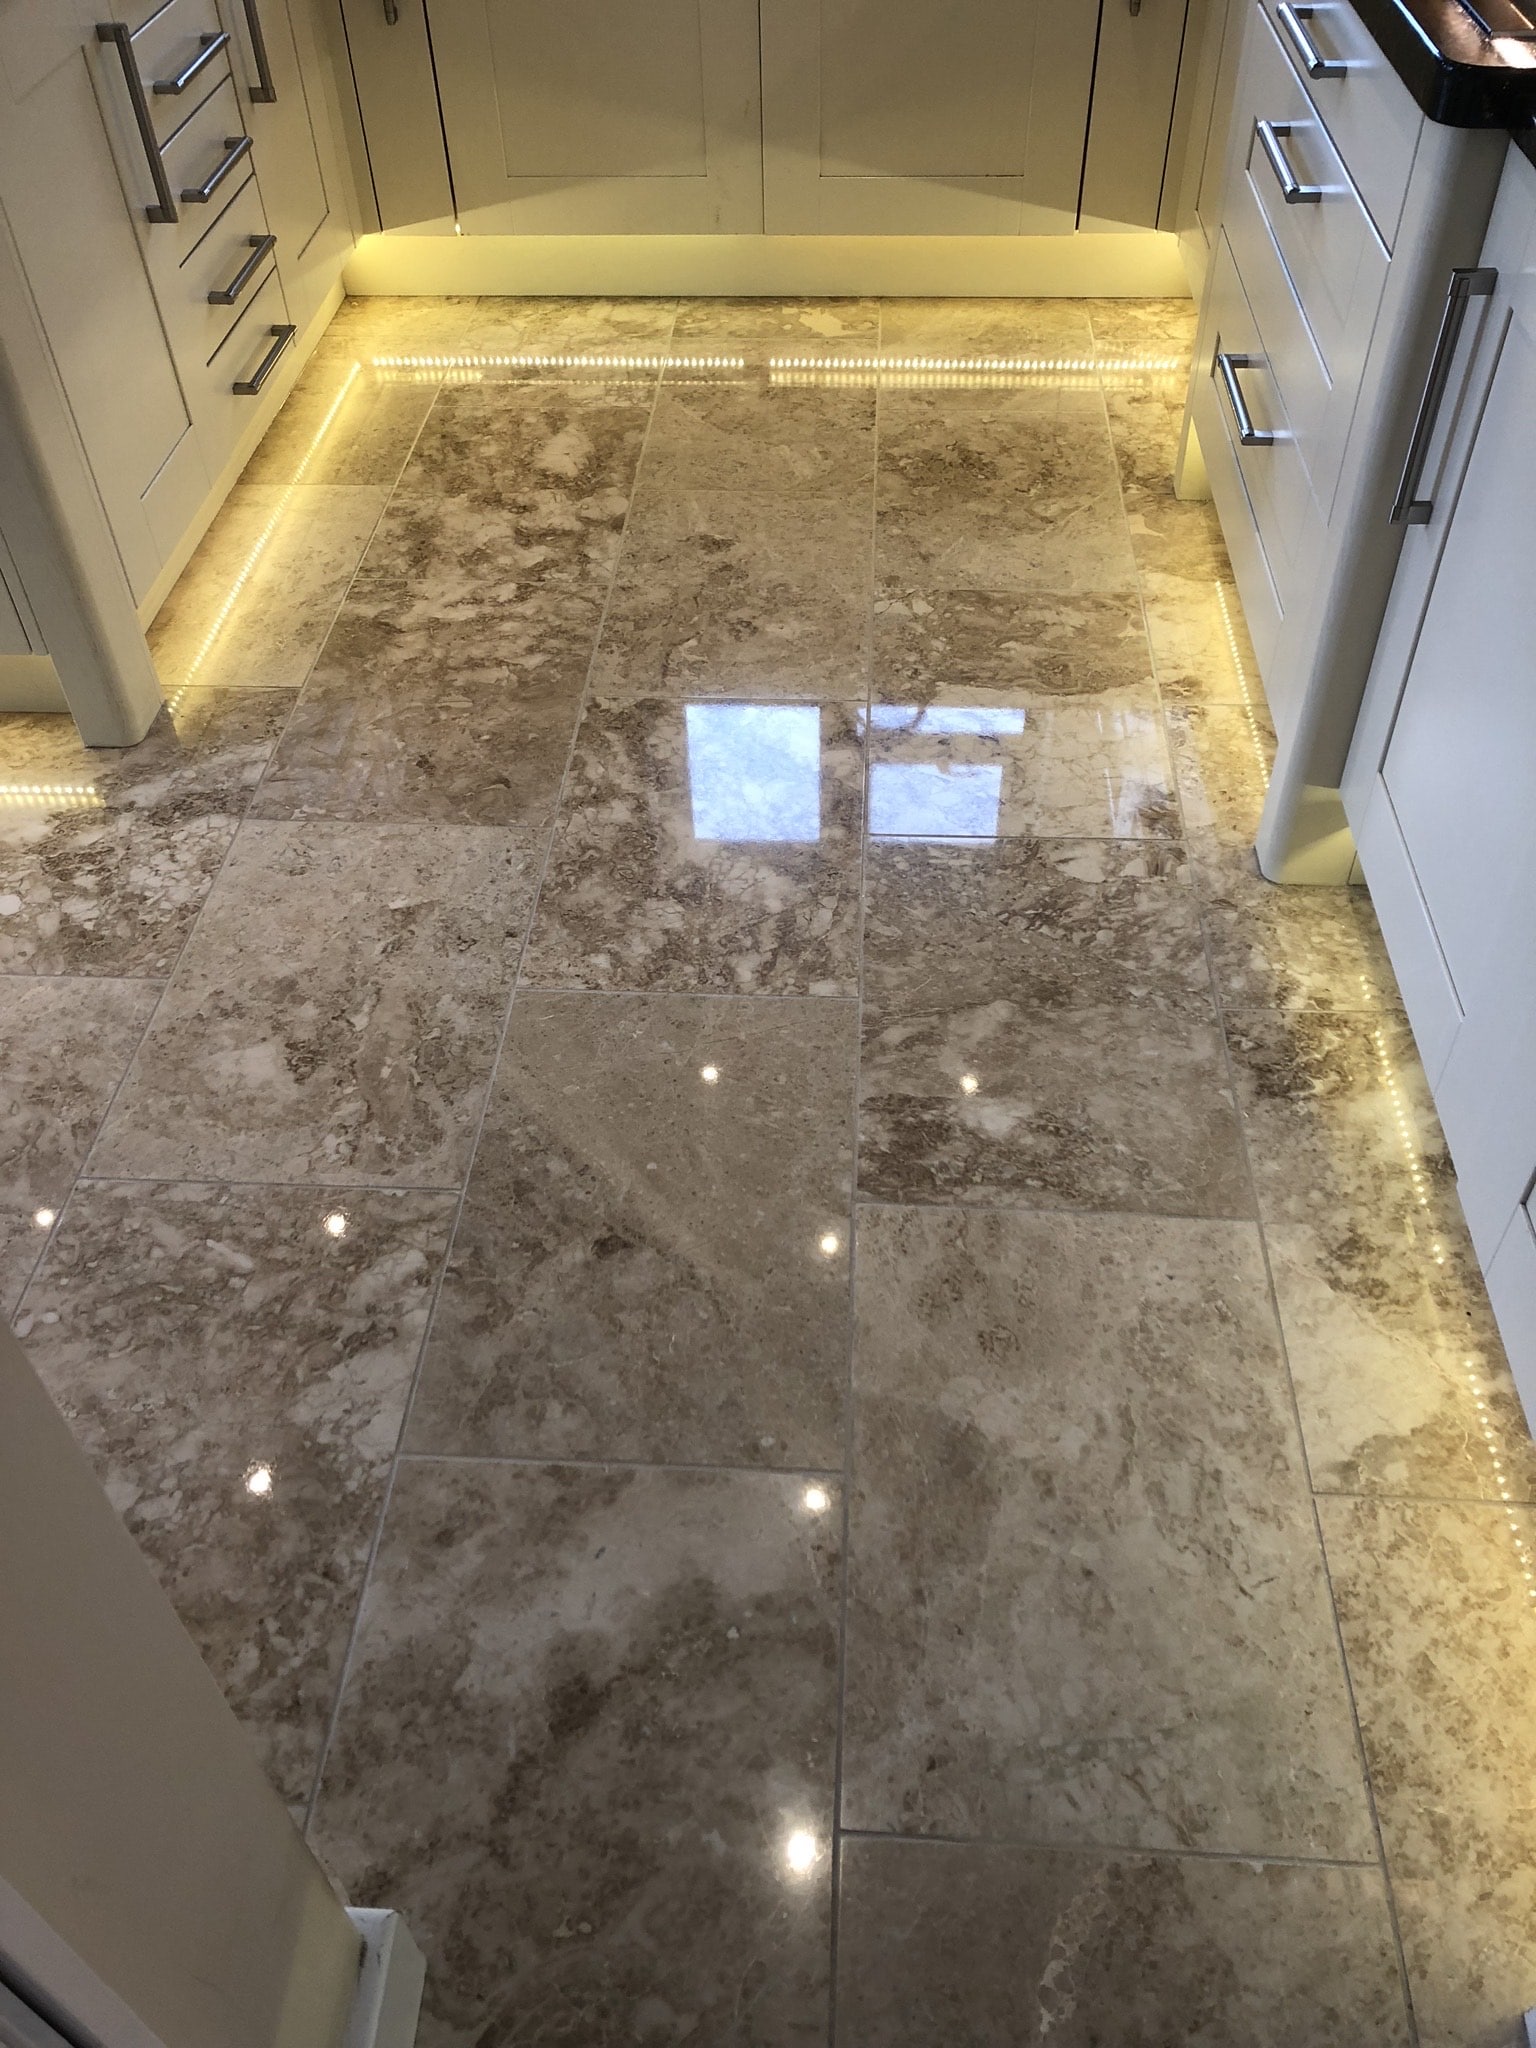
Marble Tiled Kitchen Floor After Polishing Callowend

My client was absolutely delighted with the result and agreed the floor had never looked so good and lived up to the high standard I told them they could expect. For aftercare I recommended the use of Tile Doctor Stone Soap which will keep the floor clean and help maintain the deep patina that I had built-up on the Marble tiles.

Marble Tiled Kitchen Floor After Polishing Callowend Marble Tiled Floor After Polishing Callowend


Source: Marble Tile Cleaning and Restoration Service in Worcestershire

Sunday, December 22, 2019

Advantages of Not Using Limestone Sealer

A limestone sealer is usually advertised as a product that will prevent the entry of water and/or oil on the pores of a limestone tile or limestone slab. While it is ideal to seal limestone installed in certain areas, most limestone applications do not require a limestone sealer. Walkways or foot paths lined with limestone usually become dirty when unsealed. This is because dirt and other debris get into the pores of the stone material and turn into a nasty looking surface. However, limestone installed in walls and other areas that are not usually stained or dirtied can be left as is without using a limestone sealer. Here are some advantages of not using limestone sealer.

1. Preserves Natural Beauty and Color of Limestone

Limestone provides natural beauty that adds decorative quality to where it is installed. When a limestone sealer is used to coat the material, it will loose its natural color and look more artificial. Furthermore, sealers have a tendency to cause discoloration. Poor limestone sealer products cause the limestone to turn into a nasty yellowish color.

2. Preserves the Breathable Quality of Limestone

Unsealed limestone is breathable, meaning that it allows vapor to enter and escape its pores. When a sealer is applied, water may be repelled, but moisture may find its way into the pores of the limestone and escaping will not be easy. When moisture is trapped inside the stone, it increases the risk of damage. It can soften the stone and cause cracks especially when the temperature rises. However, an unsealed limestone will allow moisture to enter its pores, but will also allow it to easily escape, therefore decreasing the chances of damage.

3. Lessens Maintenance Costs

Limestone on walls does not really need to be sealed because it does not get in frequent contact with acids and other harmful contaminants. Therefore the cost is lessened because it does not require constant sealing. Remember that topical sealers need to be replaced every once in a while. If the limestone does get stained, it only requires a few natural cleaning agents to get the stain out.

In addition, some limestone sealers can be easily scratched because they are softer than the limestone itself. When scratch marks are produced in sealed limestone, this requires additional maintenance cost because the entire coating needs to be rebuffed or replaced.

4. It Makes the Limestone More Durable

Limestone in itself is durable. However, when treated with sealers, especially those that are permanent, it will require constant chemical treatment especially when the sealer needs to be replaced or removed. Constant chemical cleaning and sealer removal will definitely make the limestone more susceptible to damage.

5. Helps the Environment

Some chemicals used in limestone sealer products may have negative effects on the environment. Impregnators, for example, cause toxic vapors to be released in the environment after use.


Sunday, December 15, 2019

Eco-Friendly Types of Limestone Sealer

It is necessary to seal your limestone before use to preserve and protect its beauty, and there are eco-friendly limestone sealers available. You must seal your limestone, as it is a very porous and soft stone. The sealant will fill the porous holes in the stone and prevent corrosion and decay of the stone.

Limestone Sealants

Limestone sealants enter the interior of the stone surfaces where they resist and prevent damage while allowing the porous stone to breathe and release moisture. Therefore, these sealants protect the stone from stains, the formation of mold or mildew and prevent discoloration. Sealing limestone is a vital process in maintenance and installation to preserve the integrity and protection of your stone.

Environmentally Friendly Sealants

There are numerous types and varieties of limestone sealants available for purchase. There are several varieties of eco-friendly sealants that offer the same level of stone protection as other sealants, while remaining safe and environmentally friendly as well. Some sealants are notably more environmentally friendly than other sealants. The more environmentally friendly sealants are water-based solutions and are free from solvents while remaining non-toxic as well. All eco-friendly sealants will, by nature, be non-hazardous and non-flammable due to the lack of added chemical that other sealants may contain. In addition, all environmentally friendly solvents will not release and VOC or noxious fumes.


Sunday, December 1, 2019

Ways to Prevent Tile Grout Stain

Tile grout stain can give your bathroom, tub, shower enclosure, and even kitchen sink backsplash an unsightly appearance. Stains can happen in a variety of different ways. Cleaning the tile grout that has been stained can be done, but it is time consuming and labor intensive. In some instances, the stain is set in so deep that you will need to chisel out the grout and replace it with new grout. This, of course, would be the last resort.

Prevention Is Better than Replacement

One of the best ways to make sure that you do not have to go to the extreme and replace the grout on your tile is to prevent the stain in the first place. There are plenty of ways that you can be proactive with your tile and eliminate most of the stains that can occur. While you can not completely eliminate all of the stain causes, you can do a lot to give your tile a much better appearance for a long time.

Keep Clean

The first way to prevent tile grout stain is to keep it clean. Each time you use the tub, or the shower, give the tile a good rub down so the dirt and soap does not set into the grout. A dry sponge, or rag, will do the job quickly. You do not have to do a complete cleaning of the grout, just a good rub down after use.

Seal Tile

Another way to give some protection to the tile grout is to seal the tile with a quality sealer. There are plenty of sealers that you can choose from to protect not only the finish of the tile, but also the grout itself. The sealer is spread out over the entire tile surface with a squeegee. When using a sealer you want to keep it even so that there is not too much in one area and not enough in another.

Keep Heated Objects Away from Tile

When you have a tile countertop, it can be easily stained if something that is hot is placed on top of the tile without any buffer or insulation. The heat will actually burn the grout and leave a dark brown stain. This is impossible to remove as it is burned into the grout itself.

Use Placemat for Drinks and Food

One of the problems with having tile on a coutertop is that it can be easily stained through regular everyday use. By placing a glass on the tile and letting the condensation settle into the grout you will see a dark ring develop. Juice from food is also a notorious cause of stain on the grout. Always use a placement, or a cutting board to prepare foods.

Dye the Grout

While this is not actually a way of preventing stains it is a way to hide the presence of a lot of stains. You can dye the grout before you even put into on to the tiles with special dye packs. You can also dye the grout while it is already on the tile. However, there is a lot of risk in ruining the tile itself. Regrouting the tile is an option if you want to add dye to the grout.


Thursday, November 21, 2019

How to Finish Ceramic Tiles with Gloss Paint

The passage of time can take its toll on the gloss paint on your ceramic tile counters, leaving you with dull, discolored surfaces. Since it is costly to replace the tiles on your countertop, you should consider repainting your tiles instead of replacing them. To finish your ceramic tiles with gloss paint, here is what you should do.

What you’ll need
  • Tile Cleaner
  • Rubber Gloves
  • Protective Mask and Garments
  • Painters Tape
  • Sponge
  • Scrubber
  • Sander
  • Rags
  • Quick Dry Adhesive
  • Caulk
  • Quick-Dying Epoxy
  • Paint Brush
  • Artist Brush
  • Paint Primer
  • High-Gloss Paint
  • Water-based Clear Urethane Paint

Step 1 – Clean the Tiles and Prepare the Area

Safety first: The materials you will be using are normally hazardous with prolonged exposure. Be sure to maintain good ventilation in the area where you work. Wear a face mask and rubber gloves.

Wet the area with a small amount of water and a heavy duty tile cleaner, then clean it briskly to remove grease, dirt, mold, etc. Ensure all areas are cleaned thoroughly to get rid of bacteria or fungus that would eat up the paint from below. Wash the area thoroughly and let it dry.

Use electric sander to remove the original “shiny” coating of the tile surface. Clean the area thoroughly again, to prevent dust and other small particles from causing ugly bubbles on your paint.

Step 2 – Rework Tile Imperfections

Rework imperfections on the tiles before starting to do the paint work. Use quick-drying epoxy on tile cracks and caulk on chipped portions of the tiles. Be sure to let the reworked area dry up completely. Re-apply grout to cracked places. Let these applications dry for 2 days. Secure painter’s tape as edging over areas not intended for painting.

Step 3 – Apply the Acrylic Paint Primer

Apply the acrylic paint primer using the paint brush. Cover all areas evenly with thin single strokes. Be sure to cover even the recessed portions occupied by grout. Let the paint primer dry overnight. Repeat this process one more time before you apply your gloss paint.

Step 4 – Apply the High Gloss Paint

Apply the high gloss paint the same way as you applied the primer. Use the artist brush to apply contrasting paint into the grout. Use the artist brush to make fine lines or shapes, if you desire, on the tile surface. Make this the fun part as you decide how your tile surface should appear. After applying the high gloss paint, let it dry completely.

Step 5 – Apply the Water-based Clear Urethane Paint

Apply the water-based urethane paint using paint brush. The urethane paint produces a hard coating on the surface that will make it last for years. Make thin layers, applying several applications to ensure a finer finish. Applying layers of paint on the surface of your tile can also help protect your tile.

Step 6 – Finishing up

After applying the gloss paint, keep whatever leftover paint you have in a safe place. If you have kids at home, make sure that you store your left-over paints in a place where your kids cannot reach them.


Friday, November 15, 2019

How to Paint Ceramic Kitchen Wall Tiles

Painting your ceramic kitchen wall tiles is easy. All you have to remember is that you have to remove as much gloss from the surface of the ceramic tiles that you are painting on so that the paint adheres to the ceramic tiles well. Below are the materials that you need along with the instructions on how to paint ceramic kitchen wall tiles.

What you’ll need
  • Fine grit sandpaper
  • Bleach
  • Sponge
  • Orbital sander
  • Mild commercial tile cleaner
  • Primer
  • Oil-based paint
  • Urethane finish
  • Dust sheets or old newspapers
  • Cleaning cloth
  • Nail brush
  • Bristle brush

Step 1 – Use Dust Sheets

Place various dust sheets at the bottom of the kitchen walls that you are repainting. This is to make sure that all the dusts from the sanding that you will do later on will be collected and easily disposed off. You can purchase dust sheets at your local hardware but if you do not want to use dust sheets you can also use old newspapers.

Step 2 – Clean the Kitchen Wall Tiles

Using a sponge and a mild abrasive commercial tile cleaner, clean the kitchen wall tiles thoroughly. Rinse with water to remove the soap grime. The abrasive cleaner will remove the gloss of your kitchen ceramic tiles so that it can be painted over. With a nail grout and bleach, clean the kitchen floor tiles some more and rinse the bleach and nail grout away with warm water. Allow your kitchen wall tiles to dry before painting.

Step 3 – Use the Sandpaper

Using a fine grit sandpaper remove the remaining gloss in your ceramic kitchen wall tiles. An orbital sander is perfect for this job. Sanding your ceramic kitchen wall tiles is the most essential aspect of painting your kitchen wall tiles as the quality of the surface that you are painting on will determine the longevity and quality of your paint job. Painting over glossy ceramic kitchen wall tiles will result to pain peelings in as early as one week so make sure to sand your ceramic kitchen wall tiles thoroughly before applying any paint.

Step 4 – Apply the Primer

Check for any remaining dusts on your ceramic kitchen wall tiles and wipe away the remaining dusts using a cloth. Apply a single coat of oil-based primer using a clean paint brush on your ceramic kitchen wall tiles. Allow the first coat to dry and then add another coating. Read the recommended drying time between each coating in the manufacturer’s label of the oil-based primer that you are using.

Step 5 – Re-sand

Using the same fine grit sandpaper, slowly sand the coat of oil-based primer to remove the primer bumps and even the surface of your ceramic kitchen wall. Wipe the dust away using a slightly wet cloth.

Step 6 – Apply the Paint

With a clean paint brush, apply the first coating of the oil-based paint on your ceramic kitchen wall tiles. You can control the hue intensity of your paint job by the number of paint coats that you will apply on your ceramic kitchen wall tiles. The more coats of oil-based paint you apply the darker the hue of your ceramic kitchen wall tiles. Make sure to follow the recommended drying time between each coat of your oil-based primer. Allow at least 2 days for the last coating of your oil-based paint to adhere into the ceramic tiles before proceeding to the next step.

Step 7 – Finish

Apply a clear urethane finish at the grout of the ceramic kitchen wall tiles with a bristle brush and allow the urethane finish to dry in accordance to its ideal drying period. Allow the finish to dry overnight.


Wednesday, November 6, 2019

The Scoop on Hardwood Flooring

Hardwood has been a popular flooring choice for hundreds of years and it is still one of the most desired flooring types today. There’s no secret to why hardwood is so popular. It’s beautiful and lasts for years (the flooring can even last longer than the house where it’s installed). After a number of years as the floor gets worn, the hardwood can be refinished and given a new lease on life. Hardwood is also easy to keep clean, and since it’s wood it won’t hold dust or dust mites as a carpet might, making it a great choice for a home where people have allergies.

Environmental Concerns

One concern people often have about hardwood is by using it in their home they’re contributing to the depletion of the world’s forests. However, primarily because reforestation practices are mandatory in the United States, our forest have actually grown in size over the past hundred years and almost 1/3 of the land in the US is covered with trees. In fact, experts say there are actually more trees today than in the 1950’s.

Solid Hardwood or Engineered Hardwood?

Just as the name says, solid hardwood is milled from solid lumber. It can be installed in most rooms in a home but not below grade (where ground moisture could get into the natural wood and cause swelling or warping).

Engineered hardwood is a man made product consisting of a hardwood surface layer bonded to an underlay of laminated plywood or fiberboard. Since it looks like solid hardwood, it can be installed everywhere solid hardwood can be used, but the laminated structure means it can also be used below grade.

Perhaps the major difference between solid and engineered hardwood is solid hardwood can be refinished many times while the engineered wood (which only has a surface layer of hardwood) can only be refinished once or twice.
Choosing the Right Wood

Oak – Oak is among the most popular hardwood flooring choices. There are actually two types of oak used for flooring–red and white. Both are primarily golden brown in color but the red oak has a slight pinkish tone while the white oak is more brown.

Maple and Birch – Maple and birch are lighter in color than oak and have light grain lines. Since they’re not as dark as oak they provide a bright, modern feel and can actually lighten up a dark room.

Ash – Ash is often darker brown in color than oak and has a more pronounced grain pattern. It’s extremely hard (it’s used to make baseball bats) so it’s long wearing and a good choice for a room with lots of traffic.

Walnut – Walnut is a dark brown color but since it’s not as hard as some of the other hardwoods it’s best used in rooms with little traffic, such as a bedroom.

Cherry – Cherry not surprisingly has a reddish tone that tends to darken over time. It also has a distinctive grain pattern that not everyone appreciates. Cherry is quite hard, so it stands up well to traffic.


Friday, November 1, 2019

Wine Stain Removal Tips

Having friends over or entertaining during the holidays can be a very pleasurable event. But in all the excitement people tend to get a little careless, and, before you know it, you have beverage stains on your carpeting or that new sofa you just had to have for the holidays. Getting these stains out can be a daunting task, but can be made a lot simpler if you use the proper materials and a little elbow grease.

Move Fast
Getting the stain cleaned up before it has a chance to set is probably the best thing you can do for things like beer, coffee, and wine. Carefully blot the stain, and use the proper cleaner to remove it. Don’t rub the stain – you will only spread it around and drive it in deeper.

Chances are that during an evening of entertainment, a stain will get overlooked and you end up the next day with a nice stain dried on valuable clothing, carpeting, or furniture. Here is what to do.

Forget the Club Soda
Wine stains, especially red wine, can be removed if you follow the correct procedure. For clothing that can be laundered, mix a good liquid detergent such as Dawn half and half with hydrogen peroxide. These cleansers must be used together, and the mixture should be fresh. Gently pour over the stain and allow it to sit as a presoak. Use a clean towel between the stain and the back of the garment to avoid the stain leeching through. Launder following care label instructions.

Research shows that white wine will remove red wine stains. Hold the game or tablecloth over the sink, and pour white wine on the red wine stain. It will disappear. If wine stains get on carpeting, pour hydrogen peroxide on the stain. Allow to stand for a few minutes. With a spray bottle mixture of half water and half of a good carpet cleaning shampoo, such as Bissell Fiber Cleansing Formula, mist the stain, and blot dry with a clean white cloth. This will work well even on white carpeting.

  1. Mix one teaspoon of a mild pH balanced detergent (a mild non alkaline non bleaching detergent) with a cup of lukewarm water
  2. Blot
  3. Mix one third cup of white household vinegar with two thirds cup of water
  4. Blot
  5. Mix one teaspoon of a mild pH balanced detergent (a mild non alkaline non bleaching detergent) with a cup of lukewarm water
  6. Sponge with clean water
  7. Blot

Note: Always test an inconspicuous area for colorfastness, etc. before treating the exposed area. Also note that certain stains are permanent


Source: www.DoItYourself.com

Tuesday, October 22, 2019

Bathroom Cleaning Tips

When cleaning up your bathroom, there's a lot more to think about than when you are cleaning other rooms of your home.

Bathrooms have sinks and toilets that need to stay clean; otherwise the they will not only look unsightly, but also breed germs and bacteria that can be bad for family and friends. Also, unlike many other rooms in a home, bathrooms tend to have a lot of awkward nooks and crannies that are go unseen, and therefore go uncleaned. Bathrooms also have multiple types of surfaces - glass, tile, porcelain, wood, carpet, and marble - that all need to be cleaned in different ways.

Although it can seem like an overwhelming job to sanitize even the tiniest of guest bathrooms, we've got a few tips that should help you get the job done quickly and thoroughly.

Dust First

Getting dust off everything is not only a good way to start with something simple, but also helps you see what needs the most elbow grease when it comes time for scrubbing. Often the back and bottom of toilets are a dusty mess. However, if you dust them first, you can see if they just need a once over with the Swiffer or if they need something a little bit more intense to get them clean.

By dusting the room first, you can determine what needs to be first on your to-do list for your next step in cleaning. Try and use something like a Swiffer or a similar device that traps dust rather than just pushing it around.

After dusting, the next best step is to sweep, that way you get any stray dust out of the way for the next round of cleaning.
Clean Surfaces Separately

While there are many different cleaners that claim they can clean all types of surfaces, none of them really do. So, you will need different cleaners for different kinds of surfaces.

If you want to use items around the house, vinegar can be used to clean mirrors, tile, and porcelain, and you can use olive oil to clean your wood. Homemade cleaners can be extremely effective. Alternatively, you can use brand name cleaners as well.

No matter what products you use to clean, you want to clean every surface separately so that you're not just smearing dirt from one section of your bathroom to another.

You should also attempt to clean like surfaces at the same time. For example, start with all porcelain - the toilet, the tub, the sink basin, etc. Then go for the cabinets and shelves. Work on the floors last, as they will need a chance to dry.
Catch Frequently Missed Spots

Bathrooms often have spots that you just never see or never use: the place behind the underside of the toilet, The back corners of your over-the-sink cabinet, the hidden spots on shelves that hold the things that you need to get ready for your day, or the bottom where your tub meets the floor. These areas need to be cleaned completely because when neglected, bacteria can grow and breed in these spaces without being noticed.

This is another reason to clean by like surfaces. You'll be less likely to miss if you're organized in your approach.
Let Surfaces Dry

Units like your toilet, sink, shower, or bathtub, even though they are constantly inundated by water, need time to dry out like everything else.

After you’ve used or cleaned your bath or shower, open a window or run a fan to remove excess humidity from the air. This will help keep your bathroom dry and can help prevent bacteria, mold, and mildew from growing. Doing so can also help your bathroom rug dry out as well, which is important so that it doesn't hold onto bacteria and dampness.

For the sink, make sure it is completely dry after you've cleaned it, which can help keep scale off the faucet.

Toilets do not need to be emptied. However, it is a good idea to make sure to have them cleaned at least once every two weeks to keep bad things from growing under the rim or around your toilet.
Change out Items

There are many items in the bathroom that need to be changed out. Toothbrushes should only be around for a few weeks. Towels, both hand and body, should be thoroughly cleaned and switched out every couple of days. Toilet brushes are good for a year, although if you don’t use them often you can even stretch it out further than that.

Toss all old medication, medicines, toothpaste, razors, and skin care items as appropriate. Keeping things around past their prime is just extra work that you don’t need. Getting rid of these items can help you keep your bathroom in great working order.

This should be the last thing you do. Once everything is clean and it is time to put back toiletries and more, you can toss anything that has gone beyond its lifespan.
Final Thoughts

Taking on your bathroom may feel like an overwhelming chore. However, if you take the room step-by-step and make sure that what you are doing is done the right way, you’ll find that you are done in no time.

The other good thing about the bathroom is that once you give it a good clean you can just give it the occasional clean up every couple of days without worrying.

The bathroom is an important part of your home that not only you but also your guests will see often. So, make sure that it looks it’s best.


Wednesday, October 16, 2019

Installing a Radiant Floor Heat System

Radiant floor heat works on the principle of thermal radiation. This is explained scientifically by the fact that electromagnetic radiation is emitted from the surface of a heated object. A simple example of thermal radiation is the sun, or a light bulb. This is the principle used in a typical electric baseboard heater. Electricity is utilized to heat the elements of the baseboard heater, and the heat is distributed throughout the room through thermal radiation.

Radiant floor heat works on this same principle. The main difference between the standard baseboard heater and radiant floor heat is that the panels are placed in the flooring of the home, and radiate the heat upwards towards the ceiling. Electrical cables, or tubing charged with hot water, are placed in the flooring of a home, and the energy supplied to these heating elements causes heat to be generated, and thus warms the home. Depending on the installation, the radiant heat system’s thermostat can be set 4-8 degrees cooler than that of a a typical forced air system and still accomplish the same level of comfort. This can amount to a great deal of savings over the typical heating period in many parts of the northern United States.

Installation of a radiant floor heating system is accomplished by different methods, depending on whether you are installing the radiant floor heating system in new construction, or are adding radiant heat to an existing home. Methods of installation may vary from manufacturer to manufacturer, but the principle is the same. The two types of installation are the “dry” installation method, and the “wet” installation method. A dry installation requires panels to be mounted to the flooring, subflooring, or under the subfloor. The method of radiant heat transfer, either electrical cables or tubing carrying a liquid medium, is then hooked up to the appropriate source.

In a wet installation, the heating panels are installed on the floor, and a thin layer of concrete or gypsum is spread over the installation, sandwiching the cables or tubing between two layers of either flooring or concrete. This installation is generally placed over an existing concrete slab. It is the ideal in new home construction, where a concrete slab, which has high thermal mass, is used to build the ground floor.

What to Consider Before Installing Radiant Floor Heat

Although a radiant floor heat installation can be accomplished by an experienced do it yourselfer, your best bet is to consult a heating and cooling specialist if you are considering installing a radiant floor heating system. Many things need to be considered if the installation is to be successful. These would include:

1. In an existing home installation, how efficient is the existing insulation in the home? Is there proper insulation in walls and ceilings?

2. What energy source will be used to power the installation? If you are considering electrical cable, are energy costs competitive in your geographical area? Will the electric company give you a credit for taking advantage of time-of-use rates? Check with your electric utility – the time of use rates can be a significant saving to you. Typically, the off peak times are from 9:00 PM to 6:00 AM. If you have significant floor mass, such as a concrete slab, then the radiant heat system can be “charged” during the off peak hours. An efficient installation may not require any electricity to be used during the day, when daytime temperatures are higher, and the sun helps warm the home.

3. Floor covering over the installation should be considered. Because carpeting has an insulating effect, especially when used with a pad, ceramic tile is the better choice for a radiant floor heat system. Other types of floor coverings can be used, such as linoleum or vinyl floor coverings, but remember that any covering used on the floor insulates the subfloor from the room and cuts down on the efficiency of the radiant floor heat system.

4. Although you may at the time of installation determine that the type of radiant floor heat you install is the best choice, will it be so in the future? You should also take in to consideration such energy sources as solar power, wood or LP gas as an energy source, or even a coal fired boiler if you decide on a hydronic system. Always insure that the system you install has the ability to be converted at a later date to a different energy source.

Radiant floor heat is very user friendly. It provides a comfortable heating arrangement for the home that is energy efficient, silent in operation, and friendly to the environment. People suffering from allergies, especially during the heating season, may notice a significant amount of relief, because the old forced air system is no longer blowing allergens into the home. And the best part of all is that when you get up in the morning, you don’t have to put your feet on a cold floor.


Thursday, October 10, 2019

How to Remove Scratches From a Linoleum Floor

A linoleum floor is an attractive and inexpensive option for your home. Linoleum has a high resistance to moisture, which contributes to its durability. This makes it an excellent choice for use in entry rooms, kitchens and bathrooms. However, linoleum is prone to scratches, especially if it is laid in high traffic areas. An accumulation of scratches reduces the aesthetic appeal of your floor. Fortunately, you can restore the fine appearance of your linoleum floor with the handy guide below.

What you’ll need
  • Vacuum
  • Mop
  • Water
  • Linoleum floor polish
  • Lambs wool mop
  • Sandpaper, rough grade
  • Linoleum piece
  • Small bowl
  • Wood glue
  • Popsicle stick
  • Putty knife
  • Damp rag
  • Acrylic floor sealer
  • Paint roller

Step 1 – Clean the Floor

Vacuum your floor to remove dust and fine debris. Clear residual dirt with a wet mop. It is vital that you have a clean floor before you proceed with the repair. Use an old terrycloth to absorb moisture from the floor. Allow the floor a couple of hours to air-dry.

Step 2 – Small Scratches

Apply a thin coat of floor polish with a lamb’s wool mop. For best results, apply the polish in back and forth motions. Allow 1 hour for the polish to set before you apply another coat. This is sufficient to clear small scratches on linoleum. For bigger scratches, proceed to the next step.

Step 3 – Obtain Linoleum Powder

Look around your home for a leftover piece of linoleum. If you fail to get one, purchase a few pieces from a flooring dealer. Be sure to obtain as close to an exact match as possible. Use rough grade sandpaper to obtain some powder from the linoleum. Hold the linoleum over a large cardboard as you sand. You should aim to obtain enough powder to allow you to fill the scratches completely.

Step 4 – Create a Paste

Pour the linoleum dust into a small bowl. Add a small amount of wood glue into the bowl to make a thick paste. Mix the dust and glue thoroughly with a popsicle stick. Once you obtain a uniform color, the paste is ready to be used.

Step 5 – Fill the Scratches

Scoop a small amount of the paste with the tip of your putty knife. Apply the paste carefully inside the scratch. Firmly press the paste into the scratch. Use a damp rag to wipe away excess paste from the linoleum. Allow at least 24 to 48 hours for the paste to set completely.

Step 6 – Apply Sealer

It is a good idea to apply a sealer to complete your repairs. Obtain a suitable sealer for linoleum floors from a flooring store. Apply 2 thin coats of sealer onto the treated linoleum. Allow the first coat to dry for the specified amount of time before applying the second coat.

Step 7 – Protective Steps

It is best not to wear shoes as you walk on your linoleum floor. The abrasive action of the shoes contributes to frequent scratches and scuffs. Avoid dragging heavy items across the floor. Ask somebody to help you carry the items instead to avoid scratches on the floor.


Friday, October 4, 2019

Quarry Tile Floor: Pros and Cons

If you are considering installing a quarry tile floor, there are many different factors that you should look at. This type of floor can provide you with some advantages and disadvantages to be aware of. Here are some of the pros and cons of quarry tile floors.

Pros

One of the biggest advantages of this type of tile is that it is very inexpensive. Quarry tile is very basic and does not require any glaze on the top layer of the tile. This makes it fast and easy for tile manufacturers to produce which lowers the cost to the consumer.

Another advantage of this type of tile is that it is very durable. Quarry tile tends to be very thick and will not chip or break easily. This makes it an ideal solution in heavy traffic areas.

Cons

One of the disadvantages of quarry tile is that it is notorious for being stained. Since there is no glaze on the top of the tile, liquids can easily penetrate the tile and permanently stain it. Therefore, even though it is a durable solution, it might look bad after a very short period of time.

Installation of quarry tile is also more difficult because you will typically want to try and seal the top layer to help avoid problems.


Monday, September 23, 2019

How to Deep Clean and Renovate a Travertine Tiled Floor

The client in Bishops Cleave contacted me as she was so frustrated with her Travertine tiled floor she was thinking of having it taken up. The tiles had been laid throughout the Hallway and into the Kitchen many years prior. The appearance of the floor had slowly deteriorated over the years to the extent that she was now having real trouble getting it clean.

Travertine Tiled Kitchen Floor before polishing Bishops Cleave

I arranged to visit the property in Bishops Cleave which is a small village between Cheltenham and Tewkesbury. The floor was indeed in need of attention, the sealant had clearly broken down and dirt had become ingrained in the pores of the stone. I discussed with the client what could be done to restore the appearance and demonstrated the cleaning process on part of the floor. She was thrilled with the result and about the possibility of getting the floor restored. Better still she would avoid all the disruption of relaying the floor and of course the cost. We agreed a price to carry out the work and I arranged a suitable date to return and complete the work which would take two days.

Travertine Tiled Kitchen Floor before polishing Bishops Cleave


Renovating a Dirty Travertine Tiled Floor

Returning to the property the first task was to protect the kitchen units and wooden stairs with masking film. I then started cleaning with floor with a coarse 400-grit Diamond burnishing pad fitted to a rotary floor buffer using water to lubricate the abrasive process. The pad is run over each tile a few times and then once the section is completed the floor is rinsed with more water and fine slurry extracted with a wet vacuum.

This process is then repeated with the medium 800-grit pad and fine 1500 grit pads, again rinsing with water and extracting after each pad with the wet vacuum. it’s a slow process but burnishing the floor in this opens the pores in the stone so the dirt can be removed and then closes them up again so restore its appearance.

The grout lines were quite heavily soiled with dirt, so my next task was to scrub them with a strong dilution of Tile Doctor Pro-Clean. The area was then again rinsed, and the soil extracted leaving the floor to dry off overnight.


Sealing a Travertine Tiled Kitchen Floor

Returning the following morning, I then spray burnished the floor with a 3000-grit polishing pad to remove any residue that might have been left behind and to further bring up the polished appearance of the Travertine.

This final pad is applied dry with only a little water, so it leaves the floor nice and dry and ready for sealing. For the sealer I had selected Tile Doctor Ultra Seal which is a no-sheen, penetrating sealer which doesn’t change the appearance of the stone leaving a natural finish. It is formulated to provide maximum stain protection, so is particularly good in kitchens. It is also an excellent grout sealer. The sealer was applied and left to dry for an hour then buffed again with the 3000-grit pad. This gave the floor a lovely finish and the natural beauty of the Travertine was at last able to shine through. I was very pleased with this restoration.

Travertine Tiled Kitchen Floor after polishing Bishops Cleave Travertine Tiled Kitchen Floor after polishing Bishops Cleave

The client was delighted and very pleased the she had contacted Tile Doctor, the floor looked great. She was very happy she had not needed to replace the floor. I suggested to her to maintain the floor she should use Tile Doctor Stone Soap which is a pH balanced product which you dilute. It will ensure the seal is not compromised and will keep the floor in great condition.

Travertine Tiled Kitchen Floor after polishing Bishops Cleave


Source: Travertine Tile Cleaning and Renovation Service in Cheltenham

Friday, September 20, 2019

How to Seal a Cracked Shower Tile

Having a ceramic tile shower is among the most commonly and easily achieved methods of adding everyday luxury to your home. Not only does tile look great, but it is also both highly durable and easy to clean. Despite these benefits of ceramic shower tiles, damage to the tile surface will sometimes occur.

There is no need to hire a professional to repair damaged tile. So long as the damage is not extensive, a well versed do-it-yourself homeowner can complete such repairs quite easily. Simply follow the steps below and equip yourself with the tools and materials listed above in order to repair your damaged ceramic shower tiles.

What you’ll need
  • Utility knife
  • Silicone or water based tile and grout sealer
  • Tile grout

Step 1 – Remove Old Tile Grout

Using a utility knife you can very carefully scrape out the old tile grout from around the cracked tile. The reason for doing this is that the grout may have been cracked as well due to the shifting of the cracked shower tile and this will allow water into your underlying wall. You want to avoid this happening as much as possible as it will allow mold to grow.

Step 2 – Seal the Cracked Shower Tile

To seal the crack in the time you will want to use either a water based or silicone tile and grout sealer. You can push the sealer into the crack with your fingers to totally fill the cracked area. Make sure to wipe the rest of the tile clean and remove all of the excess sealer before it dries on the tile.

Step 3 – Reapply Grout and Grout Sealer

At this time you can apply grout around the repaired tile and once it is dry you can apply grout sealer. Make sure to wipe off any access grout or grout sealer from the shower time before it dries.


Wednesday, September 11, 2019

How to Renovate a Victorian Tiled Hallway

Our client had recently moved to a property in Newport, Gwent and when removing the carpet in the hallway she discovered this beautiful Victorian Tiled floor. The property had numerous period features and realising the value that the floor could add to the property she was keen to have it restored and so contacted Tile Doctor for help.

Victorian Tiled Hallway Floor Newport Before Cleaning

We popped round to survey the floor and except for a couple of broken tiles it had preserved well under the carpet. It was a shame the previous owner had covered the floor over but I was confident we could source some matching tiles to replace the broken ones and then restore the overall appearance. We gave the client a quote for the work which would take a couple of days. Pleased to hear that the floor could be restored and that it could soon be on show the quote was accepted and a date set to do the work.

Repairing a Victorian Tiled Hallway Floor

We returned later the same month to renovate the floor and started by removing the broken tiles, cleaning out the old grout and adhesive and then relaying matching replacements. There are several specialist suppliers that can supply Victorian tiles so we can usually source reclaimed or reproduction tiles.

Some of the grout lines had dropped so as well as grouting around the replacement tiles more renovation work was needed to ensure the grout was level. We used quick setting products for this work, so I was able to move on to cleaning the floor later that afternoon.

Deep Cleaning a Victorian Tiled Hallway Floor

To restore the appearance of the Victorian Tiles I used a strong dilution of Tile Doctor Pro-Clean combined with Tile Doctor Remove and Go which was left to soak in for ten minutes before being scrubbed into the tiles. This created a powerful cleaner/stripper cocktail which gets to work at removing dirt, grime and breaking down old sealers paint splashes.

After extracting the soil using a wet vacuum the floor was inspected. There were a few stubborn areas which were treated to a repeat clean and a wire brush to get the floor as clean as possible.

The floor was rinsed with water to remove any trace of cleaning products and then as much moisture as possible was extracted using a wet vacuum. The floor was left to dry off overnight and we arranged to return the next day to apply a sealer.

Sealing a Victorian Tiled Hallway Floor

The following morning, we checked the floor was dry using a damp meter and this confirmed we were good to apply the sealer. The floor was sealed with Tile Doctor Colour Grow which is an impregnating sealer that protects the floor and enhances the beautiful colours in the tile. Three coats of the sealer were applied allowing each coat to dry before applying the next.

Victorian Tiled Hallway Floor Newport After Cleaning

The client was very happy with the result and how beautiful the floor looked as you can see from the picture.


Source: Victorian Tile Cleaning and Restoration Service in Gwent

Sunday, September 8, 2019

How to Install Marble Mosaic Tile in a Shower

Unlike porcelain or ceramic tiles, installing marble mosaic tile in a shower gives a feeling of richness and depth. A natural material, each marble mosaic tile will appear to be different in terms of patterns and color tones which make the shower unique. Follow the step-by-step guide below to install these tiles in your shower.

What you’ll need
  • Utility Knife or Backerboard Knife
  • 1/2 -inch Cement Backerboard
  • Backerboard Screws
  • Drill
  • Thinset Trowel
  • 15 lbs Roofing Felt
  • Marble and Granite Thinset or FlexBond
  • 2-inch Fiberglass Tape
  • Staple Gun or Hammer Tacker
  • Grout Float
  • Grout
  • Marble Mosaic Tile
  • Grout Sponge
  • Penetrating Grout and Tile Sealer
  • Margin Trowel
  • Tile Spacers
  • Joint Knife

Step 1 – Apply Penetrating Tile and Grout Sealer

Apply a layer of penetrating tile and grout sealer over every marble mosaic tile. This prevents the dye of the grout seeping into the marble tiles.

Step 2 – Check for Mold

Remove the existing drywall and shower items. Check the studs for mold. If mold is found, apply bleach on the affected areas. Air-dry it completely before proceeding to the next step.

Step 3 – Install Roofing Felt

Cut the roofing felt (15 lbs) into pieces and fit them over the studs. Use a staple gun or hammer tacker to attach the roofing felt onto the studs.

Step 4 – Install Cement Backerboard

Cut the cement backerboards and screw it onto the studs with backerboard screws. After doing so for all the backerboard, apply the thinset over the joints with the joint knife one by one. Next, cut the 2-inch fiberglass tape and place it over the applied thinset. Excess thinset is to be scraped away using the joint knife. Repeat the thinset process for all the joints.

Step 5 – Moist the Backerboard

Remove any debris and dust from the backerboard’s surface. Using a slightly damp sponge or spray bottle, moisten its surface.

Step 6 – Apply Thinset onto Shower Walls

Mix the thinset consistently in a bucket and make sure that you have enough thinset to finish the whole project. After mixing the thinset, let it rest for 15 mins. Then, use a joint knife or margin trowel to remove the thinset to load on the thinset trowel. Apply the thinset with upstrokes onto shower walls.

Step 7 – Install Marble Mosaic Tiles

Spread the thinset onto the marble mosaic tiles and install onto the shower walls. Use tile spacers to create straight and consistent grout lines.

Step 8 – Apply Grout

Let the marble mosaic tiles dry for 1 day. Then remove tile spacers from the marble tiles. They can be kept for future tile projects. Mix the grout in a bucket to consistency and let it rest for 15 mins. Then, use a joint knife or margin trowel to remove grout from bucket and load it on the grout float. Apply the grout onto the tiles and grout joints with upstrokes. Apply the grout with force into grout lines so that there are no gaps or spaces. Let it dry for 20 to 25 minutes. Excess grout is to be wiped off from the tiles with a damp sponge.

Step 9 – Apply Penetrating Tile and Grout Sealer

Let the grout stand for 3 days. Then, apply 2 layers of penetrating tile and grout sealer onto the entire surface of grout lines and tiles.


Wednesday, September 4, 2019

How to Repair and Restore a Victorian Tiled Hallway

Earlier this year I was asked to quote for repairing and restoring a Victorian Tile Hallway in St Neots. The floor was in good physical condition for its age however a section of tiling had been removed so facilitate the installation of a new pipe. The contractor was not very sympathetic to the old floor and after removing the tiles and installing the pipe they had simply back filled with concrete ruining the overall look of the floor.

Victorian Tiled Hallway Before Repair Restoration in St Neots

The rest of the Victorian Tiled Hallway had not been properly cleaned and sealed in some time and any protective sealer had long since worn off in the busier parts of the hallway. Without a sealer in place dirt had penetrated the pores of the tile leaving them looking dull and impossible to keep clean.

Victorian Tiled Hallway Before Restoration in St Neots Victorian Tiled Hallway Before Restoration in St Neots
Period features like this floor are very desirable these days and understandably the owner was every enthusiastic to have the floor fully restored back to its best possible condition.

I discussed with him the work we needed to do, which included repairing the concreted sections, deep cleaning the floor and then finish with the application of a protective sealer. I was confident I could source similar tiles and would be able to get the floor looking great again. We agreed a price and booked the work in to be carried out.

Victorian Tiled Hallway Before Restoration in St Neots


Repairing a Victorian Tiled Hallway Floor

I started by manually removing all the concrete at the back of the hall with a bolster and hammer. Once cleaned of rubble the hole was filled with a self-levelling compound to even out the area in order to get the surface to the right level ready for tiling.

Victorian Tiled Hallway During Restoration in St Neots

Fortunately, I had managed to source nearly identical tiles to replace the missing ones. There are a few places that keep stock, so it makes it easier to restore this type of floor. The border was laid first followed by filling in the middle with the correct pattern.

Victorian Tiled Hallway During Restoration in St Neots


Deep Cleaning a Victorian Tiled Hallway Floor

Once grouted the whole floor was stripped and cleaned using Tile Doctor Remove and Go which is a coatings remover that is designed to clean and remove old sealers from tile and stone. The product is diluted with water, sprayed onto the tiles and then allowed to soak in for ten minutes before scrubbing it in. The solution soon turns into a dark slurry as the dirt is released from the pores of the tile and this is then rinsed off with water and extracted with a wet vacuum.

Victorian Tiled Hallway During Restoration in St Neots

The next step was to treat any potential efflorescence problems that may appear later due to the lack of a damp-proof membrane under the floor. This is quite a common issue with old floors where moisture can rise through the tile carrying with it salts from the sub floor. To counter this problem and neutralise the alkaline salts the floor is further cleaned with Tile Doctor Grout Clean-up which is an acidic product. To remove the product another round of rinsing and extracted is carried out.

During the cleaning I noticed that some of the tiles had damage to the surface from being concreted over, so I renovated the surface using a 200-grit burnishing pad that hones the tile. Once I was happy the floor was clean, I left it to dry off for two days.

Sealing a Victorian Tiled Hallway Floor

I came back to seal the floor first checking with a damp meter that the moisture levels in the tile were below an acceptable level. All was well so I started the application of the sealer with a base coat of Tile Doctor Colour Grow which is an impregnating sealer that will deepen the colours and add an extra layer of protection.

Once the first dry coat of Colour Grow was dry, I followed up with five coats of Tile Doctor Seal and Go which adds further layers of protection and leaves the tiles with a nice subtle sheen.

Victorian Tiled Hallway After Restoration in St Neots

The job took five days in total, three days to sympathetically repair the floor followed by two days to clean and seal. You can see from the pictures that the repaired area looked very original and overall the floor looked great and the pattern is stunning. For aftercare I recommended they kept the floor clean using Tiles Doctor Neutral Tile Cleaner, this will keep the floor clean and ensure the sealant isn’t eroded prematurely which can happen with stronger floor cleaning products.

Victorian Tiled Hallway After Restoration in St Neots Victorian Tiled Hallway After Restoration in St Neots

The customer over the moon with the results and left the following glowing testimonial for me on the Tile Doctor feedback system.

”Tom was professional, meticulous, polite and hard working. We would have no qualms about recommending his service to others - especially with mosaic Victorian flooring like ours. Good value and plenty of expert advice and guidance thrown in for free. Thanks Tom. By Alden W, St Neots”


Victorian Tiled Hallway After During Restoration in St Neots


Source: Victorian Tile Repair, Cleaning and Sealing Service in Cambridge

Beginners Tips for Marble Tile Installation

Marble tile installation is a process that is not extremely complicated, but it does take some care and patience. When you are installing marble for the first time, you want to be aware of how the process works and keep a few tips in mind. Your are some tips to remember when you are installing marble tile for the first time.

Subfloor Preparation

One of the most important aspects of your job is to prepare the subfloor before you start laying. If the subfloor is not in good condition, you are going to have to spend some time fixing it. If you are working with a floor that already has some type of flooring on it, you are going to want to remove the flooring. If the subfloor is concrete, you are going to need to level it out with self-leveling compound if there are problems with the floor. If you are working with a wood subfloor, you are going to need to install concrete board before you can put the marble tile in. Concrete board is going to provide you with a very strong surface to put the tile on. You will need to use adhesive under the concrete board and then use nails or screws to adhere it to the wood subfloor. Regardless of what type of subfloor you have, you want to make sure that it is completely level and smooth for your tile installation.

Wet Saw

When you are working with marble, you will definitely want to use a wet saw. When using other types of tile, you could potentially get by with other cutting methods. You could use tile snips or some other type of saw. However, with marble, you have to use a wet saw. Marble is somewhat brittle and it tends to break along the grain if you do not cut it with a wet saw. The wet saw sprays a stream of water on the marble while you cut it. This helps to make a clean cut and you will not have any rough edges when you are done.

Proper Adhesive

When you are installing marble tile, you will want to make sure that you use the proper type of adhesive. They make and adhesive that is specifically designed to work with marble and stone tiles. This type of adhesive works very well. However, you could also use traditional tile thinset if you do not have access to the marble adhesive. When you use regular thinset, you are going to want to make sure that you use white thinset. If you use a dark color, it could potentially get through the marble and you will start to see the color of the thinset underneath.

Buy Extra

Before you get started, you will want to make sure that you buy plenty of marble tile. If you are short, it can be very difficult to find tile from the same batch. This could result in you having to put tile down that does not necessarily match the tile on your floor.


Thursday, August 29, 2019

How to renovate a Victorian Tiled Hallway

The owner of this beautiful Victorian tiled hallway floor in Dinnington had wanted the floor restored for quite some time. The property had many Victorian features, but this floor had an unusual design which made it very special. The owners had researched how to clean it themselves but hadn’t managed to achieve the result they were hoping for. The main problem was that the floor had been spotted with small paint splashes from decades of decorating.

Victorian Tiled Floor Before Cleaning Dinnington Victorian Tiled Floor During Cleaning Dinnington

Dinnington officially forms part of in Rotherham and is the same distance from Rotherham as it is from Sheffield. The area was a big coal mining and steel producing area and unfortunately suffered huge job losses throughout the 80’s and 90’s so its not surprising that the local housing stock suffered for many years as a result.


Cleaning/Repairing a Victorian Tiled Hallway Floor

We first treated the floor with Tile Doctor Remove and Go, this acts quickly to break down any old sealers still present on the tiles and softens the old paint splashes. After a ten-minute dwell time a coarse 200-grit burnishing pad fitted to rotary floor buffer was applied to the tiles. More water was applied where required to help lubricate the process and make the pad really work its magic. The slurry generated was extracted using a wet vacuum and the floor inspected. The process was the repeated to ensure all the dirt was removed and the floor was as clean as possible.

Victorian Tiled Floor During Cleaning Dinnington

Once happy the Victorian tiles were as clean as the could be it was time to give the floor an acid wash which would remove any old mineral deposits including grout smears. We also recommended this for old Victorian floors which do not have a damp-proof membrane installed and can suffer from white efflorescent salt deposits as moisture rises through the tile. To do this Tile Doctor Acid Gel was scrubbed into the to the floor using a 200-grit burnishing pad to make the acid gel work hard. Afterwards we rinsed the floor several times removing the slurry with a wet vacuum. This kept the mess to a minimum and the floor was already looking great.

Victorian Tiled Floor During Cleaning Dinnington

The floor was left to dry over the weekend, and we would return the following week to carry out the sealing process.


Sealing a Victorian Tiled Hallway Floor

The following Monday we returned to seal the floor. First, we used the moisture meter to test the floor, we needed to ensure it was as dry as possible before sealing it. The client wanted a traditional look, so we opted for Tile Doctor Colour Grow which is a colour enhancing sealer that leaves matt finish. This product is perfect for this type of floor as it is fully breathable allowing moisture to pass through the tile and sealer and not become trapped under the floor where it could spread to the walls and cause rising damp.

Four coats of Colour Grow were applied in total allowing each to dry before applying the next. The sealer works by occupying the pores in the tile thereby protecting the floor and preventing dirt from becoming trapped making it much easier to clean.

I was very happy with the result; the floor was now in great condition and was one of the more dramatic in colour and pattern that I had come across. My customer also felt the same and left the following feedback for me.

"Matt did a professional and thorough job: our Victorian hall tiles really 'pop' with colour. Highly recommend. Karen T, Dinnington"

Victorian Tiled Floor After Cleaning Dinnington Victorian Tiled Floor After Cleaning Sealing Dinnington


Source: Victorian Tile Cleaning and Sealing Service in South Yorkshire

Wednesday, August 28, 2019

How to Build a Flagstone Wall

A flagstone wall is very easy to build and helps demarcate areas within your garden, enhancing the beauty of the landscape. Made from light flagstones, this type of wall resembles stacked slate and does not require any drainage system. A flagstone retaining wall is usually no more than 3 to 4 feet high and is used to retain soil in the garden.

Building a flagstone wall for your garden can be completed in a few hours. However, make sure you have adequate protection from the sun if the weather is hot, since you will be working outdoors.

What you’ll need
  • Flagstone
  • Shovel
  • Hat
  • Drinking water
  • Sunscreen lotion
  • Gravel
  • Gloves
  • Sticks
  • Thread or rope
  • Rake
  • Cement
  • Mortar

Step 1 – Select Area and Insert Sticks

Select the area for your flagstone retaining wall. Insert two sticks in the soil, at both ends of the wall. Make sure the sticks are as high as your wall will be and tie a rope or string at both ends of the sticks. This will give you a general idea of how you wall will look, and will help keep it even.

Step 2 – Dig the Base for the Flagstone Wall

For a retaining stonewall, use a shovel that is roughly a foot wider than the height of your wall. Flagstones come in very large pieces, so one rock for the depth measurement will suffice. Dig the trench at least 10 to 12 inches in the soil.

Make sure the hill you want to retain slopes back gradually about an inch per rising foot, and add or remove dirt to it accordingly. Try to maintain the slope throughout the length of the flagstone wall.
Step 3 – Add Gravel to the Trench

Add gravel to the trench and rake it so it is aligned with the ground. The gravel will help secure the base of the flagstone wall.
Step 4 – Lay the Stones

Begin laying the stones, using the largest ones first, and cover the area of the gravel underneath. Make sure the stones are placed securely and do not wobble. Save some large stones for the top layer.
Step 5 – Cover the Joints

Step back to review the wall and make sure it does not wobble. You can leave the joints bare or insert small chips of the stone into them. You can also mix soil and water to achieve a mortar-like consistency and insert it into the gaps. This will allow small plants or grass to eventually grow there, thus enhancing the charm of your flagstone wall.
Step 6 – Finish the Top

You can leave your wall as it is, or add large stones to the top layer to make it sturdy and give it a finished look. Apply a layer of concrete or mortar to the next to last layer of stone and gently place the top stones on it. Insert small stones or soil into the gaps, or insert broken chips of flagstones. This will make your wall more secure along with giving it a more rustic look. Remove the sticks and thread or rope.

Your flagstone retaining wall is now complete.


Tuesday, August 20, 2019

How to Seal Flagstone Pavers

A patio made from flagstone pavers is a very sought after look because a flagstone patio is beautiful and timeless. Flagstone pavers are not inexpensive so it is important that you take proper care of them. Flagstone pavers come in rich earthy colors which can fade over time as the pavers are exposed to the elements. This is an unfortunate chemical reaction due to the flagstone pavers not yet acclimating to the surroundings. Sealing the flagstone pavers can help to prevent this fading. The following article will explain how this is done.

What you’ll need
  • Paint tray
  • Broom
  • Bucket
  • Water
  • Hose
  • Oil-free dish detergent
  • Stiff-bristled scrub brush
  • Flagstone sealant

Step 1 – Remove Debris and Materials

Prior to sealing the flagstone pavers you will first need to remove debris and materials that are resting on top of them. Start by removing any furniture that may be present which would include patio chairs and tables as well as grills. You will also want to remove any planters or other smaller objects. Anything that can hinder the process has to be removed.

Step 2 – Clean the Flagstone Patio

Applying sealer to flagstone pavers is like painting a wall or staining wood. This can only successfully be done if the area to seal is clean. This means that the flagstone pavers need to free of all dirt, rubbish and oil. Either of these materials can create a bad seal. Use the broom to first brush away any loose dirt or leaves that may have accumulated on the patio. Once his is achieved you can then put a few drops of the dish detergent into a bucket of warm water. You want it to be somewhat sudsy but not completely foamy. Dip the scrub brush in the bucket and begin scrubbing the flagstone pavers clean. Once finished, you can then rinse the pavers clean with the hose. Allow the flagstone pavers to dry completely before moving forward.

Step 3 – Seal the Flagstone Pavers

Once the pavers have had time to fully dry you can then begin the job of sealing them. Choose a far corner to begin working so that when you are finished you will not have to walk over sealed flagstone pavers. Open the can of flagstone sealer you purchased and pour some of it in to the paint tray. Use the paint roller to apply the sealer to the flagstone pavers. Make certain that the flagstone pavers are fully painted. Continue to paint the pavers with the sealant until all of them are sufficiently and generously covered.

Step 4 – Finishing Up

Allow the sealant to dry completely. You will need to consult the can of sealant to determine how long that may be for the one that you used. Once the sealant is dry you can then apply a second coat of the sealant. Two coats of the sealant are enough to properly protect the flagstone pavers. If you happen to live in a climate that is warm more times out of the year than it is cool then a third coat is warranted. The sealer must be completely dry before replacing the furniture.


Thursday, August 15, 2019

How To Repair and Restore an Old Victorian Tiled Floor

This detailed Victorian tiled hallway at a property in Camden was overdue some much-needed repair and maintenance. The owners of the property appreciated that original period features like this add a lot of value to a property and asked me to visit the property to quote for renovating it. The property was in a terrace of similar properties most of which appeared to have retained their Victorian character.

Victorian Hallway Floor Tile Before Restoration Camden

I inspected the floor and found there were a couple of loose, cracked, worn and broken tiles that needed to be replaced. In addition, the floor tiles needed a deep clean and then seal to bring back the wow factor. I was confident we could renovate the floor but at that point unsure if we would be able to find exact match replacements for the damaged tiles. Fortunately, Victorian tiles are still in demand and I knew of several companies I could check with so I was confident they could be found.

Victorian Hallway Floor Tile Before Restoration Camden

We discussed how long the work would take and assuming I could source the replacements agreed a price for the full restoration of the floor. After doing some research I managed to find suitable replacements with a company called Original Style and the work was scheduled for the following month.


Cleaning/Repairing a Victorian Tiled Hallway Floor

Firstly, we prepared all areas with protective tapes to threshold edges and skirting. This was followed by spaying the tiles with a strong dilution of Tile Doctor Remove & Go which is product designed to remove old sealers and coatings. After about ten minutes the tiles were scrubbed with black scrubbing pads and scrubbing brushes. Fresh water was used to rinse the floor and the slurry was extracted using a wet vacuum.

The floor was inspected and then a second clean carried out, this time using Tile Doctor Pro-Clean which is a Tile and Grout cleaning agent. The same process of application was used and after rinsing and extracting the dirt the tiles were given a steam clean. This ensured all the dirt was lifted out of the pores of the tile and the floor was now as clean as it possible could be.

The next step was the remove the loose and cracked tiles using the reclaimed tiles we had sourced earlier. Some cuts were necessary to get the replacements to match the originals but overall the plan worked. A quick drying adhesive was used to secure the tiles so we could apply the grout shortly after. The whole floor was then re-grouted and cleaned off to ensure a good match. The floor was left to dry off overnight, and you could already see it was now looking considerably improved.


Sealing a Victorian Tiled Hallway Floor

Returning the next morning we checked the floor was dry using a moisture meter, this is important as to apply a sealer to damp tiles will lead to a patchy experience. All was well so we were ready to apply the sealer.

To start a single base coat of Tile Doctor Colour Grow sealer was applied to the floor and left to dry. This sealer is an impregnator that protects from within by occupying the pores in the clay tile improving colour in the process. This sealer does leave a matt finish however and the client wanted a subtle shine so one dry it was followed by four coats of Tile Doctor Seal & Go. The combination of the two sealers works really well to add long lasting protection to the tiles and provide the desired finish to the floor.

Victorian Hallway Floor Tile After Restoration Camden

The floor was much improved, and the client was delighted. The detailed pattern and colours were now much more prominent, and the hallway looked much more inviting for both the owner and their guests. For the aftercare of Victorian tiles, I recommended the use of Tile Doctor Neutral Cleaner which is pH neutral and won’t prematurely erode the life of the sealer.


Source Victorian Tile Cleaning and Restoration Service in North London

How to Weather Proof Your Flagstone Patio

A flagstone patio is a beautiful and expensive place where you can enjoy many hours of free time with friends and family. The flagstone patio is able to house anything from deck furniture and a fire pit to a grill. Flagstone is a natural stone and because it has not acclimated to its surroundings the color of it can fade instead of remaining vibrant. This is not necessarily your fault but that of the environment and the elements. If you were to install flagstone to a kitchen floor or on a mantle the color of the flagstone will remain consistent. This is because the environmental conditions are standard. With a flagstone patio it will be bombarded with wind, rain, snow, ice and then of course heat. The flagstone does not have time to adjust to any one particular circumstance and so they become discolored. The solution is to weatherproof your flagstone patio and the following article will show you how it is done.

What you’ll need
  • Weatherproof membrane
  • Scissors
  • Paintbrush
  • Flagstone sealer
  • Broom
  • Quick-set sand


Step 1 – Weatherproof Membrane

If you are installing your flagstone patio from scratch then you most likely used landscaper’s fabric to prevent weeds from growing between or through the flagstones. This is one key step to weatherproofing a flagstone patio. For this you will also want use a weatherproof membrane which resembles rubber with little pockets throughout the surface. The membrane prevents water from entering the site and is instead absorbed by the surrounding ground. The membrane is cut to fit the site and is then placed directly on top of the sand.
Step 2 – Sand

Using mortar to seal the edges of the flagstone patio stones will ruin the overall look of the patio. The traditional way is to use sand to do the job for you because once dry it is compacted and very hard. If you are in an area that gets a lot of rain this may not be practical. The solution is to use a product that is known as a quick-set or mortar sand. It is still sand but is treated with certain additives that when wet it is just like typical sand but when it dries it dries as hard as concrete. You can still work with it in the same manner as typical sand. You pour it over the patio and then broom it into the gaps. You then wet it down and repeat with more sand until the gaps are completely full and dry.
Step 3 – Sealer

To prevent the color of the flagstone from fading you will want to seal it with a special weather coating. It resembles polyurethane but is formulated specifically for flagstones. You can purchase stone sealer with special color enhancing additives added to it. Application of the sealant is as simple as painting a wall. Simply pour the sealant into a paint tray and then use a paintbrush or paint roller to apply at least two layers of sealant to the flagstone patio.


Monday, August 12, 2019

How to Renovate a Victorian Tiled Hallway Floor

This beautiful Geometric Victorian Tiled Hallway at a property in the small Cumbrian town of Sedbergh had been covered by carpet and then Vinyl beneath the carpet. Far from causing an issue with the floor however it had protected the beautiful old tiles, but they needed a deep clean and seal. The client really wanted to make the most of the character features of the property and the hall floor was their first priority.

Geometric Victorian Tiled Hallway Before Cleaning Sedbergh

I discussed with the client the process of cleaning and we agreed a quote for the work, arranging a date for the work to be carried out later in the month. If you have never been Sedbergh is well worth a visit, it sits just within the Yorkshire Dales National Park at the foot of the Howgill Fells making it very popular with walkers.

Geometric Victorian Tiled Hallway Before Cleaning Sedbergh


Cleaning a Victorian Tiled Hallway Floor

The floor had a lovely decorative tile border that ran along the perimeter of the hallway however some damage had occurred when fitting central heating pipers many years earlier. There were also small holes around the edges that I suspect were used to secure the carpet gripper. To resolve this my first task was to replace the damaged tiles and fill the small holes with grout in a matching colour. 

Once the repairs had set, I started the cleaning process with a coarse 200-grit Diamond pad followed by a 400-grit pad which were run over the floor using a weighed buffing machine. Only water is used during this process to add lubrication, no chemicals are needed and once done the floor is rinsed with water and the slurry removed with a wet vacuum.

The corners and edges which were are not accessible with the machine had to be done by hand, so we used small burnishing blocks for these. The Green block is great at getting the dirt off the tiles, but leaves the pores of the clay open, so this needs to be finished with the Black 100, Red 200 and Yellow 400 Diamond Block used in sequence which then matches the pores of the clay tiles in the rest of the floor.

We finished the clean, with a light acid rinse using Tile Doctor Grout Clean-up, left on the surface for no more than 5 minutes before rinsing and extracting. This process further cleans the floor and counters any potential efflorescence issues by neutralising alkaline salts in the floor. This is a common problem with old Victorian tiles which don't have a damp-proof membrane.


Sealing a Victorian Tiled Hallway Floor

The floor was left to dry out overnight and the next day I came back to inspect the floor and make sure it was dry so it could be sealed. Usually one night to dry is fine during the summer although in the winter sometimes it takes two or even three days. Sealers don’t cure well on damp floors resulting in a patchy appearance so before sealing we always check the floor is fully dry with a damp meter in several areas. Only once we are happy that the moisture readings in the floor are below a certain level do go ahead and apply a sealer.

Geometric Victorian Tiled Hallway After Cleaning Sedbergh

To seal and protect the Victorian tile, a couple of coats of Tile Doctor Colour Grow were applied to the floor. Colour Grow is a fully breathable, colour enhancing sealer which ticks a lot of boxes for this type of floor as old floors don’t have a damp-proof membrane fitted. This is an important consideration as moisture will be also to rise through the tile from the subfloor and not get trapped underneath where it could spread to the walls. Other types of sealer such as acrylic, wax, polishes etc don’t last long if there is dampness in the floor. Tile Doctor Colour Grow copes well in these conditions and can be used in wet rooms, shower cubicles and external patio areas so its’s more than suitable for a slightly damp floor which is often the case with a Victorian base.

Geometric Victorian Tiled Hallway After Cleaning Sedbergh


Source: Victorian Tiled Floor Cleaning, Renovation and Sealing service in Cumbria