Showing posts with label sealing tiles. Show all posts

Tuesday, March 1, 2022

Victorian Tiled Hallway Floor Restoration Detailed by North London Expert

My client discovered found this Victorian tiled floor under the carpet of a communal hallway in a large Victorian house in Bounds Green. The property had previously been converted into three flats and it seems the developers of the property dodged the cost of having the floor renovated and opted to glue down a carpet instead. The floor was in quite a state and there was a section of tiles missing where a pipe had been laid under the floor.

 
Victorian Tiled Floor Before Restoration Bounds Green

I visited the property to survey the floor and prepare a quote for renovating the floor. With the floor in such a state I could see I would need to source replacement tiles. Whilst there I also carried out a small test clean to understand what it would take to ensure a good result could be achieved. Impressed with results from the test clean and happy with the quote my client agreed to have us back to do the work.


Cleaning and Repairing a Victorian Tiled Hallway Floor

Day one started by deep cleaning the floor using a strong dilution of Tile Doctor Remove and Go which was scrubbed in with a black pad fitted to a rotary machine. This product weakens the glue and allows it to be removed with handheld scrapers, a steamer also comes in handy during this process.

Next step was to tackle the thin layer of cement screed which had been applied in some areas to level the floor ready for carpet. To do this a 200-grit diamond pad was fitted to the rotary floor buffer and run over the tiles along with Tile Doctor Acid Gel both to lubricate and help clean away the cement residues. This process generates a lot of soil with is rinsed off with water and extracted using a wet vacuum.

The 200-grit pad was followed up with a finer 400-grit pad to improve the condition of the tile, again using Acid Gel. After another round of rinsing and extracting the cleaning process was complete. As well as removing the cement the Acid Gel will neutralise any potential efflorescent salt issues that are a common problem with floors of this age. The floor was then rinsed with water and the soiling removed with a wet vacuum.

The next step was to tackle the damaged section of tiling where the pipe had been laid. To do this the backfilled cement was carefully chiselled out and the rubble removed. The subfloor was then rebuilt to with fast drying cement ready for tiling the next day.

For this project we were unable find existing replacement tiles that fitted exactly so instead large square tiles in the colours required were obtained from Original Features (just down the road in Crouch End N8) and then cut down to size on site.

Victorian Tiled Floor During Restoration Bounds Green Victorian Tiled Floor During Restoration Bounds Green

After cutting all the tiles to match the existing pattern I laid them into the floor using a fast-drying flexible adhesive. The floor set over lunch and were grouted later that afternoon.

Sealing a Victorian Tiled Hallway Floor

The following day I returned and sealed the tiles with three coats of Tile Doctor Colour Grow which is a breathable impregnating sealer that will soak into the tile adding protection. This takes a while to apply as you have to wait at least half an hour between coats to dry before applying the next. 

Additionally, Colour Grow is a colour enhancing sealer and so was a perfect choice for this colourful floor. Being breathable it will also cope well with any moisture rising through the floor which is important for old floors like this which don’t have a damp proof membrane installed.
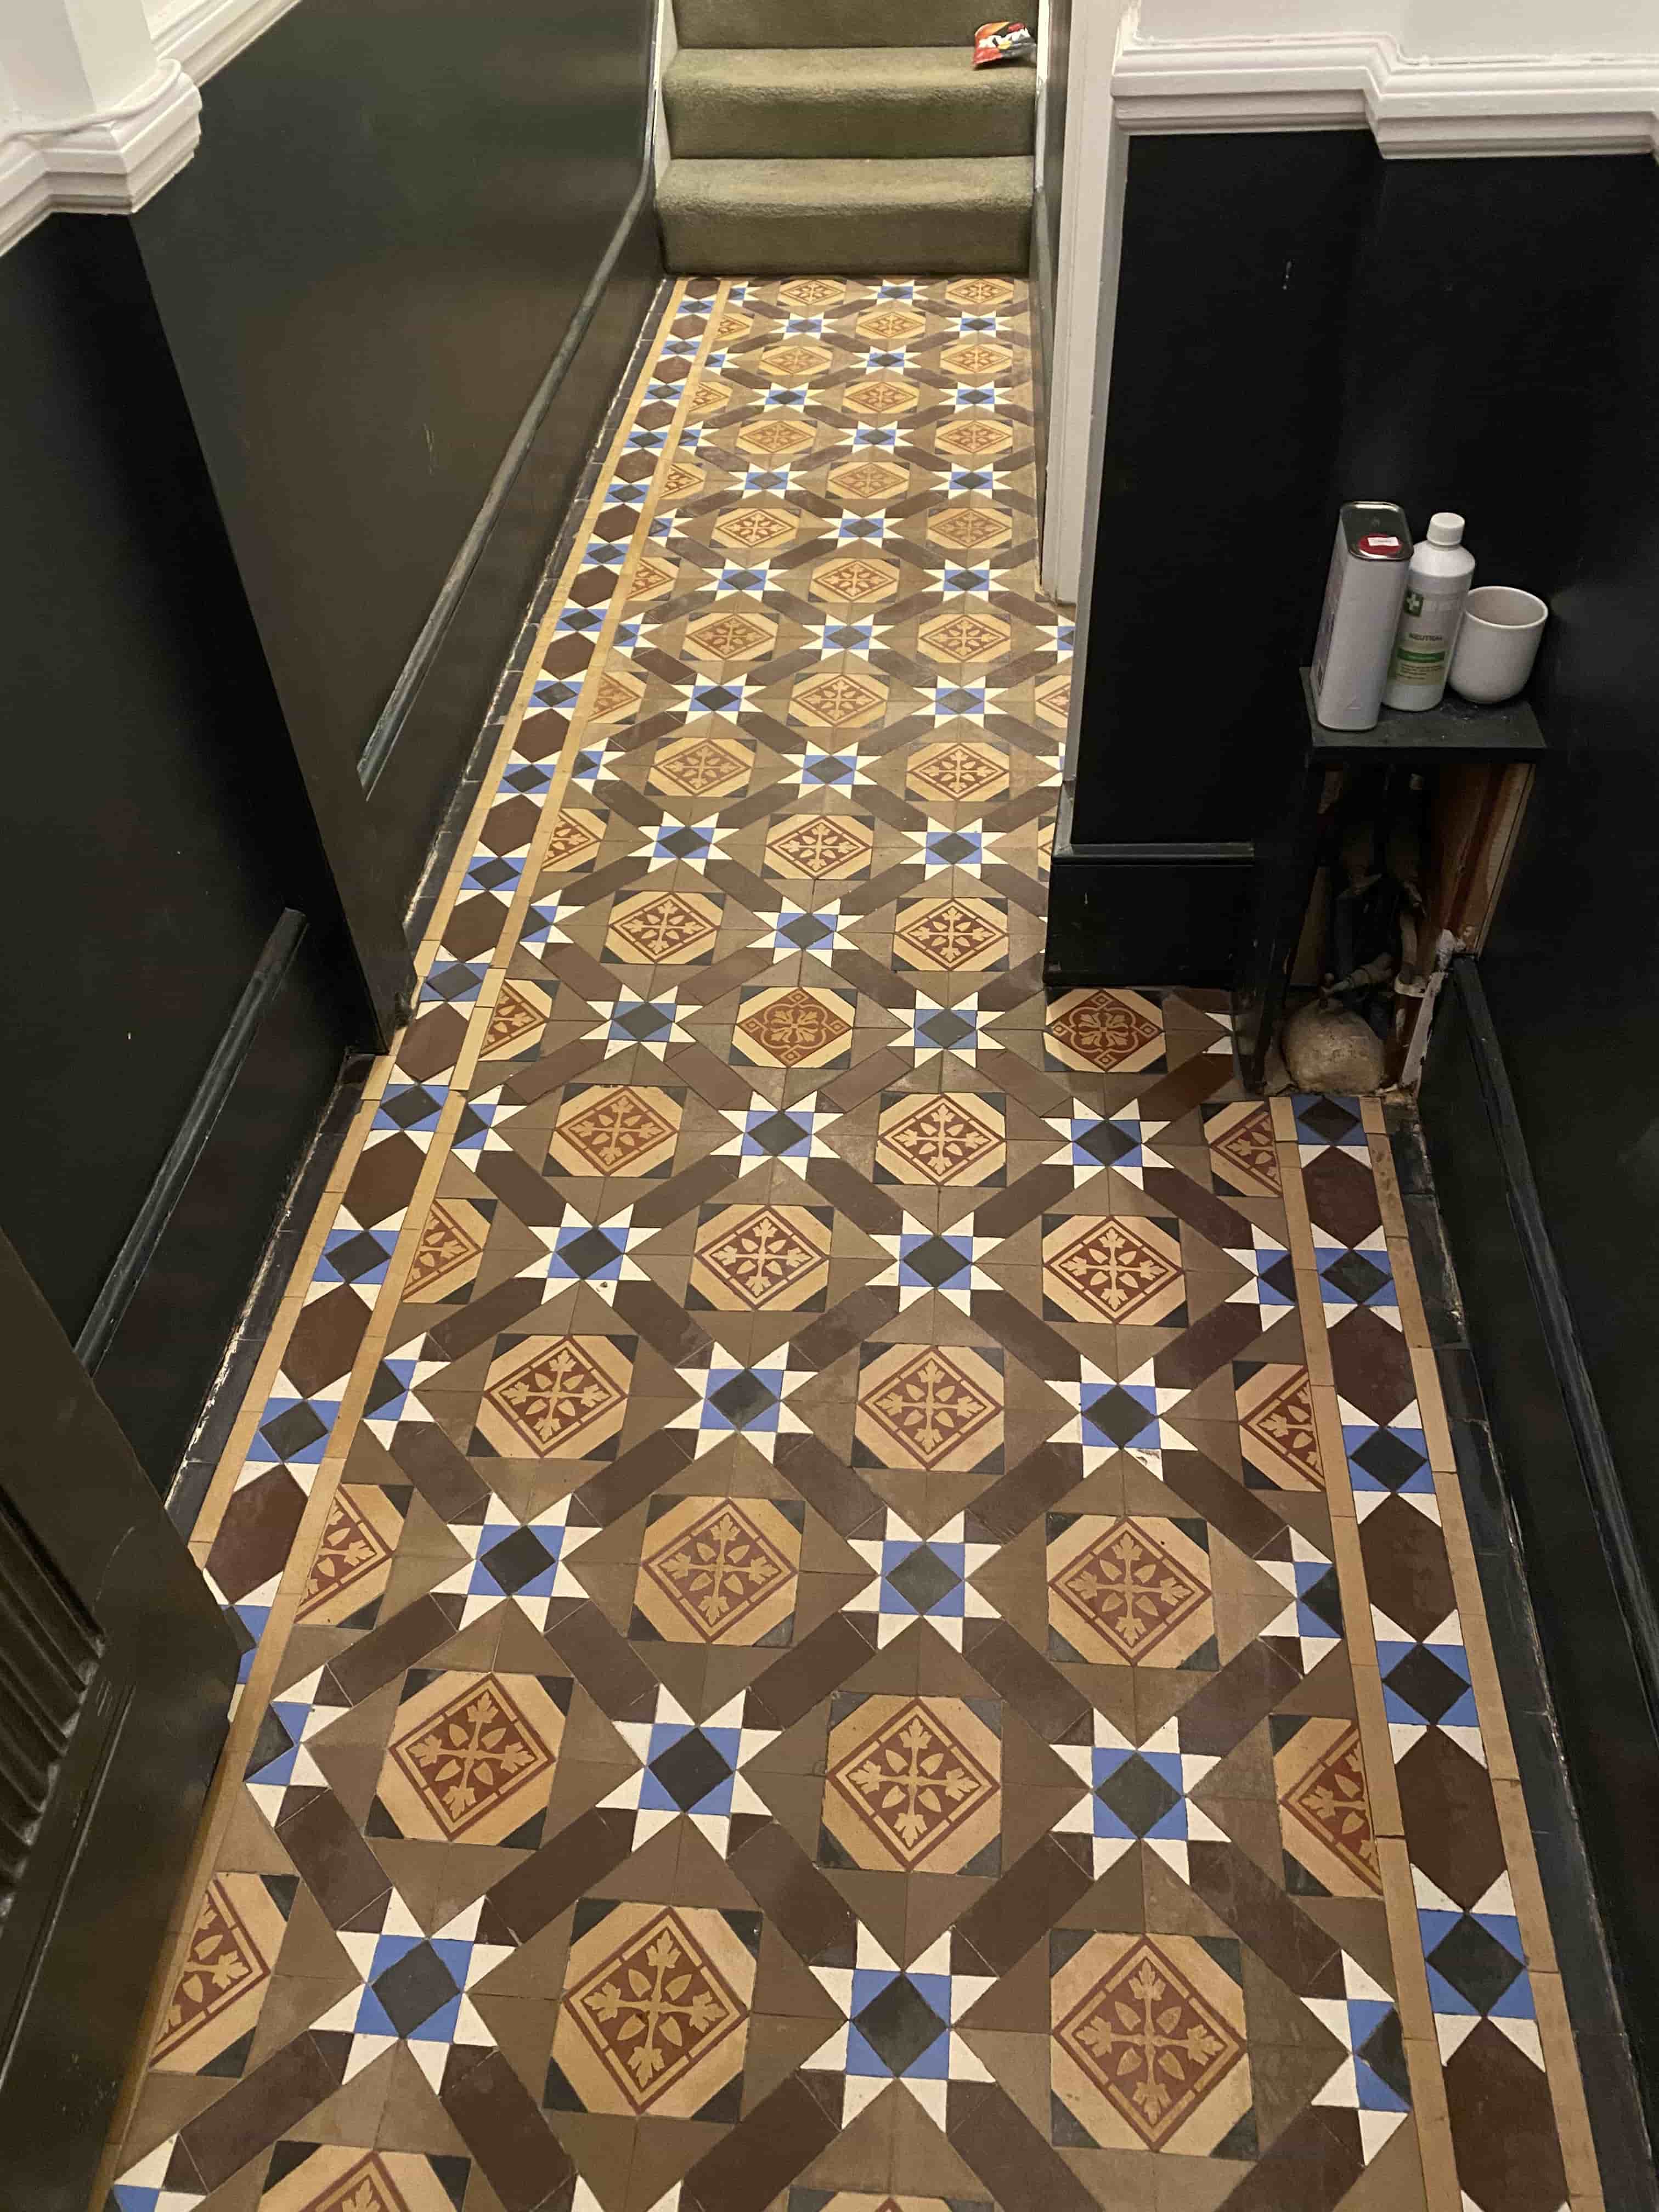
 
Victorian Tiled Floor After Restoration Bounds Green

My client was very happy with the newly restored Victorian tiled hallway which looked so much better than the previous carpet and had added so much more value to the property. For aftercare I recommended the use of Tile Doctor Neutral Tile Cleaner, which is pH balanced cleaner that will clean the tiles without being so strong that it impacts the sealer.


Sunday, May 28, 2017

Victorian Tile Restoration in Wiltshire

This customer had just brought a house in Chippenham which they were renovating and it had come to their attention that Victorian tiles had been laid under the hallway carpet. Keen to restore them the customer called us in to see if we could enhance the appearance of their floor. Cleaning Read more...

To read more on this topic click here

Tuesday, May 9, 2017

Removing Carpet Tiles from Victorian Tiles

I've seen a few Victorian Tiled floors in my time and I can tell you the condition of this particular floor was one of the worst I've seen in a while. The tiles had been covered up with carpet tiles which had been stuck down with a strong adhesive and there was still a fair amount of carpet Read more...

Saturday, April 29, 2017

Tiled Limestone Hallway Cleaned, Polished and Sealed

This Limestone tiled floor was located in the entrance hall of a residential property in Burford. I popped round following a cleaning enquiry to provide a quote and did a sample clean on a test area, I was then asked if I could do the whole floor there and then and not wanting to disappoint I Read more...

Friday, April 21, 2017

Putting the Shine Back on Water Damaged Limestone Tiles

This 50 m2 Limestone tiled floor at an old thatched cottage in Slough had unfortunately been stained following a radiator system leak which covered the tiles in dirty radiator water and sludge. The limestone tiles had been laid on a floor without a screed damp proofing membrane which resulted in Read more...

Tuesday, April 18, 2017

Slate Tile Maintenance in Windemere

The customer from Windermere called me in to take a look at their Slate tiled kitchen floor which was looking very dirty with ingrained stains and marks on the stone from spills etc. that were proving difficult for the customer to clean. The brief was to give the floor a deep clean, remove the Read more...

Saturday, April 15, 2017

Combining Sealers for Maximum Effect

These photographs from the hallway of a house in Banbury where old thick slate tiled floor had been laid and the customer was unable to get them clean or restore any colour back into the stone. Cleaning Slate Flagstone Tiles I prepped the skirting boards with masking tape to protect them and Read more...

Monday, April 10, 2017

Terracotta Tile Maintenance

Another Terracotta tiled floor installed in a conservatory this time in Henley on Thames. The previous sealer was mostly worn away and was no longer offering much protection allowing dirt to get ingrained into the tile and making it difficult to clean effectively resulting in dull looking tile Read more...

Saturday, April 8, 2017

Deep Cleaning Slate tiles in Cumbria

This property in Ulveston had previously been used as a guest house and was now being refurbished and turned back into a home. The kitchen and conservatory had a Slate tiled floor and as you can imagine had seen a fair amount of wear from the numerous fried breakfasts that had been prepared in Read more...

Wednesday, April 5, 2017

Sealer Problems Resolved on Travetine Floor Tiles

These Travertine tiles were laid five years ago at a residential property in Ashton Clinton and our client had never been entirely happy with the tillers finish from sealing which was marked with smears and also had the tillers bare footed prints embedded within the seal. The sealer was now Read more...

Tuesday, April 4, 2017

Maintaining Travertine Floor Tiles

This Travertine tiled floor had been laid in a house in the picturesque village of Brightwell-Cum-Sotwell in south Oxfordshire and the owner had decided it was time to have it properly cleaned and re-sealed. Cleaning Travertine Floor Tiles The floor was given a wash with Tile Doctor Neutral Read more...

Thursday, March 30, 2017

Cleaning Tumbled Travertine Kitchen Tiles

This Tumbled Travertine kitchen floor in Twickenham, Middlesex was in need of a deep clean including stripping out the old sealer and re-sealing to ensure easy maintenance in the future. The floor had not been professionally cleaned and re-sealed for over 10 years and being in a high traffic Read more...

Putting the life back into Slate Floors

Details below of a tired Slate and Flag Stone floor installed in a house in Cookham, Berkshire; the client was actually the son of an existing client whose floor we had also cleaned recently. The existing sealer had been wearing away over time and the floor had becoming increasingly ingrained Read more...

Wednesday, March 29, 2017

Restoring the Appearance of Brazillian Slate Tiles

This beautiful Brazilian Slate tiled floor was installed in the kitchen of a house in Barrow-in-Furness, Cumbria; the slate has been previously sealed with a number of products including Varnish and the overall effect was inconsistent making the floor dull and had done little to bring out the Read more...

Deep Cleaning Travertine Tiles

Another Tumbled Travertine kitchen floor, this time in Teddington and much dirtier than the previous post. The grout was badly stained and dirt had built up in the pores of the tile causing it to go black and very un-appealing. Normally a sealer would stop this from happening and I suspect these Read more...

Monday, March 27, 2017

Restoring the look of Travertine tiles

I was recently asked to pop over to a large house on the Wynyard estate near Wolviston where a customer with a beautiful Travertine Tiled Kitchen floor needed some help to put the shine back on their tiles. It seems their cleaner had been using the wrong cleaning product on the tiles and it Read more...

Wednesday, March 15, 2017

Polishing Tumbled Marble

This 50m2 Tumbled Marble tiled floor in Dewlish, near Dorchester had not been deep cleaned and re-sealed for at least five years and showed signs of the normal wear and tear associated with a busy kitchen/dining room and a dog that enjoyed muddy walks. The old sealer was now breaking down allowing dirt to become ingrained in the Marble making it difficult to clean. Stripping a Tumbled Marble Floor To restore the surface finish it needed to be burnished using a set of diamond encrusted burnishing pads. The pads come in a number of different grades from coarse (used to strip off sealers and dirt from the Marble) too very fine (used for final polishing) and are applied one after another starting with the coarse pad and moving through to the very fine pad towards the end. Each stage requires a little water which captures the soil and is rinsed away and removed with a wet vacuum. This process completely removed the old sealer and surfaces scratches with a new shine. The floor was given a thorough wash down at this point again using a wet vacuum to remove as much water as possible from the surface before leaving it to dry for the evening. Sealing Tumbled-Marble Tiles The next day the Marble had dried and I started to seal the tiles using two coats of Tile Doctor Colour Grow sealer Read more...

Sunday, March 12, 2017

Cleaning Old Ceramic Tiles

This fifty year old Ceramic tiled floor was installed in the communal parts of a small block of flats in Poole, Dorset. The tiles had not been given a deep clean in a long while and were now ingrained with dirt from many years of wear. Cleaning Ceramic Floor Tile and Grout To clean the tiles a Read more...

Monday, March 6, 2017

Deep Cleaning a Terrazzo Hallway near Caerphilly Castle

I previously restored an Quarry Tiled floor for the owner of this residence near Caerphilly Castle and was asked back to deep clean their Terrazzo hallway floor which was far from looking its best. Restoring a Terrazzo Floor Terrazzo is a very hard surface and needs to be burnished to get the best results so after scrubbing the floor with Tile Doctor Pro-Clean and a black scrubbing pad to remove what felt like 100 plus years of black dirt I set about burnishing the floor with a set of Read more...

Thursday, March 2, 2017

Dealing with stained Marble Shower Tiles

The picture below really tells the story but basically this is bathroom from a house in Kidlington that has been tiled with Marble mosaic wall tiles which has become stained around the bath. Additionally the silicone strip between the bath and the wall had become badly stained with mould and needed replacing. Refreshing Marble Wall Tiles To get the tile and grout clean I decanted a strong dilution of Tile Doctor Pro Clean into a spray bottle and began to apply it in sections to the Marble mosaic wall tiles. Mixing the cleaning solution with air makes it lighter and less likely to run off the wall giving it chance to dwell on the tile and get to work. I left it to soak in for a few minutes before scrubbing into the tile and grout with a stiff brush finishing with a rinse with water; this process was then repeated on stubborn stains and the rest of the area until the wall was clean. Then the mouldy silicone was removed from around the bath, dried and replaced with new. Sealing Marble Mosaic Tile The wall was dried and then the mosaic tiles sealed with two coats of Tile Doctor Colour Grow which is an impregnating sealer that penetrates into the pores of the Marble to make an effective barrier. Colour Grow also enhances the colour of natural stone so when finished the colour Read more...