Thursday, February 27, 2020

How to Rebuild and Restore a Victorian Tile Floor

The photos below are of a 1.7 metre by 3 metre Victorian tiled floor at the entrance to a property in Prizet, south of Kendal. As you can see the hallway and porch was in a poor state due to old age and neglect. Some tiles were cracked, missing and stained with cement, and what I suspect was carpet adhesive. One of the tiles had a four-inch hole down to the cellar where a soil pipe was installed previously when the room was used as a downstairs W.C. The client was doubtful that we would be able to restore the floor but thought it would be worth contacting us just in case.

Victorian Tiled Entrance Floor Before Rebuild Prizet Kendal Victorian Tiled Entrance Floor Before Rebuild Prizet Kendal

I visited the property to take a proper look and found their description of the floor was accurate and clearly overdue some serious attention. I also noticed that some point in the past cracked tiles had been removed and replaced with cement. However, I was confident the floor could be restored and gave them a price for the restoration which they were happy to proceed with.

Victorian Tiled Entrance Floor Before Rebuild Prizet Kendal


Repairing a Victorian Tiled Hallway Floor

Work started by rebuilding the worst part of the floor which would require the services of my partner Russell. This involved removing the existing tiles, then preparing the concrete base which needed to be level and smooth before we started tiling.

Victorian Tiled Entrance Floor During Rebuild Prizet Kendal

We had previously managed to source very similar tiles which would be needed to replace those that were missing or damaged. Once the floor was prepped, the replacements were cut to fit taking care to ensure they matched the original pattern. Once cut they were fixed in place with flexible adhesive. We recommend the use of flexible floor adhesive on old floors due to the potential movement and the flexible floor adhesive doubles up as a grout as well. The floor was then left overnight to dry.
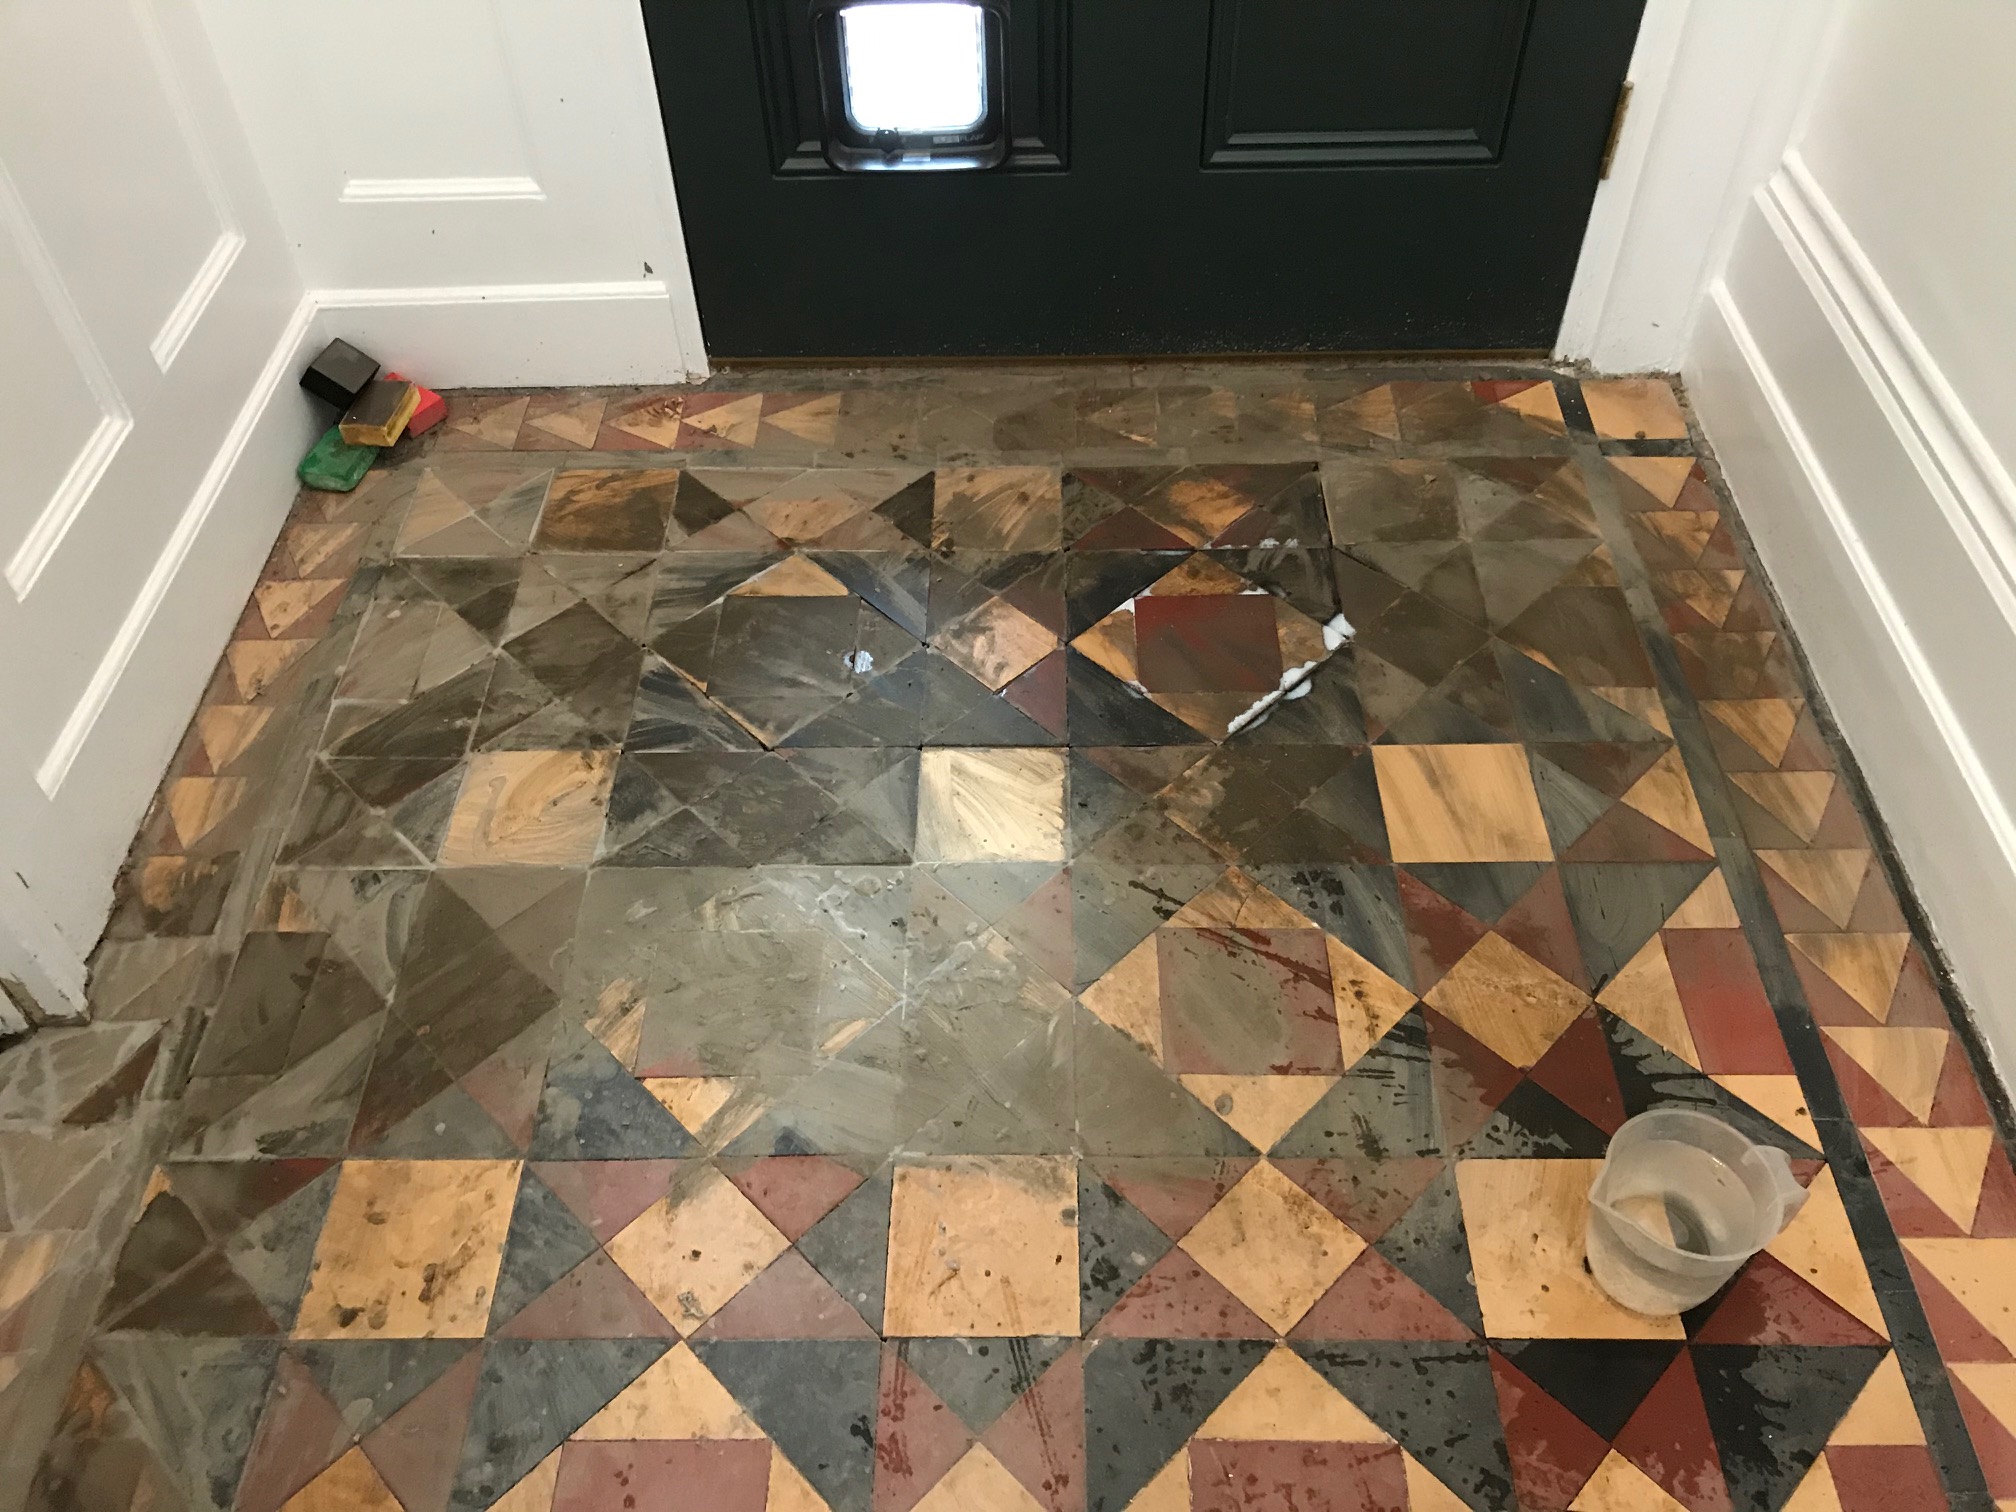
Victorian Tiled Entrance Floor During Rebuild Prizet Kendal


Deep Cleaning a Victorian Tiled Hallway Floor

On day two the floor was deep cleaned using a 100-grit resurfacing pad followed by a 200-grit pad and then a 400-grit burnishing pad. The pads are attached to a rotary machine and the floor is rinsed with water and the soil extracted with a wet vacuum in-between.

We then finished the clean with an acid rinse using Tile Doctor Grout Clean Up. This is needed to remove the cement stains from the surface of the Victorian tiles and neutralise any potential efflorescent salt issues in the tiles. Another advantage is the acid slightly etches the tiles making a better bond with the sealer.

The floor was given another rinse with water and then the wet vacuum was pressed into surface again to extract the fluids and get the floor as dry as possible before leaving for the day.


Sealing a Victorian Tiled Hallway Floor

We returned on the third day and first checked the floor was fully dry using a moisture meter. Four coats of Tile Doctor Colour Grow were applied to achieve a strong enduring seal that will cope well with the traffic coming through the entrance.

Colour Grow is a colour intensifying sealer that provides durable surface protection to the tiles, but at the same time allows the surface to breath which is important in a floor such as this where no damp proof membrane is present. The results speak for themselves I was particularly happy with the area where we had repaired the hole, it was barely noticeable.

Victorian Tiled Entrance Floor After Rebuild Prizet Kendal

Many thanks to my customer for sending over the before photos and for leaving the following testimonial.

“Great restoration job done on our Victorian hall and porch tiles including replacing broken tiles and cleaning. Now looking better than ever. Russell was very professional and knowledgeable. Nicola F. Kendal”


Source: Victorian Tiled Floor Cleaning and Restoration Service in Cumbria

Wednesday, February 26, 2020

How do I Install a Cheap Pebble Floor?

Pebble tile is a cheap way to use small and medium sized pebbles as flooring. Pebble tile flooring brings a natural, zen-like element to a room, and is much easier to lay than flooring made from pebbles and epoxy resin. Pebble tile is small pebbles attached to a nylon mesh backing. It can be cut to fit the project space with a utility knife. Pebble tile installs with thin set mortar and requires sealing and grouting.

Step 1
Measure the project area and calculate the square footage of pebble tile needed to cover the floor.

Step 2
Clean the project floor area thoroughly and fill any cracks or divots in the sub-floor with the appropriate medium for the sub-floor's composition.

Step 3
Trowel thin set mortar onto the project floor area with a notched tile adhesive trowel.

Step 4
Place the pebble tile against one edge of the project floor, in the adhesive, and lightly tap the pebbles to set them into the adhesive without pushing them down too far. Set the second course of pebble tile next to the first with no gap between courses. Cover the entire project area floor in the same manner, Trim the final course of pebble tile, if necessary, to fit flat against the floor to the last wall, with a utility knife.

Step 5
Wet the protective paper attached to the face of the pebble tile, if it exists on the tile brand installed, with a sponge and carefully peel the paper off of the pebbles.

Step 6
Apply a sealant formulated for natural stone over the pebbles with a paint brush and let it dry before continuing.

Step 7
Scrape tile grout lightly across the surface of the pebbles to fill the spaces between them.

Step 8
Wipe off excess grout with a stiff, damp sponge, then wipe the pebble surface again in approximately one-half hour to remove any film left by grout residue.


Source: www.Sapling.com

Thursday, February 20, 2020

How to Remove Bitumen from old Victorian Floor Tiles

I was contacted by a client who recently bought a house in Leyton E10 and found an original Edwardian floor in the hallway under old lino. The house was built in 1908 making it well over 100 years old and from the Edwardian era.

The customer had decided to remove the linoleum, but it had been fixed down with bitumen which he struggled to remove as it is such a sticky substance. As well as the bitumen the floor was dirty with ground in dirt, I can only deduce the previous occupants must have decided just to cover it up with the lino rather than clean it. Also, there was some damage to the tiling in front of the stairs that needed repairing. It was clearly going to be more work and more involved than the new owner had initially thought so I was asked to take over the restoration.

Edwardian Floor Covered in Bitumen Before Restoration in Leyton E10 Edwardian Floor Covered in Bitumen Before Restoration in Leyton E10

After visiting the property for a site visit, I had a good idea of what would be needed and managed to find suitable replacement tiles from Original Style Tiles. They were keen to get the floor restored so they agreed my quote and I went ahead and purchased the replacement tiles on their behalf.

Edwardian Floor Covered in Bitumen Before Restoration in Leyton E10


Removing Bitumen and Repairing an Edwardian Tiled Floor

I used a combination of floor buffers, coarse 200-grit pads, hand scrapers and lots of Tile Doctor Nanotech HBU Remover to get the floor clean and clear of the bitumen. Rather a lot of elbow grease was required too! It was a long process which took up all of day one and continued into much of day two. The day ended by removing the damaged floor tiles and replacing with the newly sourced replacements. The floor was left overnight to dry and the new tile adhesive to cure before we could return to seal the floor.

Edwardian Floor Covered in Bitumen During Restoration in Leyton E10 Edwardian Floor Covered in Bitumen During Restoration in Leyton E10


Sealing an Edwardian Tiled Hallway Floor

I returned on Day 3 to seal the floor using a couple of coats of Tile Doctor Colour Grow. Old floors like these have no damp proof membrane and being fully breathable Tile Doctor Colour Grow will allow any moisture to rise through the tiles and not get trapped underneath where it could cause problems later. The sealer also gave the floor a nice natural sheen without being too shiny. Most importantly the new sealer would protect the floor going forward which is particularly necessary in a high traffic area such as the hallway.

Edwardian Floor Covered in Bitumen After Restoration in Leyton E10 Edwardian Floor Covered in Bitumen After Restoration in Leyton E10

My client was glad to see the floor restored back to its original state which I'm sure will add a lot of value to the property as original features are very sought after these days.

For aftercare I recommend they use Tile Doctor Neutral Tile Cleaner to clean the floor. It’s a pH neutral product so it will ensure that the newly applied seal stays in place and keep the new floor restoration looking good.

Edwardian Floor Covered in Bitumen After Restoration in Leyton E10


Source: Victorian Tile and Grout Cleaning and Renovation Service in East London

Wednesday, February 19, 2020

What Does it Cost to Polish Terrazzo Floors?

Terrazzo is a man-made composite type of flooring that is either precast or poured directly onto the floor. The polishing process most commonly happens after the floor has had a chance to cure and harden, although for medallions and other custom insets, the polishing can happen in a factory setting. You need specialty tools and experience to polish terrazzo, which means the cost for the process includes a number of factors.

Specialty Tools
Since terrazzo is specifically made to be incredibly hard and durable, specialty tools such as diamond-tipped or carbide-tipped blades are a necessity, and for floors in particular, a large polishing machine is used. These are only available to qualified professionals, which means your only option for polishing terrazzo is to work with a contractor.

Skill of the Craftsman
The skill of the craftsman is directly rated to the per-hour or per-square-foot rate he gives you. For example, a journeyman craftsman may only charge you the equivalent of $25 to $30 per hour, while a master craftsman will often charge around $75 per hour or more, depending on the project. Polishing and sealing rates vary drastically depending on your location in the country, but as a general rule range between $1 and $5 per square foot at time of publication.

New Installation or Remodel
Depending on if you are having a new floor polished for the first time or an old floor repolished after years of foot traffic, the prices for the project can vary. With new installations, the terrazzo professional does not need to worry about the subsequent dust from the polishing process affecting the house, while a remodel project includes dust prevention and protection methods. These extra methods cost extra money. Although it depends on the contractor in question, the standard for remodel projects is to add on 15 to 20 percent extra to cover protection time and effort.

Optional Inclusions
Optional inclusions during the polishing process can also affect the overall price. For example, while mechanical polishing might range between $2 and $4 per square foot depending on the contractor in question, crystallization polishing and densification are additional process that can enhance the durability of the terrazzo as well as add color enhancement or dyes to change the color. These add-ons can range between $.50 per square foot up to $2 per square foot, depending on the contractor.


Source: www.HomeSteady.com

Tuesday, February 18, 2020

Learn the Correct Way to Renovate Old Quarry Tiles

The Quarry Tiled Floor pictured below was located in a wood on the outskirts of the pretty coastal village of Levington, just East of Ipswich. The client had recently purchased this old Gamekeepers cottage and they were looking to redecorate and refurbish the property including the floors.

Quarry Tiled Floor Gamekeepers Cottage Before Cleaning Levington Quarry Tiled Floor Gamekeepers Cottage Before Cleaning Levington

The floors in the house were all very dirty and the new owners wanted them cleaned in time for Christmas. I visited site and conducted a demonstration on a small section of Quarry tiles which covered the whole of the ground floor. The demonstration went well, and the client was very pleased to see the kind of result they could expect. We agreed a price for the work and arranged a suitable time to return.

Cleaning a Quarry Tiled Floor

I knew from the age of the cottage it very unlikely to have a damp-proof membrane present under the floor so I had to consider damp and efflorescence issues could become factors during cleaning. Efflorescence occurs when salts trapped in water from the ground rise through the porous Quarry tiles and are left on the surface of the tile as white deposits when the moisture evaporates.

Before starting with the cleaning process, we set about taping up the wooden skirting and doorways to protect them. Then because of the lack of a DPM I decided to clean the floor with Tile Doctor Acid Gel which would require less water and counter any alkaline salts trapped in the floor. It was applied to the floor and then worked in using a rotary machine fitted with a scrubbing pad. The grout was then scrubbed by hand using a wire brush and the resultant slurry vacuumed using our wet vacuum.

Once I was satisfied the floor was as clean as possible the floor was rinsed with warm water using the least amount of water possible. This removed any trace of cleaning product and the floor then dried using the wet vacuum and microfibre cloths. The floor was then inspected, and any stubborn areas were spot treated before leaving the floor to dry off fully overnight.

Sealing a Quarry Tiled Floor

The following morning, I conducted a damp test with a moisture meter to ensure the floor was dry enough to take a sealer. Sure enough, due to the cleaning method used, the floor was dry, and I was able to move on to applying the sealer which for this floor I used Tile Doctor Seal & Go Extra.

I selected Seal & Go Extra as it has a special acrylic-based formula which allows moisture vapour transmission making it partially breathable and well suited for floors without a damp-proof membrane. This is important as to use non-breathable sealer can result in damp building up in the tiles and under the floor where it can cause damage and spread out to the walls resulting in rising damp. Six coats of sealer were applied to the Quarry tiles to ensure the floor was fully sealed and this left a nice low sheen finish.

Quarry Tiled Floor Gamekeepers Cottage After Cleaning Levington Quarry Tiled Floor Gamekeepers Cottage After Cleaning Levington

The clients were extremely happy with the result, as you can see from the the pictures the floor looked in much better condition.

For aftercare I recommended the use of the Tile Doctor Neutral Tile Cleaner to keep the floor in the best condition and make maintenance easy for them. This would ensure the newly applied seal stayed put.


Source: Quarry Tile and Grout Cleaning and Renovation Service in Suffolk

Sunday, February 16, 2020

Blotches and Imperfections in Granite

Its wide range of colors, scratch and heat resistance, and the ease of polishing it to an aesthetically pleasing high gloss make granite a top choice for kitchen and bathroom counter tops. Although some granite may have a naturally blotchy grain pattern, other imperfections you notice on your granite may be man made. Sealing your granite every three years protects it and helps maintain its luster.

The Higher the Grade, the Better
Granite quality is broken down into three grades: first choice, commercial quality and second quality, according to Alabama Countertops. Although granite in any category is equally durable and can be polished to a nice sheen, imperfections and blotchiness are detected more easily in lower quality granite. First choice is the most expensive granite and contains no visible imperfections. Although commercial quality is less expensive -- it contains hairline cracks, blotches, and cloudiness -- the imperfections can be masked with a high polish. The multitude of natural defects and blotches in second quality granite, on the other hand, often make it a poor choice for counter tops.

Naturally Imperfect
Because granite is a natural rock, it's innately filled with imperfections such as hairline cracks and variations in color. Dark or solid colored granite shows natural imperfections, dings and spills more easily than lighter granite. Additionally, since most granite is a mixture of colors and patterns, any seam in a granite counter top may be clearly evident, sometimes making the overall appearance seem mismatched once the counter is installed.

External Causes
While granite is regarded for its durability, it isn't invincible. When not regularly wiped dry, water left on granite may eventually leave behind a white crusty residue -- a hard water stain -- from the minerals it contains. This can be remedied by scraping away the crustiness with a plastic scraper, but it takes some elbow grease and patience. Spills from oils, dark sauces, red wine, and organic material such as acidic fruits can create dark splotches on granite even when wiped away quickly. Applying a homemade poultice, or cleaning paste mixture, specific to the type of spill can safely pull out the substance that has seeped into the granite.

Professional Remedies
If you've noticed an unusual imperfection, like a gouge or dent, in your granite, it's best to contact a professional to remedy the situation. Professionals who have experience working with granite can remove scratches or other defects without causing further damage. A professional may repolish the granite to mask the imperfection and apply a granite sealer on the entire surface to protect it from stains, preventing further damage.


Source: Living.TheBump.com

Wednesday, February 12, 2020

The Slate Tile

Slate tile has been widely used for centuries in the building industry. Its main function has been as a building stone due to its easy to work with texture. However, it is a very heavy material, thus quite expensive to move around, so it was mainly used in regions close to slate quarries. Those areas producing such beautiful slate tiles included Wales, Portugal, United Kingdom and New York.

Slate is a natural quarried stone consisting mainly of quartz and muscovite particles.

Some of the secondary ingredients may include chlorite, graphite and magnetite. The process of slate formation begins when layers and layers of clay and volcanic ash have been foliated together over a long period of time. This foliation then forms the clay and ash into a finely grained sedimentary rock.

Slate tile and pavers come in many amazing and varied colors, ranging from the dark blacks and browns, to purples and greens, to blue-grays and also reds and rusts. The aesthetic appeal of slate tile or pavers is that no two tiles are the same, not only in color but also in texture! The use of slate gives a natural yet elegant appeal!

Slate Paving Stones will give you the look of traditional slate with the strength and durability of concrete.

Slate Paving Stones are available with straight edges, straight sides, a variety of sizes and consistent thicknesses. These features make Slate Paving Stones so easy to work with when installing them. It also means that they are extremely versatile when it comes to laying out various patterns and designs.

Slate Paving Stones are flexible and have high compressive strength, with an absorption rate of less than 5%. This makes Slate Pavers a great flooring alternative for your patio, decking and walkways.


Monday, February 3, 2020

How to Color & Age a Limestone Wall


Stacked limestone walls---outdoors in a garden or indoors on a fireplace---provide a note of rustic beauty to any design. Limestone can come in a variety of natural colors---gray, tan, yellow---or a combination of all three. If you want to give your limestone wall a single, unifying color, you can stain the stone with a colorant compound, available at most landscape supply stores or online. You can also use colorants to artificially "age" limestone by adding tell-tale streaks of green to represent the development of moss.

Things You Will Need:
  • Stone colorant products (base color and green)
  • Power sprayer
  • Two spray applicator bottles with adjustable nozzles
  • Watch or timer
  • Clean cotton rags or cloths
  • Garden hose
  • You can color and age limestone garden walls.

  1. Purchase stone colorant products, not "color enhancers." Color enhancers revive the stone's natural colors. You want to change the color altogether. Read the package carefully so you're sure to get the right product. You can use colorants meant for "concrete" staining on limestone walls.
  2. Study the directions for the product carefully before proceeding and gather all the recommended tools for the job ahead of time. Limestone is extremely porous and you won't have time to "stop" the recoloring process to fetch another tool.
  3. Clean the limestone surface with a power sprayer, with the sprayer head set on "broad" or "wide." Don't use a fine setting: you could accidentally etch the stone. Let the stone dry completely before proceeding, unless your product directions tell you to apply the product to wet stones.
  4. Pour the "base color" (gray, tan or yellow) colorant product into a clean spray applicator bottle. Set the nozzle to "wide." Spritz the product onto a test stone (or a less visible area of the wall or walkway). Let the product settle onto the limestone for a few minutes, or according to the product recommendations. Since limestone is so porous, longer "setting" times will usually increase the color effect. Wipe off any excess colorant with a thirsty fabric rag.
  5. Evaluate the effect of this first trial "setting" time. If the color isn't deep enough, apply a second coat and let it set longer before wiping it off. If the color is too deep, reduce the setting time and test this theory on a second trial stone.
  6. Color only two or three stones at a time across the wall until the entire project has been treated with the base colorant. Let the colorant dry completely.
  7. Pour a green-toned colorant product into another empty spray bottle. Set the nozzle on "narrow" or "fine." Choose areas along the wall where you want to apply faux moss to the surface of the stones. To make this choice, think of the behavior of real moss. Real moss on a wall follows a path of water as it flows down the face of the wall and so cascades down stones in an inverted pyramidal shape. The top stones on the walls will have the most moss, and the width of the moss will taper as the moss goes lower on the wall.
  8. Spray the green "aging" faux moss color on the stones and let the color set for a pre-determined amount of time. Wipe away any excess. Let the color dry.
  9. Gently rinse the limestone with a garden hose, not a power sprayer. You will likely remove the colorant you just applied if you use a power sprayer.
  10. Apply a sealant if your colorant product recommends it, and do so according to the product directions. Sealants generally retard fading of colors due to water and sun.