Thursday, September 29, 2016

Restoring the Appearance of Dull Slate Floor Tiles

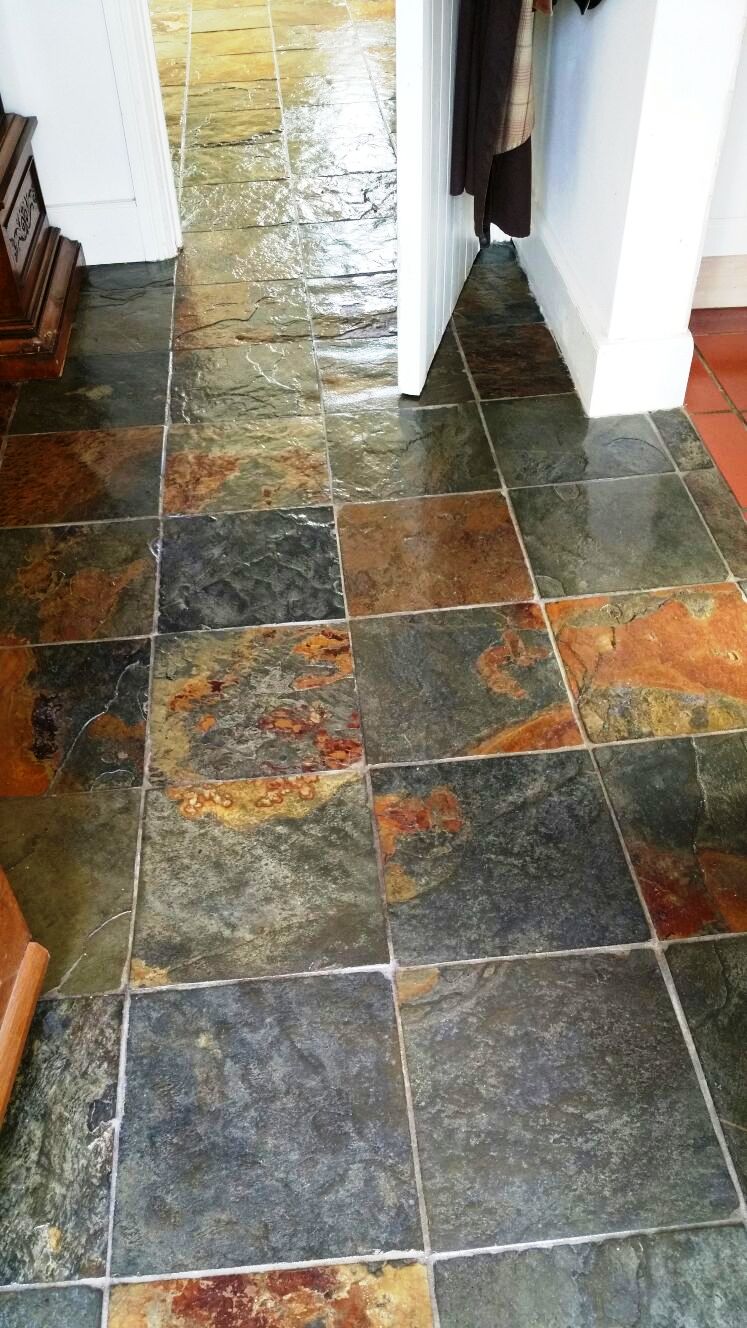
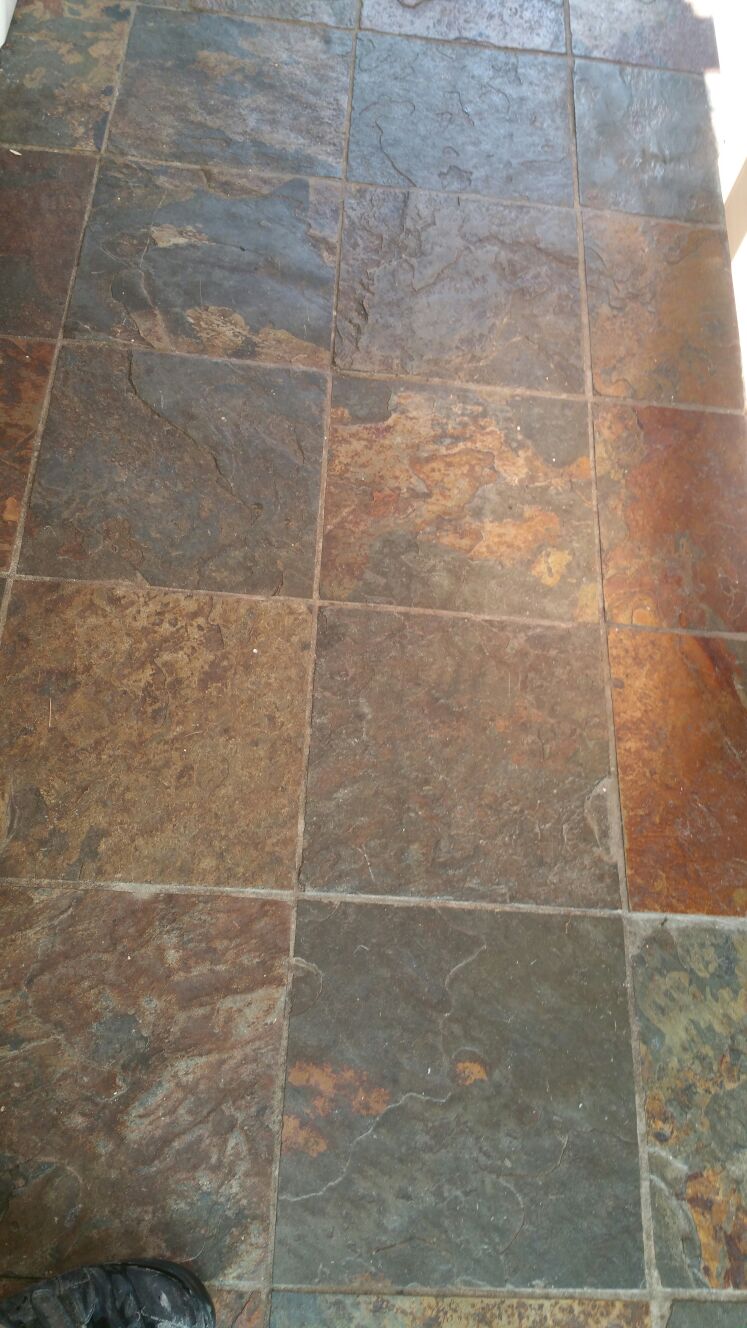
The photographs below are of rough Chinese Slate floor tiles installed at a house in Dorchester; they had not been deep cleaned in a long time and the combination of pets and grandchildren had taken its toll on the floor. Rough Slate from China is a relatively inexpensive product and although long lasting and value for money the texture of the Slate is difficult to maintain and thus difficult to keep clean even if fully sealed
Chinese rough slate before cleaning Dorchester

Cleaning Chinese Slate Tiles

To clean the tiles I used a strong dilution of Tile Doctor Pro-Clean which was left to soak into the Slate for a good ten minutes before working it in with a buffing machine fitted with a black scrubbing pad. This action removed the ground in dirt and any old sealer and a stiff brush was then run along the grout lines with more Pro-Clean to get them as clean as possible. The floor was then rinsed thoroughly and any stubborn areas retreated; a wet vacuum was used to extract the soiled water from the surface of the stone in order to get it as dry as possible.

Sealing Chinese Slate Tiles

The floor was left to dry overnight and I returned the next day to seal using three coats of Tile Doctor Seal and Go sealer which is a water based sealer (so no smell) that leaves a nice subtle shine to floor.
Chinese rough slate after cleaning Dorchester
The slate and the grout looked really dull and dirty before we started and now the floor looks like it was recently laid. For aftercare we don’t recommend the use of a Floor Steamer as they work on a 100 degrees and this damages the sealer; for regular cleaning use Tile Doctor Ph Neutral Cleaner using a two bucket system, whereby you apply the cleaning solution with a jug, wipe the floor and then squeeze off the excess into the second bucket, this stops you reapplying dirty water onto a clean floor..


Source: Slate Tile and Grout Maintenance Service in Dorset

Wednesday, September 28, 2016

How to Repair Travertine Floor Etching

It is not a very hard task to repair travertine floor etching. This can be done using a polishing powder or a sealer. Travertine, contrary to popular belief, is quite dense and can withstand heavy traffic. However, it is still susceptible to etching, stains and other types of damage if it is not properly protected. Like limestone, granite or marble, the material needs to be cleaned, polished and repaired in times of need. This is especially true when it is used as a flooring material. In order to repair travertine floor etching, follow the steps below.

What You'll Need
  • Polishing Powder (for travertine)
  • Etch Removal Product
  • Rag
  • Buff Cloth
  • Mop
  • Warm Water
  • Broom
  • Spray Bottle

Step 1 – Clean the Travertine Floor

Before removing the etching using a trusted product, make sure to clean the floor first. Sweep it with a broom or a vacuum cleaner to remove dust and debris. Soak a mop in warm water, squeeze the excess water and mop the entire floor. Allow the floor to dry completely.

Step 2 – Use a Polishing Powder

A polishing powder designed for travertine can easily remove the etch marks from the floor easily. Apply the recommended amount of powder on the etched areas. Spray water on top of the powder to make it moist, but do not spray too much water. Just a small amount will do. Rub the moist powder with a rag in a circular motion until the etching is concealed. Do not rub with too much pressure in order not to damage the floor surface. When the floor is dry and free from etching marks, buff the floor with a soft cloth.

Step 3 – Use an Alternative Etch Removal Product

Shop around for etch removal products in brick and mortar stores or online stores. Make sure to read product descriptions and reviews to get as much information and come up with the best product in the market. Ask friends, relatives, or online forums for recommendations. Some products come in a spray form that can provide ease of use. Simply spray the product, rub it a bit and buff afterward. Some products may have different instructions so make sure to read the product instructions carefully before application.

Step 4 – Seal the Floor

Sealers are important because they provide the floor with extra protection for years. Since the floor usually receives a lot of traffic, do make sure to reapply the sealer after two years at least. If the floor has not been previously sealed, then determine first if it can be sealed or not. When it comes to sealing, the floor can be categorized into two groups – honed and polished. Polished travertine should not be sealed. Instead, regularly polish it with polishing products to repair etching and other damages. If the travertine is honed, then it can be sealed to protect it from stains and damage. In order to avoid having to repair travertine often, seal the floor yourself or hire a professional to do the job.

Tuesday, September 27, 2016

Restoring the Appearance of Dirty Victorian Floor Tiles

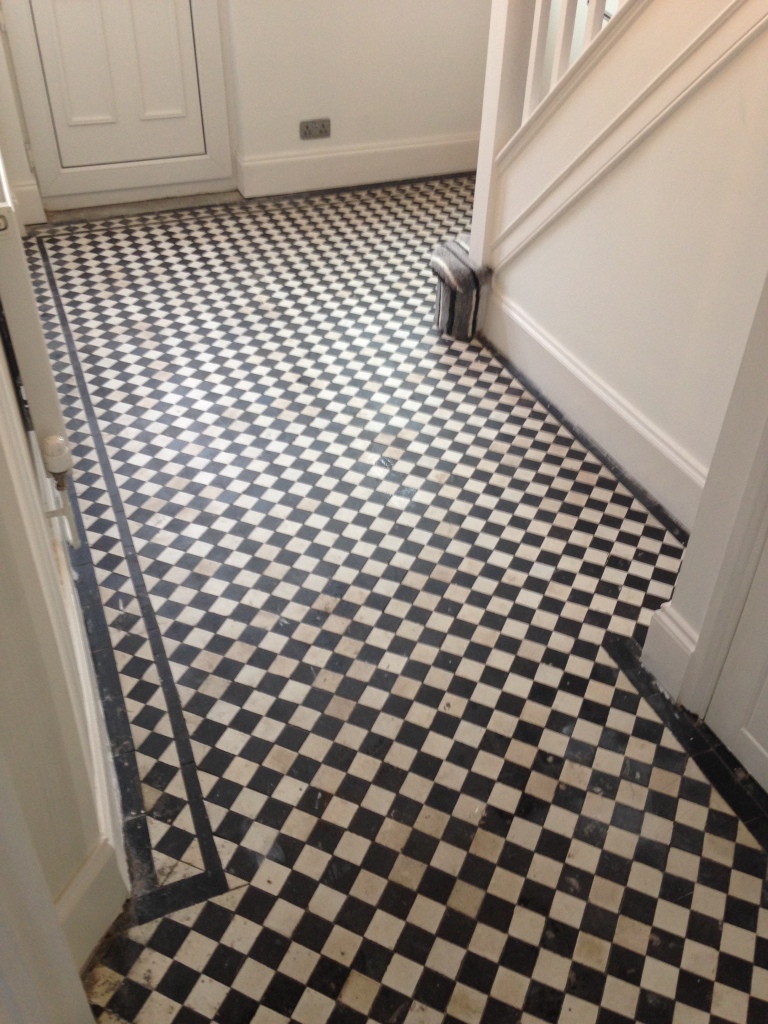
At Tile Doctor, we often come across Victorian tiled hallways in need of restoration. They're very popular due to their timeless and unique patterns - and as a result are still in production, having first being produced in the 19th century. While many have been maintained in their original state since first being laid (which is sometimes over a century ago), others have been hidden by carpet or linoleum for many years, only to be uncovered by new property owners. In this case, at a property in Newport - the port city of South East Wales - the Victorian tiled hallway had not been subject to an effective cleaning plan leaving the fantastic white and black checkered pattern grubby and unsightly. I was asked if I could help bring it back to life - and I was happy to oblige!

Victorian floor before cleaning Newport

Cleaning a Dirty Victorian Tiled Hallway

I started the restoration by applying a strong cleaning solution combined from mixing two Tile Doctor products in equal parts namely Remove and Go and Pro Clean. Together they create a powerful sealer remover and cleaner to break down any remaining old sealers, paint whilst lifting ingrained dirt and muck from the pores of the tile. The two products were worked into the tiles using firstly a 17 inch black buffing pad to remove the initial layer of dirt, followed by a 6 inch buffing pad, wire brush, and hand-held scrapper to remove the more stubborn specks of paint and dirt. The resultant slurry was then rinsed away with water and a wet vacuum and stubborn areas retreated until I was satisfied. The results were great so after a final rinse I left tiles to dry off.

Sealing a Victorian Tiled Hallway

A couple of days later, after leaving the tiles to dry completely, I went back to the property to seal the floor. I checked first for any excess moisture as this can cloud the sealer and prevent it from acting an effective barrier against dirt and stains. My choice of sealer included one coat of Tile Doctor Colour Grow to restore the rich colour to the black and white tiles, followed by seven coats of Tile Doctor Seal and Go to provide an aesthetically pleasing sheen finish. Colour Grow is an impregnating sealer that penetrates the pores of the tile to fill them and prevent dirt becoming trapped, while Seal and Go is a topical sealer that builds up an additional layer of protection on the surface of the tiles.

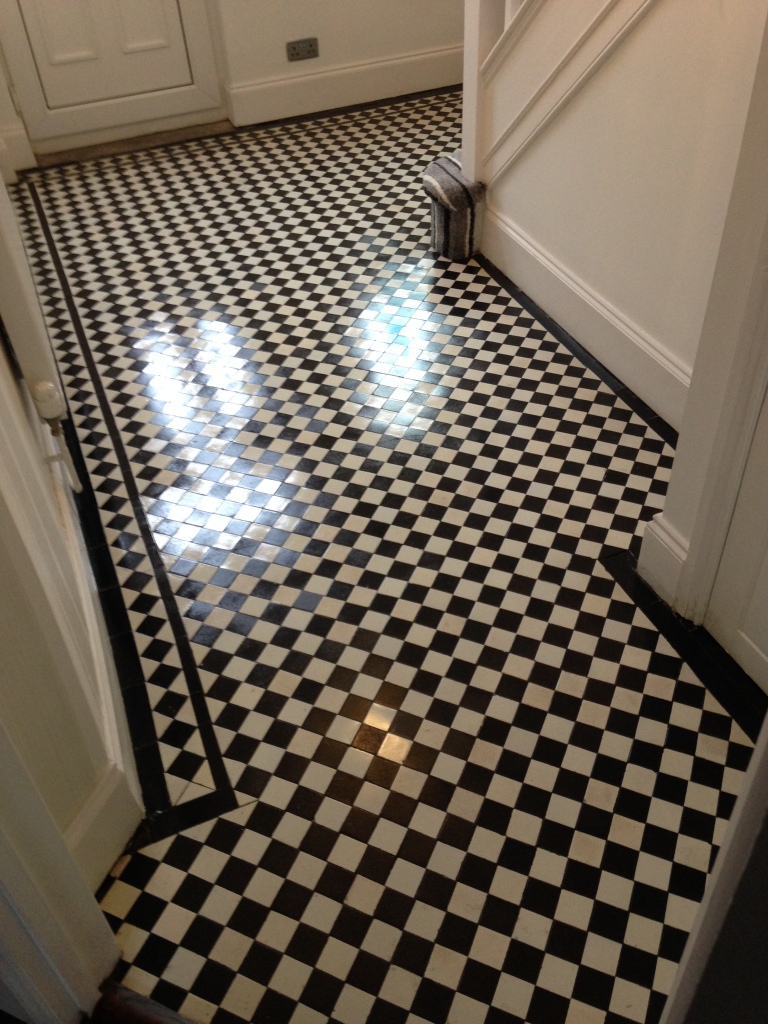
Victorian floor after cleaning Newport

The combination of fresh sealers, preceded by a deep and thorough clean, really helped to restore these Victorian tiles to a condition in which they could be easily mistaken for newly laid! The customer was very pleased and undoubtedly will be looking forward to showing off the tiles to friends and family.


Source: Victorian Tile and Grout Maintenance Service in Monmouthshire

Travertine Tile Finishes: Tumbled, Polished and Honed

Travertine tile is a popular choice of finish in many homes. The tiles are produced from a sedimentary rock known as travertine, which is a type of limestone. It is formed when minerals dissolve in groundwater and are later deposited onto the earth’s surface by springs, rivers and geysers. The tiles are a popular installation material for flooring, walls, backsplash, pavers and around a pool. Some of the more common finishes for the tile are tumbled, polished and honed. Read on to learn some basic information on each.

Tumbled Travertine Tile

Tumbled travertine has a rough pitted surface because of the naturally occurring pores and holes in the rock which are left intact. For many homeowners, the textured surface of tumble travertine has a rustic appeal which enhances home décor. However, the holes must be filled with grout during installation. If left unfilled, debris tends to gather in the holes. Water also collects in the holes when it rains which accelerates wear and tear. Grout helps to maintain the structural integrity of the tiles.
Due to its textured surface, tumbled travertine creates a less slippery surface than the polished type. It is also the easiest to walk on. This makes it suitable for poolside areas. The textured surface also gives it a higher resistance to etching than the honed variety. It is best to use a stone cleaner to wash tumbled travertine. Cleaners that contain ammonia or strong additives can damage the tile surface. Due to its high porosity, tumbled travertine isn’t as durable as polished and honed travertine. Water infiltration tends to weaken the tile structure and makes it more susceptible to cracks.

Polished Travertine Tile

Polished travertine has a smooth, slippery finish and bears a close resemblance to marble. It has an attractive shine due to its smooth matte finish and reflects a lot of light. It must be sealed periodically to preserve the structural integrity. You also need to polish it regularly so that the tiles don’t become dull with time. However, the polished surface allows easier removal of dirt. Simply use a damp mop to wipe away dirt. Polished travertine has a higher resistance to stains and scratches than the honed variety. It is also the most durable of the 3 varieties. This is partly because it has a lower porosity which allows for minimal absorbance of spills. When sealed regularly, this adds to the durability of polished travertine tiles. Polished travertine costs more than both tumbled and honed travertine.

Honed Travertine Tile

Honed travertine undergoes extensive grinding and sanding during manufacture to yield a uniform surface. Honed travertine has a smooth marble-like finish though not as smooth or shiny as polished travertine. It must be sealed periodically otherwise the tiles become more susceptible to damage which makes them less attractive. The tiles have a high susceptibility to stains. Slight contact with acidic juices can etch the surface and cause permanent damage. Coffee, tomato sauce, citrus juices and tea stains can easily etch the surface. It is best to use coasters under glasses, cans or bottles to prevent spills. All spills must be blotted out immediately. Scratches also easily develop on honed tiles because of the smooth surface. It is best to clean honed travertine with a damp cloth or sponge. 

Monday, September 26, 2016

How to Remove Stains from Saltillo Tiles

If your home features any saltillo tiles that have recently incurred any stubborn stains, you'll be pleased to know that they can be cleaned in just a few easy steps. Below is the best way to get your saltillo tiles stain free.

What You'll Need

  • Empty spray bottle
  • Sponge
  • Soft-bristled scrub brush
  • Ammonia
  • Washcloth
  • Water


Step 1 - Remove Dust from Your Tiles

Begin the stain removal process by using a damp sponge, washcloth or paper towel to wipe down the affected area and effectively remove any dust or debris. Take care to be as thorough as possible, as any remaining bits of filth may present problems later on in the process.

Step 2 - Apply Your Ammonia-Based Cleaning Solution

You'll now need to produce a mixture of 1 cup ammonia and 2 to 3 cups of water inside of an empty spray bottle. Next, spray your homemade cleaner onto the stained areas of your saltillo tiles and allow it to sit for several minutes.

Step 3 - Remove the Stains

Now that you've applied your homemade cleaner, you're ready to remove the stains that are plaguing your tiles. Using a sponge or washcloth, proceed to vigorously scrub the stains until they have been successfully purged. If the stains prove unyielding, try using a soft-bristled scrub brush.

How to Repair Chips and Cracks in Limestone Floors

Limestone floors are a handsome and durable flooring choice. Although of considerable strength, limestone can still be subject to damages such as minor chips and cracks. If you notice such faults in your limestone flooring and you want to return it back to its former glory, you can undertake a DIY repair, saving yourself the cost of a professional.

What You'll Need
  • Brush
  • Epoxy resin
  • Masking tape
  • Pieces of limestone
  • Putty knife
  • Scraper
  • Water
  • Dustpan
  • Grout
  • Paintbrush
  • Polish
  • Rags
  • Sealant


Step 1 – Clearing the Area

Before getting down on your knees, remove all furniture and other home furnishings that might be on the repair area. This will allow you to have an unobstructed view of the entire floor area as well as prevent any damages that can be done on your valuable furniture.

Step 2 – Inspecting the Limestone Floor

The first task on the repair should always be the inspection of the floor area. Check it thoroughly to identify all cracks and dents and if there are many, mark them with masking tape.

Step 3 – Cleaning the Area

To make the repair more effective, clean the surface of your limestone floor as well. Make sure that it is spotlessly clean and devoid of  obstructions. Sweep up any dust and debris. For stubborn grimes use a damp rag and some elbow grease, and wipe the floor thoroughly Wait  until the floor dries naturally or you can wipe it dry with a rag if you are in a hurry.  

Step 4 – Repairing Minor Damages

For chips and cracks that are very shallow and minor, you can make use of a mild polish that you can purchase from local hardware. Rub the product gently over the crack or chip so that you can have a smoother surface. Once you are satisfied with the result, wipe off the polish with a damp cloth and then brush on a sealant. This is to protect the repair that you have made. Alternatively, you can make use of grout that has been freshly mixed.

Step 5 – Repairing Deeper Faults

If there are deeper cracks or chips on the limestone that cannot be corrected through the previous step, you can make use of epoxy resin that has been mixed until its color is the same as that of your limestone floor. Apply the compound on cracks and chips with a putty knife. For deeper damages, you can make use of chips or slivers of limestone. Use the fragments to fill deeper cavities together with epoxy. Once you have the pieces secured, wipe off the excess glue. Allow complete drying before applying the sealant.

Friday, September 23, 2016

300 Year Old Flagstone Tiles Treated for Shaling Issues in Chorley

This Flagstone tiled floor at a cottage in the market town of Chorley was suffering from significant shaling issues, which came as no surprise when I heard that the stone was laid nearly 300 years ago. The floor is an original feature of the property, but over recent years it had started to flake and become very rough, making it very difficult to keep clean, uncomfortable to live with, and not very pleasing to look at. The process is natural to the Flagstone, and some people are quick to Read more...

Thursday, September 22, 2016

Restoring a Victorian Hallway Floor in Bridlington

It's fairly common for owners of older properties - especially houses those that are over 100 years old or more - to find original Victorian tiled flooring hidden underneath carpet. It can wait years for the tiles to be discovered, by which time they have amassed huge amounts of dirt and dust. Read more...

Victorian Tiled Hallway Restoration in Bridlington

It's fairly common for owners of older properties - especially houses those that are over 100 years old or more - to find original Victorian tiled flooring hidden underneath carpet. It can wait years for the tiles to be discovered, by which time they have amassed huge amounts of dirt and dust. Such was the case at this property in Bridlington, a Yorkshire town through which a stream known as the 'Gypsey Race' runs, before emptying in the North Sea at the Bridlington Harbour. Interestingly Read more...

Restoring the Appearance of a Dirty Victorian Hallway

It's fairly common for owners of older properties - especially houses those that are over 100 years old or more - to find original Victorian tiled flooring hidden underneath carpet. It can wait years for the tiles to be discovered, by which time they have amassed huge amounts of dirt and dust. Such was the case at this property in Bridlington, a Yorkshire town through which a stream known as the 'Gypsey Race' runs, before emptying in the North Sea at the Bridlington Harbour. Interestingly enough, folklore says that when the stream is flowing, bad fortune is at hand. The stream must not have been running on the day that we restored this Victorian hallway, as we managed to achieve some truly fantastic results!!
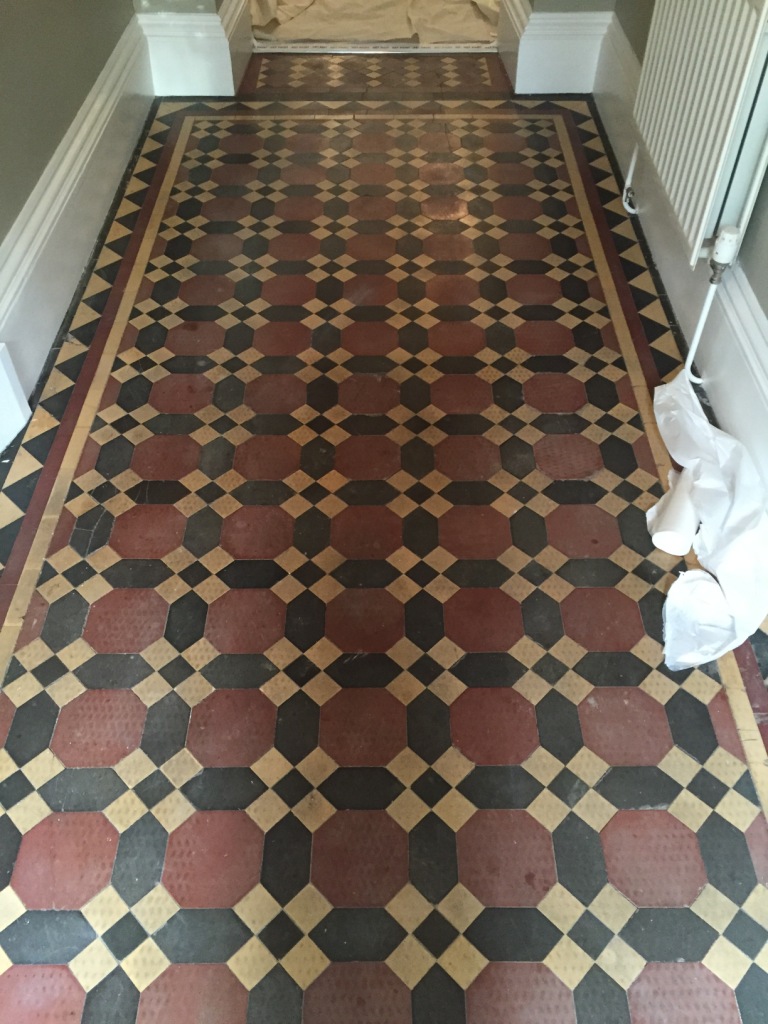
Victorian hallway floor tiles before restoration in Bridlington

The hallway had been severely dulled after going years without professional care. We set about giving it the thorough clean and fresh seal that I'd des partly needed. Here's how we did it.

Victorian hallway floor tiles before restoration in Bridlington

Cleaning a Dirty Victorian Tiled Hallway

Our first task was to remove any old, no longer effectual sealer. We did this by liberally applying a strong dilution of our alkaline-based Tile a Doctor Pro Clean, which doubles as a reliable cleaner and a stripper capable of stripping away old sealer. The product was worked into the tiles using a black stripping pad fitted to a 17" rotary machine, and the process was repeated three times.
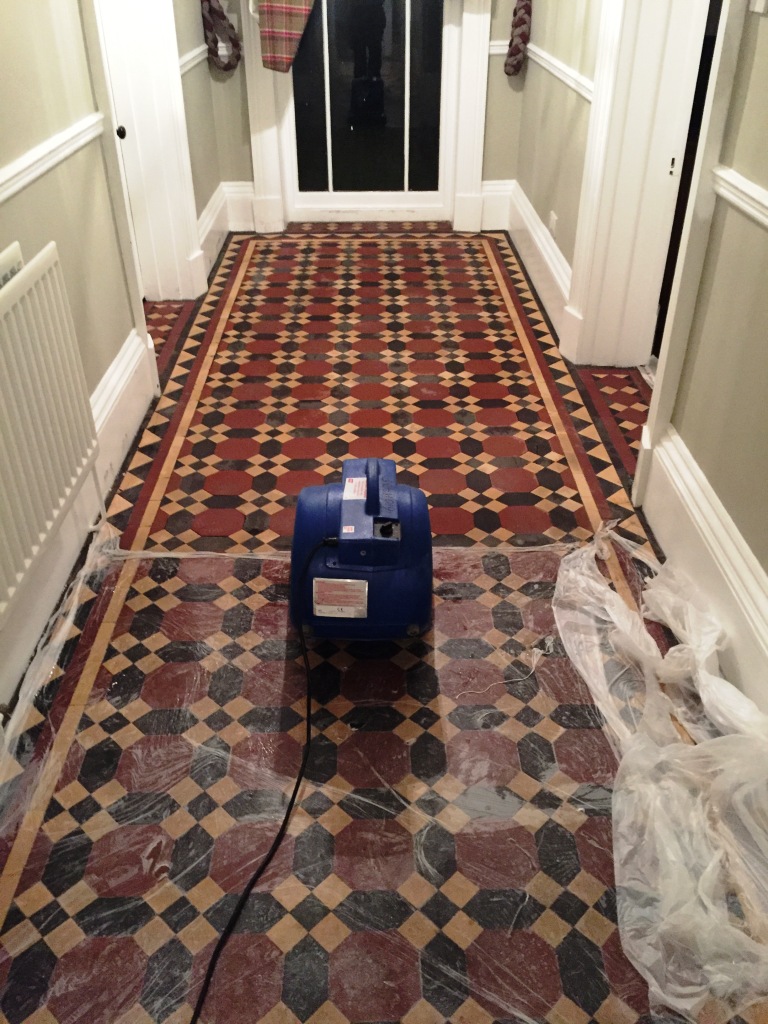
Victorian hallway floor tiles during restoration in Bridlington

I noticed that there was still some stubborn dirt and old sealer around the edges of the hallway, so I used some of our handheld diamond encrusted burnishing blocks to grind it away. To finish the cleaning process, we washed the floor with Tile Doctor pH Neutral Tile Cleaner, leaving it fresh and ready to be sealed once left to dry overnight.

Sealing a Dirty Victorian Tiled Hallway

Upon our return to the property the next day, we ran some quick tests to check for any excess moisture (even a small amount could have damaged the performance of the new sealer). Once satisfied with the the condition of the floor, we proceeded to see it with an impregnating sealer, meaning a sealer that penetrates into the pores of the tile to fill them and therefore prevent trapped dirt and ingrained stains.
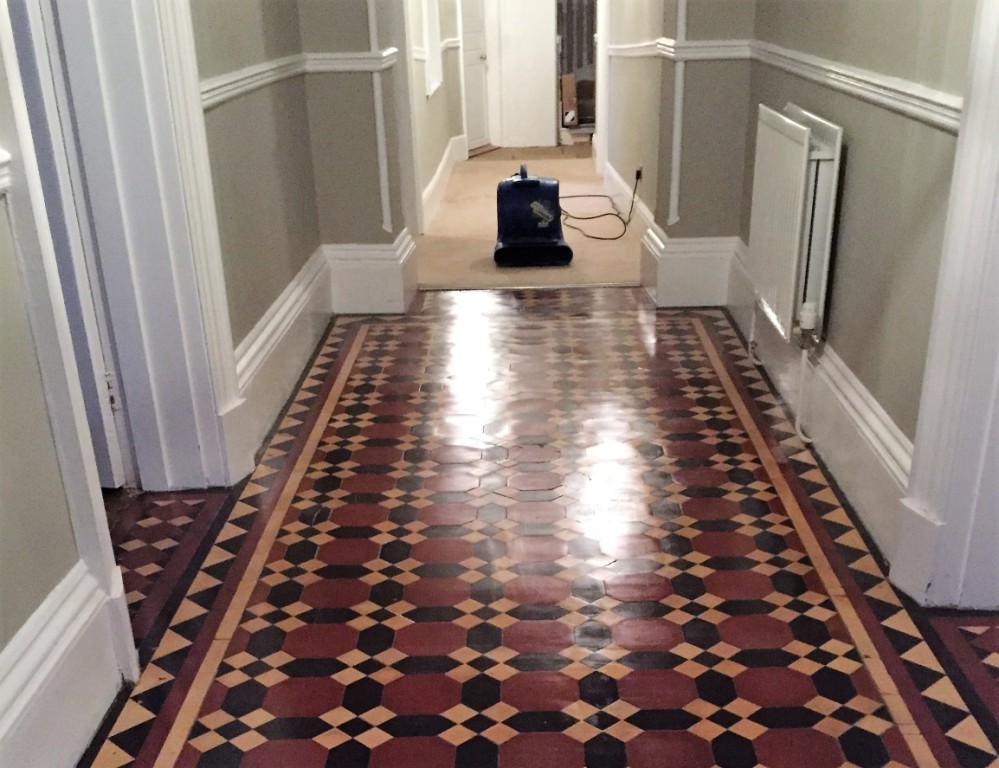
Victorian hallway floor tiles after restoration in Bridlington

Our impregnating sealer, Tile Doctor Colour Grow, has the added benefit of being colour intensifying, which really highlights the unique colourful patterns of the tiles. To give the floor a durable sheen finish, as requested by the customer, we also added a coat of Tile Doctor Seal and Go sealer.

Victorian hallway floor tiles after restoration in Bridlington

The result was a complete transformation of the condition and appearance of this great Victorian tiled hallway. Our customer is very pleased - the floor is now a complete asset to any property, and will now be easier to keep looking great in future.


Source: Victorian Tile and Grout Mainteanance Service in East Yorkshire
Friday, September 16, 2016

Milling and Sealing a Large Indian Sandstone Tiled Floor Near Lancaster

Here we have a six year old Indian Sandstone tiled floor located a property on the outskirts of Lancaster. Measuring 100 metres squared, the very large floor had under floor heating in the concrete sub base. The type of stone used inside the property is what we commonly refer to as 'patio Sandstone', a material which is usually used outside because of its very rough texture. It's not particularly comfortable to walk across in bare feet, hence why many people consider it be impractical for Read more...

To read more on this topic click here

Smoothing Rough Indian Sandstone Tiles for Interior Use

Here we have a six year old Indian Sandstone tiled floor located a property on the outskirts of Lancaster. Measuring 100 metres squared, the very large floor had under floor heating in the concrete sub base. The type of stone used inside the property is what we commonly refer to as 'patio Sandstone', a material which is usually used outside because of its very rough texture. It's not particularly comfortable to walk across in bare feet, hence why many people consider it be impractical for Read more...

Thursday, September 15, 2016

Saltillo Tile Floor: Pros and Cons

Saltillo tile floor is a type of natural stone that is commonly used on patios. This type of tile has several advantages that make it ideal for many different applications, but it also has some drawbacks. Consider the following pros and cons of saltillo tile flooring to decide whether it is the right choice for you.

Outdoor Application

One of the advantages of saltillo tile is that it can be used outside, like on patios and around pools. Many tiles are not suitable for outdoor applications because they are not dense enough. Saltillo tile should not break during cold weather like ceramic tile would. 

Customizable

Another advantage of using this type of flooring product is that it is customizable. You can install it in a number of different patterns and designs. This makes it a popular choice for those who want to get creative and make a floor that is one-of-a-kind. 

Look

This type of tile provides you with a unique that you can not get from any other tile. Saltillo tile has an old-world, Mexican look that works very well in an outdoor area. It is a very classic look that will not likely go out of style. 

Cost

You can generally get saltillo tile for $2 per square foot or less. In some cases, it might be more expensive, but it is still not among the most expensive options on the market. If you are going to install the tile yourself, it is a very economical flooring option.

Heat Absorption

One of the disadvantages of using saltillo tile is that it can absorb a great deal of heat. It will be difficult to walk on this type of tile barefoot when the sun has been on it for any amount of time. It tends to absorb the sunlight and become extremely hot to the touch. If you walk on this type of tile without protection, it may burn your feet.

High Maintenance

This type of tile also takes a great deal of regular maintenance to make it look good. You have to seal it every year in order to keep it from staining or absorbing water. Saltillo tile is porous, so you need to keep sealer on it at all times.

Scuffs

Another potential drawback of this type of tile is that it can scuff easily. It will show marks on the floor from regular foot traffic. It can also stain relatively easily compared to some other types of tile. This means that you have to be very careful when walking on it and wipe up your spills immediately.

Difficult to Install

If you are planning on installing saltillo tile yourself, it will most likely be a difficult job. It is difficult to grout saltillo because the grout can get into the pores of the tile. You also need to seal the tile before installing it.

Deep Cleaning a Heavily Soiled Limestone Patio

This patio, at a house in Windermere was made of fantastic Green Indian Limestone that despite sounding exotic is widely available in tile shops and building yards. But while it is a very good quality stone, it doesn't always make for a good patio tile. Tiled patios are rarely easy to keep clean, especially if they are made of a sensitive stone, like Limestone. Over time, damage from weather and other environmental elements can leave these sorts of patios in really poor shape. The area at Read more...

To read more on this topic click here

Deep Cleaning Bathstone Window Cills

Bath Stone is a material that we don't often encounter. A variation of Limestone Read more...

Dirty Bath Stone Cill's Deep Cleaned in Cardiff

Bath Stone is a material that we don't often encounter. A variation of Limestone Read more...

How to Cut Onyx Tiles without Chipping

Onyx tiles are usually considered by some to be among the most attractive of all decorative tiles. To some degree, this is because they are made of marble, and because marble is fragile and vulnerable to chipping when being cut, onyx tiles can be quite tricky to cut. Below you'll find information that will help you cut your onyx tiles with little or no chipping or breaking.

What You'll Need
  • Pencil
  • Straight edge
  • Tile wet saw
  • Find tooth blade
  • Goggles

Step 1 – Preparing to Cut

Use a pencil and straight edge to make a line you can follow with your saw blade. Wear a pair of goggles or safety glasses to protect your eyes from flying particles. Examine the water basin on your wet saw. Without an adequate water supply when you cut through the hard resin and marble of your tile, your saw blade can overheat, burn its teeth, and ruin the blade's temper.

Step 2 – Sawing Your Onyx Tiles

As you begin you sawing, line up the saw blade with the line you drew. Push your saw slowly along the tile, following the line. Avoid using more than a slight pressure to push the saw. Otherwise, you can cause chipping or breaking of the tile.

Green Indian Limestone Patio Treated for Heavy Staining in Windermere

This patio, at a house in Windermere was made of fantastic Green Indian Limestone that despite sounding exotic is widely available in tile shops and building yards. But while it is a very good quality stone, it doesn't always make for a good patio tile. Tiled patios are rarely easy to keep clean, especially if they are made of a sensitive stone, like Limestone. Over time, damage from weather and other environmental elements can leave these sorts of patios in really poor shape. The area at Read more...

To read more on this topic click here

Removing Algie from Bath Stone Cills

Bath Stone is a material that we don't often encounter. A variation of LimestoneCardiff was quite upset that her Bath Stone window sills had become so unsightly over the four-year period since her house was built, so much so that she contacted Tile Doctor to see if we could help.

Bathstone window cill before cleaning Cardiff Bathstone pillar before cleaning Cardiff

Cleaning Dirty Bath Stone Window Sills

While at Tile Doctor we most often work on tiled floors, patios and shower cubicles, I was more than happy to assist in this situation. I popped round to the property to carry out some initial cleaning tests on an inconspicuous area of one of the window sills. I applied Tile Doctor Pro Clean, which is our high alkaline cleaner, since it's a very versatile and reliable product, and is suitable for use on most kinds of natural stone. Some fantastic results were achieved quickly, with Pro Clean working efficiently to remove the green and black algae that I presumed came from the trees which were plentiful around the property.

Bathstone window cill after test clean Cardiff

With the test clean a success, we agreed a date to complete the job. I returned on the agreed date with a ladder to treat the rest of the sills using Pro Clean, including the one on the first floor window.

Bathstone window cills after cleaning Cardiff

Before carrying out the work, I tested the stone for moisture and the readings were sky high. Therefore, I suggested to the customer not to seal the stone, but instead to maintain it using the same cleaning process as I had undertaken.

Bathstone window cill after cleaning Cardiff

The outcome of my restoration was brilliant, so now when the customer feels that the sills need to be rejuvenated again, she can do so very easily.


Source: Limestone Tile and Grout Cleaning and Mainteanance Service in Cumbria

Wednesday, September 14, 2016

Dealing with Deep Soiling on a Limestone Patio

This patio, at a house in Windermere was made of fantastic Green Indian Limestone that despite sounding exotic is widely available in tile shops and building yards. But while it is a very good quality stone, it doesn't always make for a good patio tile. Tiled patios are rarely easy to keep Read more...

Tuesday, September 13, 2016

Burnishing and Sealing Works Wonders for Limestone Tiles in Harrogate

I was recently at a property in the North Yorkshire town of Harrogate, undertaking what I initially thought would be the cleaning and polishing of a Cream Limestone tiled kitchen. However, as I began the cleaning process I quickly discovered that under the dirty grout lines someone had taken a lot of effort to paint with a small brush directly onto the grout using varnish! Removing Varnish from Grout In a normal situation, I would have covered the whole floor with Tile Doctor Remove & Go to Read more...

Monday, September 12, 2016

Cleaning Natural Stone Floors: 2 Tips

If your home features natural stone floors that are in need of a good cleaning, you may be unclear on how to remove any caked-on filth. Below are two helpful tips that are guaranteed to make the cleaning process simple and stress-free.

1.) Avoid Using Cleaning Products Whenever Possible

One of the best features about natural stone floors is the fact that they can often be successfully cleaned without the aid of any commercial cleaning products. Stone flooring can typically be cleaned with nothing more than a dampened, sponge, mop or washcloth. In addition to not staining very easily, natural stone can be damaged by the chemicals found in many commercial products, particularly those that are acidic in nature. For best results, it is recommended that you clean any spills or smudges immediately upon discovering them.

2.) Use Diluted Bleach for Tough Stains

If you're ever faced with a stain that can't be purged with water alone, diluted bleach can be an invaluable resource. To remove stubborn stains from your natural stone floors, combine a mixture of mild bleach and warm water in an empty spray bottle, then apply the newly formed solution to any stained areas. Next, give the cleaner 1 to 3 minutes to penetrate the stains before wiping them away with a sponge, paper towel or washcloth.

Sunday, September 11, 2016

How to Seal Saltillo Mexican Tile

Saltillo Mexican tile is a handmade tile that is unglazed, and very porous. Many homeowners like to use these tiles because of they are handmade. Using these tiles does mean that some extra work is involved. These Saltillo Mexican tiles need to be sealed in order to protect them. The sealant also gives the tile some added strength and keeps dirt and rocks from scratching the surface. Applying the sealant is not a difficult job, but does require some time and attention to detail.

What You'll Need
  • Broom
  • Penetrating Grout
  • Tile Sealer
  • Paint Tray
  • Saltillo Tile Stain
  • Grout Sponge
  • Grout Float

Step 1: Clean Tiles

The first step to sealing your Saltillo Mexican tile is to clean them of any type of dirt or debris. It is important to make sure that the entire surface of the area you are going to seal is free from any dirt. Use a broom for a very light sweeping, and then use a vacuum. After the must has been lifted, then use some warm water to clean off the tiles. Make sure to let the tiles dry thoroughly before continuing. 

Step 2: Stain Tiles

Before applying any sealant to the Saltillo Mexican tile you should always apply some stain to the surface. This will make the colors come out much more vibrantly. Use a grout sponge for applying the stain to the tiles. Work in a small 6 square foot area at a time. Continue applying stain until surface is covered. Wait for an hour and then apply a second coat.

Step 3: Clean Tiles Second Time

After the stain has had 24 hours to set and dry, go over them again with a vacuum cleaner. Use a sponge and warm water and go over the area. Make sure not to saturate the tiles with water, but to clean them of any dust and dirt. Allow the tiles to dry thoroughly. 

Step 4: Seal Saltillo Mexican Tiles

Apply a coat of the sealant of your choice. You can choose from either a matte finish or a gloss finish for an extra shine. Work the sealer onto the tile with the use of a grout sponge. You should work in a circular motion and do not exceed a 6 foot square area. Continue working along the tiled surface until it is completely sealed. Wait for an hour and then add a second coat of sealant. You can apply up to three coats of the sealant if you feel it is necessary. 

Step 5: Grout Tiles

A penetrating grout is best used to give the tiles much better protection. Use a grout float and apply the grout to the space between the tiles. Glide the float over the tiles pushing the grout into the spaces. Allow to dry until it begins to set and wipe away the excess grout. 

Step 6: Add More Sealant

Once the grout is dry, and you have washed the tiles of any debris, apply up to three more coats of sealant to the Saltillo Mexican tile. This will ensure that there are no imperfections, or low spots in the sealer.

Friday, September 9, 2016

Reviatalising an Old Victorian Tiled Floor

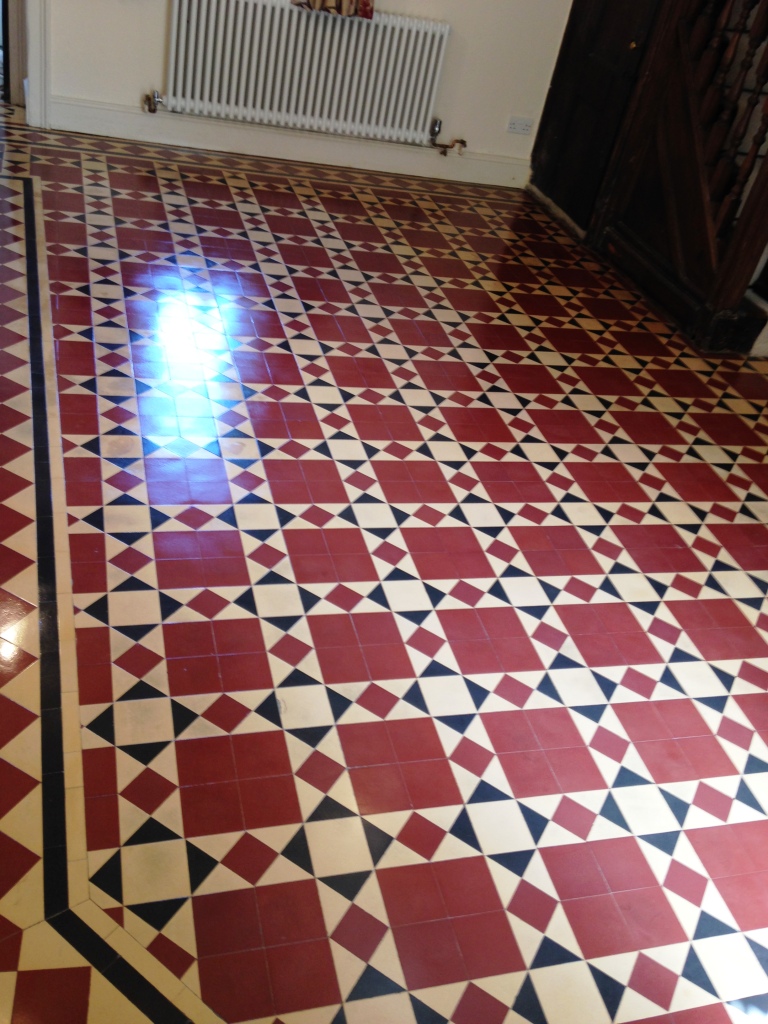
I was asked to take a look at this fantastic classic Victorian tiled floor at an old vicarage in Caldicot which was built in the early 1800s, the floor was structurally sound but was now looking washed out and overdue some TLC.

Victorian floor tile before deep cleaning Caldicot

Repairing and Cleaning Dirty Victorian Tiles

I started by using a 50/50 mixture of Tile Doctor Pro-Clean and Remove and Go diluted with water to create a powerful stripper/cleaner that would take off any remaining old sealer and many years’ worth of dirt. I followed the usual process of applying the solution, allowing it to dwell for then minutes and then scrubbing it in with a scrbubbing pad fitted to a rotary floor machine. The thin grout lines were also treated with the same solution but scrubbed with a stiff brush by hand. This process released the dirt from the tile which was then rinsed away using more water and a wet vacuum to extract the solution from the floor. I then repeated the process until satisfied the floor was clean. A couple of days later I went back to seal the floor but on removing the dust sheets I could see much of the floor was covered in effervescence from the salts that had risen up through the tile as it dried. I could not seal the floor like that so I applied tile doctor's new Acid Gel product to get rid the problem.

Sealing Victorian Tiles

A couple of days later I returned again and this time I was able to proceed and sealed the Victorian tiles using eight coats of Seal and Go which adds a nice subtle sheen to the tiles and will protect the floor going forward.

Victorian floor tile after cleaning and sealing Caldicot

The floor now looks much fresher and the sealer should keep it looking that way for some time to come.


Source: Victorian Tile Cleaning and Restoration Service in Monmouthshire

Tuesday, September 6, 2016

Restoring an Origianl Victorian Tiled Hallway

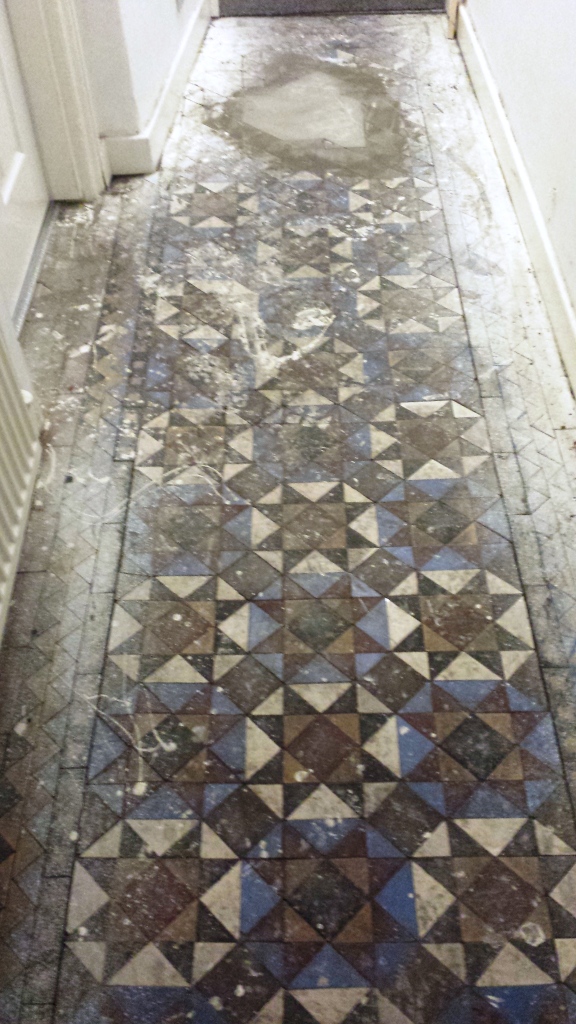
When you uncover a tiled floor after it has been covered by carpet for many years, it's almost a given that it will be in a bad state. However, my customer, who lives in the town of Lymm, wasn't expecting the Victorian tiled hallway they had recently uncovered to be in quite so terrible a state. As you can see from the photograph, it has been completely devastated by paint plaster and a big pool of cement floor leveller. Understandably, the formerly colourful appearance of the tiles had completely drained and it would require a through restoration to get them back into a usable condition.

Victorian Floor Uncovered Before in Lymm

Cleaning a Victorian Tiled Floor

To begin the restoration, I mixed a strong cleaning solution which consisted of Tile Doctor Remove & Go combined 50/50 with Tile Doctor Pro Clean. Remove & Go is a heavy duty remover that breaks down old sealers, along with adhesives, paint stains and other tough soil build up where as Pro-Clean is a versatile alkaline-based cleaner that reliably eradicates dirt on a wide variety of natural stone floors. The solution was applied liberally across the floor, and left to dwell for a short period, allowing time for it to soften up the paint plaster. Next, I fitted a coarse scrubbing pad to my rotary cleaning machine and began to scrub the solution into the tiles, with a big difference to the appearance of the tiles being made quite quickly. The resulting cleaning slurry was promptly removed using a wet-vac machine. I repeated the process two times to provide an extra thorough clean and then give the floor a thorough rinse. Some particularly stubborn marks remained on the floor which I was able to remove using Tile a Doctor Acid Gel, a blend of phosphoric and hydrochloric acids in gel form that’s easy to control. The floor was then left to dry fully overnight.

Sealing a Victorian Tiled Floor

The next morning, I returned to the property and ran some damp tests. This is incredibly important to do before sealing any tiled floor because any excess moisture can cloud the sealer and prevent it from doing its job properly. Once satisfied that the floor could be sealed, I applied several coats of Tile Doctor Seal and Go, our topical sealer which provides both a robust surface seal and a long-lasting low sheen finish in one and ideal for Victorian tiles.

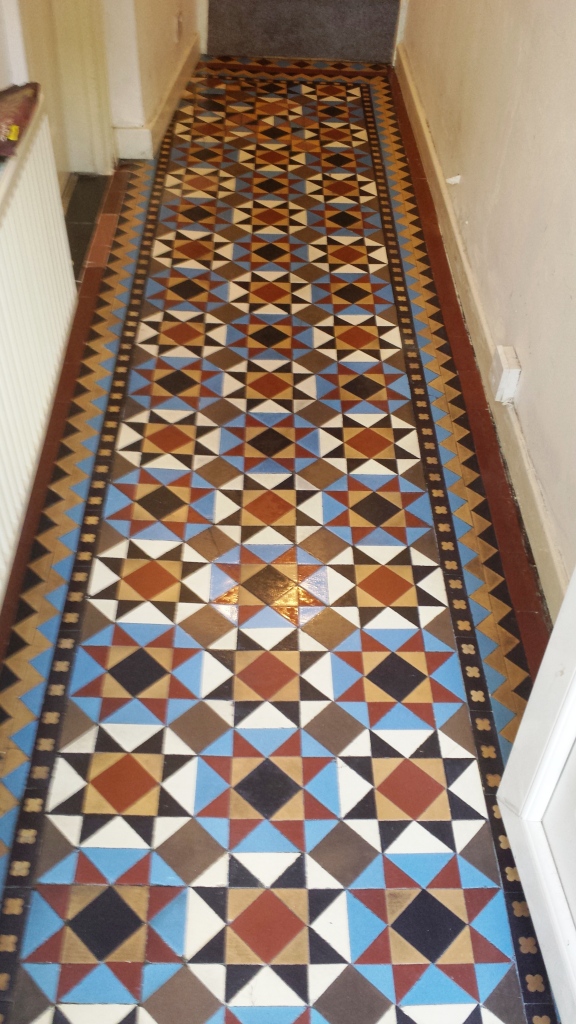
Victorian Floor Uncovered After in Lymm

It would be an understatement to say that this Victorian tiled floor was transformed. The customer was amazed at the results considering how bad a state the tiles had been in just a day earlier. When you have a situation like this, it's hard to believe the tiles could ever be fully restored. Nonetheless, we could now see them in their full and original glory, and needless to say, the customer was very, very pleased with the result.


Source: Victorian Tile Restoration Service in Cheshire

Thursday, September 1, 2016

Pros and Cons of Cobblestone Flooring

If you are considering cobblestone flooring in your home, you may want to first weigh the pros and cons. Here is a little information to help you with a decision.

Design

Cobblestone flooring design is unique. You can choose the colors and the patterns of the stone and let the design represent your personal style. There are so many different options and patterns that everyone is likely to find something that they love.

Cost

The good thing about cobblestone flooring is that you can really control the cost depending on the design you are after. Because of this, cobblestone flooring is affordable for all budgets and you can use your own budget to decide which style is best for you and your home.

Maintenance

Maintenance is one of the downsides of cobblestone flooring. It can be hard to clean if you have children who track mud through the room. While there are several cleaners that are designed especially for this type of material, some may be costly and getting into the nooks of the flooring may be difficult on a regular basis.
Overall though cobblestone flooring is a wonderful asset to any home. It looks great and if you are up to the maintenance challenge then this flooring is for you.