Tuesday, June 28, 2022

How to Install an Umbrella into a Concrete Patio Floor

 A concrete patio floor is a common feature in many houses. Patios can serve a wide variety of purposes, such as family gatherings, outdoor parties, and play areas. Consequently, it is a good idea to have cover for at least part of the patio.

The impact of the weather may ruin your plants or your outdoor events. Installing an umbrella is often the easiest and most common choice to cover up an outdoor area.

What You'll Need:

  • Umbrella
  •  Drill
  •  Measuring tape
  •  Concrete mix
  •  Safety equipment

Step 1 - Decide On the Cover and Size

First, settle on which area of the patio you wish to cover up. Depending on this decision, you can then decide on the size of the umbrella, Sometimes, you may need to buy more than one umbrella.

Purchase the umbrella, while making sure that you keep an eye on quality. Keep in mind that the umbrella will be exposed to weather conditions, like heavy rain and strong winds, so it should be made from heavy material.

Step 2 - Assemble the Umbrella

You need to assemble your umbrella. Sometimes the umbrella top is readily fixed to its pole, but if this is not the case, you will need to do so yourself.

Place the umbrella's top flat on the floor. Affix the loops of its points to corresponding fixtures in the inner center metallic part. Then, fix the pole in its position and decide how many extensions you need to apply, according to the height you need.

Step 3 - Make the Hole In The Concrete Floor

Now that the umbrella is ready you can prepare the hole in the floor where it will be fixed. This is not an easy task because cutting through concrete is difficult. Make sure you have a heavy-duty drill and wear appropriate safety equipment in the process. Safety glasses, gloves, and earplugs are very important. Install a concrete core bit to create a hole of approximately the same size as the umbrella pole's size.

Drill the hole to size. When you are done, insert the umbrella's pole to check how it fits. If it cannot be inserted comfortably, then, you can drill a bit further to make the hole slightly larger. In the process, spray some water onto the hole to enable the drilling to produce less dust.

Step 4 - Fix the Umbrella In Place

Once the hole in the concrete floor is the right size, tidy up the area from the dust and debris. Then, insert the umbrella's pole.

Have someone hold it for you while you fill the hole's remaining space with concrete mix. Allow it to dry well and hold it in place for as long as you can. Your umbrella should be securely and steadily fixed in the floor once it has dried up.


Source: www.DoItYourself.com

Monday, June 20, 2022

New Low Moisture Cleaning Technique used on the Restoration of Vintage Victorian Flooring in Carlisle Cumbria

This is probably one of the oldest Victorian floors we have worked on, the house dates back to 1853 and is the second one we have covered on the same road in the leafy city of Carlisle . The whole street was owned by the council for several decades and the houses including floors have experienced all sorts of damage to them over the years. More recently the houses have been released to a private developer who called us in to handle the restoration and resurrect the hallway tiles which you will see on the pictures.
 
Period 1853 Victorian Hallway Floor Before Restoration Carlisle Period 1853 Victorian Hallway Floor Before Restoration Carlisle


Cleaning and Repairing a Victorian Tiled Hallway Floor

The first job for us was the tile repair, and this meant preparing the surface for the new tiles, which involved carefully knocking up all the loose and cracked tiles and then re setting them using matching replacements where necessary.
  Period 1853 Victorian Hallway Floor During Restoration Carlisle 
To do this I like to use a multi tool to score the grout and then break out the cracked tiles with a hammer and chisel or a power drill. The replacement tiles had to be re-sized to fit, oddly enough most of the damage was along the edge of the floor where air ducts used to be in place and then these had been concreted in. The main part of the floor though was still in good order even though it was 170 years old.
 
Period 1853 Victorian Hallway Floor During Restoration Carlisle Period 1853 Victorian Hallway Floor During Restoration Carlisle
Once the replacement tiles were set, a low moisture cleaning technique was used to get the whole floor clean. This involves covering the tiles in Tile Doctor Oxy-Gel and leaving it to soak into the tile for ten minutes. Being a gel cleaner, it is easier to control and there is less water involved. The gel is then scrubbed in with a buffing machine fitted with a 100-grit milling pad. A little bit of water is added to help lubricate and scrub off the dirt and soiling. A wet vacuum is then used to remove the soil which is an essential piece of kit for this line of work.

After the initial clean the floor was given an acid rinse using Tile Doctor Acid Gel which was applied neat and as before scrubbed in using a pad, this time using a finer 200-grit milling pad. Again, a little water was used to aid in the clean up being careful not to flood the floor.

The reason for the low moisture clean is that there was a basement underneath the hallway and the client had nowhere else to put certain fabrics, furniture etc so with a low moisture clean we can minimise the chance of any water finding its way into the space below. The wet vacuum was deployed again to remove the cleaning products and water and the floor was left to dry.


Sealing a Victorian Tiled Hallway Floor

Once clean and dry the floor was sealed using two coats of Tile Doctor X-Tra seal which as the name suggests is a little bit extra as it's a very robust sealer, although mainly designed for outside areas it’s an oil-based formula that works really on Victorian tiles.

 
Period 1853 Victorian Hallway Floor After Renovation Carlisle Period 1853 Victorian Hallway Floor After Renovation Carlisle
One done the floor looked great, and the developer was very happy with the result.

Wednesday, June 15, 2022

What Makes Pergo Flooring Different

Pergo flooring is a commercial name for laminate flooring. This type of flooring first became popular in the late 1980s and early 1990s, when it was introduced as a cost-effective alternative to traditional wood floors.


Pros of Pergo

There are several benefits to installing Pergo floors in a home, particularly if you decide to complete the installation yourself.

Cost

When compared to traditional wood floors, Pergo is inexpensive.

Eco-Friendly

Pergo is constructed from wood products that are processed into boards, and then a thin paper pattern is attached to them. Over this, a thin layer of plastic seals and laminates the boards.

The wood products are recycled wood and the paper is usually recycled paper.

Easy to Install

In most cases, a homeowner can install a Pergo floor over the course of an afternoon or weekend. The only special tools required are a cincher or a mallet to pull the boards tight against each other.

Easy to Maintain

Pergo does not require any special waxing or cleaning solutions. Spills can usually be wiped up, and even paint or other materials that would damage a wood floor are easy to scrape up or remove without damaging the floor.

Versatility

Pergo is available in a wide variety of patterns. Patterns include woods, tile, and stone, and often look very similar to the natural or real material.


Disadvantages of Pergo

Appearance

Early Pergo looked like what it was: an inexpensive alternative to natural wood or stone floors. Although contemporary Pergo has improved substantially, it does not compare well when installed directly next to natural materials.

Cost

Although Pergo is inexpensive when compared to installing wood floors, it can be more expensive than other flooring such as vinyl or adhesive tiles.

Hardiness

Pergo can be very easy to maintain. However, it can be easily scratched and does not do very well when installed in areas with high traffic or heavy usage.


Measuring for Pergo

If you are planning to install a Pergo floor in your kitchen or other areas in your home, measure carefully before you purchase any planks. Measure the area of the floor.

Take into consideration whether you will install the flooring around cabinets currently installed on the floor or if you will remove the cabinets and install the flooring underneath them.

Also, take into consideration any objects like fireplace surrounds, kitchen islands, or other items you may need to cut around as you install the floor.

If your room is an irregular shape, then break the room into smaller sections and measure those areas.

Multiply the entire width and length together to calculate the square footage area. Add 10 percent to that number to account for material waste.


Tuesday, June 14, 2022

Tips on Deep Cleaning Victorian Hallway Tiles by Expert Restorer in Johnstone

 This is another Victorian hallway floor we deep cleaned in Johnstone which is located to West of Paisley. Before quoting I visited the property to survey the Victorian tiles and ensure I had a complete idea of what would be needed to fully renovate floor.

 
Victorian Tiled Floor Before Cleaning Johnstone

After inspecting the floor, I could see there were no surprises such as loose or cracked tiles that would need replacing and that the main issue was it was just incredibly dirty. All that it needed would be deep cleaning including stripping of any remaining sealer, then cleaning and ultimately sealing. This is a typical Tile Doctor job for us to carry out and having worked on many Victorian floors before I was very confident of a great result. The client was happy to go ahead with the quotation and we arranged to return a few weeks later.


Cleaning a Victorian Tiled Hallway Floor

The floor was given a pre spray of Tile Doctor Remove and Go diluted 50:50 with water and then left to soak in for10 minutes to give it time to break down the dirt and any previous coatings that may have been present on the floor. Then the floor was scrubbed using a rotary bonnet machine fitted with a silicon carbide brush. This is an effective brush that in combination with the Remove and Go released a lot from the pores of the tile to the surface where it could be extracted with a wet vacuum. The floor was dirtier than anticipated and the process was carried out three times to ensure floor was as clean as possible.

Once the chemicals had done as much as they could the Victorian tiles were resurfaced using Tile Doctor 100 and 200 grit milling pads that remove stubborn ingrained dirt and staining. This process was carried out twice rinsing with water and extracted the soiling with a wet vacuum afterwards.

Last process was to give the tiles a mild Acid wash using Tile Doctor Grout Clean-up. This was scrubbed in using soft brushes fitted to the bonnet machine and then extracted as before. This process further cleans up the tile and will counter any efflorescent salts that can build up in floors of this age which won’t had a modern damp proof membrane in place.

The floor was left to dry out for a few days with a fan left in place to speed up the drying times. The floor looked so much cleaner than when we started, and my client was already pleased with the results.

Sealing a Victorian Tiled Hallway Floor

On my return the I took a few moisture readings with a damp meter to check it was dry enough to accept a sealer. We don’t recommend applying a sealer to a damp floor as from experience the results can be inconsistent so always best to check first.

The meter readings were fine, so I started applying the sealer, which for this floor Tile Doctor Colour Grow was chosen. Three coats were applied to fully protect the floor and bring the colours back after being cut back with the milling pads. This sealer works by soaking into the pores of the tile, occupying the pores, and thereby preventing dirt from becoming ingrained there going forwart. As the name suggest it’s a colour enhancing product that is also fully breathable which is important for floors with no damp proof membrane.

 
Victorian Tiled Floor After Cleaning Johnstone

For aftercare cleaning I recommended the use of Tile Doctor Neutral Cleaner which is a mild pH neutral tile cleaner that is gentle enough for daily use and will ensure that the newly applied seal is not compromised and kept looking good, especially in such a high traffic area.

Sunday, June 12, 2022

How to Clean Grout Haze from White Porcelain Tile

White porcelain tile can help you create an attractive interior décor. When installed on the bathroom or kitchen walls, the tiles easily brighten up the room. This enhances indoor ambiance.

Porcelain is one of the most resilient materials for tiles. This is partly due to its high density. It also has an extremely low water absorbency level which helps to prevent stains. 

This contributes to lower maintenance requirements. It is easy to clean porcelain tiles. Simply use a dry, soft cloth to remove light dust and dirt daily. Once a week, you can clean the tiles with a wet cloth.

When tiles are newly installed, you may encounter grout haze on your porcelain tiles. This is a thin film left over after you grout. Grout haze can be easily cleaned with the help of the guide below.

What You'll Need:

  • Grout sponge
  •  Water
  •  Scouring pad
  •  Sponges
  •  White vinegar
  •  Spray bottle
  •  Terry cloths
  •  Microfiber cloth
  •  Commercial grout haze remover
  •  Mild detergent
  •  Bucket
  •  Soft cloths

Step 1 - Use Grout Sponge

It is best to use a grout sponge about 10 minutes after you’ve applied the grout. Obtain a grout sponge and wet it in warm water. Wring the sponge to reduce water content. Clear away the haze from the tiles with your sponge in short, swift strokes.

Rinse the sponge frequently as you proceed so that dirt does not spread on your tiles. The grout sponge helps to reduce the haze which makes your work easier in the next section.

Step 2 - Clean with White Vinegar

Mix equal portions of white vinegar and water in a spray bottle. Shake the bottle well to mix the contents properly. Spray the solution along the grout lines on your tiled floor. Scrub the grout and tiles with a scouring pad. The acid in the vinegar helps to destroy the haze. Wipe away the solution with a terry cloth.

Step 3 - Buff the Tiles

Polish the tiles in a circular motion with a microfiber cloth. This helps to clear fine particles from the tiles. Use a damp, soft cloth to clean your tiles. Sometimes, all it takes is steps 1 to 3 for the haze to be cleared effectively. However, if the haze persists, you’ll need to move on to the next step.

Step 4 - Use a Commercial Grout Haze Remover

Prepare the haze remover according to the instructions supplied with the product. Apply the cleaner to your tiles with a sponge. Be sure to apply the remover sparingly because you want to avoid excess remover on the tiles.

Allow the remover to work on the haze for a couple of minutes. Scrub the tiles with your scouring pad. Rinse the tiles with a damp sponge. Rinse the sponge frequently as you proceed.

Step 5 - Clean the Tiles

Once you’ve cleared the grout haze, you can give your porcelain tiles a final clean. Add some mild detergent into a bucket of water and use a sponge to wipe over the tiles.

This will clear all traces of cleaners used during grout removal. Wipe the tiles with a clean sponge dipped in plain water. Use a terry cloth to wipe away excess water.

Thursday, June 2, 2022

How to Restore the Appearance of a 500 Year Old Floor by Devon Stone Restoration Expert

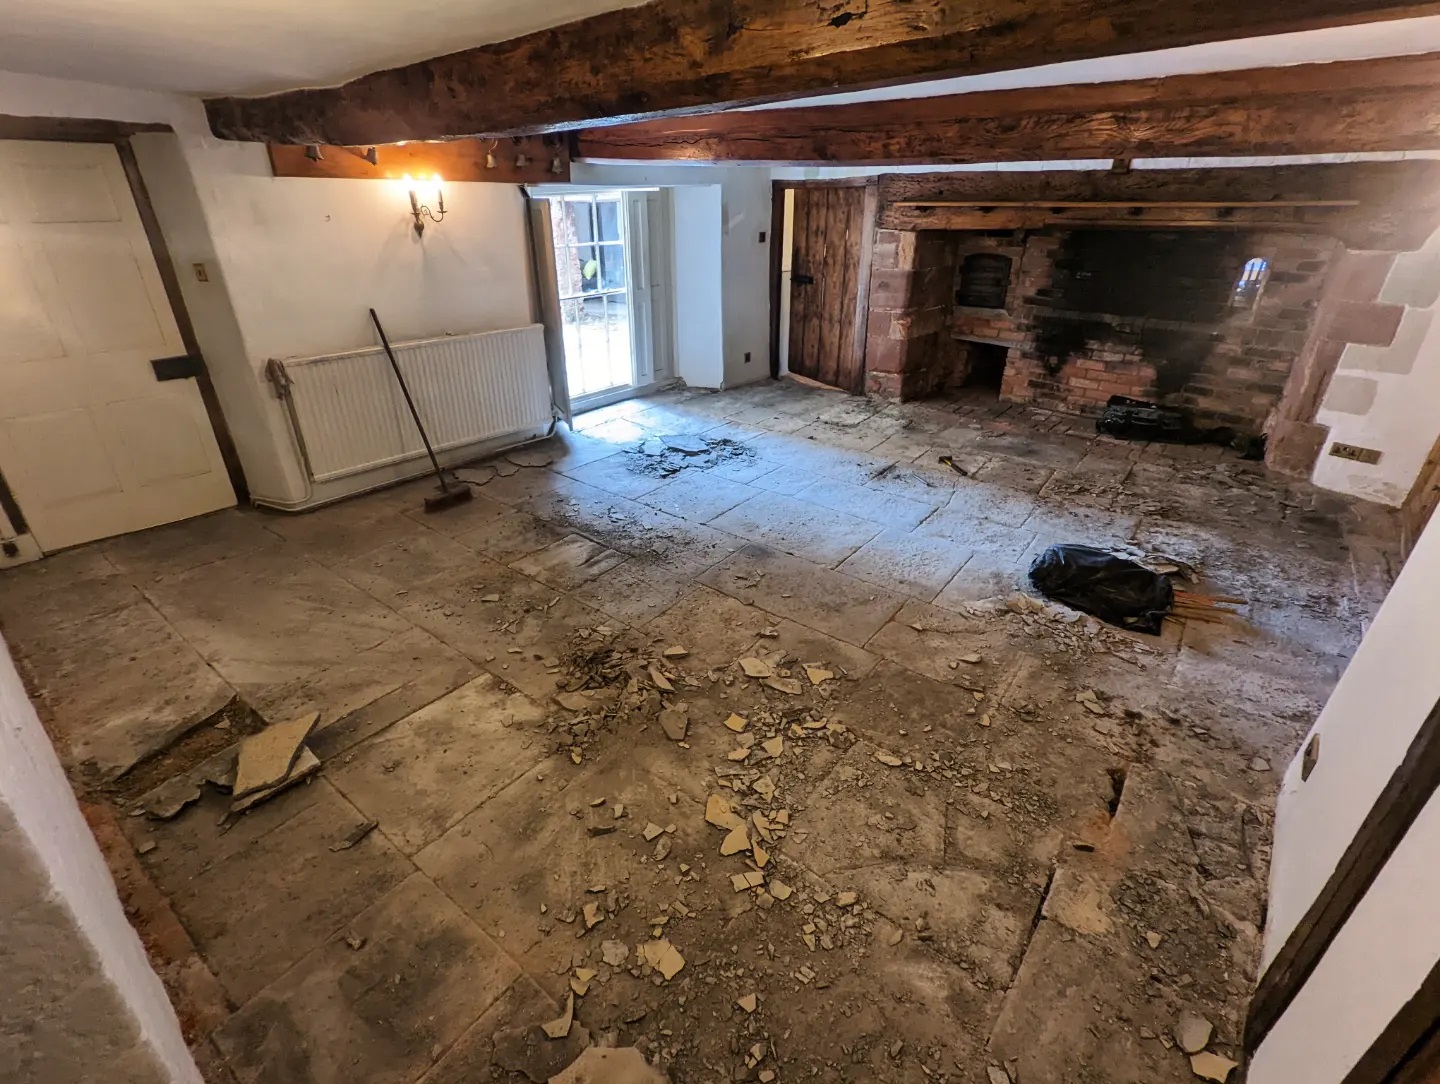
A customer in Tiverton uncovered this extremely aged and tired Blue Lias Limestone floor during renovation work. The floor was approximately 80m2 in size and they were keen for me to come and survey the large flagstones to find out if anything could be done to renovate it. They were keen to restore it, but really did not know where the start. The property in dated back to the 15th century and had a several period features that wanted to restore.

Blue Lias Stone is actually quarried in southern and western England including South Wales and has been used as a flooring and building material for over a century. These days you don’t come across it very often due to the large variety now available in the stone market.

 
Blue Lias Limestone Floor Before Restoration Tiverton

I headed over to the property to take a look and it was immediately apparent the floor would need a great deal of work to fully restore it. I could see some of the flagstones had heavily flaking and shaling in places, others were so damaged they would need replacing and the whole floor would need re-pointing. In addition, with the floor being so large I could see if would take a significant amount of time to restore.


Deep Cleaning and Repairing a Blue Lias Limestone Floor

To reveal the true beauty of the Limestone I had to remove a thin layer of stone from the surface. This was done by cutting back the stone using a very coarse 100-grit milling pad fitted to a Viper rotary buffer machine that was heavily weighted. This method also flattens the surface of the stone removing any excessive shaling in the process. Once I had a cleaner stone to work with, I set to work removing old jointing which needed replacing and then removing a couple of the broken stones.

Fortunately, I had been able to source replacement stones which were a close match to the original before starting work. They were then bedded in and then pointed with the rest of the joints with a German product called VDW800.

The next step was to deep clean the whole floor, removing deep seated stains and any remaining dirt and grime. For this I decided to go with Tile Doctor Remove & Go which is a powerful cleaning and coatings remover. The product is sprayed onto the floor, left to soak in for then minutes and then scrubbed in using a black scrubbing pad fitted to the rotary buffer. Once done the soiling is removed using a high-pressure industrial cleaning system that is mounted in my van; it’s a powerful machine which jets water out at 1000psi and then simultaneously vacuums up the dirty water and debris leaving behind clean, bare stone. This keeps the mess made to a real minimum and ensures the tiles are cleaned efficiently. The process had to be repeated three times before I was satisfied the floor was clean after which is was left to dry out thoroughly before sealing.


Sealing a Lias Limestone Tiled Floor

After the floor had dried over the course of a few days, we returned to seal the floor. The first job was to use a damp meter to check the moisture levels in the stone and verify it was dry enough to seal. Damp can be a big issue with older properties with no damp proof membrane and the stone has been laid directly onto soil. Satisfied with the readings I was happy to go ahead with the sealing process.

The sealer used on this floor was Tile Doctor X-Tra Seal, it’s a fully breathable formula which will allow any moisture under the floor to be able to rise through the Limestone and not become trapped where it could cause long term problems. It’s also an impregnating sealer which basically means that it soaks into the stone thereby occupying the pores and preventing dirt from becoming ingrained there. Lastly X-Trea seal has an oil-based resin formula which really improves the structure and colour of the stone.

 
Blue Lias Limestone Floor After Restoration Tiverton

With the application of the fresh sealer the floor really came alive, and the 15th Century Blue Lias limestone floor was transformed. The customer was delighted with the renovation and could not believe how well the floor had come up I only wish I had remembered to take more photographs.

For aftercare cleaning I recommended the use of Tile Doctor Neutral Tile Cleaner, this is a mild tile and grout cleaner which is pH balanced, so it will ensure the integrity of the newly applied sealer and will keep the floor in top condition.