Thursday, June 29, 2017

Types of Mortar For Slate Wall Tiles

There are many types of mortar that can be used for installing slate wall tiles. Also called thinset, the mortar that you require depends largely on the type of installation used for the slate wall tiles. It also depends on whether you are installing the wall tiles internally or externally. Listed below are a few mortar types for slate wall tiles.

Latex-Modified Mortar

This type of mortar is the most common among the mortars available and contains latex. Latex makes the mortar more sticky and elastic. You can use this type of mortar in many installations, either in external or internal locations. However, latex-modified mortar takes a longer time to dry than other mortars.

Unmodified Mortar

Unmodified mortar does not contain polymer or latex additives. It is considered the lowest quality of all mortars available and is among the cheapest. As it does not contain latex, it is less sticky and is not suitable to apply on wood surfaces. Unmodified mortar is not used very often in installations, as the installation areas move over time when this mortar is applied. It is suitable to apply on exterior applications where you install the slate wall tiles directly onto concrete surfaces, such as chimneys.


Wednesday, June 21, 2017

Old Victorian Tiled Hallway Floor Transformed in South Wales

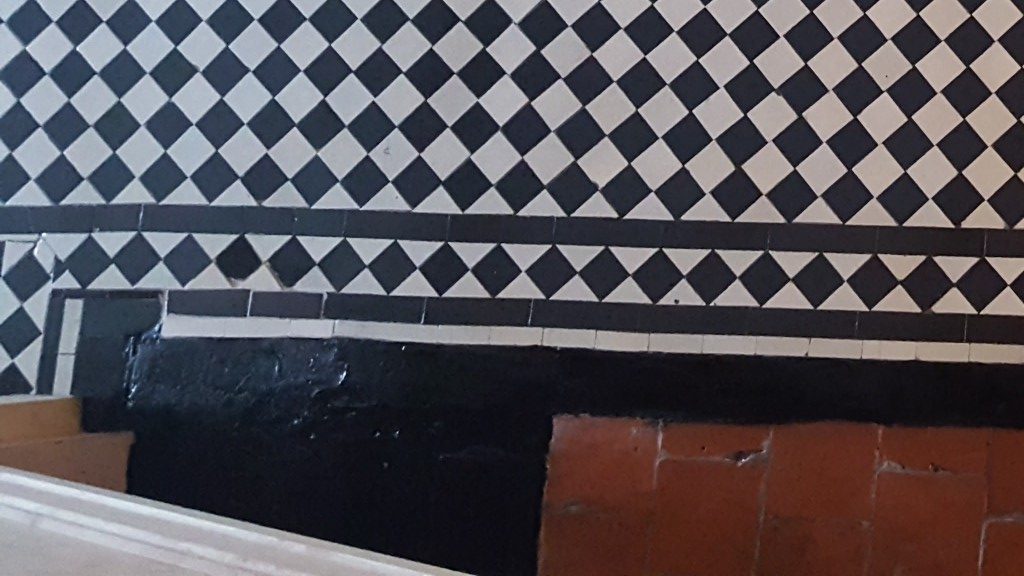
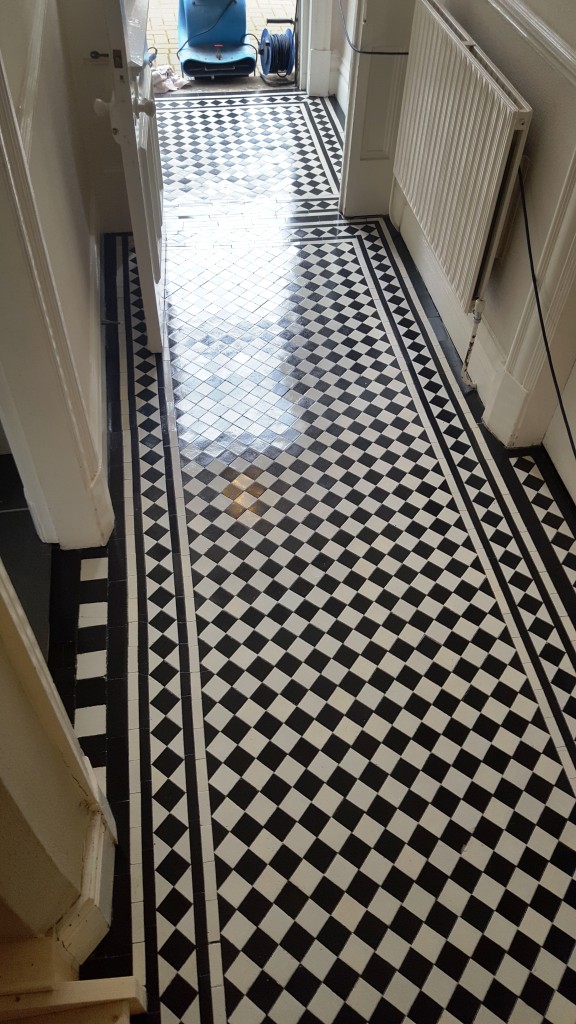
This Victorian tiled hallway floor, located in a property in Blackwood, South Wales, was in a bad way. It was suffering from several broken and missing tiles, and the entire floor looked like it had not experienced a good clean and fresh seal in several years. The property itself dated back to 1905, and it’s very likely that the Victorian tiles are original. However, the property owner was very hopeful that the hallway could be rejuvenated, so he contacted me to carry out the work. Upon my first inspection of the floor, I could immediately see that a lot of tile replacements would need to be carried out. I suggested to the customer that I repurpose the tiles that surrounded the matt well at the front of the door to use as replacements for the tiles that were broken and damaged. I would then create a new, larger matt well while using original tiles to fix the damaged areas. It’s a technique I’ve used before so I was confident it would work. He was happy with this suggestion so I agreed to return later that week to complete the restoration.

Victorian Hallway Floor Blackwood Before Repair

Repairing and Cleaning an Original Victorian Tiled Hallway

My first task was to carefully remove the tiles around the exiting matt well, clean off the cement, and, in some cases, skim the thickness off some tiles so that they would position flat against the adjacent tile. Next, I proceeded to fix these replacement tiles in the areas required. After completing these repairs, I moved on to cleaning the entire hallway. First, I manually scraped off as much of the paint and cement deposits from the surface of the tiles as possible, before cleaning the floor thoroughly with a mixed solution of three products: Tile Doctor Pro Clean, Tile Doctor NanoTech HBU Remover, and Tile Doctor Remove and Go. Each of these products serves a different purpose. Pro Clean is reliable and powerful alkaline tile cleaner, while NanoTech HBU is a powerful cleaner which uses nano-sized particles to penetrate the pores of the tile and dissolve ingrained dirt and stains. Remove and Go strips away any old sealers, along with any of the stubborn paint and cement deposits. The solution was left to dwell on the floor for about half an hour, before I scrubbed it into the stone by hand using a coarse black scrubbing pad. The floor was then rinsed thoroughly, before Tile Doctor Grout Clean-Up was applied using a wire wool pad remove light grout smears (grout haze) and signs of efflorescence. I then completed the grouting of the floor left it to dry for half an hour before giving it a final wipe with a sponge.

Victorian Hallway Floor Blackwood During Restoration

Sealing a Victorian Tiled Hallway

After leaving the floor to dry out overnight, I returned to the property the following morning. I ran some quick checks for moisture to see if the tiles were ready to be sealed. Thankfully, the floor proved dry and I could proceed the applying Tile Doctor Seal and Go. This sealer works really well on Victorian tiles and provides a nice subtle sheen finish whilst providing stain resistance. The customer had initially thought the floor could not be salvaged, but now he will be able to enjoy this fantastic original feature from years to come. It just goes to show that a bit of creativity and hard work really can make a difference.

Victorian Hallway Floor Blackwood After Restoration


Source: Victorian Tile Cleaning and Restoration in South Wales

Saturday, June 17, 2017

Victorian Tiled Hallway Transformation in Cheshire

This fantastic chequered black and white Victorian Tiled Hallway was located at a house in the village of Prestbury north of Macclesfield in Cheshire. According to Wikipedia Presbury is part of the "Cheshire Golden Triangle" villages which include Wilmslow and Alderley Edge which are the most sought after and expensive places to live outside of London. It was a lovely building however a new stair case had been fitted which didn’t quite match the foot print of the original staircase leaving a gap in the hallway tiling. The owner of the property wanted matching tiles fitted and also to give the floor and good clean and seal so they would blend in.

Chequered Victorian Floor Prestbury Before Repair and Clean

Cleaning a Victorian Tiled Floor

To clean the floor and strip off any remaining sealer I first created a strong dilution of Tile Doctor Pro-Clean cleaning solution which is a versatile alkaline cleaner that’s designed for use on tile, stone and grout. reliably eradicates dirt on a wide variety of natural stone floors. The solution was applied liberally across the floor, and left to dwell for about ten minutes to allow time for it to soak into the Victorian tiles. It was then scrubbed into the tiles using a scrubbing pad fitted to a rotary cleaning machine. The resulting cleaning slurry was rinsed off with water and then extracted from the floor using a wet vacuum. I repeated this process until I was confident the tiles were clean and free of old sealer. The next step was to treat the floor to an acid wash using Acid Gel, this is especially important on old floors where there is no damp proof course to prevent damp rising through the tile leaving salt deposits on the surface. This problem is known as efflorescence and is neutralised by the acid. The gel was then removed and the floor given another rinse using the wet vacuum to get the floor as dry as possible. The last task of the day was to fix replacement tiles in the gap left by the original staircase. Fortunately, Tile Doctor keep a range of replacement tiles so I was able to source some that matched without too much problem. After grouting the hallway was left to dry off fully overnight so it could be ready for sealing the next day.

Chequered Victorian Floor Prestbury After Repair and Clean

Sealing a Victorian Tiled Floor

The next morning, I returned to the property and ran some damp tests. This is incredibly important to do before sealing any tiled floor because any excess moisture can cloud the sealer and prevent it from doing its job properly. Once satisfied that the floor was dry, I applied a single coat of Tile Doctor Colour Grow which is a breathable impregnating sealer that enhances colour and protects from within. I dusted off any excess sealer and then followed up with the application of four coats of Tile Doctor Seal and Go which provides both a robust surface seal and a long-lasting low sheen finish. I waited two hours for the sealer to dry and then the rotary machine fitted with a white buffing pad over the floor to makes sure everything was nice and tight.

Chequered Victorian Floor Prestbury After Repair and Clean Chequered Victorian Floor Prestbury After Repair and Clean


Source: Victorian Tile Cleaning and Restoration in Prestbury, Cheshire

Tuesday, June 13, 2017

Polishing Slate Tiles Easily

In order to keep slate tiles is good condition, it is important that you polish them from time to time. Let us outline the main steps involved to carry out this task successfully.

What You'll Need:
  • Bucket
  • Mop or floorcloth
  • Broom or vacuum cleaner
  • Soft Rags
  • Wax
  • Stone Cleaner
Step 1 - Cleaning

Sweep or vacuum the floor to remove dust and dirt. Then use a mop or a dampened soft floorcloth to remove any residue. You may also wish to add some cleanser to the water. However, make sure to use a neutral type which is suitable for slate tiles. Acidic based cleansers are not suitable for slate tiles.

Step 2 - Apply Stone Sealer

Once the floor has been cleaned and allowed to dry, apply some stone sealer to the tiles.

Step 3 - Apply Wax


Next, apply a coating of wax. Both commercial and household types of wax can work well. Place a small amount of wax onto a soft rag, and then start rubbing into the slate tiles. Once you have finished, buff the floor a second time using a clean rag. This will help to bring out a better result and a more polished, shiny look.


Friday, June 9, 2017

Restoring 18th Century Sandstone Flagstones

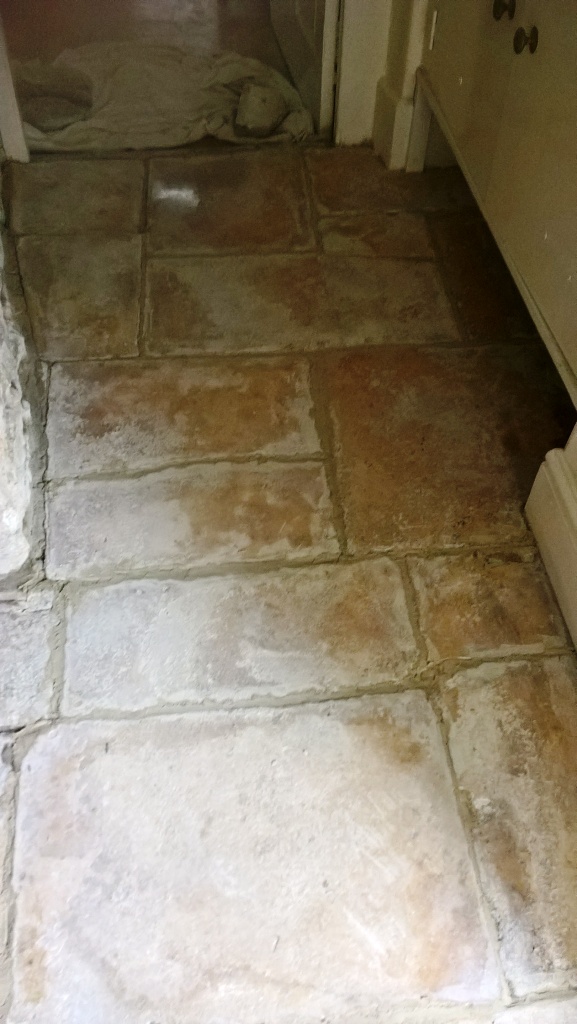
Minchinhampton is an ancient market town located on a hilltop in the Cotswolds area of Gloucestershire, famous for being one of the UK’s areas of outstanding beauty. The town has a long history and many of the residents live in some truly picturesque and characterful cottages that date back to the 18th century and beyond. I was recently contacted by a property owner in the village. She had just uncovered an original Flagstone tiled floor in her cottage, which dates to 1765. The floor had previously been covered by a wooden floor and the property owner was keen to see if I could restore it. We’ve had some fantastic success with restoring similar floors in the past, so I was more than happy to see what could be done. I visited the property initially to conduct a test clean and check that I would be able to remove the copious wood adhesive left on the floor after the covering had been lifted. This test clean was successful, and the customer booked me in for complete the full restoration straight away.

Old Flagstone Floor Before Restoration at Minchinhampton Cottage


Cleaning a Dirty Flagstone Tiled Floor

My first action in the process of restoring the floor was to mix a strong solution of two products – Tile Doctor NanoTech HBU and Tile Doctor Remove and Go. Remove and Go is designed to strip away any old sealer on the floor and dissolve any adhesive and paint stains, while NanoTech HBU is a potent cleaner which uses nano-sized particles to penetrate deep into the stone and eliminate ingrained dirt. This solution was applied across the floor and left to dwell for 40 minutes. Then, using a poly-brush fitted to a floor buffing machine, I cleaned the floor and in doing so removed 85 percent of the ingrained dirt. To tackle the rest of the ingrained dirt, I spot cleaned the stubborn area using Tile Doctor Acid Gel in combination with a handheld steamer. Acid Gel is a concentrated mix of phosphoric and hydrochloric acids. I also used a handheld buffing machine fitted with a Coarse 100 grit diamond encrusted pad to grind away any outstanding dirt and level off the surface of the tiles. When I was satisfied with the results of the cleaning process, my next operation was to replace all the missing grout on the floor. I did this using a Limestone grout, which was a good colour match for the Flagstone.

Sealing a Flagstone Tiled Floor

With the first day of work complete, I left the floor to dry out for the next three days. With the floor being particularly old, it was important to give it a long period to dry to help avoid any damp issues. Upon returning to the property, I ran some quick damp tests to check the floor could be sealed. When satisfied that there was no excess moisture to deal with, I proceeded to seal the floor with three coats of Tile Doctor Seal and Go, leaving 30 minutes to dry between coats. This will give the floor robust protection against ingrained dirt along with the high-quality satin finish the customer had requested.

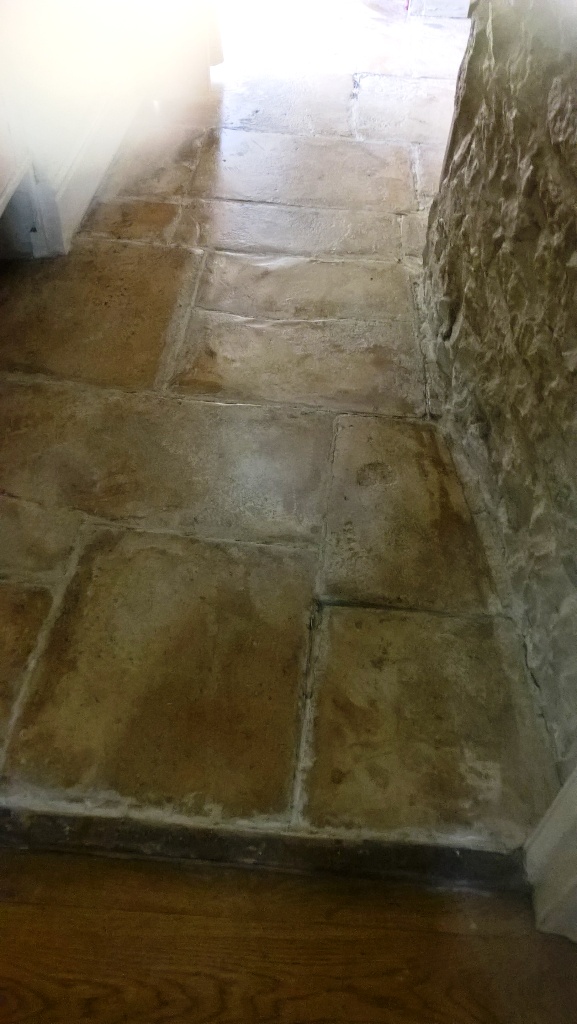
Old Flagstone Floor Before Restoration at Minchinhampton Cottage

Seeing the result, the customer was really pleased with her floor. She had previously thought there was nothing that could be done to restore these old Flagstones, but with the right combination of products and cleaning methods I was able to achieve a fantastic restoration. Another satisfied customer.


Source: Sandstone Tile Cleaning and Restoration in the Cotswolds

Wednesday, June 7, 2017

Installing Black Slate Tiles in a Bathroom

Black slate tiles are very beautiful and ornate and will enhance any bathroom. Black slate tiles can increase your home’s value as well. You can save a lot of money by putting in a little sweat equity and doing the job yourself. The article that follows will show you how easy it is to install black slate tiles.

What You'll Need:
  • Black slate tiles
  • Backboard
  • Wet saw
  • Tape measure
  • Grout
  • Black grout dye
  • Thinset
  • Trowel
  • Sponge
  • Plastic spacers
  • Screws and power screwdriver
  • Drywall mud
  • Putty knife
  • Sanding block
  • Paint roller
  • Grout float
  • Caulking gun
  • Caulk
  • Metal edging strip

Step 1 – Install the Backboard

A backboard is the canvas in which black slate tiles will be placed. Backboard resembles drywall and consists of a concrete center and paper on one side. Measure the wall and then cut the backboard to size. Score the paper and then gently snap the board. Place the backboard on top of the plywood that is the main wall of the shower. Fasten it in place with screws at each corner. Place screws every 6 inches. Apply drywall mud over the screws using a putty knife and then smooth the mud out flat. When the mud is dry, sand it flat.

Step 2 – Place the Black Slate Tiles

Since walls are rarely uniform, you will have tiles that need to be cut. Measure down from the top of the wall a distance equal to the width of a full tile plus an additional 1/8-inch. Draw a horizontal line from one edge of the wall to the other. Repeat at the bottom but measuring up to draw the second horizontal line. Apply thinset to the wall between the lines using the straight edge of the trowel. Apply thinset to the back of the tiles and then set them in place one at a time using a spacer between each one. Continue placing black slate tiles until the wall is full. Apply thinset to the bare areas and add the full tiles. Measure the remaining space and then use the wet saw to cut the black slate tiles to size. Affix them to the remaining space.

Step 3 – Seal the Tiles

Black slate tiles are porous and need to be sealed. Wait a day for the thinset to dry and then paint the sealer over the black slate tiles. Wait a few hours for the sealer to dry.

Step 4 – Grouting

Mix the grout with the dye according to the directions and then apply it over the tiles with the grout float. The grout float evenly spreads out the grout while pushing it between the spaces. Use as much grout as needed. Wipe off the grout residue with a damp sponge to avoid a haze from forming over the tiles. The grout has to cure for several days before you use the shower.

Step 5 – Optional Finishing
If the black slate tiles are thick, you may want to add edging. Choose a metal strip that is as wide as the tiles are thick. Measure the top of the wall to where the wall stops and then cut the edging. Apply a bead of caulk to the edge of the tiles and then press the edging firmly in place. Remove excess caulk with a wet finger.


Source: www.DoItYourself.com

Sunday, June 4, 2017

Restoring an old Quarry Tiled Farmhouse Kitchen Floor

Rackenford is a tiny village in North Devon, with a population of approximately 400 people, and is surrounded by many farms as agriculture is the main source of employment in the area.

I recently visited one of the farmhouses in the area at the request of the property owner who needed help restoring an area of Victorian quarry tiles which were around one hundred and twenty years old. The floor had been extended with a new batch of tiles which ran into a later extension about ten years prior. Both areas were dirty and attracting grime and the older tiles had some heavy damage to some tiles and had lost the colour which was indicative of being covered by carpet for a long period and salts had dried in to the tiles, damaging them and creating an orange peel type of surface.

In the past, the floor had been sealed with a topical sealer i.e. one that sits on top of the tile rather than being absorbed into it. In most areas, the sealer had long since worn off but in a few areas that it remained it had been scratched by the chairs near the large inglenook fire at one end of the room.

The customer was looking to clean and re-seal the whole floor to try to improve the look of the damaged tiles but also to make the floor easier to keep clean and maintain and were hoping that the divide between old and new tiles was less striking.
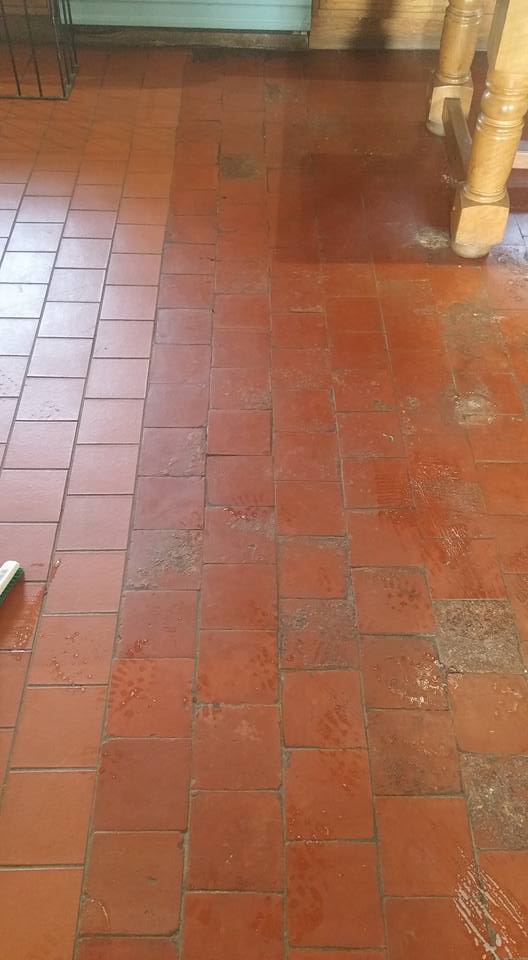
Old Quarry Tiled Farmhouse Floor Rackenford Before Cleaning

Cleaning a Dirty Quarry Tiled Kitchen Floor

When it comes to cleaning natural stone tiles, our go-to cleaning product is Tile Doctor Pro Clean. Pro Clean is a multi-purpose, high alkaline cleaner that serves to both strip away any old and ineffectual sealer, and clean heavily soiled stone. The product is suitable for use on all types of natural stone and tiled floors.

I mixed a strong dilution of Pro Clean and water before spreading it liberally across the whole floor. I then left it to dwell for roughly 10 minutes before proceeding to agitate it with a scrubbing brush fitted to a heavy rotary machine. This helped to eradicate the soil build-up. Any resulting cleaning slurry was promptly removed using a wet vacuum, before the floor was left to dry completely overnight.

Sealing a Quarry Tiled Kitchen Floor

Returning to the property the next day, I immediately ran some damp tests to see if there was any excess moisture present on the floor. Knowing that this was an old property, I expected that there would be no damp proof membrane installed and this would increase the chances of damp issues.

Thankfully, the floor proved to be completely dry and I was able to seal the floor using eight coats of Tile Doctor Seal and Go. Seal and Go is a water-based acrylic polymer sealer that provides both a stain resistant surface seal and a durable, aesthetically pleasing low-sheen finish that helped to return the natural reddish colours to the Quarry tiles. Although the top layer of the damaged tiles had been lost the colour had returned and were now looking much healthier.

With a fresh seal in place, the floor will now be much easier to clean and maintain. The customer was really pleased with the outcome of the restoration, which you can see in the photos below. Another satisfied customer!
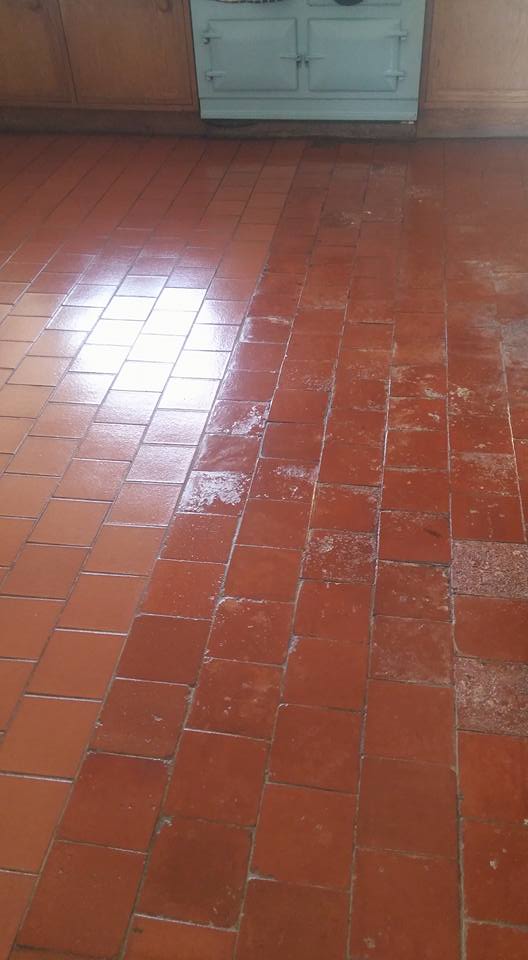
Old Quarry Tiled Farmhouse Floor Rackenford After Cleaning

Although nothing can really replicate a hundred years of patina, the difference between the old and new tiles was reduced with a good clean and a consistent finish throughout. Certainly, the customer was happy and left the following feedback:

"We are very pleased with this refurbishment of old quarry tiles, which have regained colour and texture. The overall slight gloss added to both these and the newer tiles next to them makes a huge difference to the whole picture. The cleaning and maintenance guide is also very useful. The bill was also very reasonable for two intensive days work - many thanks"
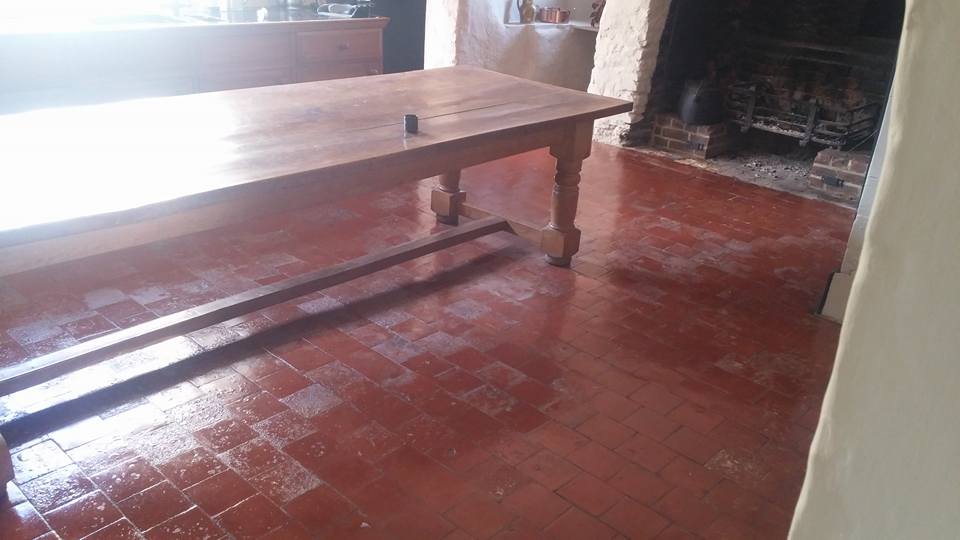
Old Quarry Tiled Farmhouse Floor Rackenford After Cleaning Panorama


Source: Quarry Tile Cleaning and Restoration in Devon

Saturday, June 3, 2017

How to Epoxy Pebble Flooring

Pebble flooring is a type of stone flooring that is held together by epoxy resins. It is used mostly for its natural look as well as its capacity to hide flaws on the floor. Installation of pebble flooring is very easy and it does not require elaborate knowledge of tile installation. Here are the procedures for this project.

What You'll Need:
  • Pebbles
  • Brush
  • Epoxy primer
  • Sealant
  • Trowel
Step 1 - Remove Debris From The Floor

Clean the floor properly by sweeping away loose debris with a bristled broom or brush. Once the loose debris have been removed, it is important to apply a mild cleaner (soap and water solution) on the surface to remove stubborn dirt and oil. Rinse the surface to remove the residue left from the cleaner.

Step 2 - Inject Sealant To Fill Cracks On The Floor

Fill cracks in the floor prior to the installation of the pebble flooring. You can inject a sealant into the cracks and allow it to dry more than 24 hours before you proceed to the next step.

Step 3 - Apply Epoxy Primer


Once dry, apply the epoxy primer on the floor and let it dry for an hour. Use a brush when applying the primer.

Step 4 - Mix The Pebbles With Epoxy Resin

Separately, mix the pebbles with the epoxy resin and spread the mixture across the floor until you have covered the floor completely. Let it dry for 24 hours.

Step 5 - Seal The Surface Of The Pebble Flooring

Apply a coat of varnish on the floor to smoothen the surface. Let it dry completely.