Saturday, April 30, 2016

How Does T-Molding Work?

T-molding is a transition piece that is needed to adjoin laminate to another type of hardsurface flooring. It is used to meet up to tile, wood or other types of laminate. Here are the basics of how t-molding works and what it does for you.

Expansion

One of the main purposes for t-molding is to allow laminate to expand and contract. As temperature and humidity changes occur, laminate will expand and contract accordingly. Around the outside of the room, you have to leave an expansion gap to accommodate this. When you meet another floor, you cannot leave a gap to walk over. Therefore, putting a t-molding in the gap, will help cover it up and allow the floor to expand.

Professional Finish

T-molding also provides you with a professional-looking finish to the floor. If you do not install a t-molding, you will have an unfinished edge to walk over. Laminate is a floating floor and does not actually attach to the sub floor. Therefore, if you do not put a t-mold in where it meets where one flooring type meets another, there will be nothing there to hold the edge of the laminate down. A t-molding helps hold the laminate in place and keep it from coming up.

Removing Limescale from Limestone Shower Tiles

Sometimes, Tile Doctor customers will have more than one tiled area in need of professional maintenance. At this house in Wandsworth, South London; I was commissioned to clean and seal firstly a Limestone tiled kitchen floor, and a Limestone tiled shower unit. Cleaning and Sealing a Limestone Read more...

Limestone Kitchen Floor and Shower Tiles Refinished in Wandsworth

Sometimes, Tile Doctor customers will have more than one tiled area in need of professional maintenance. At this house in Wandsworth, South London; I was commissioned to clean and seal firstly a Limestone tiled kitchen floor, and a Limestone tiled shower unit. Cleaning and Sealing a Limestone Kitchen Floor I started with the Limestone tiled kitchen floor which, like many other stone floors had not been treated to the correct regular care and had become dull and dirty over time as a result. Read more...

Friday, April 29, 2016

Polishing and Sealing Grey Limestone Floor Tiles

This beautiful Grey Limestone tiled floor in the small village of Barton had been installed by a tile company but had not been treated in any way. The customer had been told by the tile shop that the stone in question would have to be sealed. After doing her own research and finding us at Tile Read more...

Thursday, April 28, 2016

What Moisture Barrier Should You Use under Laminate Flooring?

Putting a moisture barrier underneath laminate flooring is essential if you are installing it over a concrete sub floor. Most manufacturers require it in order to maintain your warranties. Here are a few different kinds of moisture barriers that you could potentially use effectively. 

Visqueen Barrier

A visqueen vapor barrier is one type of moisture barrier that you could use underneath laminate flooring. This type of moisture barrier comes in rolls that typically cover 100 square feet or more. You simply unroll them and tape them to the floor. This will help to keep any moisture that comes up from the concrete from getting into the laminate core. Since laminate still has wood in the core, it can swell when moisture gets into it. The visqueen will effectively prevent anything from coming through into the laminate.

2-in-1 Pad

Something else that you could potentially put under a laminate floor is a 2-in-1 pad. This type of material is actually a combination of a laminate pad and a moisture barrier. They put both of these items together in one easy roll. They typically come in the same size rolls as the visqueen vapor barrier and are installed the same way. This just makes it easier as you do not also have to install a pad. 

Grey Limestone tiled floor Polished and Sealed in Barton

This beautiful Grey Limestone tiled floor in the small village of Barton had been installed by a tile company but had not been treated in any way. The customer had been told by the tile shop that the stone in question would have to be sealed. After doing her own research and finding us at Tile Doctor I went to see what could be achieved. Polishing a Limestone tiled floor As the floor was new I was able to get straight into polishing the Limestone with a set of four diamond encrusted Read more...

Wednesday, April 27, 2016

Deep Cleaning a Very Dirty Terracotta Floor

The old town of Halstead, Essex, meaning 'safe place' or 'place of refuge' in Old English, was the site of this job. Similarly, historic is the property I was called to, a fantastic seventeenth century thatched cottage, situated just on the outskirts of the town. The owner was keen to have her Read more...

Thursday, April 21, 2016

Heavily Soiled Terracotta Kitchen Floor Transformed in Penn

The new owner of this house in the very old and quaint English village of Penn, Buckinghamshire wanted to refresh the look of the Terracotta tiled kitchen floor before they moved in. It had suffered from a heavy soil build-up of dirt over time due to inadequate maintenance and ineffectual sealer. Since Terracotta (which came into popular use in the West in the 19th century) is highly porous, large amounts of dirt can become ingrained very quickly if not taken care of. Restoring this floor Read more...

To read more on this topic click here

Transforming a Terracotta Tiled Kitchen Floor

The new owner of this house in the very old and quaint English village of Penn, Buckinghamshire wanted to refresh the look of the Terracotta tiled kitchen floor before they moved in. It had suffered from a heavy soil build-up of dirt over time due to inadequate maintenance and ineffectual Read more...

Wednesday, April 20, 2016

How to Lay a Moisture Barrier under Laminate Flooring

There are different kinds of moisture barrier available in the market. All of which are satisfactory once applied and sealed appropriately, you too can easily do it on your own. Make sure that you select well the moisture barrier that suits your laminate flooring. Meanwhile, laminate flooring manufacturers have moisture barrier particularly designed to be used with their own products. The main objective of the moisture barrier paint is to hold moisture from reaching the material of the laminate flooring coming from the subfloor below. For instance on concrete subfloors, the moisture barrier installation is particularly important since concrete can grasp moisture and humidity for an extended time compared to other subflooring material. Laying a moisture barrier under laminate flooring eliminates the risk of moisture problems on account of moisture seeping into the main structure from underneath the laminate flooring.

What You'll Need
  • Moisture barrier
  • Closed cell foam
  • 4 mil poly or plastic
  • Foam padding
  • Measuring tape
  • Packing tape
  • Scissors

Step 1 – Prepare the Area

Consider the subfloor which supports your laminate flooring. If it is wood floors, you need to provide room for it to breathe in order to avoid moisture buildup. Also, if the subfloor is concrete, you have to cover the concrete floors with a moisture barrier to prohibit moisture from flowing up and reaching the laminate. Make sure that you scrub the subfloor well and it is already debris and dust free because it needs to be clean before laying the moisture barrier underneath the laminate floor. Cut off any poking nails and sand down the high spots in wooden subfloors. Meanwhile, you can apply a self-leveling compound, for concrete subfloors, to level out any valleys.

Step 2 – Choose the Moisture Barrier

Selecting the appropriate moisture barrier that you will be using is a must. Moisture barrier paint and liquid is the common choice because it holds enough moisture.

Step 3 – Apply Moisture Barrier

Cut out your moisture barrier and lay it on the subfloor, then fasten pieces together using packing tape. It is important to have the plastic pieces overlap by the minimum of 8 inches. You can also paint the entire exterior surfaces using moisture barrier paint. With that, you can slowly proceed with the application under the laminate flooring. Another method of application is to spray the exterior cavities of the subfloor using spray foam. This kind of foam must be a closed cell once you desired it as a moisture barrier. The moisture barrier will just level itself out. Begin with the farthest point of the room then toil your way out from the room.

Step 4 – Apply Fasteners

Once insulation is finished, you need to place a 4 mil poly or plastic up above the exterior parts of the subfloor, which is under the laminate flooring. Employ a minimal quantity of fasteners to install properly the barrier underneath. Ensure corners are movable enough to put on sheetrock for wall sheathing. Allow moisture barrier to fix for 24 hours.

Step 5 – Do the Final Set-Up

Ensure that the moisture barrier is properly installed to avoid any moisture later on. Take note that a liquid or paint moisture barrier has strong odor, which is why during applications windows and doors should be open to allow air to circulate. Employ odorless mineral spirits to get rid of moisture barriers stick on your hands.

Tuesday, April 19, 2016

Newly Laid Quarry Tiled Terrace Treated for Grout Haze in Dunstable

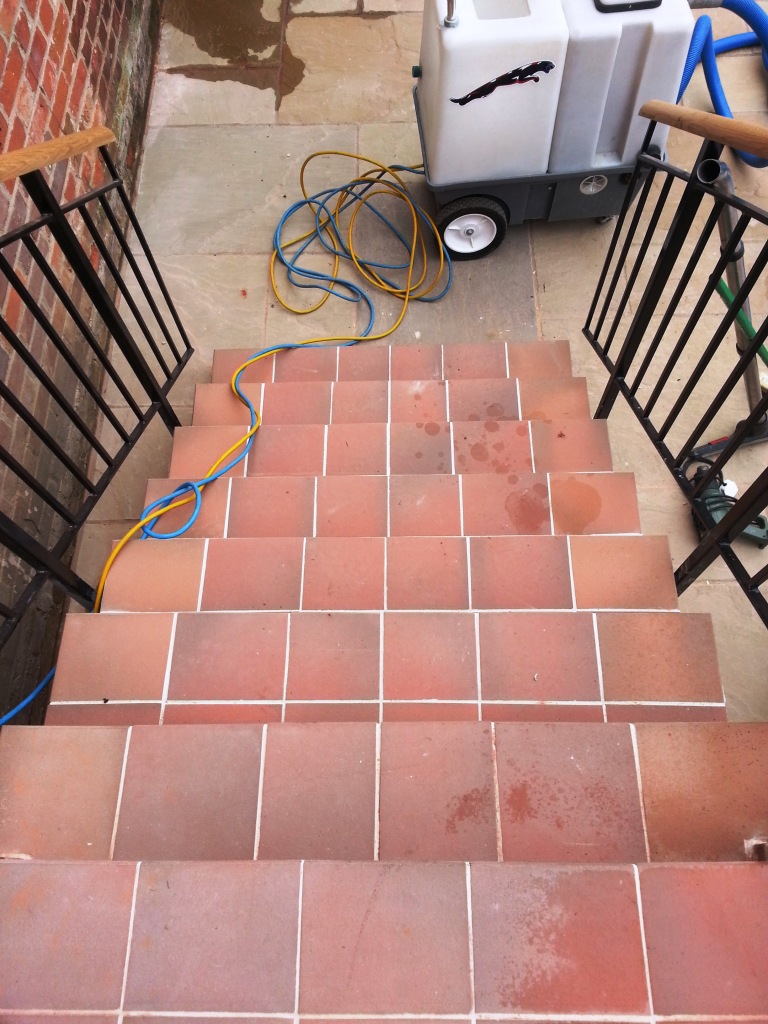
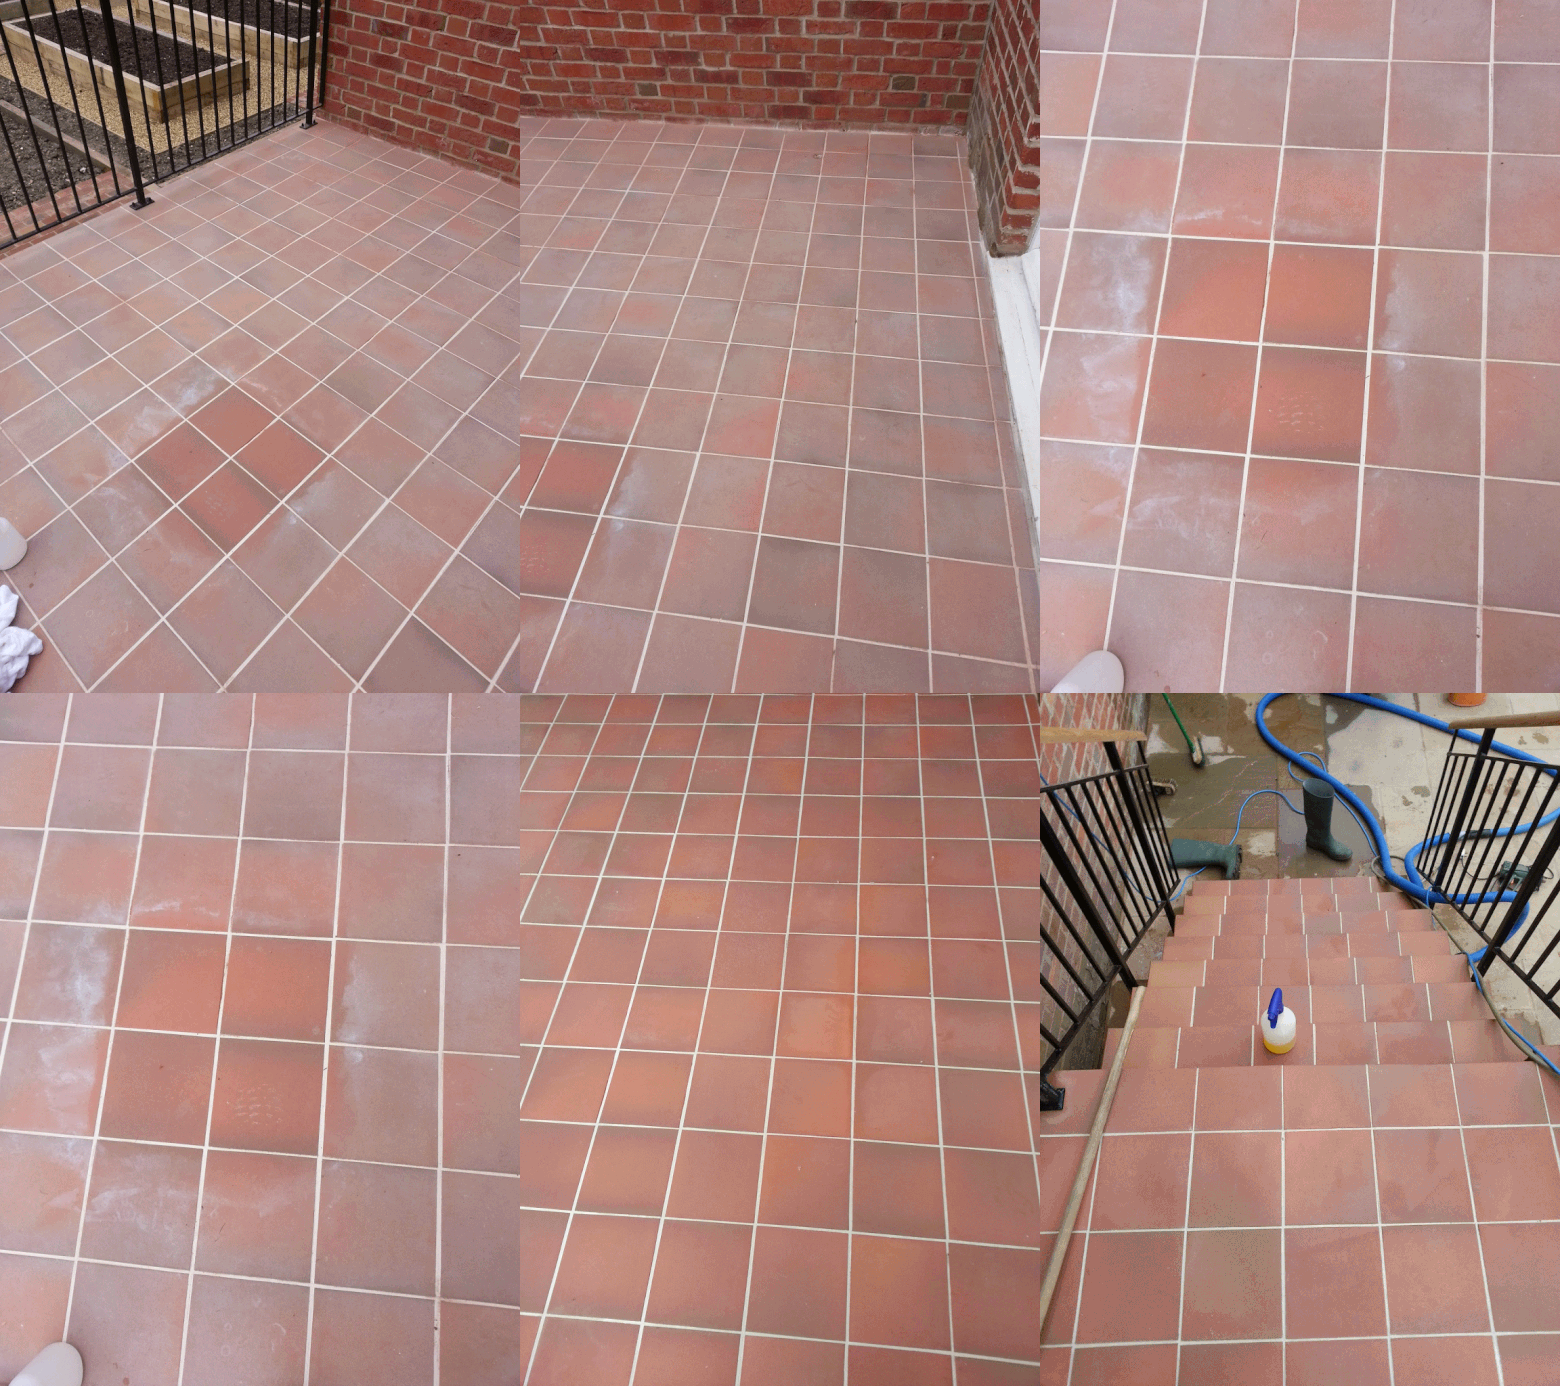
This customer had a fantastic rough heather set Quarry tiled terrace laid on the exterior of their property in Dunstable. While from a distance the tiles appeared to be in quite good condition, there was one very obvious problem. The customer, following the advice of the retailer - but against best practice and the advice of the installers - opted to use a polymer-based white grout. To worsen the problem, the tiles were also not sealed before grouting, resulting in a blotchy white appearance Read more...

Removing Grout Smears from newly laid Quarry Tiled Stairs

This customer had a fantastic rough heather set Quarry tiled terrace laid on the exterior of their property in Dunstable. While from a distance the tiles appeared to be in quite good condition, there was one very obvious problem. The customer, following the advice of the retailer - but against best practice and the advice of the installers - opted to use a polymer-based white grout. To worsen the problem, the tiles were also not sealed before grouting, resulting in a blotchy white appearance once dried.

Removing Grout Haze from Quarry Tiles Dunstable

This was a big problem, and needless to say the customer was eager to set the situation right. The customer contacted me and I travelled to the property to see what could be done. Although it was virtually impossible to remove the problem entirely, I was able to eliminate most of it and significantly improve the condition of the tiles. Here's how I did it:

Removing Grout Haze from Quarry Tiles Dunstable

Cleaning Badly Stained Quarry Tiles

Removing the blotchy white stains required the use of a number of different cleaning products, combined with lots of rinsing with clean water. My initial attempts involved firstly the application of Tile Doctor Remove and Go, before scrubbing it into the tiles. Remove and Go is a multi-purpose product that is often used to break down old sealers, adhesives and synthetic finishes, however, in this case it served to draw out the ingrained white stains. I followed this up with an application of Tile Doctor Acid Gel, which is a blend of Phosphoric and Hydrochloric acids in gel form used to treat grout smears and efflorescence. It is not recommended for use on acid sensitive stone such as Limestone and Marble as it can cause etching, but here it helped make some good progress with cleaning the Quarry tiles.

Removing Grout Haze from Quarry Tiles Dunstable

Even after a long period of cleaning, some of the particularly ingrained polymer refused to budge. My best option was to use Tile Doctor NanoTech HBU, which utilises nano-sized cleaning particles to penetrate deep into the stone to eliminate stubborn marks. The product was brushed into the Quarry tiles in combination with a steamer, achieving some good results. We then brought in a spinning tool fitted to our truck-mounted cleaning machine to thoroughly rinse the tiles, leaving them much improved.

Removing Grout Haze from Quarry Tiles Dunstable

We used air movers to dry the terrace off quickly in order to see the final result, which the customer was very pleased with, especially considering the extent of the staining. We then advised the client to wait until June or July to give the terrace another clean, along with a fresh seal using Tile Doctor Colour Grow, a colour enhancing, impregnating sealer which will improve the appearance even further.

Source: Quarry Tile and Stone Cleaning and Maintenance Service in Bedfordshire

Resolving Quarry Tile Installation Problems

This customer had a fantastic rough heather set Quarry tiled terrace laid on the exterior of their property in Dunstable. While from a distance the tiles appeared to be in quite good condition, there was one very obvious problem. The customer, following the advice of the retailer - but against Read more...

Monday, April 18, 2016

Damaged Victorian Hallway Restored in Cardiff

Pontcanna is a popular residential area in the western district of Cardiff, in South East Wales. Known for its rather large houses and spectacular foliage, interestingly enough roughly a quarter of the population are English folk. I was called down to a property in the area to take a look at a Read more...

Heavily Soiled and Damaged Victorian Tiled Hallway Restored in Pontcanna

Pontcanna is a popular residential area in the western district of Cardiff, in South East Wales. Known for its rather large houses and spectacular foliage, interestingly enough roughly a quarter of the population are English folk. I was called down to a property in the area to take a look at a Victorian tiled floor which was in quite poor condition. Along with the typical amount of dirt and muck seen on poorly maintained tiles, there were a number of missing tiles and a fair bit of cement Read more...

How to Peel and Stick Vinyl Plank Flooring

Vinyl plank flooring has quickly become one of the most popular types of flooring on the market today. With the realistic looks and level of durability that it can provide, it is really an appealing option for many people. Some types of vinyl plank flooring come with a peel and stick feature that makes installation extremely simple.

What You'll Need
  • Utility knife
  • Tape measure
  • Straightedge
  • Roller
  • Peel and stick vinyl plank flooring

Step 1- Calculate Flooring Needs

In order to properly install vinyl plank flooring in your home, you will first have to determine how much you need. With vinyl planks, this is very simple as you only need to know your square footage. Use your tape measure to get the dimensions of the rooms that you are covering. Take the length times the width for each room and multiply for the square footage. Add together the square footage from each individual room and then add 10 percent for overage. 

Step 2- Select the Planks

Once you know exactly how much you need, you can decide on what type of flooring you want. You could get a wood-look floor or vinyl planks that look like tile or natural stone. Spend some time and select the pattern that you want. 

Step 3- Acclimate the Planks

Once you have received the vinyl planks, allow them to sit in the environment in which they will be installed for 24 hours. This will allow the vinyl to expand and contract to the level that it will be after it is installed and prevent any gaps after installation.

Step 4- Prepare the Sub Floor

Make sure that the sub floor that you are planning on installing on is clean and free of debris. You should sweep and vacuum away any dirt and make sure that you have a smooth surface for the adhesive to stick to.

Step 5- Leave an Expansion

Start in one corner of the room and leave about 1/4 inch expansion gap around the outside edge. Vinyl planks will expand and contract, and this gap will allow it to move freely. You can cover up the gap with baseboards or quarter round after installation.
Step 6- Lay the Planks
Start by peeling off the protective layer of one of the planks and exposing the adhesive. Once you take off the protective layer, you should stick the vinyl plank to the floor immediately. Take the protective layer off of another plank and place it next to the first. It works best if you work in rows until you get all the way across a room.
Step 7- Finishing a Row
When you get to a wall, you will need to cut the planks to fit. Measure the distance between the last plank and the wall. Subtract 1/4 inch and mark that distance on a plank. Lay your straightedge down on the top of the plank. Run your utility knife across the plank, next to the straightedge so that you make a straight cut. You should now have a piece that fits perfectly between the wall and the last plank in the row with the small expansion gap. 
Step 8- Finishing Up
Continue laying row after row until the floor is complete. You can then install baseboards or quarter round around the outside to cover up the gap between the vinyl and the wall. Your floor should now be ready to walk on. 

Friday, April 15, 2016

Slate Tiles Cleaned and Sealed to Restore Condition and Lustre in Hampton

Slate tiles have been in use for centuries, often chosen for roofing and both interior and exterior flooring due to their hard-wearing nature. While the popularity of the material perhaps peaked a hundred or more years ago, punctuated by the so-called "Slate boom" in 1870s Europe, it is still seen used en masse in large construction projects globally, and Slate tiled floors remain a feature of many houses in the UK, both old and new. Despite its natural durability, Slate still requires Read more...

Putting the Lustre back on Slate Tiled Flooring

Slate tiles have been in use for centuries, often chosen for roofing and both interior and exterior flooring due to their hard-wearing nature. While the popularity of the material perhaps peaked a hundred or more years ago, punctuated by the so-called "Slate boom" in 1870s Europe, it is still Read more...

Thursday, April 14, 2016

Fill in Gaps Between Poorly Laid Vinyl Plank Flooring

Installing vinyl plank flooring can be an effective way of installing cheaper flooring while retaining the look and feel of a wood floor. However, putting in this flooring is an art form, and sometimes gaps can appear between poorly laid boards. If you have this problem, then you may be wondering what you can do, both to improve the look of your vinyl plank flooring and also to fill in gaps that can allow cold to enter from the subfloor.

Apply Epoxy

If you have fairly small gaps, then one solution would be to pour a water-proof epoxy resin into the gaps. Only a tiny amount should be needed for each gap, just enough to cover the surface and ensure that the holes are filled. Small gaps can also be filled in using a grout, by simply smearing this on, and then painting it the same shade as the vinyl flooring.

For Larger Holes

Larger holes may require more severe action, such as putting in small pieces of wood or plastic into the gaps, and sealing using a glue bond. If you have any spare vinyl left over from your flooring, cut this into the right shape, and then seal into place. You can also use varnished wood, which can be painted black to complete the wood floor effect.

Tuesday, April 12, 2016

Victorian Tiled Path Restored in North London

At first sight, this Victorian tiled pathway in Palmers Green, N13 did not appear to need too many repairs, with just a few obvious broken and loose tiles to be fixed. On closer inspection however it became clear it was in need of a deep clean and fresh seal. Repairing, Cleaning and Sealing Read more...

To read more on this topic click here

Restoration of an Extremely Dirty Yorkstone Tiled Floor in Brighton

This Yorkstone tiled kitchen floor at a house in Brightonhad been hidden under 18 months worth of accumulated builders work, intended to get the property ready for new occupancy. As you might expect, the tiles were extremely dirty, caked in layers of dust and muck left over from months of brickwork. The site manager asked me to come down to the house on the South Coast to clean and seal the Yorkstone tiles before the new homeowner moved in. It should be noted that Yorkstone is a tightly Read more...

Monday, April 11, 2016

Restoring Yorkstone Tiled Flooring after Builders

This Yorkstone tiled kitchen floor at a house in Brightonhad been hidden under 18 months worth of accumulated builders work, intended to get the property ready for new occupancy. As you might expect, the tiles were extremely dirty, caked in layers of dust and muck left over from months of brickwork. The site manager asked me to come down to the house on the South Coast to clean and seal the Yorkstone tiles before the new homeowner moved in. It should be noted that Yorkstone is a tightly Read more...

Tired Victorian and Edwardian Tiles Rejuvenated in Palmers Green

At first sight, this Victorian tiled pathway in Palmers Green, N13 did not appear to need too many repairs, with just a few obvious broken and loose tiles to be fixed. On closer inspection however it became clear it was in need of a deep clean and fresh seal. Repairing, Cleaning and Sealing Victorian Tiles To start, we applied Tile Doctor Remove & Go across the entire length of the pathway to break down and strip off the old sealer and provide an initial clean. In the more stubborn and Read more...

To read more on this topic click here

Restoring Tiled Flooring after Builders have been

This Yorkstone tiled kitchen floor at a house in Brightonhad been hidden under 18 months worth of accumulated builders work, intended to get the property ready for new occupancy. As you might expect, the tiles were extremely dirty, caked in layers of dust and muck left over from months of brickwork. The site manager asked me to come down to the house on the South Coast to clean and seal the Yorkstone tiles before the new homeowner moved in.
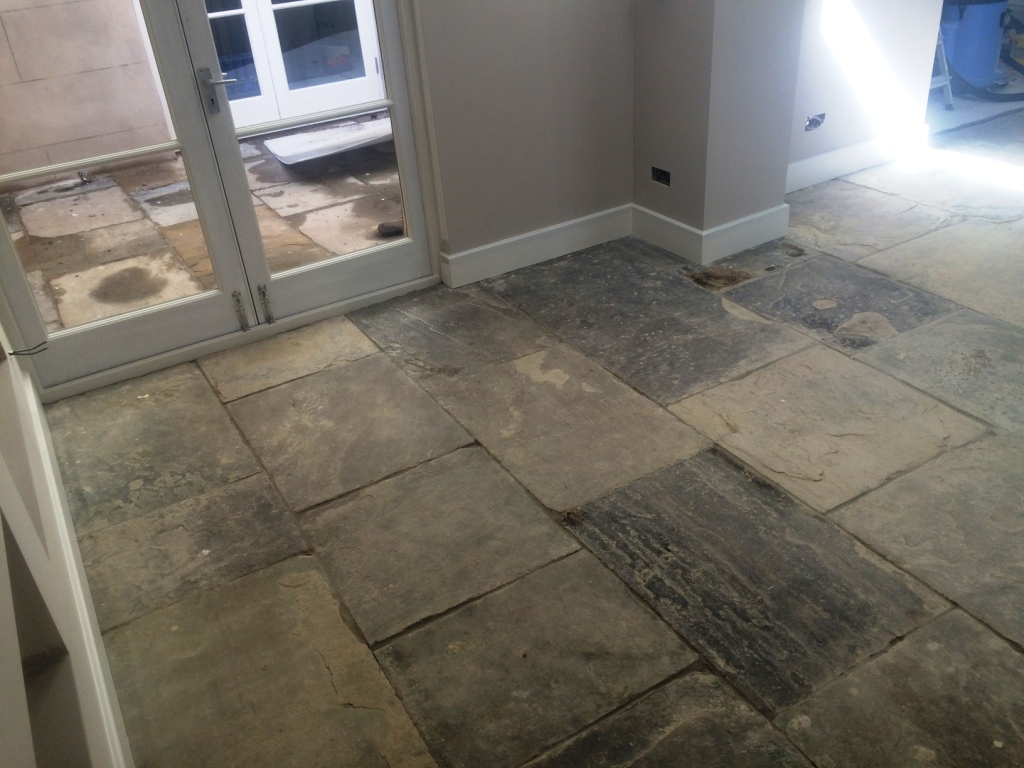
Yorkstone Kitchen Floor Before Cleaning Brighton
It should be noted that Yorkstone is a tightly grained variation of Sandstone, named as such due to being worked in Yorkshire quarries since medieval times. Thanks to its hard wearing nature and being reasonably inexpensive, it is still popularly used for interior and exterior furnishing, construction and landscaping across the globe.

Cleaning a Filthy Yorkstone Tiled Floor

To clear the floor ready to be cleaned, I firstly vacuumed up the excess layers of dust and muck using my strong wet/dry vacuum. Then, I applied a solution of Tile Doctor Remove and Go stripper, mixed with a dash of Tile Doctor Grout Clean Up. This would break down any old sealer and remove the stubbornest muck, while also cleansing the grout at the same time. Next, I attached a coarse 200 grit pad to my buffing machine and set to work eradicating the subsequent layers of muck. Almost immediately a brown sludge developed, which I promptly removed with the wet/dry vacuum. Stopping first to rinse the floor with clean water, I proceeded with the buffering process, this time with my bristly patio cleaner attachment, which was coarser still to ensure the difficult dirt was completely broken down. Finally, I rinsed the floor again with more clean water to remove any excess cleaning slurry, and then left it to dry.
Yorkstone Kitchen Floor During Cleaning Brighton

Sealing a Yorkstone Tiled Floor

Three days later, once all moisture had evaporated, I returned to the property to seal the floor. I did so by applying an initial coat of Tile Doctor Colour Grow sealer, which is designed enhanced the depth of colours. Colour Grow soaks into the pores of the stone to prevent dirt from becoming trapped within, making it particularly suitable for use on other types of porous stone, such as Limestone. As the stones were particularly riven, I carefully filled in the gaps with a paint brush, thus ensuring that the sealer covered the entire surface area. After the first coat had dried, I applied another. An hour later this too was dry and the site manager appeared, quite evidently pleased with the results.
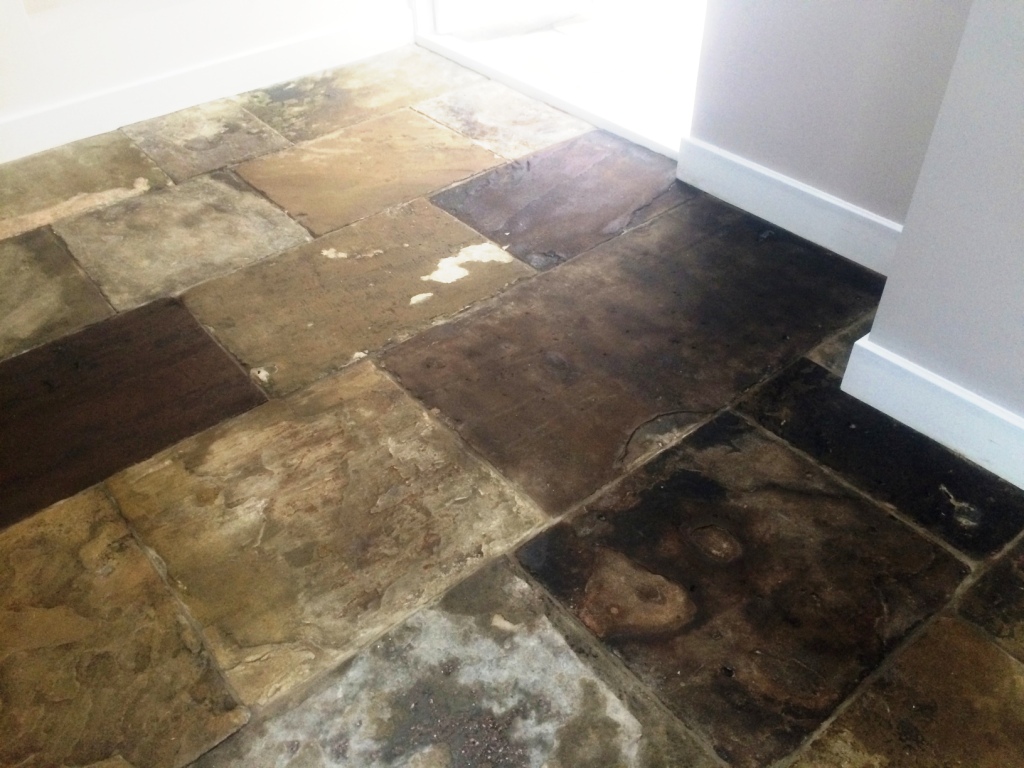
Yorkstone Kitchen Floor After Sealing Brighton
He commented that it looked amazing and he couldn't believe the colour range on show, especially since they had the tiles had been hidden for so longer under thick layers of muck. Thankfully, this is no longer the case, and this floor is ready to be enjoyed by the new homeowner.     Source: Sandstone Tile and Stone Cleaning and Maintenance Service in East Sussex

Sunday, April 10, 2016

Maintaining A Slate Kitchen Floor In Shepperton

This slate floor was installed in the kitchen and adjacent dining area of this house in Shepperton, Middlesex and now as with all sealed floors the sealer had worn down and the floor was becoming difficult to clean leaving it looking dull and uninviting. To remedy the old sealer would need to be stripped off, the floor deep cleaned and a fresh seal applied. I suspect the sealer had been eroded prematurely by the use of harsh cleaning chemicals and a steam cleaner. This had destroyed the Read more...

Saturday, April 9, 2016

Getting the Best From Slate Flooring

This slate floor was installed in the kitchen and adjacent dining area of this house in Shepperton, Middlesex and now as with all sealed floors the sealer had worn down and the floor was becoming difficult to clean leaving it looking dull and uninviting. To remedy the old sealer would need to be Read more...

How to Install Vinyl Plank Flooring Over Tile

Vinyl plank flooring can provide you with one of the best flooring options around. You can use it in any room in the house and it does not suffer from some of the limitations that come with other floors. It can be installed in wet areas, will not scratch as easily as wood, and is softer underfoot. One of the great things about vinyl planks is that you can install them over the top of many other floors. You can even install it over the top of tile. This allows you to avoid the painstaking process of taking up tile and save you a lot of time and money. Here are the basics of how to install vinyl plank flooring over the top of tile. 

What You'll Need
  • Trowel or paint roller
  • Floor patch
  • Vinyl adhesive
  • Utility knife
  • Straightedge
  • Tape measure
  • Roller

Step 1- Determine Amount of Flooring Needed
The first thing that you need to do is figure out exactly how much vinyl you need. Since the flooring comes in planks, you only need to determine the square footage of the room and add 10%. Take your tape measure and get the dimensions of the room that you are planning on installing in. Multiply the length and the width of the room to get the square footage and then add 10% for waste.
Step 2- Order the Materials
Go to your preferred flooring store and order the materials. You will need to order the vinyl planks that you prefer as well as the adhesive that is appropriate for the job. Many vinyl planks are now installed with a pressure sensitive adhesive that is specific to each brand of vinyl. Therefore, you will most likely have to special order the floor and the adhesive. 
Step 3- Acclimate the Planks
Once your vinyl arrives, you need to pick it up and bring it to the house at least a day before you install it. Vinyl can expand and contract a bit depending on the temperature and needs to acclimate to the environment that it will be installed in. Otherwise, you could find some gaps in the floor after you have installed it. 
Step 4- Prepare the Tile Floor
You will need to level out the tile floor in order to apply the vinyl to it. By using floor patch and a trowel, you can fill the gaps in between the tile and level everything out. Coat the entire floor with this leveling compound to give yourself a clean slate to work with. Allow it to sufficiently dry before installing the planks.
Step 5- Apply the Adhesive
If you have a pressure sensitive adhesive, you should be able to just roll it onto the floor with a paint roller. If you are using a different type of glue, you might have to trowel it onto the floor. 
Step 6- Install the Planks
Apply the planks one at a time starting from a corner of the room and working out. Cut the planks by using the straightedge and the utility knife to fit the room.

Tuesday, April 5, 2016

Getting the Best From Indian Fosil Flagstones

This Indian Fossil Sandstone tiled floor in Skipton was in a terrible state. Indian Sandstone, sometimes known as Indian Sandstone Flags, are an alternative to Yorkshire Sandstone (or 'Yorkstone'), which is known for being particular hard wearing and high quality. Nonetheless, the problems with the floor were not due to the quality of the stone, per say. Rather, the floor's poor condition was caused by a lack of sealer, allowing the floor - and by extension the entire house - to become very Read more...

Indian Fossil Stone Floor in Terrible Condition Restored in Skipton

This Indian Fossil Sandstone tiled floor in Skipton was in a terrible state. Indian Sandstone, sometimes known as Indian Sandstone Flags, are an alternative to Yorkshire Sandstone (or 'Yorkstone'), which is known for being particular hard wearing and high quality. Nonetheless, the problems with the floor were not due to the quality of the stone, per say. Rather, the floor's poor condition was caused by a lack of sealer, allowing the floor - and by extension the entire house - to become very Read more...

Monday, April 4, 2016

How To Get The Best Ffrom Sandstone Flagstones

This Indian Fossil Sandstone tiled floor in Skipton was in a terrible state. Indian Sandstone, sometimes known as Indian Sandstone Flags, are an alternative to Yorkshire Sandstone (or 'Yorkstone'), which is known for being particular hard wearing and high quality.

Indian Fossil Stone floor Before Cleaning in Skipton
Nonetheless, the problems with the floor were not due to the quality of the stone, per say. Rather, the floor's poor condition was caused by a lack of sealer, allowing the floor - and by extension the entire house - to become very dusty. In addition, the grout lines had been pointed with cement and sand instead of normal grout, which simply made the floor look messy and poorly cared for.

Indian Fossil Stone floor Before Cleaning in Skipton

I was called down to the property to set the situation right by providing a deep clean and fresh seal.

Cleaning an Indian Fossil Sandstone Floor

I started the job by dealing with the unsightly cement splashes around the grout lines, breaking them down manually using a good old fashioned hammer and chisel. Nonetheless, my main concern around the grout lines was the grout haze caused by the excess cement. To neutralise the haze I carefully treated the grout lines with a phosphoric acid cleaner known as Tile Doctor Grout Clean Up, this product removes mineral deposits such as excess cement leaving the surface looking a lot tidier. The floor was then rinsed with water to remove the acid cleaner. To round off the cleaning process, I mixed a solution of one part Tile Doctor Pro Clean to four parts clean water, before applying it to the tiles and scrubbing it in with a black pad fitted to a rotary machine. This helped to remove the ingrained dirt caused by a lack of sealer and clean the area ready to receive a fresh seal.

Sealing an Indian Fossil Sandstone Floor

I left the property to allow the floor to dry over night. Upon my return the next day, I checked for excess moisture and, once satisfied the floor was dry, I proceeded to seal the floor with four coats of Tile Doctor Seal & Go.

Indian Fossil Stone floor After Cleaning in Skipton

Seal & Go is a water-based topical sealer designed to build up stain resistant protection on the surface of the floor and to allow moisture vapour transmission. It is typically used to seal internal, unsealed porous surfaces, including Sandstone, Quarry and Victorian tiled floors.

Indian Fossil Stone floor After Cleaning in Skipton

Given the awful original condition of this floor, the results achieved over the space of two days were very good. Certainly my customer was very pleased with the transformation. The addition of a robust surface seal will go a long way to ensure the floor doesn't fall back into such a bad state again.    


Source: Sandstone Tile and Stone Cleaning and Maintenance Service in North Yorkshire

Yorkshire Flagstones Cleaned and Sealed in Hebden Bridge

The photographs below are of an 18m2 Yorkshire Stone floor in the kitchen of a barn conversion in the village of Hebden Bridge. The flagstones which appeared to be various shades of dark grey had lost any colour and vitality they once had, in fact they only seemed to come alive when wet and once dry the natural features and colours of the Yorkshire stone faded away. This was caused by the sealer being worn away allowing dirt to become ingrained in the stone making it difficult to properly Read more...

Large Area of Limestone Tiled Flooring Burnished in Uckfield

This customer owned a large house in Uckfield, East Grinstead with honed Limestone tiled flooring throughout the whole downstairs, which comprised the living room, dining room and kitchen. The Limestone floor was in good condition and had been treated to regular professional care, however, the customer wanted the floor to be pristine and I was asked to further refine the appearance of the floor. Limestone is a very tough stone so this is done primarily through the process of burnishing Read more...

Sunday, April 3, 2016

Maintaining A Large Pristine Honed Limestone Floor

This customer owned a large house in Uckfield, East Grinstead with honed Limestone tiled flooring throughout the whole downstairs, which comprised the living room, dining room and kitchen. The Limestone floor was in good condition and had been treated to regular professional care, however, the Read more...

Laying Laminate Click Flooring in 7 Steps

Laminate click flooring is quickly becoming a popular choice for flooring for many homeowners. They have the beautiful look of hardwood without the hassles of upkeep and maintenance. They are easier to keep clean and don’t look much different than traditional hardwood. With a little elbow grease most people can install click flooring in their homes without the need for a professional.

What You'll Need
  • Tape measure
  • Pencil
  • Floor underlay
  • Saw
  • Straight edge
  • Surface grinder
  • Wide tape
  • Kick boards
  • Quarter inch spacers
  • Quarter round boards
  • Hammer
  • Finishing nails
  • Puller tool

Step 1- Check the Subfloor

You will want to use the long straight edge you have to ensure that the concrete floor is flat. You will also want to make sure there are no cracks or dips. Mark any low areas you find with a pencil.
Go back and fill in the areas that lie lower with a self leveling compound. Follow the manufacturers directions for dry time.

Step 2- Polish Floor

Now you can use the surface grinder to polish any spots that may sit higher than they should. Use a damp towel to wipe any dust that is left behind from the grinding.

Step 3- Door Frames

Place a small piece of click laminate flush with the bottom of the door frame. Mark the frame directly above the laminate. You will want to cut the bottom of the door frame at this mark so the door won’t grind on the floor.

Step 4- Install Underlay

Every brand of click laminate will be a little different. You will need to read the directions provided so you have a better understanding of how to lay the floor. You will also need to install any underlay that the manufacturer recommends before you start to lay the floor.

Once that is done you can decide where you are going to start laying the floor. The underlay needs to be installed in the same direction and the same starting point as the actual floor. Use the wide tape you have to tape the seams down. Allow an extra two inches of underlay outside the perimeter of the floor. You will want to do this in small sections to make it easier on you.

Step 5- Find the Number of Planks

Measure the width of the room and divide that by the width of the plank. This will give you the number of planks you will need. If the number you get isn’t a whole number just divide that fraction by two. This will give you the width of the first and last row of planks and will give you what you need so you can cut those planks.

Step 6- Start Installing

Use your quarter inch spacer between the first plank and the wall. The second row plank will need to be held up at a small angle facing away from the first plank. Press the second plank into the first one so that the tops of both planks touch each other. Rotate the second one downward until you hear it click in.

Continue laying the planks in this manner. Make sure you use a staggered pattern. The puller tool will need to be used on the last row. The tool will give you a snug fit and help you ensure the quarter inch space between the last row and the wall.

Step 7- Finishing the Job

Finish the project by using your round trim around the perimeter of the floor. This will hide the quarter inch space allowance. Miter the ends of the trim for the corners. Nail it to the wall, and use putty to cover the nail holes when you’re done.

Pros and Cons of Hardwood vs Laminate Flooring

Are you looking at the differences between hardwood vs laminate flooring? If you are currently on the search for a new floor and you are unsure whether to choose a laminate or a hardwood, here are a few things to consider.

Manufacturing Characteristics

Laminate flooring is made with 4 different layers, where each of the layers are designed to do a specific job. One layer may provide the flooring pattern, whereas another layer may provide durability. Laminate is made from different materials including resin, responsible for making sure the laminate lasts and wears well. As a contrast, wood flooring is either engineered, or not engineered. If it is man-made, then it is likely to be manufactured with several layers that include the pre-finish shine and sometimes you will find a wood floor made with renewable sources. 

Installation and Repair Characteristics

Laminate floors tend to be a little easier to initially install. However, that being said, wood floors can always be repaired. Laminate floors are not a surface that can easily be repaired. If you have dogs or cats in the house, you may want to consider a hardwood floor over a laminate floor surface.

Durability

If not installed properly, the laminate will shift over your concrete floor and you will see 'cracking' in between some of the tiling. Some of your wood flooring that is exposed to UV rays, over time will change color and become a much lighter finish. With proper care, and with a routine maintenance or refinishing plan, your hardwood floors will last a lifetime.

Friday, April 1, 2016

Quarry Hallway Restored in East Sussex

Here's a quick job I completed in the coastal town of Eastbourne in East Sussex. While more commonly I am asked to work on entire floors, this customer was specifically interested in restoring a small doorway-like area with Quarry tiled flooring, the reason being that it had been covered for a Read more...

Small Quarry Tiled Area Restored in Eastbourne

Here's a quick job I completed in the coastal town of Eastbourne in East Sussex. While more commonly I am asked to work on entire floors, this customer was specifically interested in restoring a small doorway-like area with Quarry tiled flooring, the reason being that it had been covered for a long time by an old wardrobe and dog basket. As a result, the area had not been properly cared for, becoming very dusty and dirty. Also revealed were some unsightly splashes of white paint from Read more...