Friday, October 6, 2017

Maintaining a Victorian Tiled Hallway Floor in Cheshire

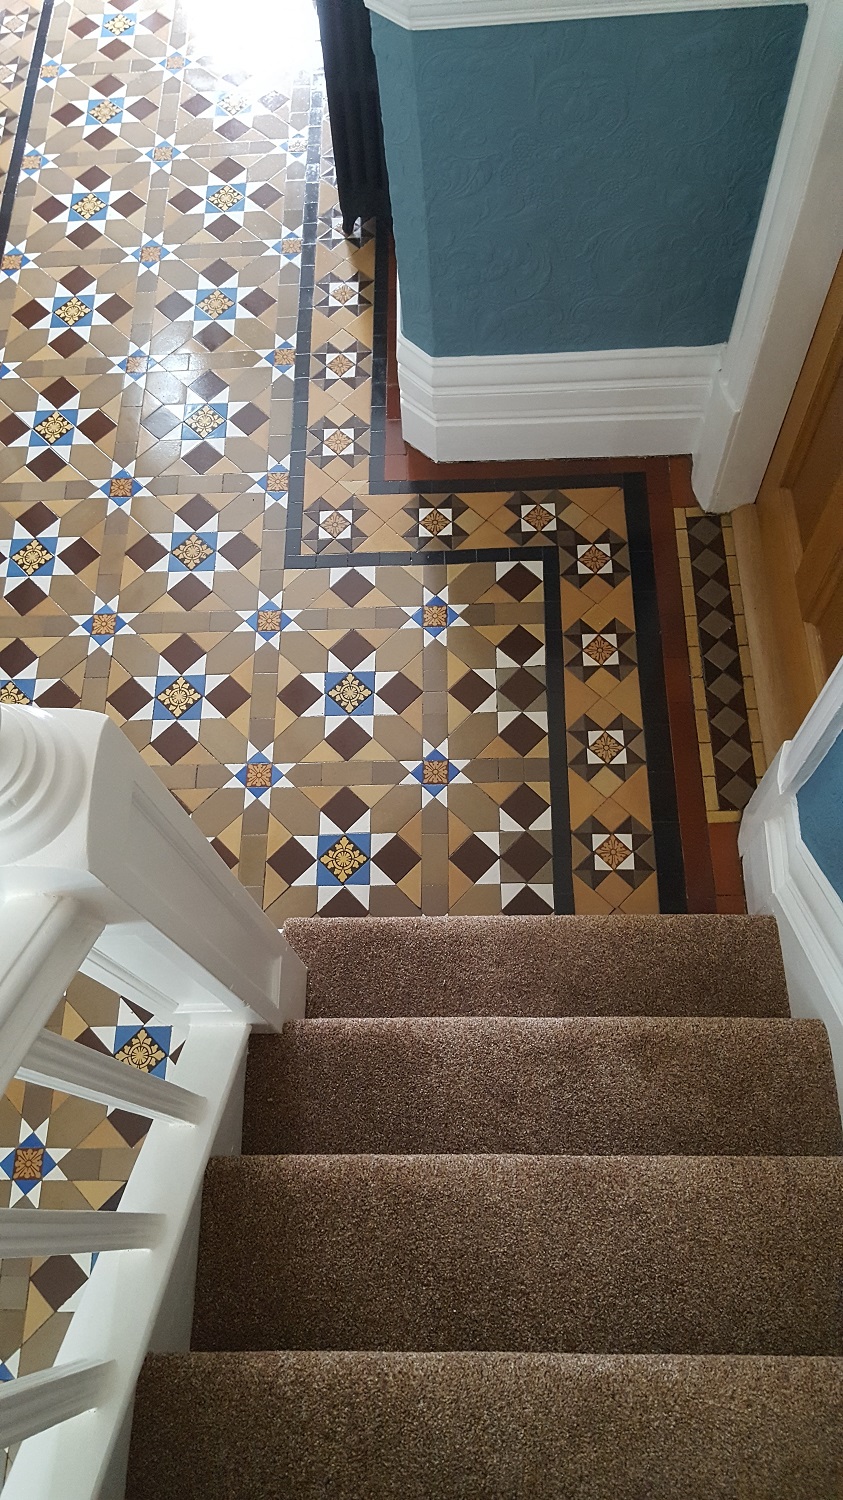
The village of Grappenhall has a long history that goes all the way back to the bronze age and as a result has all periods of architecture including quite a lot of houses with Victorian tiled hallways . This particular floor at a house in the village had been well looked after well by the owner but had now lost its vibrancy, was looking dull and now needed a deep clean and reseal

Victorian tiles are porous and so need to be sealed to protect them from dirt becoming ingrained in the floor. However, hallway floors get a lot of foot traffic which over time wears down the sealer until it becomes so thin and patchy it’s no longer effective. As a result, you need to regularly top up the sealer or every three to four years it will need to be stripped off and reapplied.

Victorian Tiled Hallway Grapenhall Before Cleaning Victorian Tiled Hallway Grapenhall Before Cleaning


Deep Cleaning the Victorian Tiled Floor

I used clear plastic to protect the wood skirting boards from splashing and then gave the tiles a good scrub with a mixture of Tile Doctor Pro-Clean and Remove and Go to deep clean and strip off any remaining sealers. The cleaning solution was left to soak in for ten minutes before scrubbing it in with a black pad fitted to a heavy buffing machine.

Once the whole area had been scrubbed I rinsed off with water which was then extracted using a wet vacuum. With the floor now clear I was able to inspect it to ensure all the previous sealer and ingrained dirt had been removed. Any areas with stubborn stains were spot treated by reapplying the cleaning concoction I used earlier before leaving the floor to dry off fully overnight.

Sealing the Victorian Tiled Floor

When I returned the next morning my first job was to test the tiles for damp using a damp meter. This is important as damp tiles won’t take the sealer as well as dry tiles, however this time everything was fine. I then proceeded to seal the Victorian tiles with a single coat of Tile Doctor Colour Grow to enhance the natural colours in the tile before applying a further seven coats of Tile Doctor Seal and Go which leaves a sheen finish and is ideal for Victorian tiles.

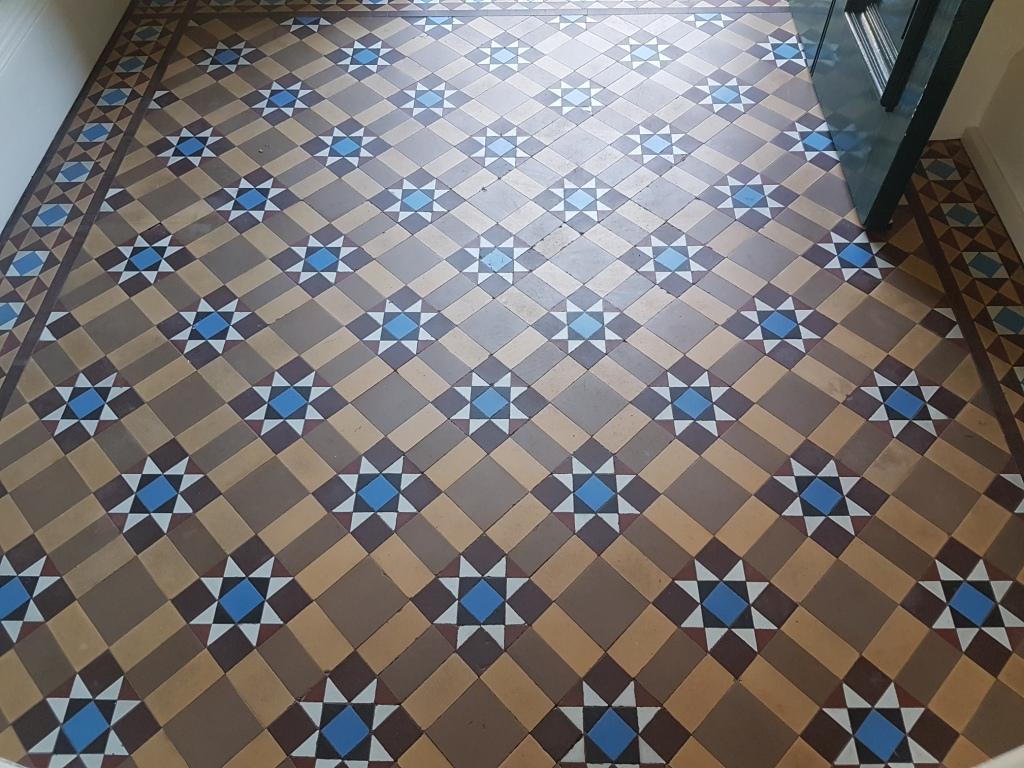
Victorian Tiled Hallway Grapenhall After Cleaning Victorian Tiled Hallway Grapenhall After Cleaning

The hallway now looks fantastic and vibrant and then new sealer will protect them from ingrained dirt making them easier to clean and keep them looking good for some time to come.


Source: Victorian Tile Cleaning and Renovation Service in Cheshire

Wednesday, October 4, 2017

How to Apply Vinyl Tiling to Bathroom Walls

Vinyl tiling is a very versatile covering for floors, walls, countertops, and anything else you want to be able to clean easily. Most of the time, vinyl covering is found on bathroom floors. However, this peel and stick type of covering can also be used to decorate, and finish off, the bathroom walls. This type of vinyl is not only very easy to clean, but also comes in a wide variety of colors, designs, and shapes. With an almost unending supply of designs, you are sure to find the exact match for your home. Here are some steps to take in applying vinyl tiling to your bathroom walls.

What You'll Need:
  • Vinyl Tiling
  • Tile Adhesive
  • Rubber Roller
  • Utility Knife
  • Tape Measure
  • Chalk Line
  • Bucket/Water/Detergent

Step 1: Clean Wall
The first step to covering your wall with vinyl tiling is to clean them as thoroughly as you can. This is the most important part of the entire process. If there is any type of dirt, debris, or residue from other wall covering, the adhesive will not stick very well, and there will be little bumps throughout the vinyl tiling. To clean the wall use a mild detergent with warm water. Wipe the wall with a sponge and then dry with a clean rag or towel.

Step 2: Find Center of Wall
Once the wall has been cleaned of any type of dirt and debris you can begin to lay out the vinyl tiling for your bathroom wall. To do that you need to find the center point of the wall. Measure both the height and the width of the wall in order to find this location. Snap a chalk line for both the vertical and horizontal direction. By doing this you are making sure that you use more full pieces of vinyl tiling.

Step 3: Set First Tiles
Vinyl tiling is very easy to stick onto a wall. Most types of vinyl tiling have peel-and-stick backing, but will still require that some adhesive be applied. Start at the center of the wall. This is where you will stick four pieces of vinyl tiling along each of the axis points. Spread out a thin layer of adhesive with a notched trowel, peel off the backing of the vinyl, and position it in place. Do this with all four pieces.

Step 4: Continue Setting Vinyl Tiling
With the first parts in place, use a level to ensure that they are going in a straight line along both the horizontal and vertical points. Continue setting the tiles in the same method until you get to the wall area where some trimming will be needed.

Step 5: Trim Vinyl Tiling
Once you get to the edge of the wall you will need to do a little bit of trimming of the vinyl tiling to make them fit. Set a tile on the wall in position and mark where it needs to be cut. You can also measure the opening and then transfer it to the tile. Use a utility knife to make the cut. Set the tile on the wall.

Step 6: Roll Out Vinyl Tiling
Place a rubber roller on the tiling and make sure that they all make contact with the adhesive.


Sunday, October 1, 2017

Restoring Quarry Tiles Covered in Cement Screed

The owner of this Quarry tiles floor at a house in Swansea had expended much effort in its restoration and feeling exhausted decided to call in their local Tile Doctor to finish it off.

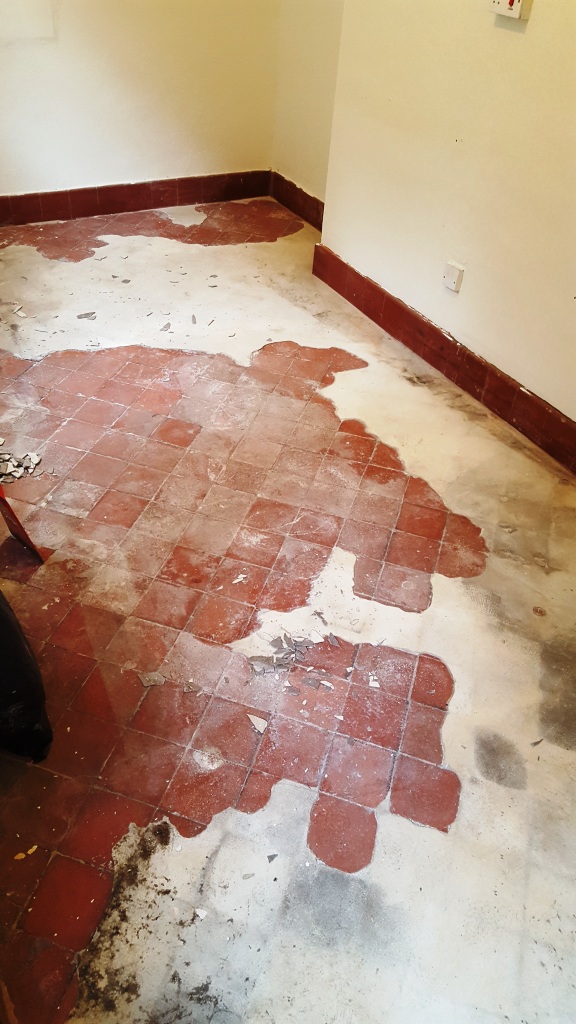
Quarry Tiles in Swansea Covered in Cement Compound Quarry Tiles in Swansea Covered in Cement Compound

I never saw the original flooring but I could see it had been covered by some sort of cement screed which had probably been used, judging by the imprints, to support large carpet tiles. I’ve come across a few floors like this, you can’t simply put carpet over a tiled surface as tiles can be slightly convex in shape and the grout lines result in dips forming in the carpet so as a result a floor levelling compound is usually applied beforehand.

After doing a cleaning sample and a test to see how stubborn the cement compound was to remove I agreed with the customer that it was possible and showing her the test results, she was happy to proceed with the work.

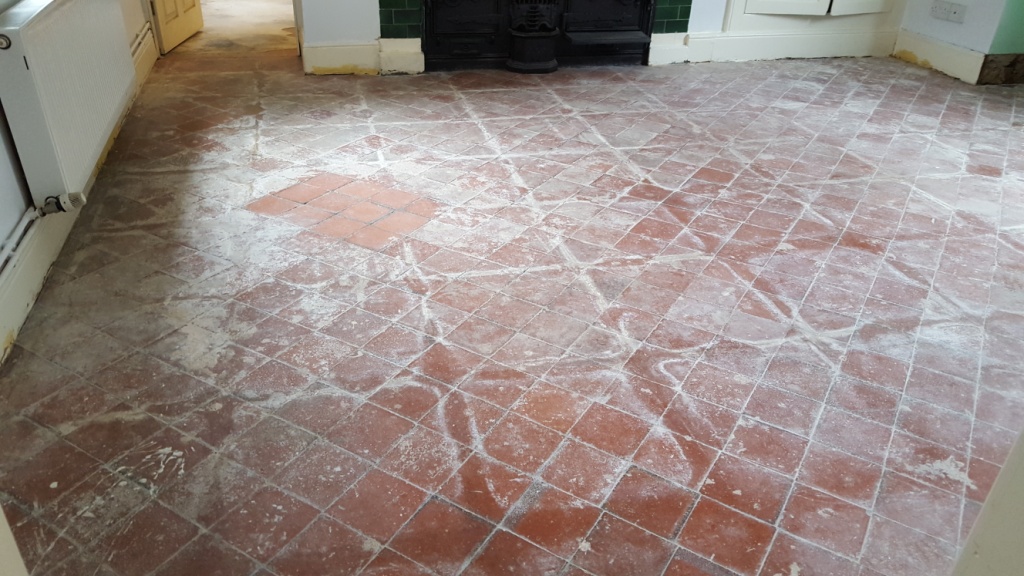
Quarry Tiles in Swansea Covered in Cement Compound Showing Test Clean

Removing Cement from a Quarry Tiled Floor

Before starting I took a few moisture readings with a handheld damp meter, I always recommend doing this at the start as it gives you a baseline reading that can be used to determine the floor has dried and ready for sealing later. Most old floors don’t have a damp proof membrane installed and so if the moisture readings were high I would recommend coming back to seal the floor at a warmer part of the year.

The first step was to remove all the cement compound from the surface of the tiles and then scrape as much paint and plaster off the tiles before cleaning with an undiluted mixture of Tile Doctor Pro-Clean and Remove and Go. This combination of two different products make a great team; Pro-Clean is a versatile, high alkaline cleaner that is used to deal with reasonably heavy soil build-up on natural stone and Tile. Remove and Go, also safe to use on natural stone and tile is specially formulated to remove old coatings including paint and old sealers.

Quarry Tiles in Swansea Removing Cement Compound

This solution was applied to the floor and, working in small sections, I scrubbed it into the tiles using a rotating scrubbing machine fitted with a nylon brush attachment; it was also scrubbed into the grout using a stiff brush. The floor was then rinsed, and the resulting cleaning slurry was vacuumed away using a wet-vax machine.

The final stage of the cleaning process was to run over the tiles with a coarse 200 grit diamond pad together with Grout Clean-up which is another Tile Doctor product that removes mineral deposits such as old grout and cement smears. After a final rinse I could see the all the cement had been removed and the Quarry tiles were looking much healthier and ready for sealing.

Quarry Tiles in Swansea With Cement Compound Removed

Sealing a Quarry Tiled Floor

I left the floor to dry out overnight with the aid of heater fans and all doors closed to keep it warm. When I returned the next day, I retested the floor for moisture and compared the initial readings to confirm the floor was ready for sealing.

The Quarry tiles were quite porous so to seal the Quarry tiles, I eventually used eight coats of Tile Doctor Seal & Go which not only provides a protective covering but also enhances the colours of tiles especially old red quarry floor tiles.

Quarry Tiles in Swansea After Restoration

The customer was thrilled with the results of the floor and was so impressed told me she was going to recommend Tile Doctor to her friends.


Source: Quarry Tile and Grout Cleaning and Restoration Service in South Wales

Wednesday, September 27, 2017

How to Cut Vinyl Flooring Tiles

Whenever you lay vinyl flooring in your kitchen or bathroom, you will always need to cut some tiles to fit around cabinets, pillars or doorways. Learn some ways to make cutting vinyl floor tiles easier, neater and safer for yourself.

Vinyl Composition Tile Cutter
If you are tiling the floor of a large kitchen or basement recreation area, rent a special cutter for vinyl tile. It has an L-shaped platform and measuring guides for accurate cuts. The sharp sliding cutter will slice through 9- or 12-inch tiles, and also cuts tiles diagonally.

Utility Knife
Practice using a straight-edged metal ruler and a utility knife before you start the job. Warm the tile with a heat gun before cutting till it is flexible in your two hands, then lay it down on a warm flat surface and cut with firm, steady pressure on the utility knife. Change the utility knife's blade frequently to keep from snagging or shredding the tile.

Minimize the Amount of Tile Cutting
Plan your tile layout on paper before you start placing tile on the floor. A well-planned layout starting in one corner helps you use mostly full-sized tiles. You may have to cut just a few near a doorway or against the lower cupboard base.


Monday, September 25, 2017

Restoring a Faded Victorian Tiled Porch in Scotland

Edinburgh became an increasingly important city in the UK during the Victorian period. Although overtaken by Glasgow as Scotland’s largest city in the early 19th century, Edinburgh experienced expansion and industrialisation, and many areas which had been populated by Georgian architecture were rebuilt with Victorian buildings. Of course, this included many Victorian residential properties, many of which are still inhabited, and still have original Victorian tiled flooring. A lot of property owners choose to keep the original tiles rather than strip them out, and we specialise in restoring and maintaining them. I recently visited a property in Edinburgh to provide a deep clean and fresh seal for some Victorian porch tiles that were looking a bit worse for wear. The job was carried out over the space of two days.

Victorian Porch Entrance Before Cleaning Edinburgh

Cleaning Original Victorian Tiles

On the first day of work, I arrived at the property and immediately began by stripping the floor of any old sealant. Sealers don’t last forever and are worn away over time requiring them to be routinely topped up with a fresh application, however in this case the sealer had worn off completely in most places allowing dirt to become ingrained in the pores of the tile, so the only course of action would be to strip off what was left, clean the floor and reseal. The old sealant was removed using a strong solution of our natural stone cleaner and stripper, known as Tile Doctor Pro-Clean, and our heavy-duty sealer and coating remover, known as Tile Doctor Remove and Go. This combination of products was applied and scrubbed into the stone using a black buffing pad fitted to a rotary machine. The floor was then rinsed to remove any excess chemical residue and the moisture was soaked up. Next, the floor was then burnished using a coarse diamond-encrusted burnishing pad to grind off tough stains and rinsed again with fresh water. Tile Doctor Neutral Tile Cleaner, which is an excellent pH-neutral cleaner for routine maintenance, was then used to complete the cleaning process and the tiles were left to dry completely overnight.

Sealing Original Victorian Tiles

On the second day of work, the tiles had dried off nicely overnight and I was able to return to the property to seal the tiles using five coats of Tile Doctor Seal and Go. This is a topical sealer which provides a high-quality low-sheen finish and protection against ingrained dirt and stains. In this case, the customer had opted for a sheen finish as opposed to a natural-look, matte finish. Comparing the before and after photos, it’s clear how significant a difference routine maintenance can make to the appearance and condition of these original Victorian tiles. The customer was very pleased with the outcome and I recommended the use of our Neutral Tile Cleaner for frequent cleaning in the future. Being PH neutral it won’t prematurely erode the sealer like many acidic supermarket products.

Victorian Porch Entrance After Cleaning Edinburgh


Source: Victorian Tiled Floor Cleaning and Restoration Service in Edinburgh

Saturday, September 23, 2017

Remove Mold and Mildew from Vinyl Flooring

While vinyl flooring is affordable, sturdy, resilient, and durable, mildew can damage this type of flooring, causing unpleasant odors, and even damage to your home foundation if it is not kept in check. Therefore, cleaning your vinyl floors frequently is important.

As you clean your floor, make sure that your body does not come into contact with mold. Wear long pants, long sleeves, a face mask and goggles to protect your skin and lungs. It is also important that you select a cleaning agent that is non-toxic and safe for your skin. White vinegar is a good alternatives to bleach or commercial cleaners because it produces an environment that is too acidic for mold to survive. Another alternative is boric acid, although boric acid is toxic if swallowed. If you go with boric acid or vinegar, mix your cleaning solution with one part vinegar or boric acid to four parts water.

What You'll Need:
  • Broom
  • Dust Pan
  • Garbage Pail
  • Bucket
  • Strong Bristle Scrub Brush
  • Rubber Gloves
  • Small Scrub Brush or Toothbrush
  • Water
  • Bleach or another Oxygenated Cleaner
  • Paper Towels or ClothTowels
  • Super Absorbent Cloth
  • Clean Scrub Brush
  • Spray Bottle Filled With Mildew Stain Remover
  • Sponge Mop
  • Clean Sponge
Step 1 - Clear the Floor
Remove furniture, carpet mats, and other such items from your floor. Sweep the floor and empty the contents from your dust pan into a garbage pail.

Step 2 - Mix Your Cleaning Solution
Fill your bucket with 1 part household cleaning detergent and 5 parts water. A good alternative to use is bleach. If you are not comfortable with bleach, you can also try a commercial oxygenated cleaner.

Step 3 - Start Scrubbing
Rub the floor vigorously with a strong-bristle scrub brush. Immerse the scrub brush several times into the solution and continue scrubbing. Use a small brush or a toothbrush to scrub mold that may be hiding in nooks, crannies, and corners.

Step 4 - Soak Up the Water
Use paper towels or cloth towels to soak up all of the excess water. Discard your paper towels or wash your towels in the washing machine. Be sure to wash them separately so that the bleach or cleaning solution does not come into contact with anything else. 

Step 5 - Scrub Some More
Using a clean scrub brush, scrub the floor completely again, but this time use only clean water. Work in sections and wipe up the moisture with a super absorbent cloth or towel.

Step 6 - Allow Your Floor To Dry
Leave the floor exposed to the air to dry completely.

Step 7 - Spray with Mildew Stain Remover Or Bleach
Use a spray bottle to spray the floor with a mildew stain remover. Let it sit for 2 to 3 minutes to activate. Rub the floor with a sponge mop to spread the stain remover evenly. Let it dry.

Step 8 - Rinse Your Floor
Use clean water and a sponge to rinse off the mildew stain remover. Cover the floor section by section, until you have treated the entire floor. 

Step 9 - Let Your Floor Dry

Allow your floor to dry completely before putting anything back on it.


Tuesday, September 19, 2017

Dealing with Multiple Tile Problems at a Leeds Property

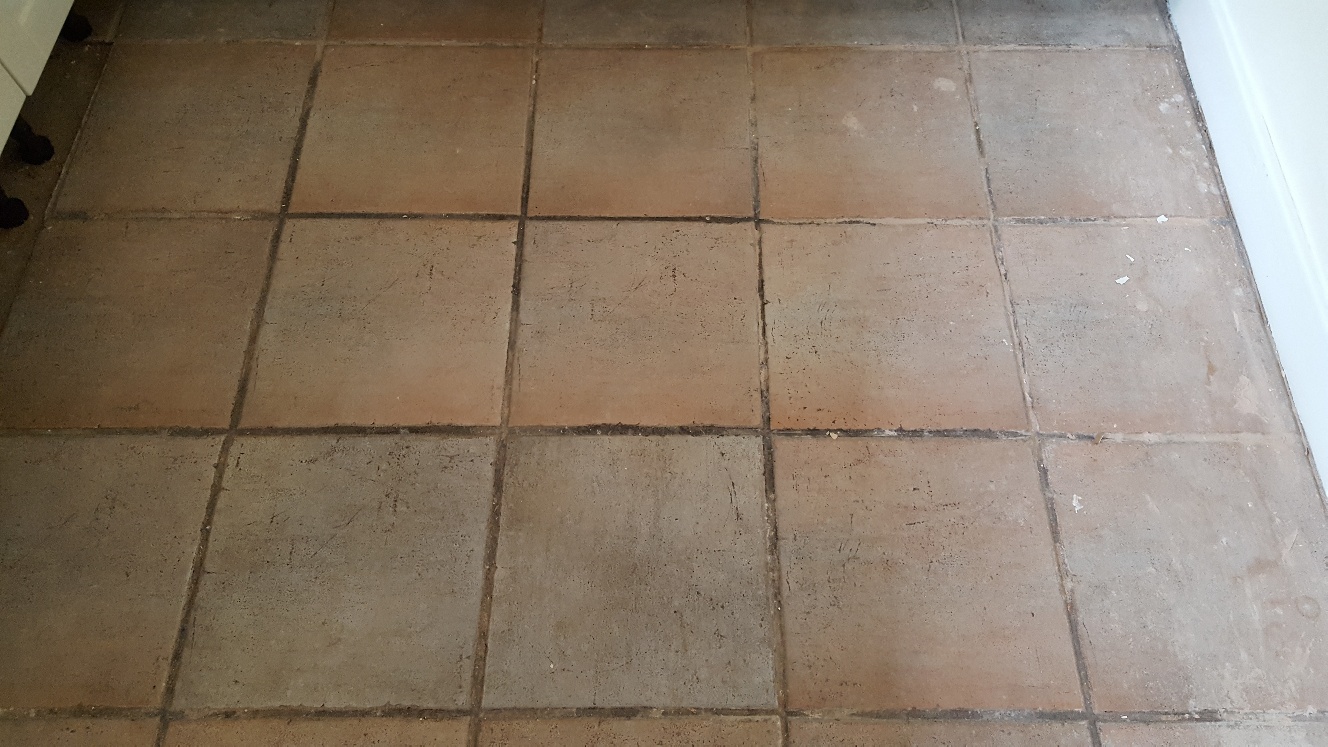
At Tile Doctor, we have completed a wide variety of restoration jobs, from very large floors in hotels and restaurants to smaller floors in kitchens and bathrooms. We also often work on different surface types, including shower cubicles and stone or tiled window sills. I recently visited the small village of Sherburn-in-Elmet in Leeds to complete two small, but very different, jobs for a customer. The first was the restoration of a Ceramic tiled kitchen floor that was really looking worse for wear. The grout lines had accumulated a lot of dirt over the years and the tiles themselves had been stained by what appeared to be plaster dust.

Ceramic Floor Tiles Before Cleaning in Sherburn in Elmet Kitchen

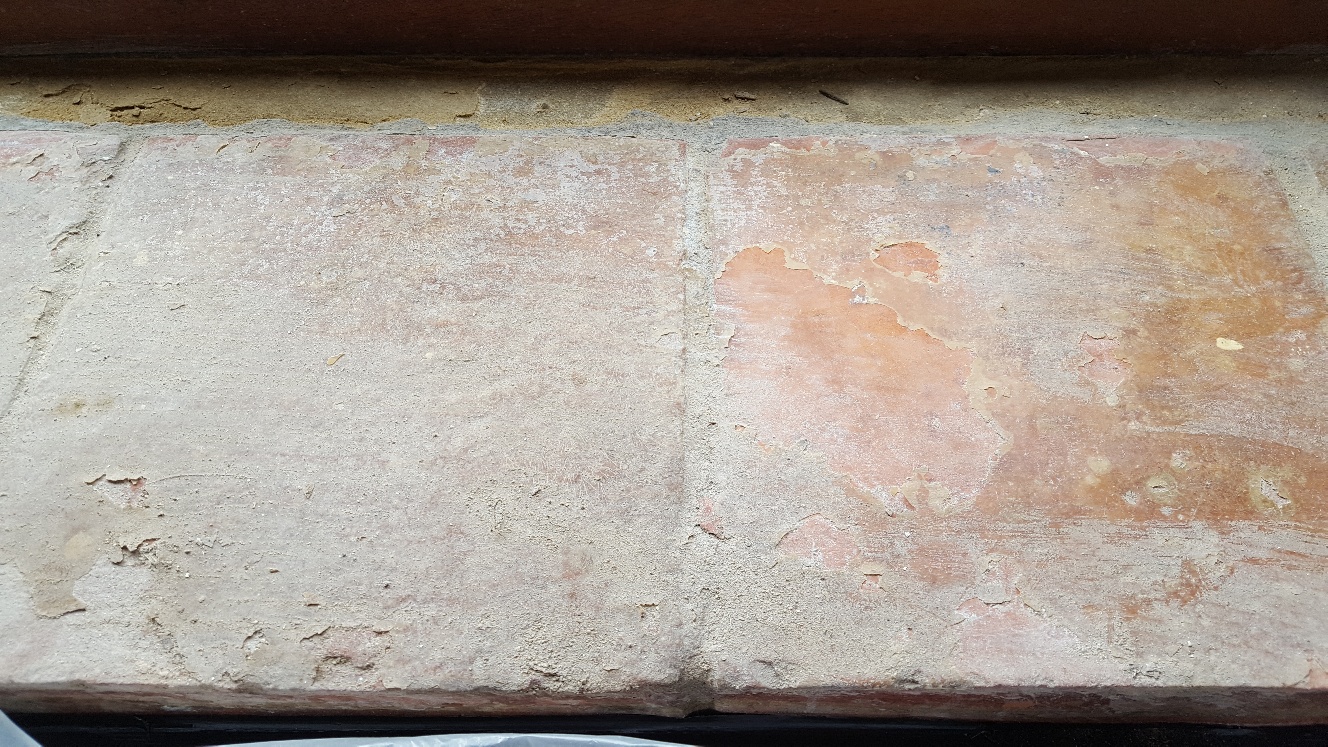
The second was the restoration of several window sills made from Catalan-style Terracotta. The stone had originally been covered in four to six coats of Yacht Varnish, which had left an unsightly white crusted covering. Naturally, the customer was keen to see the sills restored to their original, natural look.

Catalan Terracotta Window Sill Sherburn in Elmet Before Cleaning

Cleaning a Ceramic Tiled Kitchen Floor

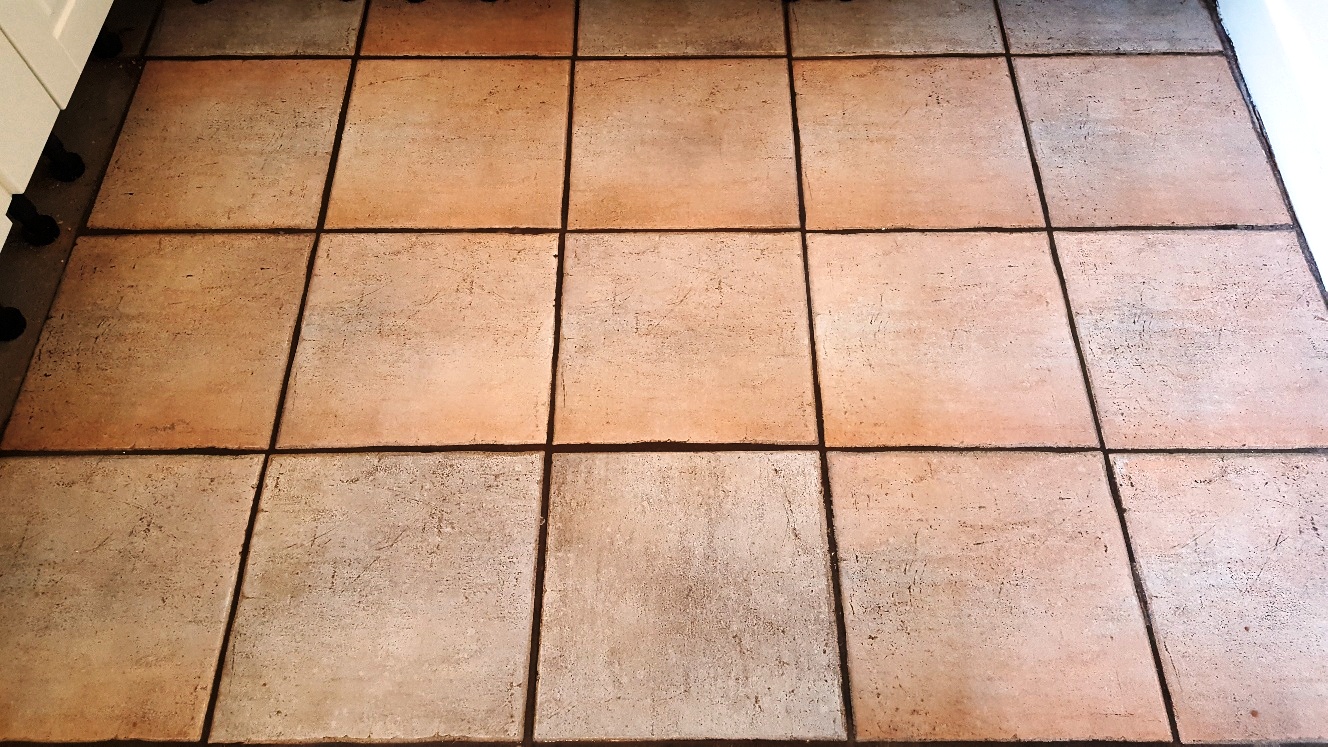
After removing the kickboards from underneath the kitchen units, I used a handheld scrapper and a wire brush to manually remove most of the plaster dust. Next, I applied a solution of Tile Doctor Pro-Clean, which is a high alkaline tile and grout cleaner, across the floor. By scrubbing the Pro-Clean into the tiles and grout I removed all the dirt and staining. As the tiles were fully glazed Ceramic, they did not need to be sealed.

Ceramic Floor Tiles After Cleaning in Sherburn in Elmet Kitchen

Cleaning and Sealing Terracotta Window Sills

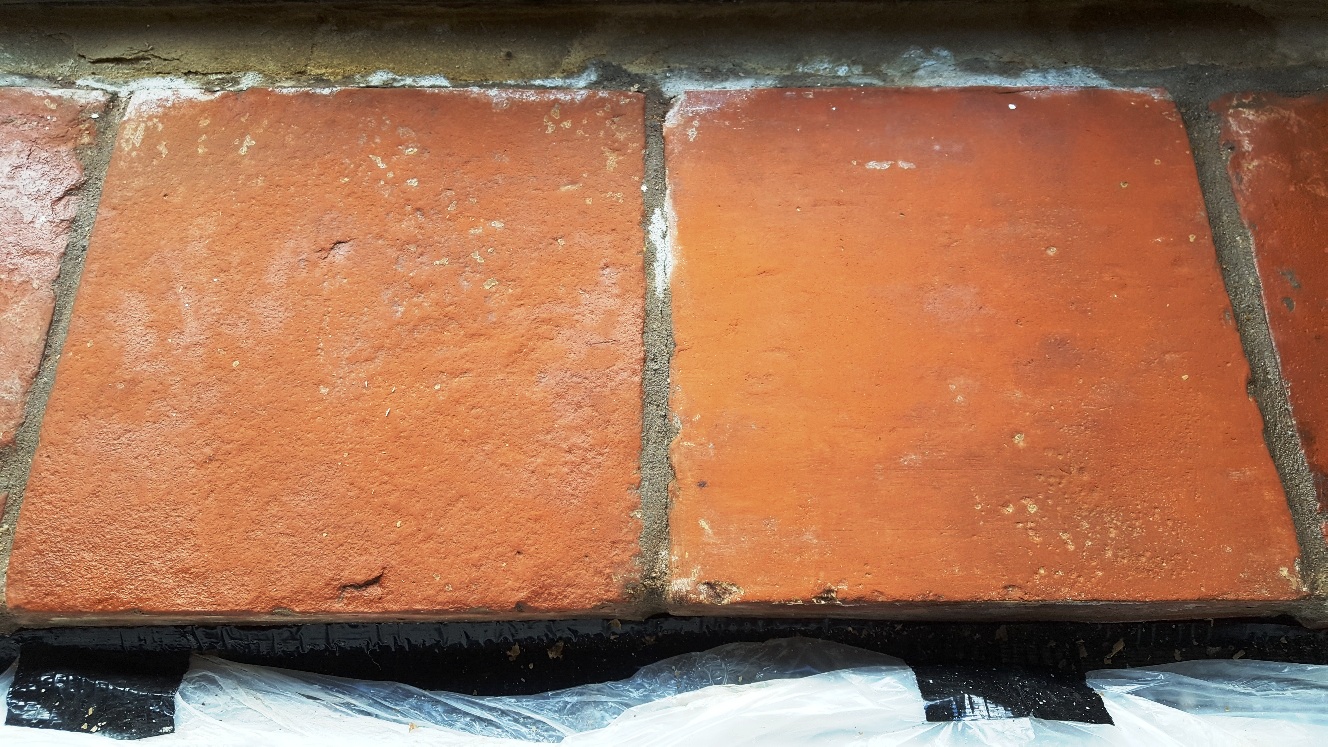
The white crusted powder covering the Catalan Terracotta window sills was caused by Yacht Varnish, which would need to be removed before I could properly clean the stone below. I removed it using a combination of Tile Doctor Remove and Go, which is a heavy-duty stripper, and Tile Doctor NanoTech HBU, a powerful cleaner which uses nano-sized particles penetrates difficult-to-reach areas. Together they make a powerful stripper/cleaning solution. This solution was left to work its magic for two hours, before I applied a handheld scrapper and wire brush to remove the white coating. Next, I rinsed the sills with water and then deep cleaned them again with Tile Doctor Pro-Clean. The window sills were subsequently left to dry off completely overnight. I popped back to the property the next day to seal them with two coats of Tile Doctor Colour Grow, an impregnating sealer which intensified the natural shades in the stone and provided a natural-looking matte finish.

Catalan Terracotta Window Sill Sherburn in Elmet After Cleaning

Two quick jobs completed to a high standard and one very satisfied customer.


Source: Terracotta Tiled Floor Cleaning and Restoration Service in Yorkshire