Friday, December 31, 2021

Making a Polished Concrete Floor

 It’s safe to say the industrial look is here to stay. Many of the highlighted materials included in the style are the same ones that have been used in construction for over 100 years. The difference now is that we don’t put a façade over them but rather allow the iron, steel, and concrete to show off all their natural appeal.

But that doesn’t mean they need to look raw or unrefined. Polished concrete floors are sleek and elegant, and blend with almost any design style for your home.

What You'll Need:

  • Concrete (optional)
  •  Concrete polisher w/vacuum attachment
  •  Metal bonded diamond sanding wheels of varying grits
  •  Polymer bonded diamond sanding wheels of varying grits
  •  Epoxy concrete repair
  •  Concrete densifier
  •  Concrete sealer
  •  As ALWAYS proper safety gear, including eye protection and gloves.


Step 1 - Pour Your Slab

Actually, this is a lot of work with a lot of equipment that merits a step-by-step article of its own. Your average DIYer should start with an existing slab. If you're an advanced DIYer starting your building project literally from the ground up, make sure you have all the necessary permits in hand before starting.

Mark out the boundary of your slab, check the level, and excavate as necessary. Create a solid base of compacted gravel. Frame out the form with dimensional lumber. You may need rebar reinforcements, especially on the perimeter.

Pour the premixed concrete into the form. Distribute the concrete into all the areas of the form. Screed it level to the top of the form using a 2x4. Use an edger to round the edges of the slab. Cut in control joints with a straight edge and a groover.

Let the concrete cure a little longer, then use a float to smooth it further. The concrete should continue to cure for three to four days, and can be misted with water and covered with plastic to keep it from cracking. After this point, remove the form, build a room around it, and get to polishing.


Step 2 - Prep Your Concrete and Your Space

If you’re pouring your own slab, it should be in pretty good shape, but if you’re polishing a pre-existing piece of concrete, this is the time to check things over for repairs and maintenance. Any large issues, like dried construction adhesive, should be removed at this time. The polishing process will create a lot of dust, so it’s best to keep things clean. Make sure the room you’re working on is properly separated from the rest of the living area with dust barriers.


Step 3 - The First Pass

If there’s already a finish on the concrete, it will be removed by the first pass with a concrete polisher. This tool is a walk-behind machine with sanding and polishing discs spinning at the bottom. It's rentable at many home improvement stores. Make sure you get one with an attached vacuum for dust control.

The polishing of the concrete starts with the heaviest grit metal bonded diamond disc. This will remove any finishes and small flaws on your slab. Take your time with each pass, overlapping slightly so there are no bare patches. This method will be the approach for the entire process.

Once the first pass is finished, inspect for more flaws exposed by the grinding. Use epoxy concrete repair to fill any cracks or blemishes.


Step 4 - Heavy Metal Grinding

Now that the first pass on the slab is done and the flaws are repaired, it’s time to work your way through the metal bonded diamond disc grits, going from heavy to light. Again, take your time with each pass, keeping an eye on how the surface is being removed. You may need to replace the discs in order to keep things fresh before you’re ready to step down to the next level.

If the polisher you rented doesn’t get all the way to the edges of your room, you’ll need to rent a separate edger so everything is even. Like everything else in this process, don’t rush and don’t skip a step. Because the polished look is so refined, it’ll reveal where you’ve skimped.

Continue on with the metal bonded discs, using finer and finer grit until you get the concrete to the desired level of smoothness.


Step 5 - Concrete Densifier and Polymer Polishing

With the heavy grinding done, you're almost ready to move on to polishing. But before that, there’s an important step that will add years to your polished concrete, and make it much easier to maintain. A liquid concrete densifier should be applied to the entire floor.

This material soaks into the concrete, bonding with it and making it denser. This surface is harder and will take a polish more readily.

Once the densifier is dry, mount the polymer-bonded diamond discs to the concrete grinder and start polishing. Like the last process, go down from heavier to lighter grits, taking your time with each pass, until the concrete reaches the desired level of polish.


Step 6 - Finish the Finish

Now that your floor is at the level of shine desired, you can apply a concrete sealer. This step is optional because the slab should be quite hard from the densifier, but the sealer will help in keeping the concrete clean.

Maintaining your polished concrete is simple. A microfiber cloth sweeping can take care of light dust and dirt. Wet mopping, either with clear water or a floor cleaner, can be used for heavier trafficked areas. Other than that, the concrete should give you years of durable use.

A simple process can take a basic building material like concrete and make it shine, producing a durable design element that can fit with nearly any style.


Sunday, December 19, 2021

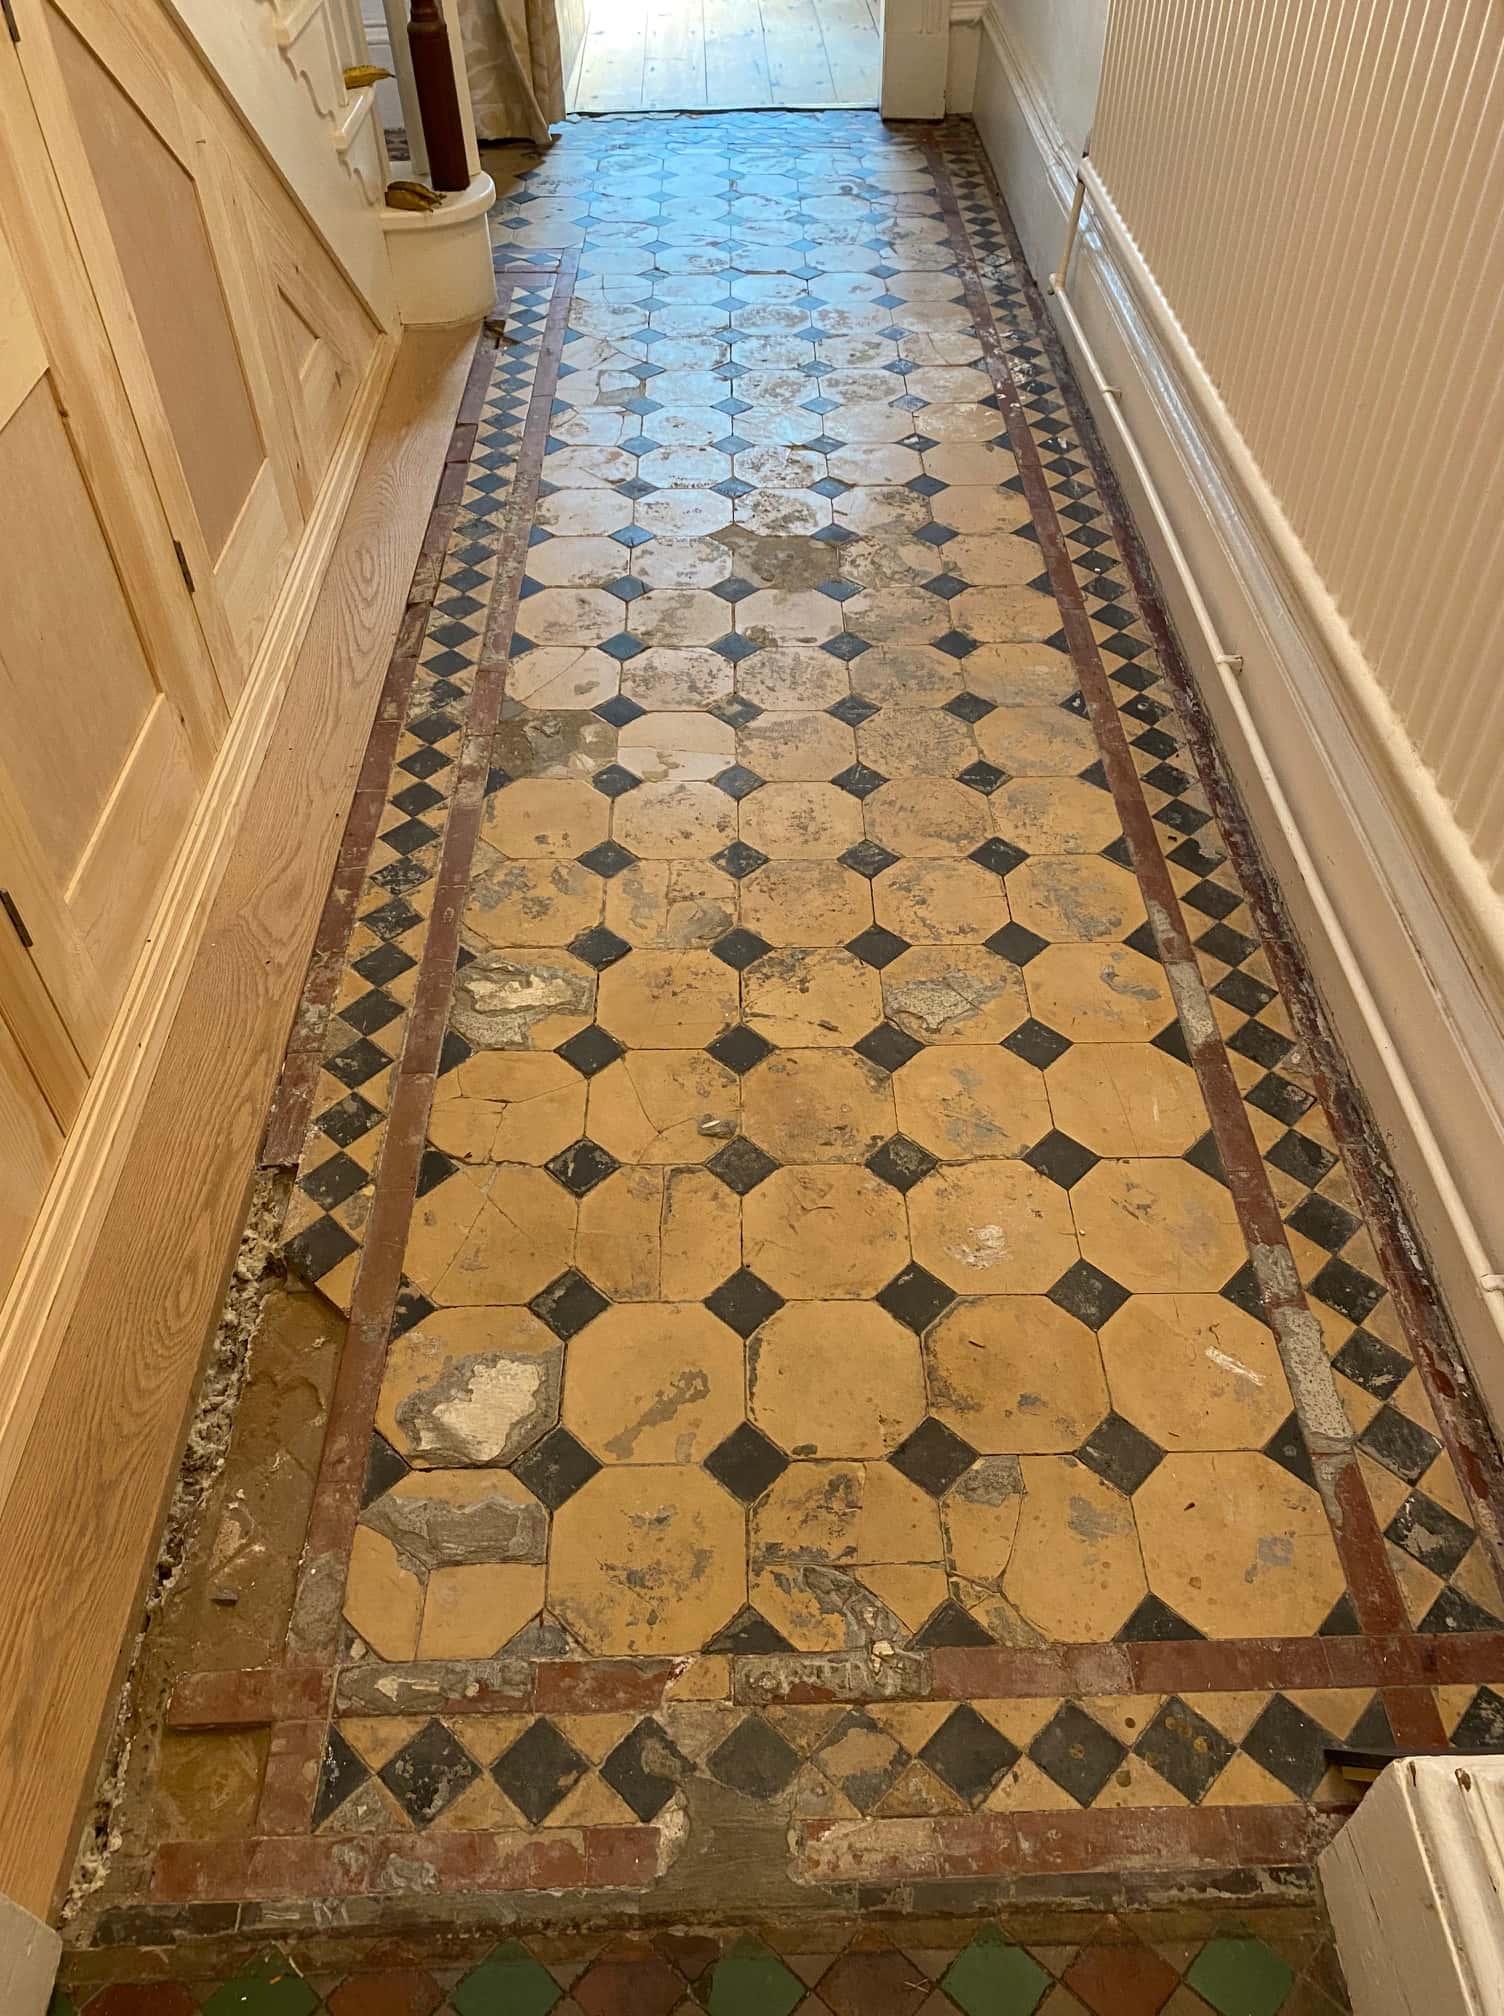
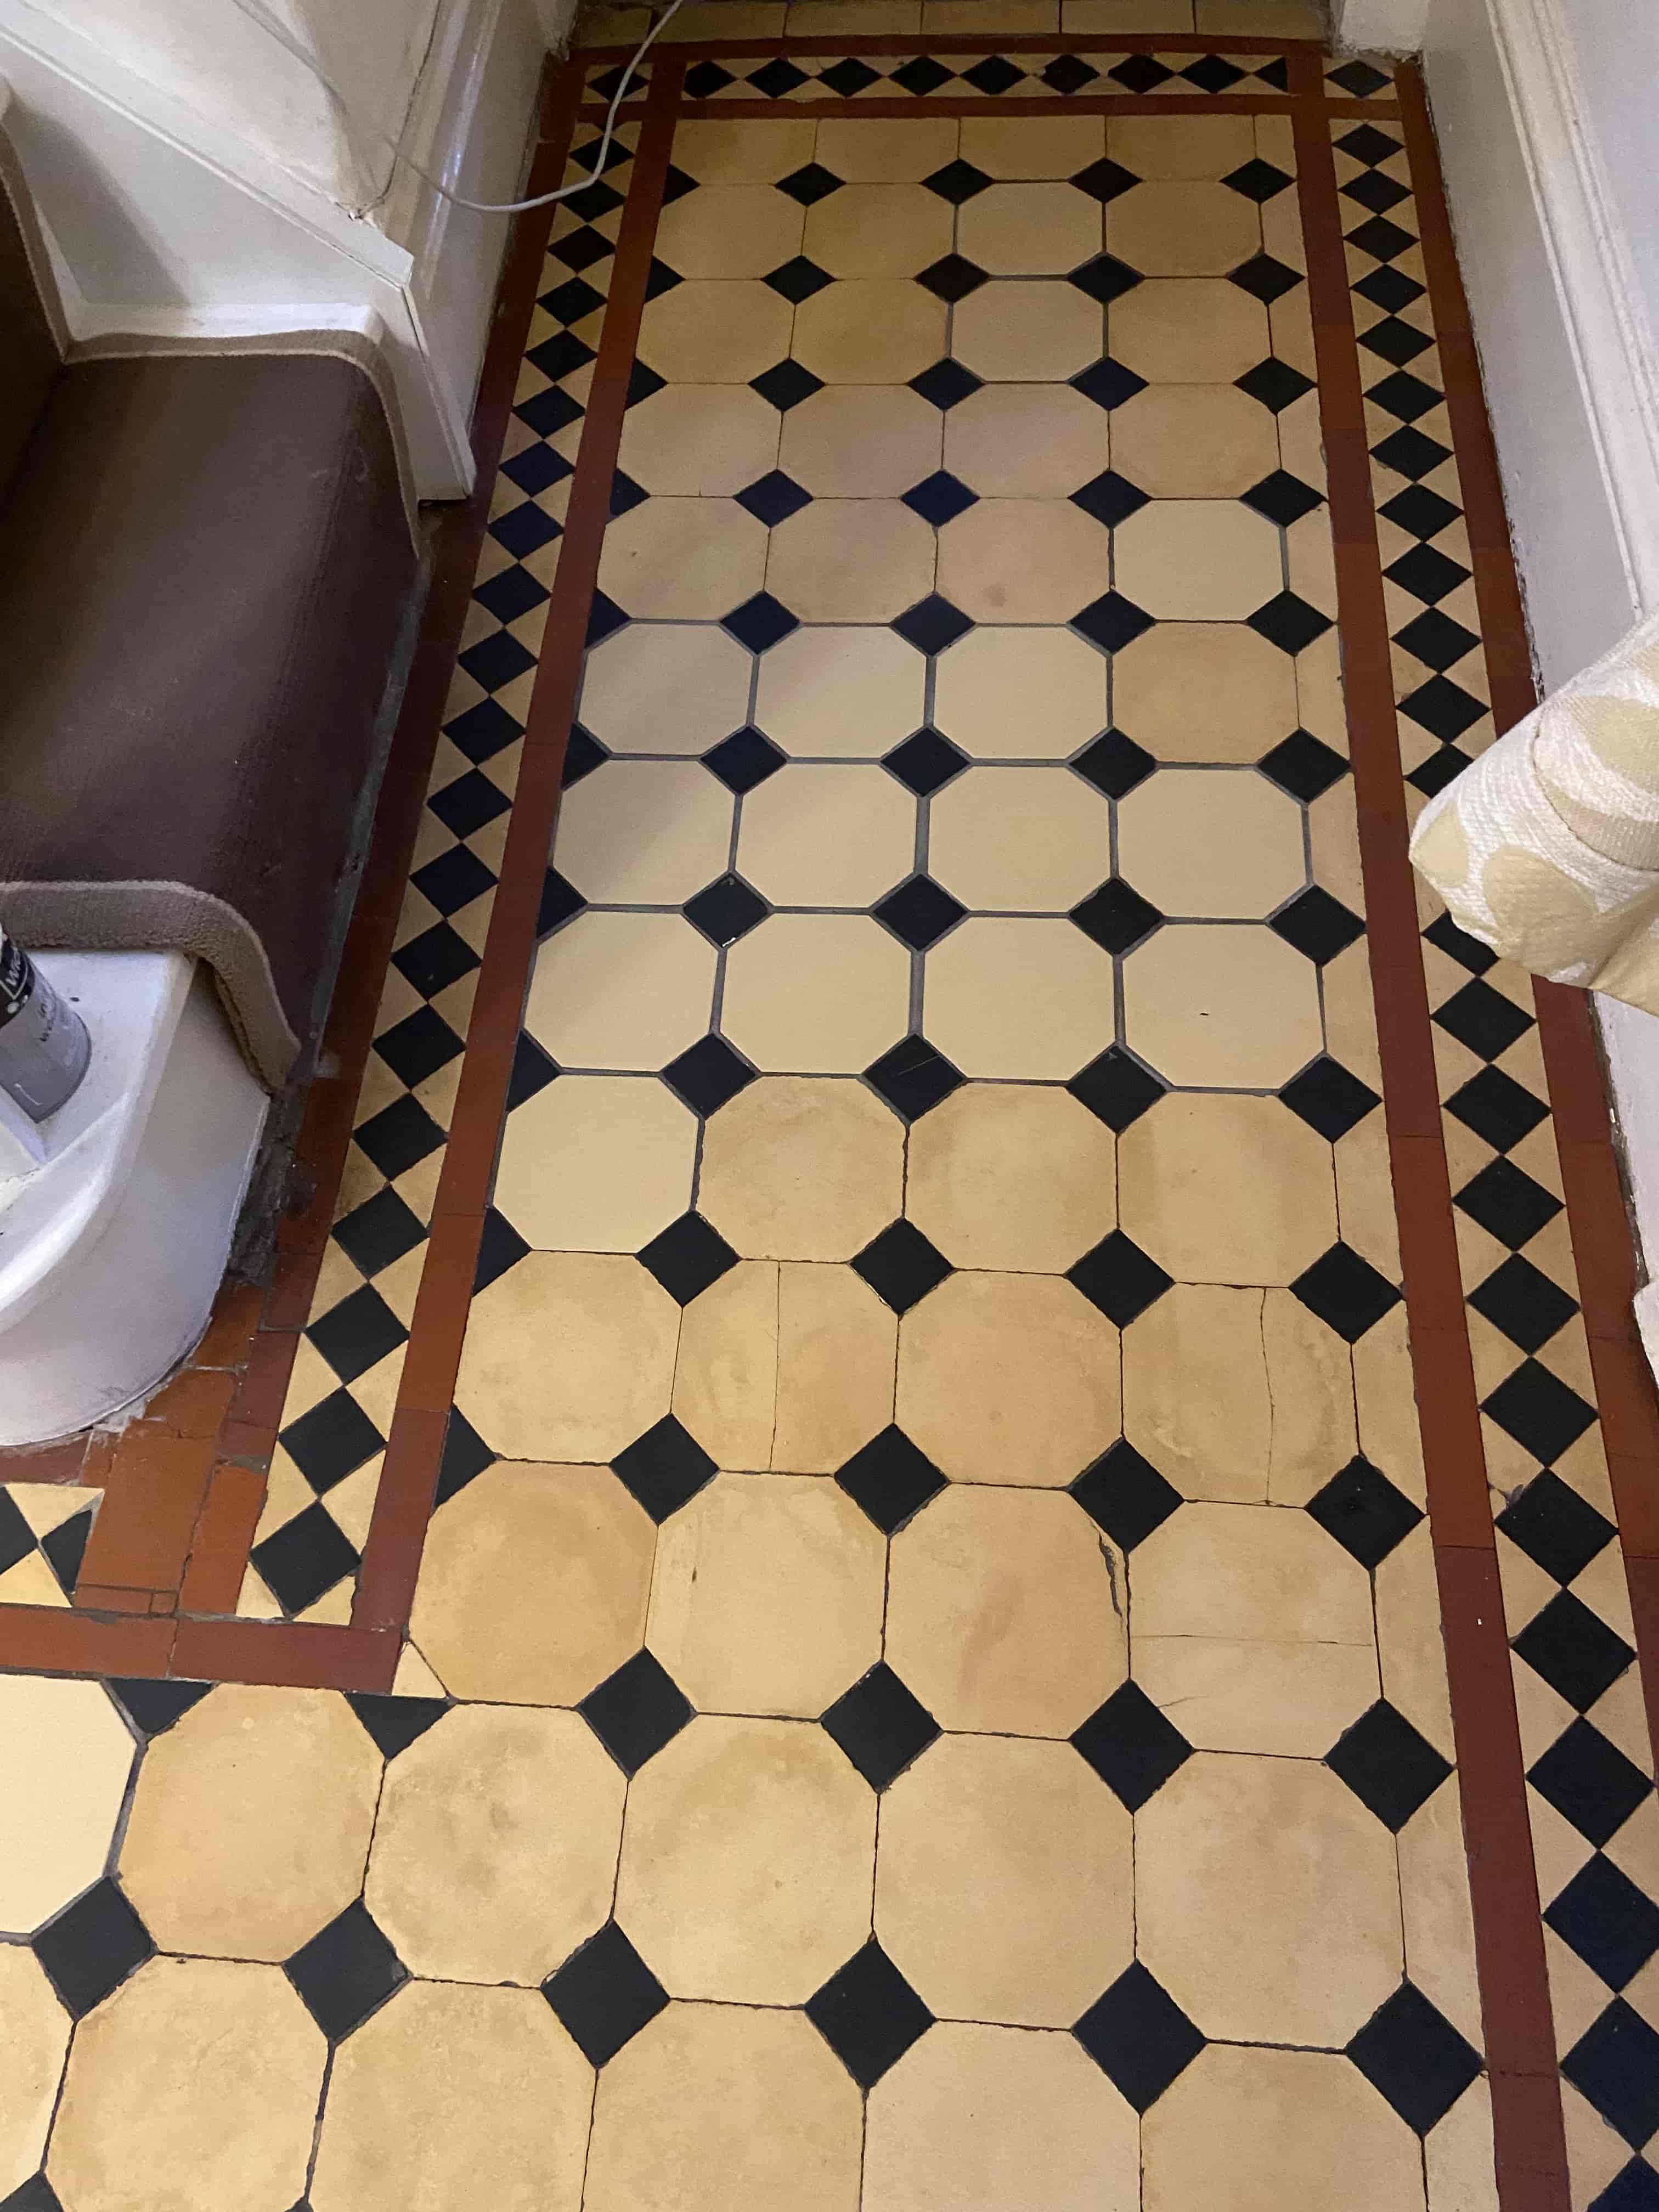
Damaged Classic Tiled Hallway Floor Fully Restored in Lancashire

Cleaning and Repairing a Victorian Tiled Hallway Floor

Detailed below is the restoration of a Victorian tiled hallway floor that we started back in June in Preston. Although we started in June there was so much damage to the subfloor and the tiles it took some time to complete, additionally, the client did not like the colour samples of the replacement tiles we had brought along and so decided to source their own which took some time.

 
Damaged Victorian Tiled Hallway Floor Before Restoration Preston


Deep Cleaning a Victorian Tiled Hallway

Three months later with replacement tiles now sourced we were given the go ahead to start the restoration. The first day’s focus was cleaning the original floor using very coarse 100-grit and 200-grit Diamond pads fitted to a rotary buffer machine and applied to the floor using a strong dilution of Tile Doctor Remove and Go to add extra cleaning power. Tile edges were given special attention using a flex machine fitted with small diamond grit pads.

 
Damaged Victorian Tiled Hallway Floor Before Restoration Preston

The floor was rinsed with water to remove the soil generated and this was followed up with an acid rinse using a 1:3 dilution of Tile Doctor Grout Clean Up. This last step in the cleaning process is especially recommend for old floors like this which don’t have a damp proof membrane and can suffer from efflorescence issues.


Replacing Damaged Victorian Tiles

The next stage focused on repairing the floor and started by carefully knocking out all the broken and chipped tiles. We had previously estimated over 30 tiles needed replacing and so the client had bought two boxes, meaning I had plenty of spares to work with.

Before tiling however, the subfloor had suffered over the years and needed attention first. To deal with this the damaged areas were raked out, cleaned up and then back filled with rapid setting self-levelling screed from Mapie adhesives. Once the sub-base was fixed then we put the new tiles back in, they were not an exact match, about 5mm too short and lighter in tone, but the colour was pretty close.

Tiling an old Victorian floor like this can be a bit like dominoes as you move one out of place 2 decent ones come loose and then they also need refixing. Some of the tiles had hair line cracks in them and once they were loose, they just cracked in half. As such the 20 spare tiles that I thought were spare came into good use and I actually ended up using all of them. I could have done with a few more so it was decided to reset the last four broken tiles and grout them in. Luckily for me the client was very understanding about the nature of tile restoration and had accepted that there would be some imperfections and they were not expecting a new floor.

The Tiles were fixed down using Ultralite Rapid Flex (another product from Mapie) and then grouted using the same adhesive (not a grout, as they did not have grout back in the day, just cement and screed).

The floor was left this to cure overnight, and we came back the next day to finish the clean using a 200-grit diamond pad fitted to a buffing machine and lubricated with water, then one last acid rinse to get the tiles as clean as possible and remove any lingering grout haze. This last clean helps to blend the new tiles in with the original.


Sealing a Victorian Tiled Hallway Floor

Before applying a protective sealer, the floor was left to dry for a couple of days, the tiles need to be thoroughly dry before sealing or you can end up with a patchy appearance.

For this floor with no damp proof membrane, it was important to use a fully breathable sealer that will allow moisture to rise through the tile and evaporate at the surface, so Tile Doctor Colour Grow was chosen. This is a good choice for old floors like this as its fully breathable, head wearing, and it contains a colour enhancer that improves the overall appearance of the tile.

 
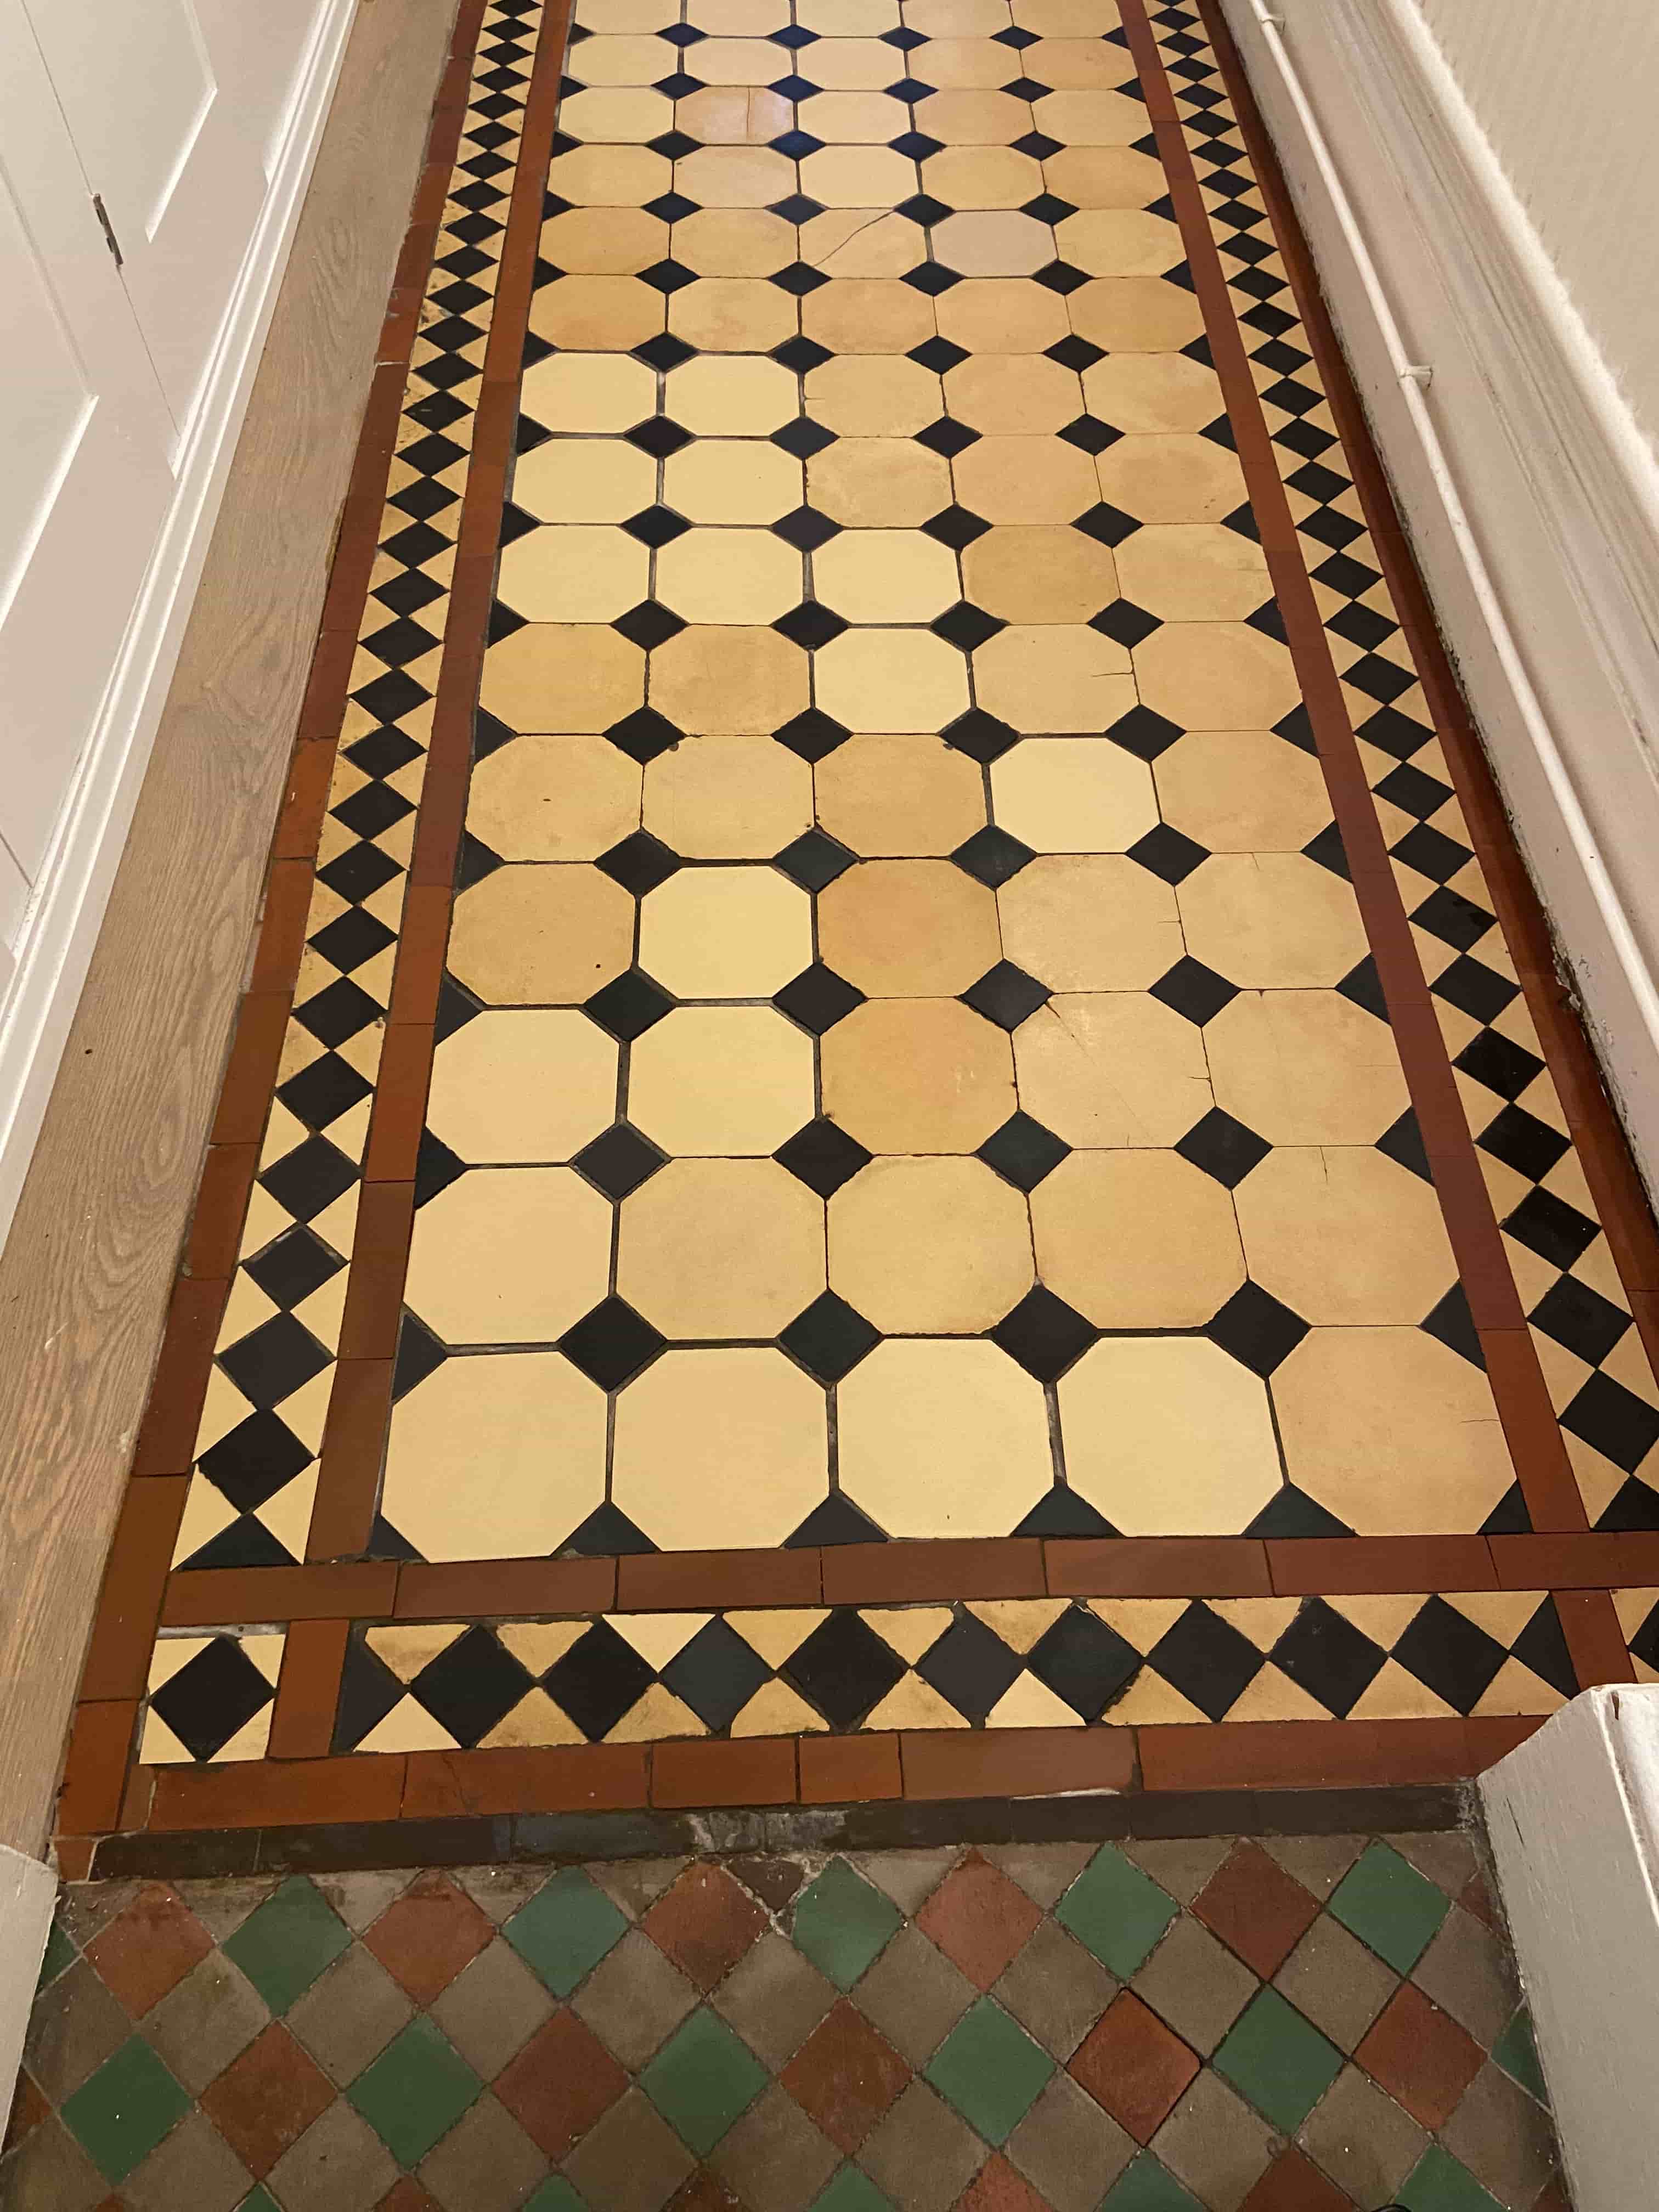
Damaged Victorian Tiled Hallway Floor After Restoration Preston

Three coats of Tile Doctor Colour Grow which is a fully breathable, colour enhancing sealer hat works by soaking into the pores of the tile protecting it from within. It has a matt finish, and it works really well with all clay tiles and is ideal for these types of floors.

 
Damaged Victorian Tiled Hallway Floor After Restoration Preston

You can probably spot the lighter coloured tiles in the after photos on this page, however it’s a very subtle difference and I think they have blended in quite well with the original. Certainly, my client was very pleased with the newly restored floor, its completely transformed from when we first visited the client, and the floor has now gained character and history. For aftercare we recommend Tile Doctor Neutral Cleaner, its an effective pH neutral product that is compatible with the new sealer.


Tuesday, December 14, 2021

Pros and Cons of Installing Cork Flooring

 Natural cork is gaining serious ground in the flooring world. Although it’s been used for thousands of years, modern day concerns for sustainable practices have brought it back in vogue. There are more than a few reasons to install cork flooring, but it’s not necessarily for everyone. If you're thinking about giving it a try, here are a list of pros and cons to help you make your final decision.

PROS

Hypoallergenic

Cork is naturally hypoallergenic, so if anyone in your home suffers from asthma or allergies, it's a great option. This intrinsic quality also means cork is mold and mildew resistant, and has some natural anti-microbial qualities that keep dust, dirt, and dander at bay.

Soft to the Step

The composition of cork is allows for a very soft step. Air-filled cells compress and release for a springy feel that's more comfortable than laminate or hardwood.

Beautiful

You may never have noticed this while popping wine bottles, but the natural swirls of cork grains are mesmerizing. They look especially cool under a layer of protective polish.

Retains Heat

Cork has a natural insulation ability that can help keep your home, and especially your flooring, warm. This cozy quality can contribute to lower heating bills in cold areas.

Sound Dampening

If you’ve ever pulled out carpet and padding in favor of laminate or hardwood, you’ve probably noticed the accompanying increase in noise. Suddenly, you’ll hear the click of the dog’s nails, the scrape of furniture, and every step made on the surface. Cork’s sound dampening qualities buffer the noises of household activity, like cooking, appliances, and watching TV.

Sustainability

Sustainability is one of the main factors of cork’s renewed fame. In contrast to wood that takes decades to grow back when it's felled, cork harms no trees in the harvesting process. In fact, cork is actually a bark, removed from cork trees that are around 20 years old. 70% of these trees grow in Portugal, with others from various spots around the Mediterranean. Many survive hundreds of years, even with the cork being removed up to 15 times during that span. This environmentally-friendly product makes a great choice for the conscientious consumer concerned about their carbon footprint.

Refinishing

Solid cork flooring can be sanded and restained for an updated look. This allows the flooring to last generations if it is properly sealed and maintained. It also adds to the sustainability aspect of not having to replace the flooring as often as other options.


CONS

Sensitive to Temperature

Going back to those cells full of air mentioned above, cork is a breathable material, meaning it expands and contracts. Temperature changes can bring this on and cause pesky issues, especially if your cork is installed without room for expansion. You can fight this problem ahead of time by acclimating your cork flooring for a few days prior to installation, and leaving a small gap around the edges when you lay it down. It's not too big a deal, though. The expansion isn’t worse than you'll see with traditional hardwood.

Trendy

Ten years ago, cork was a rarely-seen flooring option. Who's to say what the status will be ten years from now. If you like the look, go for it, but if you’re considering resale, remember it might not appeal to everyone.

Dents & Scratches

Like any wood, cork can incur damage in the form of dents and scratches. Dragging furniture, sharp heels, and pet nails can all contribute to scuffs and gouges. Damaged cork can be repaired, but it makes sense to at least consider the traffic patterns of your household when deciding where to install.

Fading

If your cork flooring will be in front of a window or glass door, you’re likely to see fading as a result of sunlight. If you cover part of a cork floor with rugs and mats you later move, this can eventually create an inconsistent look across a room.

Absorbs Liquid

One of the most common complaints about cork is that it absorbs liquids. A well-sealed floor can repel stains, but if the seal fails or is improperly applied, cork is fairly unforgiving when exposed to liquids. Many woods have this same quality, as evidenced by water rings on tables around the globe, but the absorbent nature of cork make it a questionable choice for kitchens and bathrooms, unless you’re willing to take the chance on discoloration and swelling.

Maintenance

As mentioned, cork flooring can handle some wear, but in order to protect your floor you'll need to seal it regularly. Daily upkeep involves sweeping or vacuuming, but cork isn’t considered low maintenance, because it can be difficult to clean more deeply. Oil-based cleaning products will stain the surface, so stick with water-based options and clean up spills immediately.

Durability

Some people consider durability to be a redeeming quality of cork because it holds up better than carpet or hardwood in most ways. However, sand and grit can easily damage the surface of cork. Plus it is very susceptible to dents caused by furniture legs and heavy objects.

While the list of cons may seem long, in reality all flooring options have characteristics that may make them unappealing. Before you commit, consider the area your floor material will be installed, how much daily use it will see, and what kind of maintenance will be required.


Source: www.DoItYourself.com