Monday, October 30, 2017

How to Mop Vinyl Floors without Leaving a Sticky Residue

Low cost vinyl floors are a great way to get a decent look to your kitchen, bathroom, or entryway while staying within a tight budget. While vinyl floors are relatively inexpensive, they do require a lot of cleaning to keep them free from stains and dirt. After several years of use, cleaning on a consistent basis will still leave the floor looking slightly dirty. One of the problems with mopping a vinyl floor is that the water, soap, and vinyl work to create a sticky residue. Here are some steps to take in order to mop without leaving a sticky residue.

What You'll Need:
  • Sponge Mop
  • Bucket
  • Warm Water
  • Bleach
  • Wax
  • Broom
Step 1: Sweep Floor Clear of Dirt
The sticky residue is a combination of the vinyl coating, the dirt, and the water. When all three are combined together then what is left over is a sticky residue that causes the floor to look like it is still dirty. Anyone who walks across the vinyl floors after they have been mopped will leave dirt tracks as it sticks to the floor. To help to get rid of this you will need to sweep the floor before doing any mopping. 

Step 2: Use Adhesive Broom
A new innovation in floor cleaning products is a type of broom that has a static pad that dust and dirt clings to. After sweeping the floor of most of the dirt, go over the floor with one of these brooms. Make sure to use a clean pad and possibly changing it in the middle of the process if the vinyl floors are large.

Step 3: Mix Water and Bleach
Vinyl floors need to have some bleach added to the cleaning solution to get rid of the stains, embedded dirt, and break down any residue that can build up. Mix warm water and bleach solution into a pail. The water must be warm, and even a little hot, in order for the dark stains to be lifted off the vinyl.

Step 4: Use Sponge Mop
A mop that has stringy cloths are only going to trail dirt behind it. A sponge type mop, that has a built in strainer, is the best option for cleaning vinyl floors. Dip the mop into the cleaning solution and strain the excess water out. Push the mop in a back and forth motion and then dip into the water again. Using a mop that has dirty water on it can scratch the vinyl flooring or leave dirt streaks.

Step 5: Use Rags to Dry Floor
The sticky residue can also be avoided with the use of clean rags. Wipe the floor until it is dry so that none of the water can settle on the vinyl flooring.

Step 6: Strip and Wax

Another way to keep your floor from having a sticky residue is to periodically strip the wax coating off the vinyl and then apply new wax. Use some ammonia and use a mop to apply it to the floor. This will remove the old wax. Make sure to keep the room well ventilated. After the floor is dry, then apply new wax with a small floor buffer, or through a hand buffer.


Wednesday, October 25, 2017

Deep Cleaning a Small Travertine Tiled Hallway in Bedfordshire

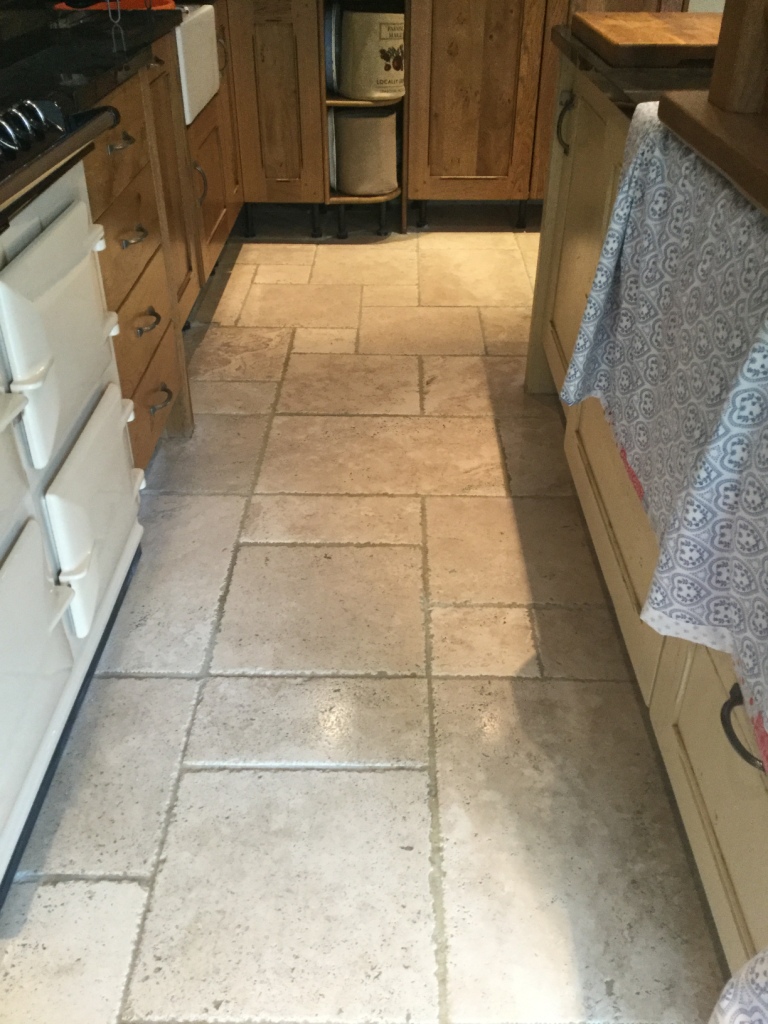
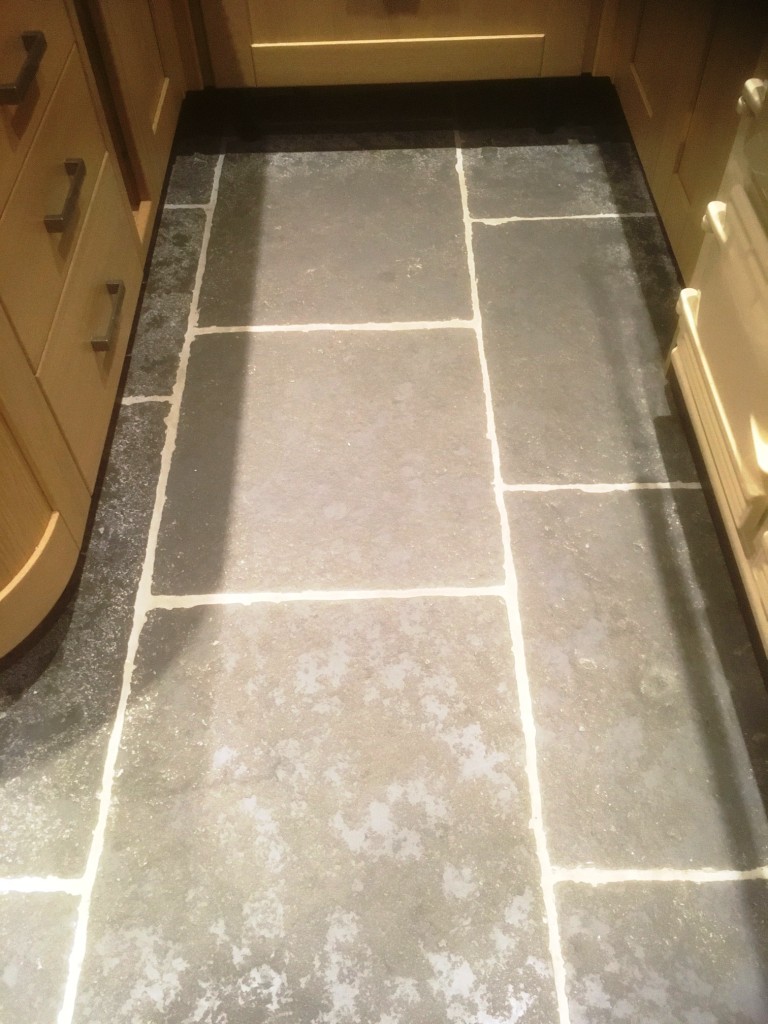
Travertine floor tiles are very appealing but without the protection of a sealer they will soon suffer, fortunately this can be remedied as demonstrated in these pictures of a Tumbled Travertine floor at a house in the Village of Clophill in the Flit River Valley South of Bedford. This customer had called me out as her ten year old floor was looking very sorry for itself and she was concerned that a lot of holes were appearing which was making cleaning of the floor difficult as dirt was getting trapped in the holes. I went over and carried out a test clean on two separate tiles in the kitchen and the customer was amazed at how clean they came up and especially the grout. An appointment was made for the next month and work commenced.

Tumbled Travertine Kitchen Floor Before Cleaning Clophill Village

Cleaning a stained Tumbled Travertine tiled floor

The first thing we do is to protect the lovely Oak kitchen units by removing plinths, covering base units and appliances with a protective film. We then commenced work by burnishing the stone with a set of Tile Doctor Diamond encrusted burnishing pads. The pads are applied individually to each tile in sequence starting with a coarse pad and finishing with the fine pad which brings up the polish. A little waster is used to lubricate the process along the way and the floor is rinsed in-between each pad with the resulting residue extracted from the floor using a wet vacuum. The process takes quite some time but the results are well worth the effort.

Tumbled Travertine Kitchen Floor Before Cleaning Clophill Village Tumbled Travertine Kitchen Floor Before Cleaning Clophill Village

Once this was done our attention was turned to the grout which being recessed is difficult to reach by with pads. So for the grout a medium dilution of Tile Doctor Pro-Clean is applied to the grout lines and scrubbed in with stiff brushes by hand. The floor was rinsed again and fans were used to assist drying before filling the holes with the same filler the customer had used previously to match the colour of the stone as much as possible.

Sealing a Travertine tiled floor

When we returned the next day the floor had dried and we were able to give the floor a final polish with a very fine burnishing pad. The floor was then sealed with two coats of Tile Doctor Ultra Seal which provides excellent protection without changing the colour of the stone to provide a natural look.

Tumbled Travertine Kitchen Floor After Cleaning Clophill Village

My customer was delighted with the results and kindly left the following testimonial on the Tile Doctor Feedback system. "We had several rooms of very dirty travertine tiles that were deep cleaned, filled and re sealed. The floor now looks amazing. Fantastic job by a professional and friendly team.”

Tumbled Travertine Kitchen Floor After Cleaning Clophill Village Tumbled Travertine Kitchen Floor After Cleaning Clophill Village


Source: Travertine Tile Cleaning and Renovation Service in Bedfordshire

Monday, October 23, 2017

Vinyl vs Linoleum: Which Is Better for the Bathroom?

Vinyl tiles and linoleum tiles have their own advantages when considering them as materials for bathroom floors. With the improvement in technology, both linoleum and vinyl have been re-invented and improved upon. The following article discusses the need for careful consideration when putting down a bathroom floor and the differences in vinyl and linoleum flooring.

What You Need in a Bathroom Floor

The bathroom needs special flooring as compared to the rest of the house. This is because the floor is constantly splashed with water, making normal tiles and floorings slippery. The water can also cause damage very easily, and materials like wood can swell up or rot over a period of time. Rubber floors available are not very nice to look at, and stone floors can be cold and stain easily. Apart from slipping, fire hazard and stains the other important thing to keep in mind when considering bathroom floors is the sound since bathrooms are the most private rooms of the house, and you need flooring that is soundproof to an extent. The solution to this is choosing between vinyl and linoleum.

Why Choose Linoleum for Bathrooms
Discovered almost a hundred years ago, the material has proved itself again and again. It is still competing with most of the latest creations in flooring. The main reason is that it is made of solidified linseed oil and is considered the more environment friendly option. It is durable, and dents and scrapes can be easily buffed. The material is non-slippery, fire resistant, waterproof and easy to clean.

The disadvantage of this type of flooring is that it yellows with age in areas where it remains out of sunlight. The material may be less expensive than most, but the installation should be done by a professional and that can be expensive. The linoleum tiles are also limited in colors as compared to vinyl. Another big drawback is that it is not very soundproof.

Why Choose Vinyl Tiles for Bathrooms
Vinyl tiles or sheets are very hygienic and waterproof. Vinyl is a synthetic, petroleum based material and has been competing against linoleum since its discovery. Vinyl is extremely durable and, with a protective layer on top, can retain its freshly laid look for a long time. It does not fade with age and is available in more styles and designs than any other material. It can also mimic other materials in terms of looks, like stone or wood while, at the same time, being easier to clean, non-slippery and low cost Another advantage of vinyl tiles or sheets is that they are very easy to install, and you will not need a professional to help you. This would reduce the cost of laying down the bathroom floor considerably.

Conclusion
Vinyl tiles and linoleum floors have similar advantages over other materials. When considering either of the two, it would, in the end, depend on your budget, style, color and design of your bathroom.


Wednesday, October 18, 2017

Slate Tiled Floor Renovation Service in Hertfordshire

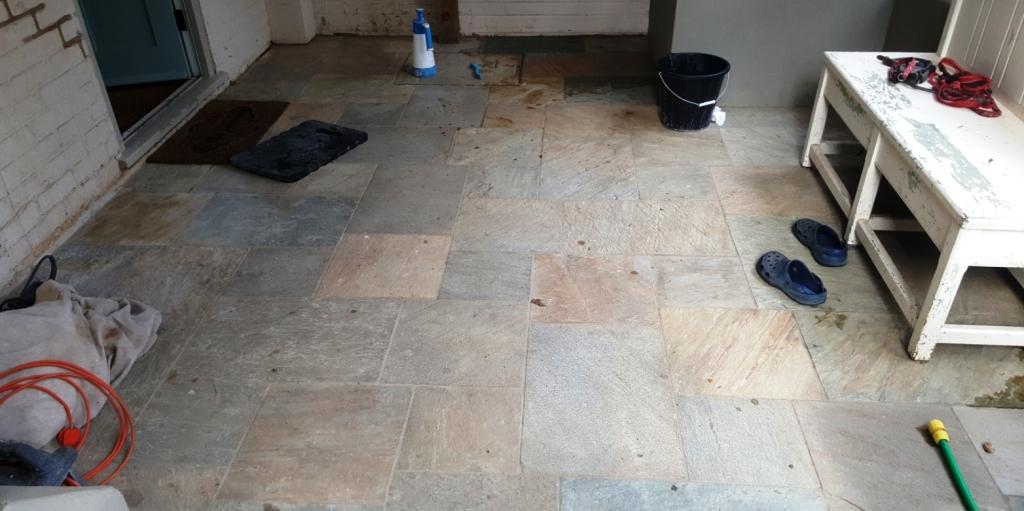
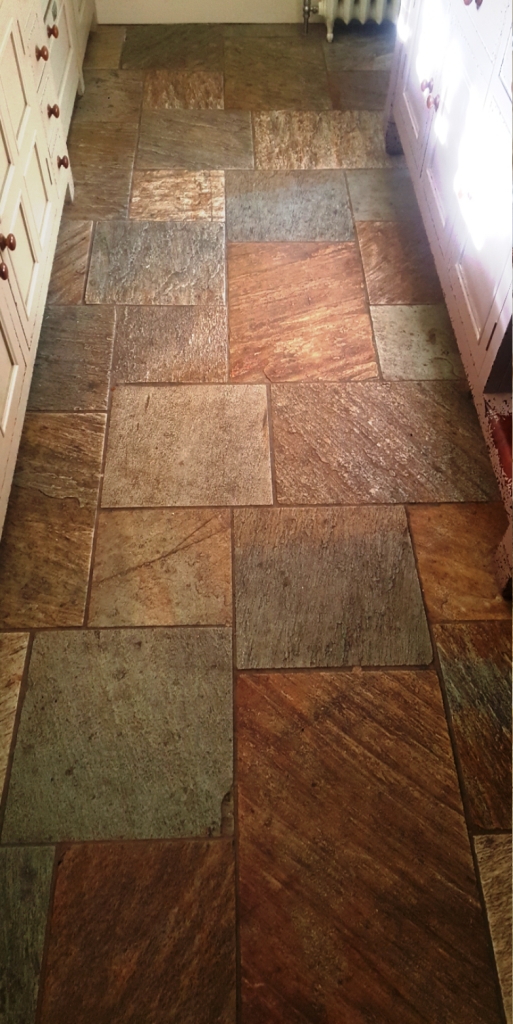
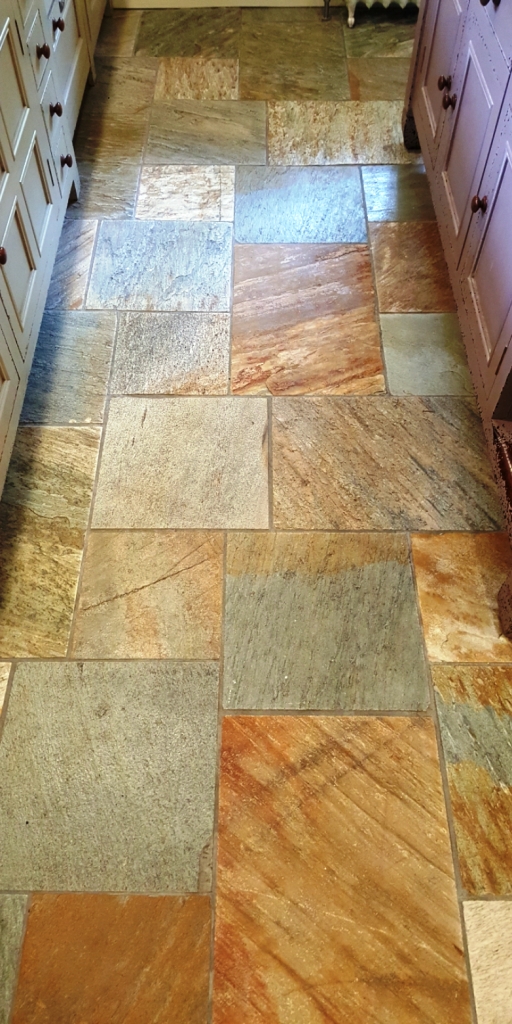
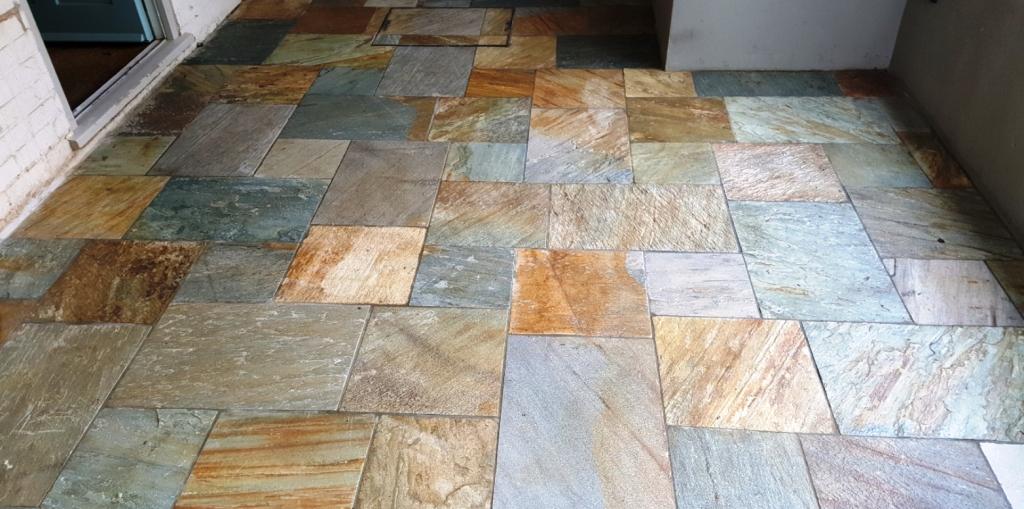
Slate is a very popular choice for floor tiles due to it being hard wearing with a relatively low porosity making it more stain resistant. Some property owners opt for darker Slate, while others prefer wonderful multi-coloured Slate, such as that used in this kitchen in Datchworth, a small village in between the towns of Herford, Stevenage and Welwyn Garden City.

Multi Coloured Sawn Slate Play Room Floor Datchworth Before Cleaning

What can be said for certain is that no-one likes a dull looking and dirty floor! Unfortunately, Slate tiles can easily lose their lustre if not treated to routine maintenance. This customer felt that her Slate tiles, which covered the kitchen, utility room and a child’s playroom, were well overdue a refresh. Here’s what we did.

Cleaning a Slate Tiled Kitchen and Utility Room

We followed our tried-and-tested process for restoring the natural lustre and appearance of Slate tiles. To begin, we removed any old sealant on the tiles using Tile Doctor Remove & Go, which is both a coatings stripper and cleaning product. The product was applied liberally across the floor and worked into the tiles using a buffing machine fitted with a black buffing pad. Hand-held brushes were used to tackle the fine grout lines. This process removed old sealers and gave the tile and grout an initial clean.

Multi-Coloured Sawn Slate Kitchen Floor Datchworth Before Cleaning Multi-Coloured Sawn Slate Utility Floor Datchworth Before Cleaning

Next, we applied Tile Doctor Pro-Clean, which is our industrial strength tile and grout cleaner which was scrubbed into the Tile and Grout as before to remove remaining ingrained dirt. The resultant slurry was promptly removed using a wet vacuum. To complete the cleaning process, we steam cleaned the Slate to remove any further residue trapped in the pores of the stone and any trace of cleaning product. The floor was then left to dry off overnight so it would be ready for sealing in the morning.

Sealing a Slate Tiled Kitchen and Utility Room

Upon returning to the property, we ran some quick damp tests, since even a small quantity of moisture can cloud the sealant and damage its performance. Thankfully, the tiles proved dry and we were able to seal the Slate using three applications of Tile Doctor Colour Grow. This impregnating sealer helps to enrich the natural colours in the stone, while offering a natural-looking matte finish and robust protection. Between each application of sealant, we machine-buffed the surface of the floor to help dry the stone naturally while maintaining the matte finish.

Multi-Coloured Sawn Slate Kitchen Floor Datchworth After Cleaning Multi-Coloured Sawn Slate Utility Floor Datchworth After Cleaning

This two-day job was truly transformative for these Slate tiles. Just compare the before and after photos above – the customer was certainly very impressed with the speed and quality of the work. Another satisfied customer.

Multi Coloured Sawn Slate Play Room Floor Datchworth After Cleaning


Source: Slate Tile Cleaning and Renovation Service in Hertfordshire

Friday, October 13, 2017

Removing Old Grout Smears from Concrete Tiles is South Cumbria

The stone floor in these pictures are in fact pre-cast concrete tiles created to emulate Limestone flagstones laid in a Kitchen in Arnside. You can’t beat the natural beauty of Limestone but these concrete tiles do give the Kitchen that rustic look the customer sought. The odd thing is, it’s actually less expensive to buy real Limestone these days as Pre-cast concrete is not a cheap product.

Stone Effect Concrete Kitchen Flooring Before Cleaning Arnside Stone Effect Concrete Kitchen Flooring Before Cleaning Arnside

Unfortunately, in this case, the concrete had been smeared with Ivory Grout during installation and the tiler had failed to remove it after grouting and this had dulled the look of the tile. The customer was led to believe by the Tiler that the off-white colour was indeed part of the stone and had put up with it for several years before we were called out.

Cleaning a Damaged Flagstone Tiled Floor

First of all we conducted a test clean to make sure our usual cleaning system would work as well on pre-cast concrete. I was aware that this type of product has a colour dye added to it which does seem to lose colour over the years and also can lose quite a bit of this dye once we start cleaning with strong chemical's. Not wanting to risk any depreciation in the colouring I opted instead for the application of a set of Tile Doctor Burnishing pads. The pads are encrusted with industrial Diamonds and come in different grits from coarse to fine and I found that not only did the process remove a lot of the of White grout haze left by the tiler but also gave us a good start to the cleaning process without losing any more of the colour Dye. The customer has specified they were keen for the floor to have more of a sheen finish, so we finished the cleaning with the rest of the Diamond pads finally ending on the super fine pad. We had to do some edging work where the circular pads could not reach but apart from that the pre-cast concrete responded well to this treatment as you will see on the before and after pictures.

Sealing a Flagstone Tiled Floor

The next day we called back to seal the Kitchen floor to protect it from staining, something that is more than likely in a Kitchen. For this we used a couple of coats of Tile Doctor Colour Grow which not only protects by soaking into the pores of the tile but also restores a lot of the colour that had previously been lost.

Stone Effect Concrete Kitchen Flooring Before Cleaning Arnside Stone Effect Concrete Kitchen Flooring Before Cleaning Arnside

For aftercare I explained to the customer that sealers do wear off over time and so to get maximum life out of the sealer they should clean the floor with a pH Neutral Cleaner like Tile Doctor Neutral cleaner. It’s designed for cleaning sealed tiled floors and it won’t affect the colour dye or the Sealer we have applied unlike stronger products will eat away at the sealer over time. Additionally, pre-cast concrete like Limestone is Acid Sensitive and as such products like certain types of the Cillit-Bang range cannot be used on a floor like this as it will cause surface damage.


Source: Tile Cleaning and Renovation Service in South Cumbria

Tuesday, October 10, 2017

3 Tips on Applying Peel-and-Stick Vinyl Tiling on Walls

Vinyl tiling can be used for a broad variety of applications in your home, most commonly your floors, but if you want a more unique approach, you can put peel and stick vinyl tiling on your walls. This is commonly done in the bathroom or kitchen to enhance the decor and make the walls easier to clean, but you can make your choice on what room you want it in. Peel-and-stick vinyl tile comes in a broad variety of different colors and a broad variety of different designs. You are sure to find one that matches what you want in your home. Remember to bring samples home to see how it would look on your walls. Here are a few tips on applying peel-and-stick tiling.

Clean Walls Well

This is one of the most important tips. Make sure that your walls are nice and clean. Scrub them with a very good cleaner and make sure that they are very clean and free from any wetness or stickiness before you install the tiles. If the wall is wet, the tiles will not stick. It is a good idea to clean them the night before you plan to do the tile. Do not clean them with a solution that is gritty or has crystals in it, as that could mess up the adhesive in the tile backing.
Use Adhesive

Many people think that with peel-and-stick tile, you should not have to use adhesive at all. The truth is that over time, the adhesive that is already on the back of the tile can wear off. Make sure that you pick out a decent adhesive that will help the tile stick. Only put a thin layer of adhesive down and allow it to almost dry before placing your tiles. Make sure that you pop a chalk line before laying your tiles so that your tiles are straight and look good in your room.
Buy Decent Tile

Peel-and-stick vinyl tiling can be very cheap, but it is best to avoid the really cheap kind. The cheaper kind can break and fall off your walls, which can lead to you having to replace the vinyl within a short amount of time. Check the tile to see if it comes with a warranty. If it comes with a warranty, chances are that the tile is decent, and you will have customer support whenever you need it. Shop around before deciding on one particular brand of tile, as this will help you find the perfect tile for you walls and your home.

Taking on a tiling job can be quite a task, but armed with the proper tools and knowledge, you can easily install a tile wall in no time. If you need further assistance, there are many shows and videos online that will let you see exactly how the peel-and-stick vinyl tiling is installed. This is great for people who are just starting out and are unsure of what to do and how to install the tiles.


Friday, October 6, 2017

Maintaining a Victorian Tiled Hallway Floor in Cheshire

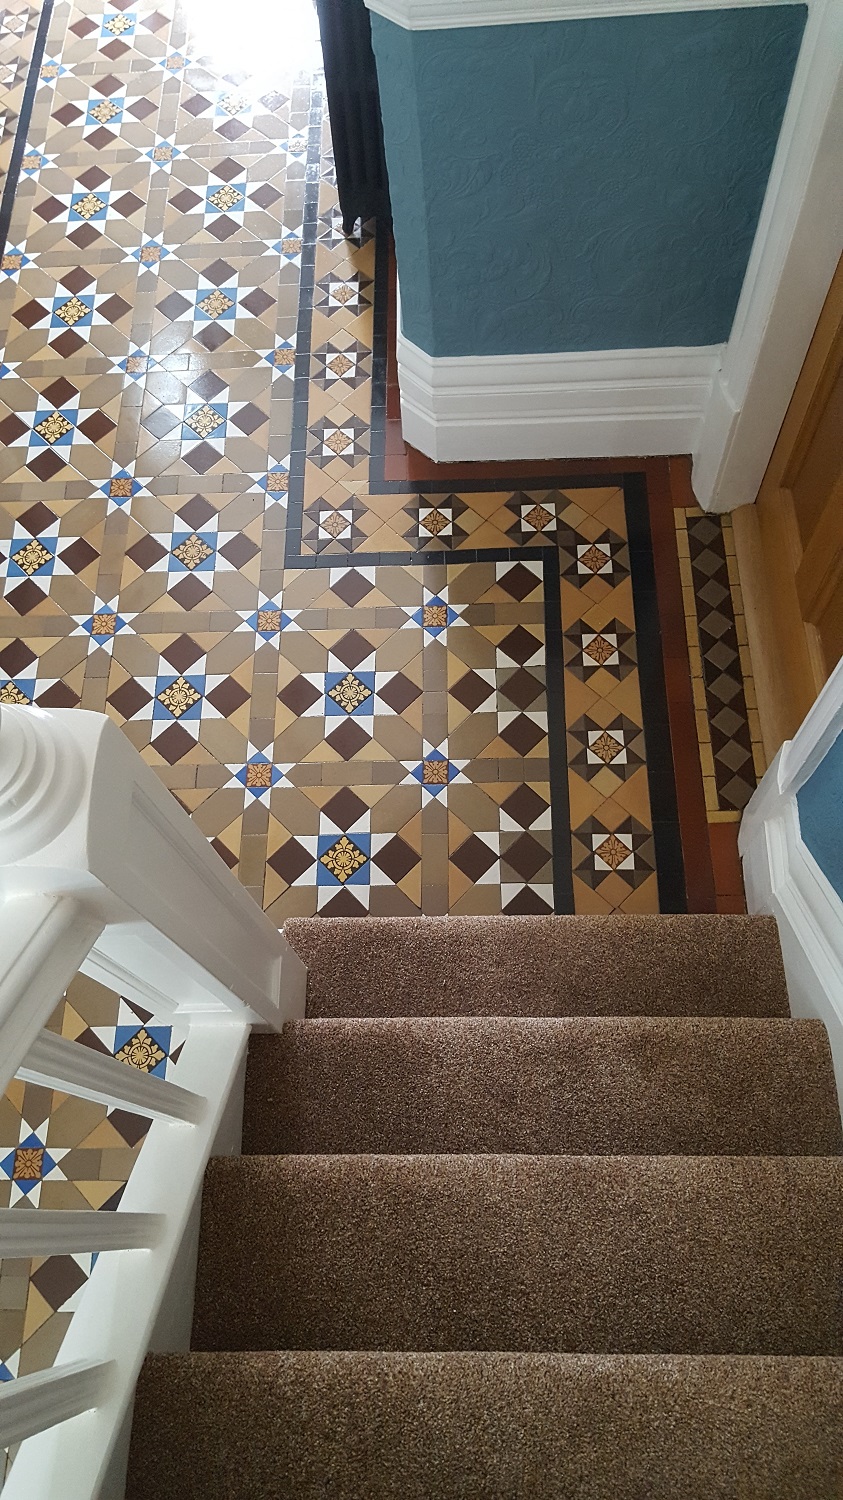
The village of Grappenhall has a long history that goes all the way back to the bronze age and as a result has all periods of architecture including quite a lot of houses with Victorian tiled hallways . This particular floor at a house in the village had been well looked after well by the owner but had now lost its vibrancy, was looking dull and now needed a deep clean and reseal

Victorian tiles are porous and so need to be sealed to protect them from dirt becoming ingrained in the floor. However, hallway floors get a lot of foot traffic which over time wears down the sealer until it becomes so thin and patchy it’s no longer effective. As a result, you need to regularly top up the sealer or every three to four years it will need to be stripped off and reapplied.

Victorian Tiled Hallway Grapenhall Before Cleaning Victorian Tiled Hallway Grapenhall Before Cleaning


Deep Cleaning the Victorian Tiled Floor

I used clear plastic to protect the wood skirting boards from splashing and then gave the tiles a good scrub with a mixture of Tile Doctor Pro-Clean and Remove and Go to deep clean and strip off any remaining sealers. The cleaning solution was left to soak in for ten minutes before scrubbing it in with a black pad fitted to a heavy buffing machine.

Once the whole area had been scrubbed I rinsed off with water which was then extracted using a wet vacuum. With the floor now clear I was able to inspect it to ensure all the previous sealer and ingrained dirt had been removed. Any areas with stubborn stains were spot treated by reapplying the cleaning concoction I used earlier before leaving the floor to dry off fully overnight.

Sealing the Victorian Tiled Floor

When I returned the next morning my first job was to test the tiles for damp using a damp meter. This is important as damp tiles won’t take the sealer as well as dry tiles, however this time everything was fine. I then proceeded to seal the Victorian tiles with a single coat of Tile Doctor Colour Grow to enhance the natural colours in the tile before applying a further seven coats of Tile Doctor Seal and Go which leaves a sheen finish and is ideal for Victorian tiles.

Victorian Tiled Hallway Grapenhall After Cleaning Victorian Tiled Hallway Grapenhall After Cleaning

The hallway now looks fantastic and vibrant and then new sealer will protect them from ingrained dirt making them easier to clean and keep them looking good for some time to come.


Source: Victorian Tile Cleaning and Renovation Service in Cheshire

Wednesday, October 4, 2017

How to Apply Vinyl Tiling to Bathroom Walls

Vinyl tiling is a very versatile covering for floors, walls, countertops, and anything else you want to be able to clean easily. Most of the time, vinyl covering is found on bathroom floors. However, this peel and stick type of covering can also be used to decorate, and finish off, the bathroom walls. This type of vinyl is not only very easy to clean, but also comes in a wide variety of colors, designs, and shapes. With an almost unending supply of designs, you are sure to find the exact match for your home. Here are some steps to take in applying vinyl tiling to your bathroom walls.

What You'll Need:
  • Vinyl Tiling
  • Tile Adhesive
  • Rubber Roller
  • Utility Knife
  • Tape Measure
  • Chalk Line
  • Bucket/Water/Detergent

Step 1: Clean Wall
The first step to covering your wall with vinyl tiling is to clean them as thoroughly as you can. This is the most important part of the entire process. If there is any type of dirt, debris, or residue from other wall covering, the adhesive will not stick very well, and there will be little bumps throughout the vinyl tiling. To clean the wall use a mild detergent with warm water. Wipe the wall with a sponge and then dry with a clean rag or towel.

Step 2: Find Center of Wall
Once the wall has been cleaned of any type of dirt and debris you can begin to lay out the vinyl tiling for your bathroom wall. To do that you need to find the center point of the wall. Measure both the height and the width of the wall in order to find this location. Snap a chalk line for both the vertical and horizontal direction. By doing this you are making sure that you use more full pieces of vinyl tiling.

Step 3: Set First Tiles
Vinyl tiling is very easy to stick onto a wall. Most types of vinyl tiling have peel-and-stick backing, but will still require that some adhesive be applied. Start at the center of the wall. This is where you will stick four pieces of vinyl tiling along each of the axis points. Spread out a thin layer of adhesive with a notched trowel, peel off the backing of the vinyl, and position it in place. Do this with all four pieces.

Step 4: Continue Setting Vinyl Tiling
With the first parts in place, use a level to ensure that they are going in a straight line along both the horizontal and vertical points. Continue setting the tiles in the same method until you get to the wall area where some trimming will be needed.

Step 5: Trim Vinyl Tiling
Once you get to the edge of the wall you will need to do a little bit of trimming of the vinyl tiling to make them fit. Set a tile on the wall in position and mark where it needs to be cut. You can also measure the opening and then transfer it to the tile. Use a utility knife to make the cut. Set the tile on the wall.

Step 6: Roll Out Vinyl Tiling
Place a rubber roller on the tiling and make sure that they all make contact with the adhesive.


Sunday, October 1, 2017

Restoring Quarry Tiles Covered in Cement Screed

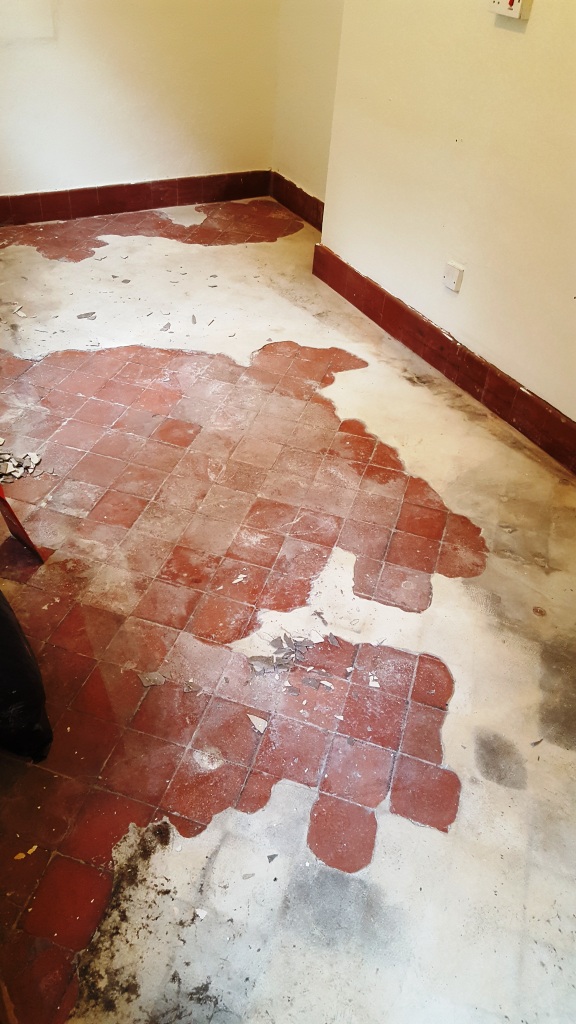
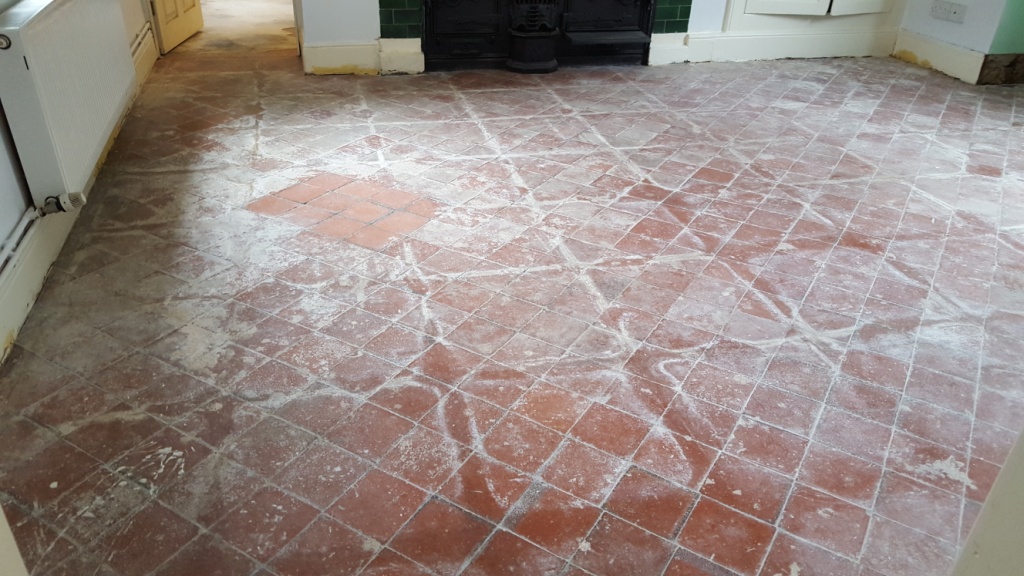
The owner of this Quarry tiles floor at a house in Swansea had expended much effort in its restoration and feeling exhausted decided to call in their local Tile Doctor to finish it off.

Quarry Tiles in Swansea Covered in Cement Compound Quarry Tiles in Swansea Covered in Cement Compound

I never saw the original flooring but I could see it had been covered by some sort of cement screed which had probably been used, judging by the imprints, to support large carpet tiles. I’ve come across a few floors like this, you can’t simply put carpet over a tiled surface as tiles can be slightly convex in shape and the grout lines result in dips forming in the carpet so as a result a floor levelling compound is usually applied beforehand.

After doing a cleaning sample and a test to see how stubborn the cement compound was to remove I agreed with the customer that it was possible and showing her the test results, she was happy to proceed with the work.

Quarry Tiles in Swansea Covered in Cement Compound Showing Test Clean

Removing Cement from a Quarry Tiled Floor

Before starting I took a few moisture readings with a handheld damp meter, I always recommend doing this at the start as it gives you a baseline reading that can be used to determine the floor has dried and ready for sealing later. Most old floors don’t have a damp proof membrane installed and so if the moisture readings were high I would recommend coming back to seal the floor at a warmer part of the year.

The first step was to remove all the cement compound from the surface of the tiles and then scrape as much paint and plaster off the tiles before cleaning with an undiluted mixture of Tile Doctor Pro-Clean and Remove and Go. This combination of two different products make a great team; Pro-Clean is a versatile, high alkaline cleaner that is used to deal with reasonably heavy soil build-up on natural stone and Tile. Remove and Go, also safe to use on natural stone and tile is specially formulated to remove old coatings including paint and old sealers.

Quarry Tiles in Swansea Removing Cement Compound

This solution was applied to the floor and, working in small sections, I scrubbed it into the tiles using a rotating scrubbing machine fitted with a nylon brush attachment; it was also scrubbed into the grout using a stiff brush. The floor was then rinsed, and the resulting cleaning slurry was vacuumed away using a wet-vax machine.

The final stage of the cleaning process was to run over the tiles with a coarse 200 grit diamond pad together with Grout Clean-up which is another Tile Doctor product that removes mineral deposits such as old grout and cement smears. After a final rinse I could see the all the cement had been removed and the Quarry tiles were looking much healthier and ready for sealing.

Quarry Tiles in Swansea With Cement Compound Removed

Sealing a Quarry Tiled Floor

I left the floor to dry out overnight with the aid of heater fans and all doors closed to keep it warm. When I returned the next day, I retested the floor for moisture and compared the initial readings to confirm the floor was ready for sealing.

The Quarry tiles were quite porous so to seal the Quarry tiles, I eventually used eight coats of Tile Doctor Seal & Go which not only provides a protective covering but also enhances the colours of tiles especially old red quarry floor tiles.

Quarry Tiles in Swansea After Restoration

The customer was thrilled with the results of the floor and was so impressed told me she was going to recommend Tile Doctor to her friends.


Source: Quarry Tile and Grout Cleaning and Restoration Service in South Wales