Thursday, June 30, 2016
Victorian Hallway Tiles Restored in Cheshire
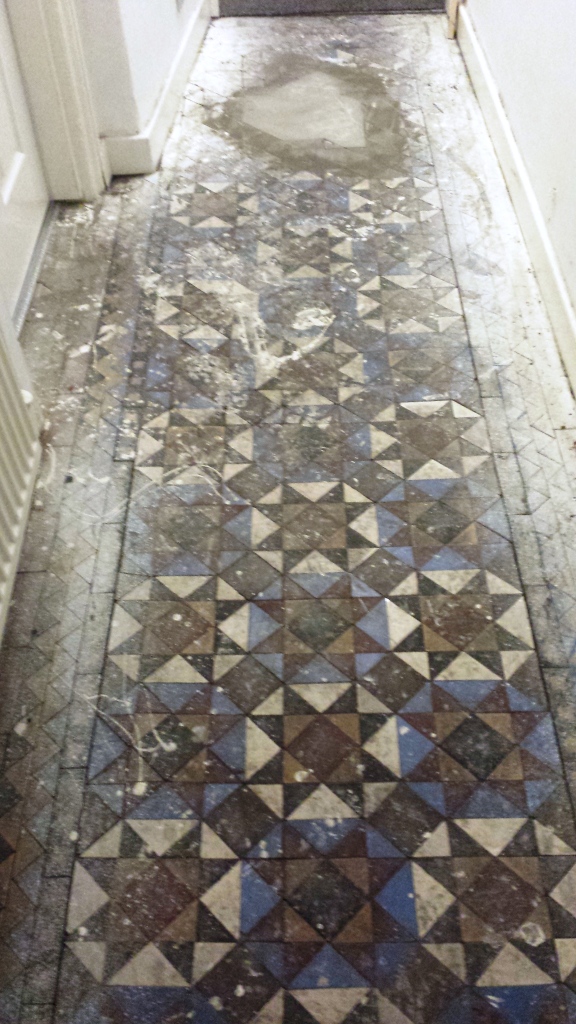
This set of photographs are from a house in the Warrington suburb of Stockton Heath where my client had discovered a Victorian Tiled floor under carpet in the hallway and was keen to have it restored back to its original condition. You can see from the photograph below that it was in quite a
Read more...
Restoring and Sealing Victorian Hallway Floor tiles
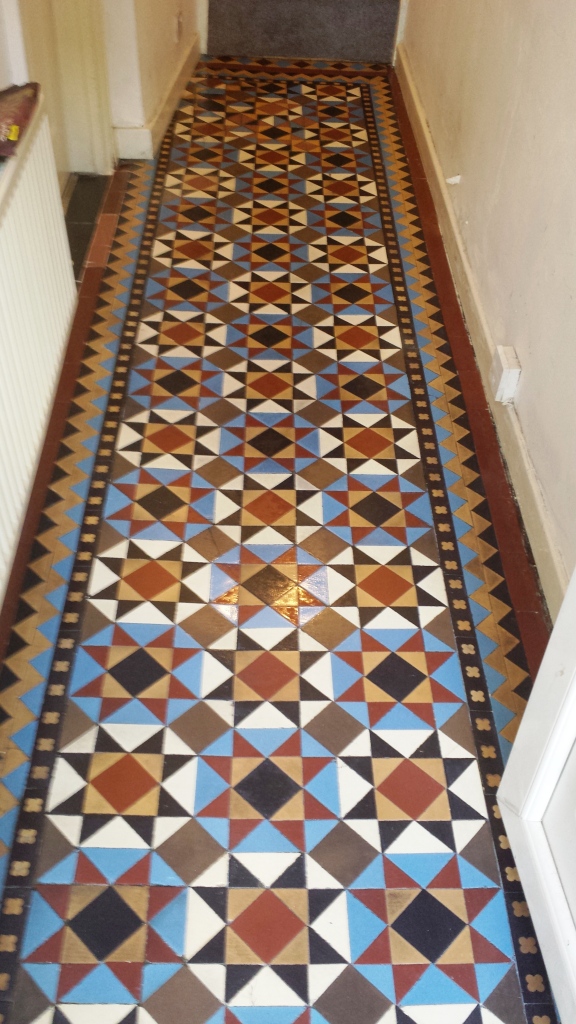
This set of photographs are from a house in the Warrington suburb of Stockton Heath where my client had discovered a Victorian Tiled floor under carpet in the hallway and was keen to have it restored back to its original condition. You can see from the photograph below that it was in quite a state with dirt and paint splashes however I was confident we could manage it.
Source: Victorian Tile Cleaning and Maintenance Service in Cheshire

Deep Cleaning the Victorian Tiled Floor
On arrival I started to protect the skirting boards and entrance carpet to another room. Once that was done i started to strip the paint splashed and any remaining sealer from the floor using Tile Doctor Remove and Go which is an effective coatings and sealer remover that unlike some products is perfect safe to use on Victorian tiles Working on the floor the product was diluted, scrubbed into the tile and then left to dwell for twenty minutes before being rinsed off with water which was then removed using a wet vacuum. The floor was now looking a lot cleaner, however I could see a number of stubborn areas that were going to need further treatment so I mixed the Remove and Go 50/50 with another Tile Doctor product called NanoTech HBU (Heavy Build-up Remover), which adds abrasive particles to the solution. This solution was scrubbed in and then rinsed off when i was happy with the condition of the floor. This process took much of the day and once done it was left to dry overnight ready for sealing the next day.Sealing the Victorian Tiled Floor
On my return the next morning i tested the floor in several places with a damp meter to ensure it was dry. When i was happy the floor was dry i started sealing with thin coats of Tile Doctor Seal and Go leaving thirty minutes between coats to allow it to dry; in total i gave the floor seven coats of sealer which gave the floor a nice shine which the customer was very happy with. As well as enhancing the look of the floor the sealer will provide stain protection going forward.
Source: Victorian Tile Cleaning and Maintenance Service in Cheshire
Wednesday, June 29, 2016
Restoring the Appearance of Classic Victorian Tiles in Monmouthshire
This black and red Victorian tiled hallway at a property in Newport, the third largest city in Wales, had a timeless charm about it, and a classic diamond pattern. Unfortunately, the tiles had lost their colour, leaving them looking dull and lifeless. It was clear to me, upon further inspection,
Read more...
Travertine: How to Hone
Travertine tiles are a naturally forming tile the consistency of a hard sandstone, but not quite the strength and smoothness of marble stone. Because it is a sandstone type stone it's necessary to seal to keep fluids from being absorbed. Honing and polishing travertine can be done by the do-it-yourself homeowner. Allot several hours to this project to ensure that you have enough time to complete all the steps before walking on the floor.
What You'll Need
What You'll Need
- Water
- Mop
- Soapy Water
- Clear Water
- Tile Sealant
- Wet Floor Sign
- Floor machine with following pads:
- 120-grit diamond resin bond115-grit diamond metal bond220-grit carbide stones400-grit resin bond diamond800-grit carbine stones
Step 1: Creating a Flat Surface for Honing
Attach the 120-grit diamond resin bond to the floor machine. Do not start at the edge of the floor but leave ¼ inch from the wall. Keep the floor wet. Slide the floor machine from the side to side. Keep your movements in parallel to the wall. Make sure that the surface stays wet, so reapply water as necessary. Water is the medium that keeps friction down. Also, note that if you leave the floor machine in one place it will pit the surface of the floor tiles.
Step 2: Fine Grit Final Hone
Remove the 120-grit pad from the machine and put on the 115-grit pad. Make sure you re-wet the floor and follow the same path you used when you first passed over the floor tiles. The grit is much finer on this pad and will help to smooth out the rough surface made by the first pad.
Step 3: Begin Polishing
Begin polishing by replacing the 115-grit pad with the 220-grit pad. Again, wet the tiles. You will have to make sure that you wet the travertine tiles often because the finish is gone and the tiles are very porous, and they will absorb the water quickly. Repeat the same parallel pattern using the 220-grit polishing pad.
Step 4: Smoothing the Surface of the Travertine
Put the 400-grit pad onto the floor machine. Pass the floor machine from the wall outward, again making sure the floor is wet. Also continue on the same parallel path that has been created in the previous steps. Don’t forget to keep the machine moving to ensure you don’t create any pits or valleys in the surface of your travertine tiles.
Step 5: Complete the Polish
Finally, use the last floor machine pad, the 800-grit pad. Repeat the same path and the same steps that you have been doing. Remember to keep the floor wet and the floor machine moving. After you have finished this step you will see a nice polished finish on your travertine tiles.
Step 6: Finishing
Use a soft mop and thoroughly clean the floor, mopping with a soap solution and then using a clean mop as many times as it takes to remove the soap from the floor. Apply a tile sealant to the travertine tile surface using a damp sponge mop and let it completely dry. Put a wet floor sign up and barricade the area for at least 24 hours.
Source: www.DoItYourself.com
Tuesday, June 28, 2016
Restoring the Appearance of Terracotta Kitchen Tiles in Monmouthshire
Terracotta may be one of the most aesthetically pleasing types of tiled floor, but as many of our customers will tell you can be particularly difficult to keep clean. This is due to the naturally high porosity of clay, which allows dirt to become very easily trapped. Quite commonly this
Read more...
Installing Granite Flooring: Everything You Should Know
A new granite flooring taking the place of an old and worn out flooring will make a sudden impact into the look of your room. Granite tiles are one of the most popular forms of flooring for its beauty, elegance, and amazing ability to transform a room into a luxurious area.
The great thing about installing granite flooring is that you can easily install the flooring yourself in a weekend, and the tiles themselves are relatively inexpensive.
What You'll Need
The great thing about installing granite flooring is that you can easily install the flooring yourself in a weekend, and the tiles themselves are relatively inexpensive.
What You'll Need
- Granite tiles
- Plastic spacers
- Wet saw
- Notched trowel
- Grout
- Grout float
- Mortar
- Grout sealer
- Rubber mallet
- Sponge
Prepare the Sub-floor
Before laying down any granite flooring you must make sure the sub-floor is clean. Remove any old tiling, paint, residue, adhesives, or sand down old wood floors. Patch up any scratches, or holes in the flooring, and make sure it is free of any debris.
Lay out Tiles
Begin with a plan before you start putting down tiles permanently. Start at a corner of the area and start laying down tiles. Use the plastic spacers so you know who each tile will fit. When you get to the places where the tiles will need to be cut, take the measurements and cut them on the wet saw.
Cutting your pieces now will help you to keep a steady flow in laying your tiles and not giving the mortar a chance to set before you can get to it.
Cutting your pieces now will help you to keep a steady flow in laying your tiles and not giving the mortar a chance to set before you can get to it.
Using Mortar
Mix the mortar according to the directions on the bag. Mix to a thin, mud like consistency. Using your trowel, lay down an thin, even layer over the surface of the area to be tiled. Lay down a backer board on the floor and screw down tightly. The backer board will give your granite flooring a hard, stable platform.
Spread out Mortar
Once the backer board has been installed, start applying the mortar for the tile installations. Covering small areas at a time, spread out the mortar with the trowel at a 45 degree angle to the surface. This will keep the grooves, and notches at a consistent depth and level.
Apply Granite Flooring
Working in a smooth manner, begin laying out the tile according to your plan. Place a tile in the first corner and press down firmly in the corners. Twist the tile a little to let it get a good grip of the mortar and form a bond. Tap the tile lightly with a rubber mallet to get out any air bubbles to make sure of a firm contact. Set up spacers in between the tile and repeat this process until all the tiles are set. Allow 24 hours to cure.
Grout Tile
Mix the grout in small batches and begin spreading it out over the tile. Force the grout into the space between tiles as you remove the spacers. Allow the grout to cure for 72 hours and then clean off with a sponge and warm water. After the grout is dry, seal it with grout sealer for protection against water and stains.
Source: www.DoItYourself.com
Monday, June 27, 2016
Unique Brick Kitchen Floor Restored in Wrestlingworth
This brick floor, installed in the Kitchen of a property in in the town of Wrestlingworth was one of our toughest assignments so far; the floor was made from handmade Norfolk bricks which were laid approximately 20 years ago but had been subject to grease, general dirt and still had cement from the grouting present on top. Although this wasn't your typical tiled floor I knew we could achieve some fantastic results with the brick by using the right products and techniques. Cleaning a
Read more...
Sunday, June 26, 2016
Deep Cleaning Brick Floor tiles
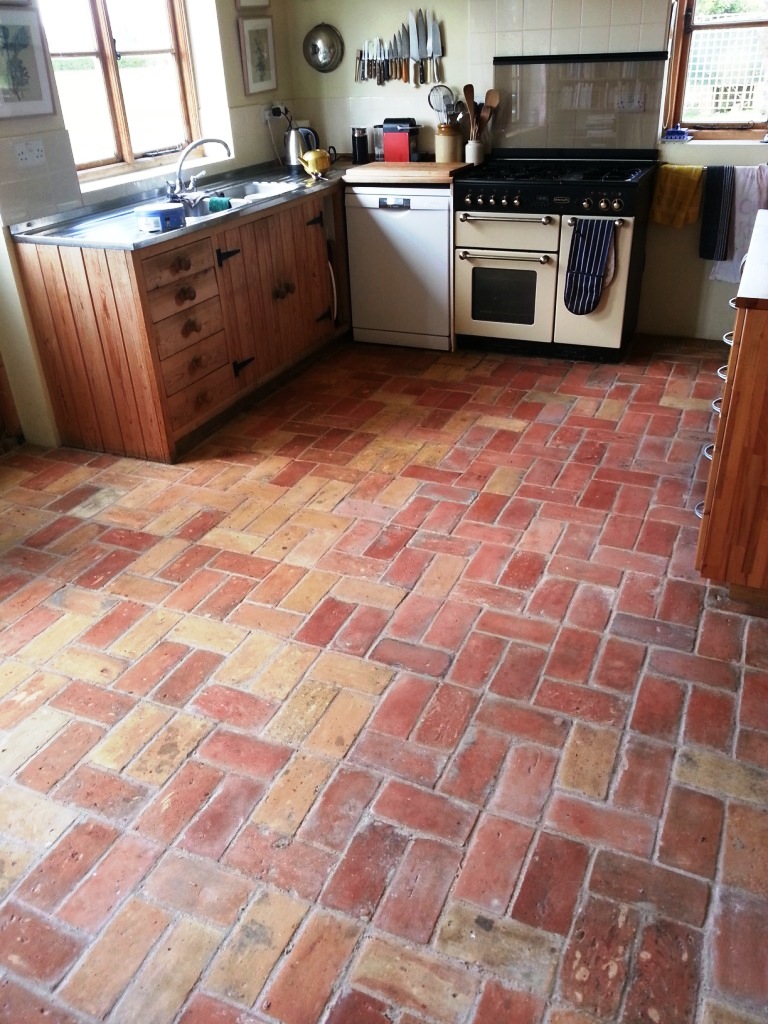
This brick floor, installed in the Kitchen of a property in in the town of Wrestlingworth was one of our toughest assignments so far; the floor was made from handmade Norfolk bricks which were laid approximately 20 years ago but had been subject to grease, general dirt and still had cement from the grouting present on top.
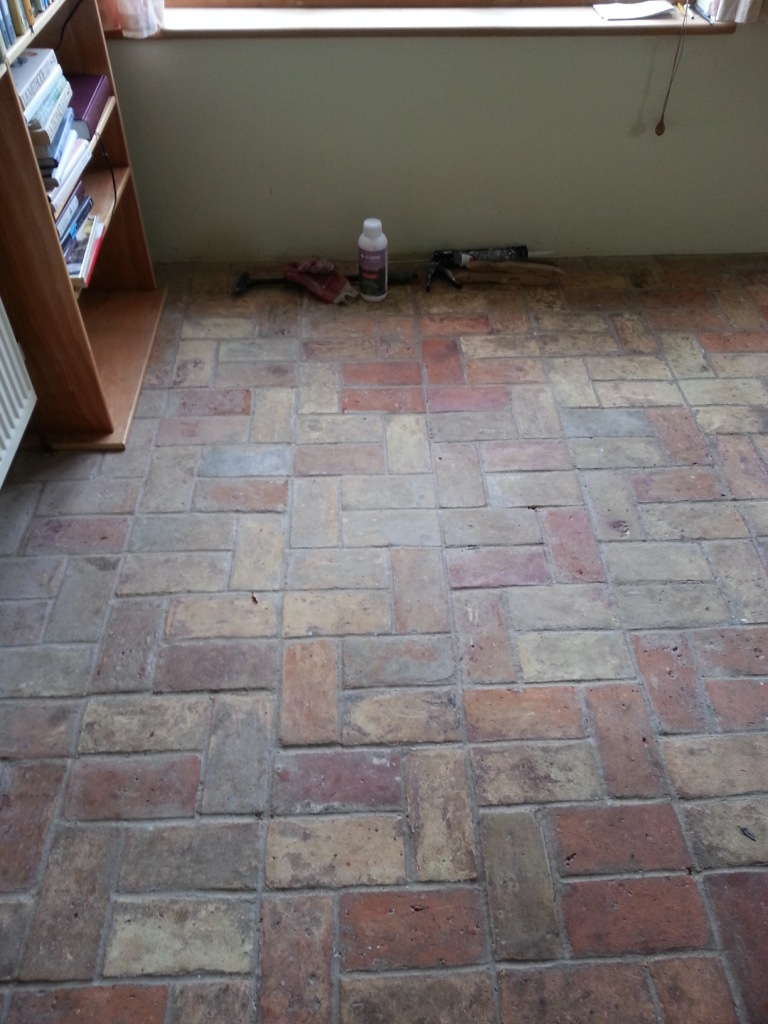
Although this wasn’t your typical tiled floor I knew we could achieve some fantastic results with the brick by using the right products and techniques.
As you can see from the photographs this certainly did the trick, and the customer was very pleased with the new revitalised appearance of her floor. While brick wasn't the easiest stone to work with - nor one that I normally encounter - I think you will agree we achieved an impressive transformation.
Source: Brick Tile Cleaning and Restoration Service in Bedfordshire

Although this wasn’t your typical tiled floor I knew we could achieve some fantastic results with the brick by using the right products and techniques.
 |
 |
Cleaning a Handmade Brick Floor
My first instinct was to use Tile Doctor Pro Clean, a high alkaline product, to clean the bricks since it is highly versatile. It cleans most types of natural stone tile very effectively, and so I believed it would also work well on brick. I applied the product to the floor and left it to dwell for twenty minutes before scrubbing into the brick with a black scrubbing pad fitted to a low speed rotary machine. As I anticipated this was successful in cleaning a large area of the floors, but a very greasy area by the range cooker and a lot of cement in thick patches remained. To resolve these problems I opted to cover the greasy area with Tile Doctor NanoTech HBU (Heavy Build-Up Remover) and left it for at least twenty minutes. This allowed the nano-sized cleaning particles to penetrate into the grease stains and dissolve them from within: something everyday cleaners can't do. I then used another black scrubbing pad to fully remove the stains from the floor and the area thoroughly with clean water. The improved the appearance of the floor a lot, but as a final step I went over the entire area using a steamer, along with more HBU Nanotech and handheld scrappers to manually remove stubborn marks and bits of paint. Dealing with the cement residue proved particularly difficult as some areas were an inch thick. To deal with these I used Tile Doctor Acid Gel - a blend of hydrochloric and phosphorus acids in gel form - to break them down as much as I could, before using scrappers to finally remove large clumps of cement.Sealing a Handmade Brick a Floor
After rinsing and extracting excess moisture from the floor I left it to dry for 10 days. Upon my return some areas of the floor were still too wet to seal even with continuous drying equipment in place. The floor needed to be fully dry in order to sealed, since moisture can negatively affect the sealer's performance, so I spent time drying those areas with a heat gun. Once satisfied that the floor was dried I sealed it using Tile Doctor Colour Grow. This is an impregnating sealer that I would typically use on unsealed porous stone such as Sandstone and Limestone since it is designed to penetrate into the pores of the stone to act as a barrier against ingrained dirt and stains. I decided that Colour Grow was the best fit for the brick, especially since it contains colour intensifying properties that would really accentuate the natural reddish and orange shades.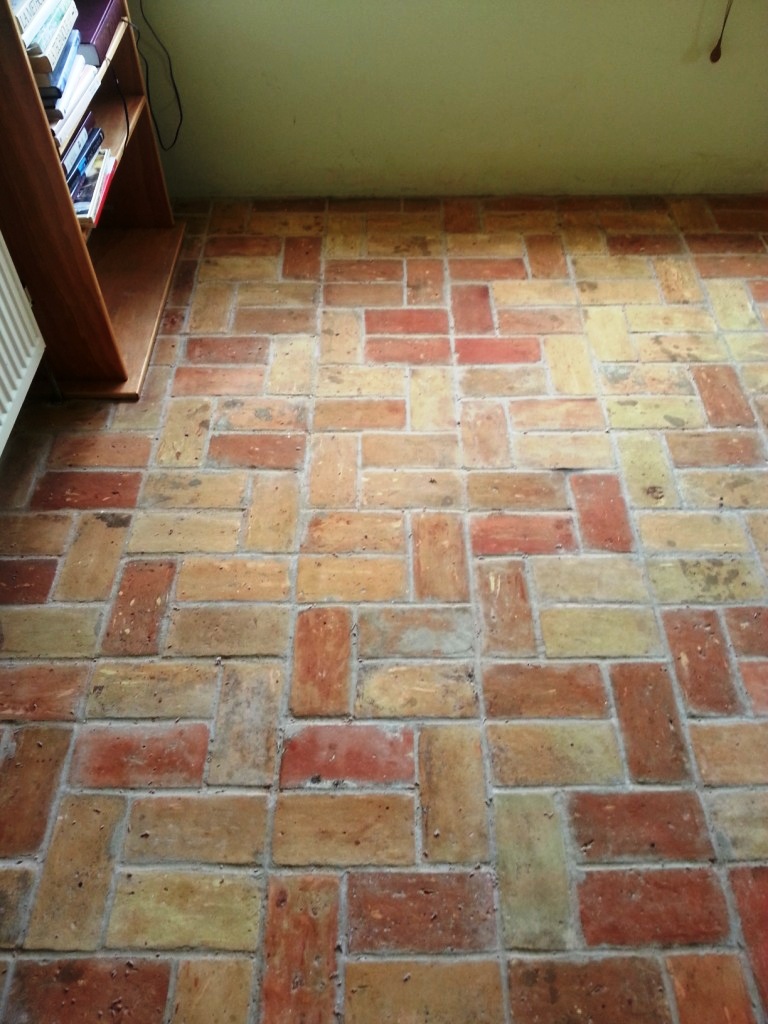 |
 |
As you can see from the photographs this certainly did the trick, and the customer was very pleased with the new revitalised appearance of her floor. While brick wasn't the easiest stone to work with - nor one that I normally encounter - I think you will agree we achieved an impressive transformation.
Source: Brick Tile Cleaning and Restoration Service in Bedfordshire
Beautiful Victorian Hallway Restored in Warwickshire
This Victorian tiled hallway was one of the most beautiful Victorian floors I have ever had the pleasure to work on. With the wide range of patterns and colours they are available in, it seems no two Victorian tiled floors are exactly the same, and this uniqueness is part of what makes them so
Read more...
Beautiful Victorian Tiled Hallway Repaired and Restored in Wyken
This Victorian tiled hallway was one of the most beautiful Victorian floors I have ever had the pleasure to work on. With the wide range of patterns and colours they are available in, it seems no two Victorian tiled floors are exactly the same, and this uniqueness is part of what makes them so appealing to property owners. Unfortunately, this floor had been poorly maintained over the years, even suffering from a few loose and missing tiles. There was a thick coating of dust and dirt soiling
Read more...
Saturday, June 25, 2016
How To Care For Granite Tile Floors
An entryway with granite floor tiles displays a certain regal elegance. Because of it's physical qualities, granite is quite durable - resistant to heat, stains, and sudden drops of heavy objects. Granite floor tiles are a practical luxurious investment for your home.
Granite floor tiles can also be quite expensive. Depending on where you places them - entryway, kitchen, dining room, bathroom - you could spend a great deal of money to have granite tiles. Because of this you will want to take great care if maintaining the tiles and caring for them with regular cleaning.
Basic Granite Floor Tiles Maintenance
Once each year you should re-apply the sealant to keep the granite a glossy shine and protect it from any damage caused by heavy objects, or regular foot traffic. Besides keeping it sealed once a year, there are other periodic activities you should do to keep your granite floor tiles looking new.
1. Inspect the edges and grout - Some times small chips in the granite can lead to bigger cracks or breaks a little later on. If you see anything like that replace the tile immediately. Inspect the grout for any dried out sections that are crumbling or falling out. This would usually happen in cases where the tiles were laid in an uneven spot.
2. Wipe up spills immediately - If something gets dropped on the floor tiles, then it should be wiped up immediately. Also any mud, or dirt, should be mopped and swept up quickly so that little particles of rock do not get embedded in the granite or scratch the surface.
Cleaning Granite Floor Tiles
Besides periodic inspections and re-sealing of the granite floor tiles, daily cleaning should be done in order to ensure that the tiles look their best for a long time.
• Daily dry-mopping. Run a dry-mop, or duster, over the granite tiles at least once a day. this will keep and dust, or small particles of rock from accumulating on the tile.
• Clean with approved granite cleaner. Do not use abrasive cleaners, bleach, or other detergents. This has the potential to ruin the coloration of the granite. Recommended granite cleaners, either form the granite manufacturer or a third party, should be used when cleaning the granite.
• Clean up any food, or drink, spills immediately to keep it from staining.
• You can use warm water and soap for regular everyday cleaning of our tile. However, there will be a filmy residue left behind. So, you will need to rinse a few times to diminish the residue.
Larger Jobs
If you have a large discoloration, or stain, in our granite floor tiles, then consult a professional cleaner who will have the equipment to do the job right without damaging the floors. You might damage the floor more with trial and error if you have never used any floor polishers before.
Source: www.DoItYourself.com
Putting the Life Back into Victorian Hallway Tiles in Monmouthshire
This Victorian tiled hallway at a house in the Forest of Dean had a very interesting pattern, consisting of an array of different colours, including shades of red, yellow and blue. Unfortunately, as you can see from the first photograph below, the tiles had lost all life, with the colours
Read more...
Friday, June 24, 2016
Polishing Travertine Tiled Kitchen Floor in Hampton
These Travertine tiles installed in the kitchen of a house in Hampton, Middlesex were looking flat and un-interesting and in need of some maintenance to put the life back into the floor. The old sealer had clearly worn down and had allowed soil to penetrate the tile and grout. There were also acidic etch marks across the floor which would need polishing out. Fact is If you want a polished stone floor to keep its appearance then it will need a regular maintenance plan in place, without it the
Read more...
Restoring the Appearance of a Polished Travertine Tiled Floor
If you want a polished stone floor to keep its appearance, then it will need a regular maintenance plan in place, without it the stone will lose its polish and start to look dull and un-inviting which was the story with this Travertine tiled floor installed throughout much of the grout floor of
Read more...
Thursday, June 23, 2016
How to Restore a Deep Polish on a Travertine Floor
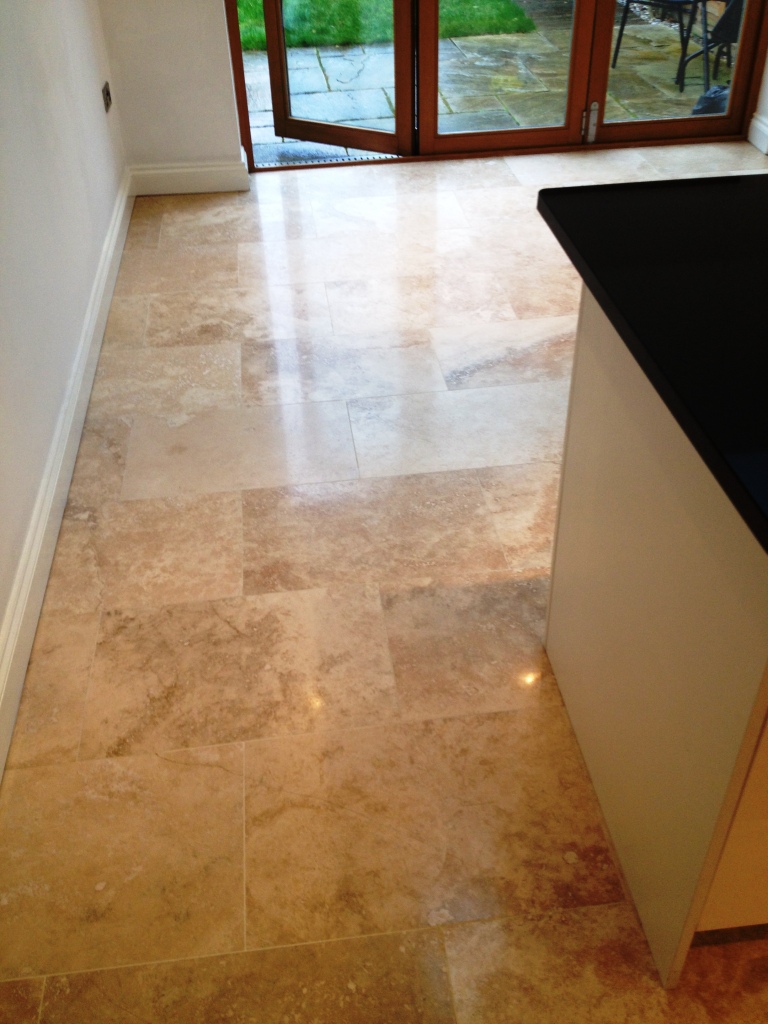
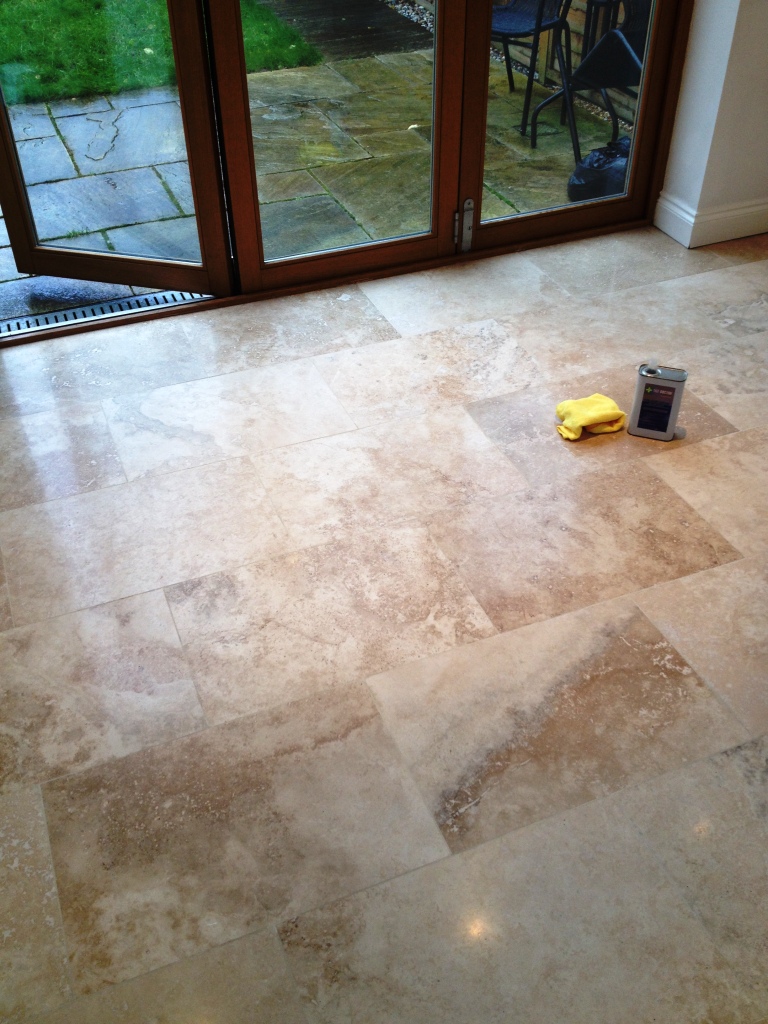
These Travertine tiles installed in the kitchen of a house in Hampton, Middlesex were looking flat and un-interesting and in need of some maintenance to put the life back into the floor. The old sealer had clearly worn down and had allowed soil to penetrate the tile and grout. There were also acidic etch marks across the floor which would need polishing out.
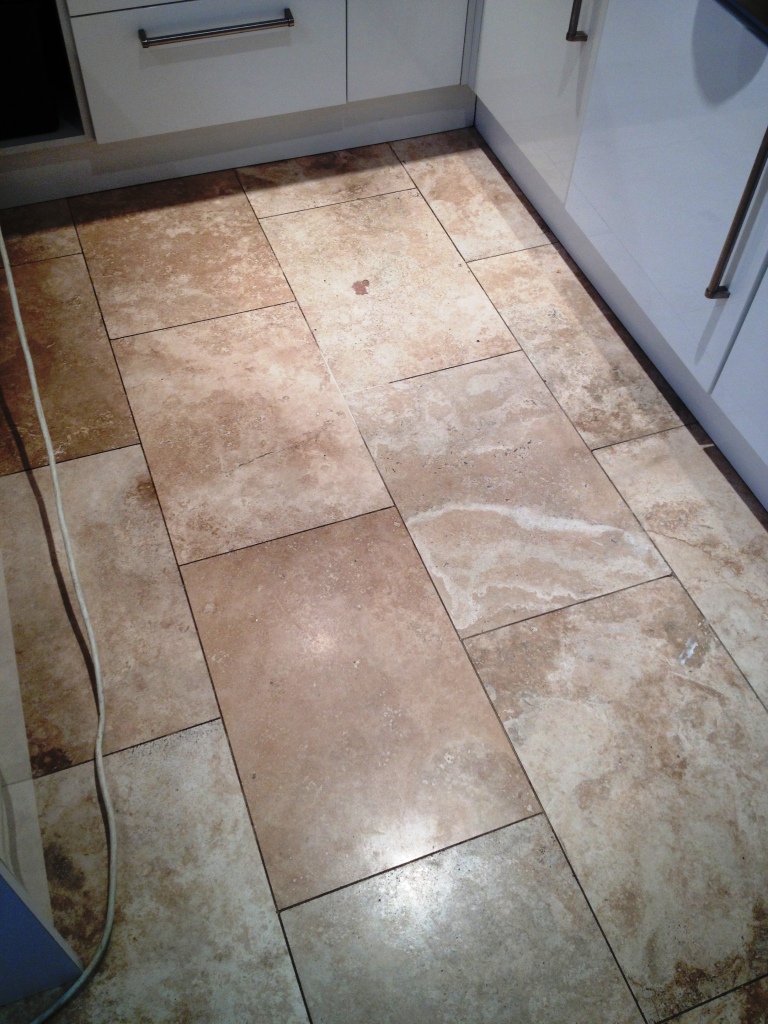
Fact is If you want a polished stone floor to keep its appearance then it will need a regular maintenance plan in place, without it the stone will lose its polish and start to look dull and un-inviting which I’m sure is a familiar story for many of you reading this post, the upside is of course that Travertine is an amazing natural stone which does look fantastic when properly maintained.
The floor was given a final rinse with water to remove any soil created by the burnishing which was then extracted using the wet vacuum and left to dry off overnight.
For the regular cleaning of stone floors, we recommend Tile Doctor Stone Soap which has been specially designed for the cleaning of polished stone floors.
Source: Travertine Tile Cleaning and Polishing Service in Middlesex

Fact is If you want a polished stone floor to keep its appearance then it will need a regular maintenance plan in place, without it the stone will lose its polish and start to look dull and un-inviting which I’m sure is a familiar story for many of you reading this post, the upside is of course that Travertine is an amazing natural stone which does look fantastic when properly maintained.

Cleaning and Re-Surfacing Travertine Floor Tiles
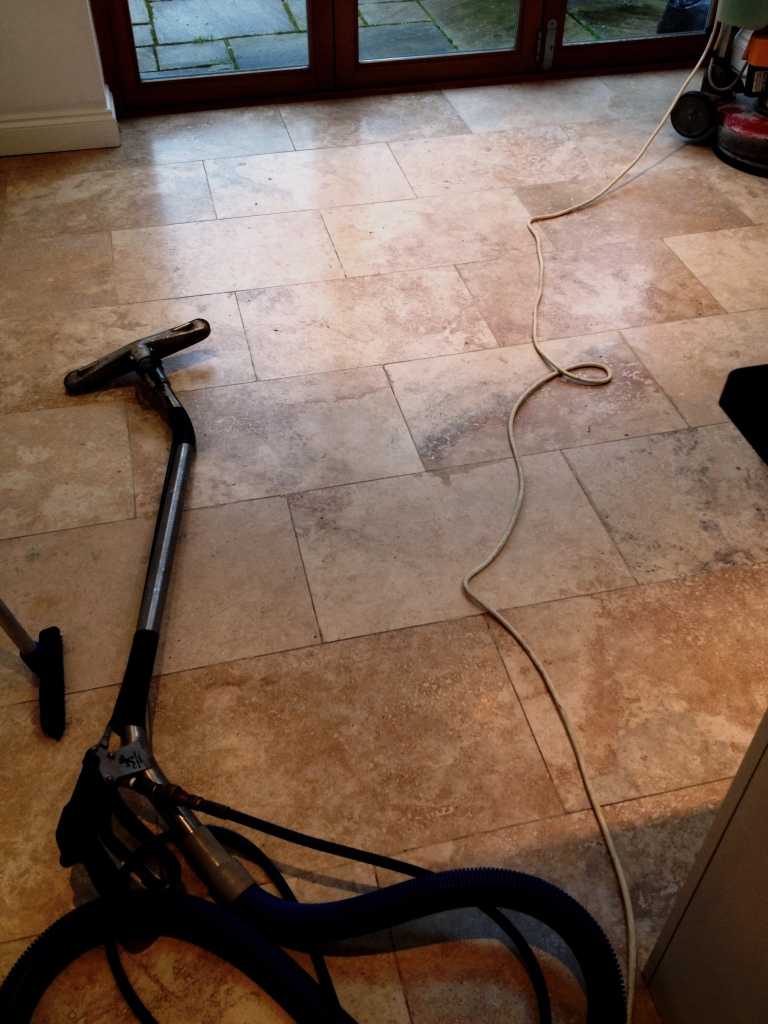
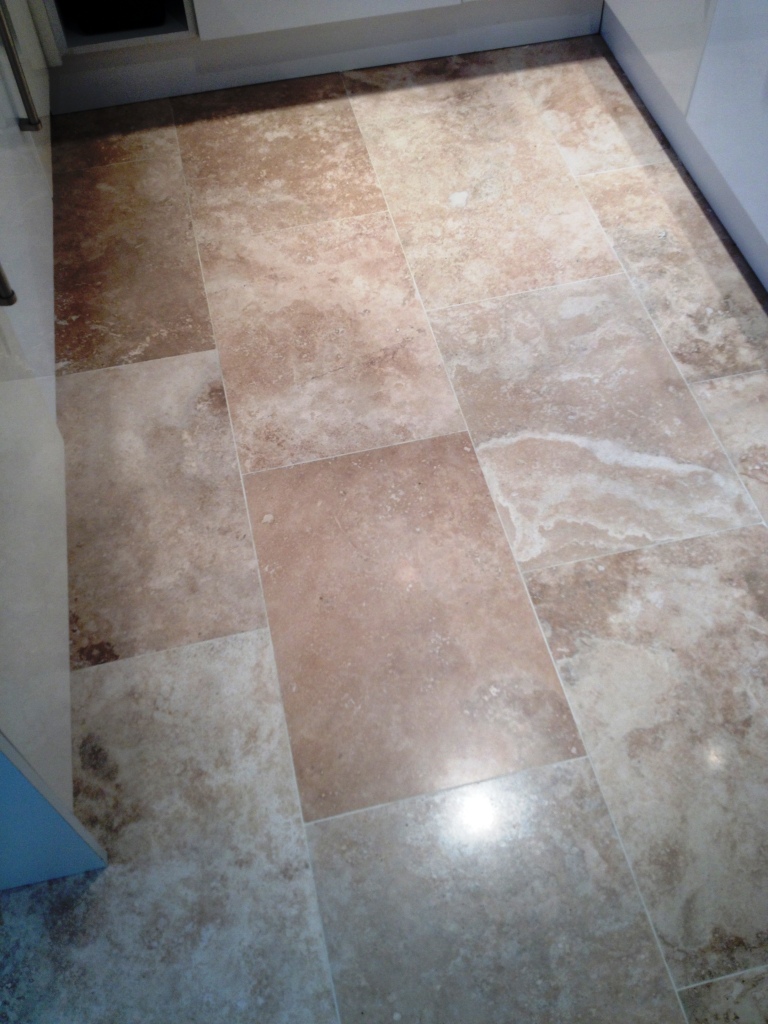
To start with, we cleaned the tiles and grout with Tile Doctor Pro-Clean which is a strong cleaner which being alkaline is safe to use on stone. The floor was then rinsed thoroughly with water and removed the soiled water with a wet vacuum. Following the initial clean we then proceeded to re-surface the tiles with Tile Doctor diamond burnishing pads which come in a pack of four pads of different grades from coarse to extra fine. This cut back through the tile to remove the etch marks, then by applying the finer grades of diamond pads resurfaced the Travertine and brought back the shiny finish that was missing.
The floor was given a final rinse with water to remove any soil created by the burnishing which was then extracted using the wet vacuum and left to dry off overnight.

Sealing Travertine Floor Tiles
I returned the next day to seal the floor, checking first that the floor had dried overnight which it had. Two coats of Tile Doctor Colour Grow were, making sure that the first coat had dried before applying the second. Colour Grow is an impregnating sealer that soaks into the fine pores of the stone protecting the floor from within and ensuring that soils and spills are easily removed.
For the regular cleaning of stone floors, we recommend Tile Doctor Stone Soap which has been specially designed for the cleaning of polished stone floors.
Source: Travertine Tile Cleaning and Polishing Service in Middlesex
Wednesday, June 22, 2016
About Cement Floors
Cement floors have become a popular choice among some home decorators, searching for decorative and affordable flooring solutions. However, some people still prefer using concrete floors for their bathrooms. This is primarily because concrete surfaces offer more durability and a wider range of designs. Cement floors are not recommended for bathroom flooring as bathroom surfaces are continuously exposed to a high level of daily usage, making them vulnerable to constant weathering.
Concrete floors are known to remain intact even when continuously exposed to water, like in the shower area. Concrete floorings are used in their pure format or for creating finished surfaces areas, i.e. laying stone floors, incorporating the use marble or terrazzo. Whereas, the top surface of the cement floor is susceptible to the cascading force of overhead showers and tend to chip-away with extended usage. This leads to an erosion-like mechanism wherein a rough surface along the exposed layer of the cement is created. This roughened surface area tends to trap dust particles which increase in volume due to water absorption, causing further cracking of the concrete flooring. These microscopic holes also host many bacterial microorganisms, creating bathroom hygiene-related issues.
This problem is created due the cement mix that is a bit porous by nature and hence, is prone to water seepage. This also causes easy staining of the cement designs on the bathroom floor. The increased water seepage is a direct deterrent to the bathroom’s plumbing installations. The accumulating water vapor due to the absorption of moisture migrates through the cement mix, causing the floor to ‘sweat’. This creates increased pressure on the plumbing installations, often cracking them, causing internal leakages.
Source: www.DoItYourself.com
Tuesday, June 21, 2016
Deep Cleaning and Sealing of a Chineese Slate Tiled Floor
This first photo shows a classic example of a poorly maintained floor, which had faded and lost its colour due to it not being maintained or sealed for many years. In this case, the tiles were Chinese Slate, and were proving very difficult for the property owner to keep clean due to the lack of
Read more...
Travertine Tiled Floor Stripped and Polished in Great Wilbraham
If you want a polished stone floor to keep its appearance, then it will need a regular maintenance plan in place, without it the stone will lose its polish and start to look dull and un-inviting which was the story with this Travertine tiled floor installed throughout much of the grout floor of this house in the village of Great Wilbraham near Cambridge. I was able to find out from the owner that the floor was last treated six years ago with Lithofin Stain Stop which is a solvent based
Read more...
Complete Restoration of Chinese Slate Tiles in Norton near Daventy
This first photo shows a classic example of a poorly maintained floor, which had faded and lost its colour due to it not being maintained or sealed for many years. In this case, the tiles were Chinese Slate, and were proving very difficult for the property owner to keep clean due to the lack of sealer to protect against dirt and stains. The grout in particular was quite discoloured and of increasing concern to the owner, prompting up the decision to contact me about a restoration job. I
Read more...
Badly Stained and Mouldy Marble Shower a Cubicle Transformed in Beddau
Tiled shower cubicles can very easily become tired and grubby looking without the right care. The shampoos and soaps we use in our everyday lives can have long lasting damage if their effects are not sufficiently dealt with, with grout mould being a very common problem for property owners in the UK where we have a cold climate that encourages us to seal up our homes limiting natural ventilation. At this property in the small village of Beddau, near Cardiff, my customer had a particularly
Read more...
Laminate Flooring Advantages
Durability:
Because it's designed with a tough and durable wear layer, laminate flooring is much stronger than most installed solid hardwood flooring, carpets and vinyls, it's more resistant to scratches than softer surfaces (solid hardwood floors for eg.) and is one of the best choices for households with heavy foot traffic, kids, or pets. But, best of all, laminates will look like new for years.
Resistance:
Laminates are highly resistant to stains, fading and moisture and many laminate flooring manufacturers offer warranty protection against them for a long period of time (usually from 10 to 25 years).
Ease of installation:
The top brands of laminate flooring have developed a glueless floating floor installation process. They just need to be cut, clicked together and are ready for walking or even placing heavy things, like furniture, on them. Most professional installers could do it in a couple of days, but expect to take longer if you want to do it yourself.
Easy cleaning and maintenance:
To clean up spills and messes, just use a little soap and water and your laminate floors will look brand new.
Healthy flooring:
Laminate flooring provides a much cleaner and healthier living environment when compared to other floorings such as carpets, with regular cleaning cycles. It accumulates less dust, pet dander, allergens and it doesn't hold residual stain contaminants on the surface. Allergic people will often be recommended to remove the carpets from the living space.
Economical
A typical laminate flooring is and extremely economical solution, if you take in consideration the costs of alternate flooring solutions. Solid hardwood floors will require 4-5 refinishings and carpets and vinyls will need to be replaced at least twice (depending on traffic loads), while laminates don't require anything.
In conclusion, kids playing with their toys on the floor, the dog running through with dirty paws, friends walking with wet shoes on it, or baby bottle spills all over it won't be a problem with laminate flooring. They are the perfect floor for busy families and growing households.
Source: www.DoItYourself.com
Monday, June 20, 2016
Restoring the Appearance of a Marble Shower near Cardiff
Tiled shower cubicles can very easily become tired and grubby looking without the right care. The shampoos and soaps we use in our everyday lives can have long lasting damage if their effects are not sufficiently dealt with, with grout mould being a very common problem for property owners in the UK where we have a cold climate that encourages us to seal up our homes limiting natural ventilation.
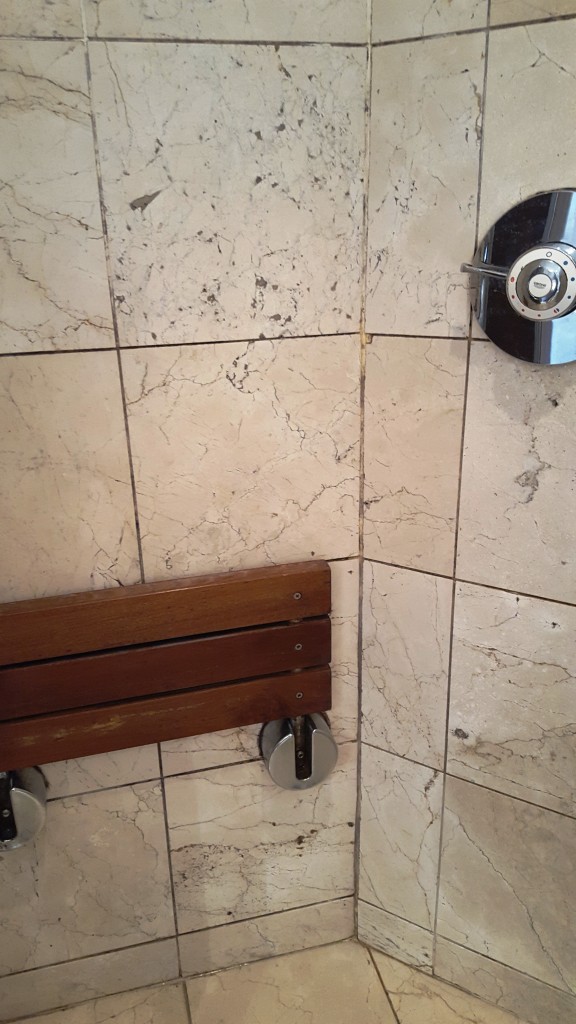
At this property in the small village of Beddau, near Cardiff, my customer had a particularly poorly maintained Marble tiled shower cubicle suffering from bad staining. Since Marble is an acid-sensitive stone it is especially vulnerable to damage when exposed to even slightly acidic shower products. The grout was also in a bad way, having turned from a pleasant off white colour to black. The entire area was now well overdue from some attention from the Tile Doctor.


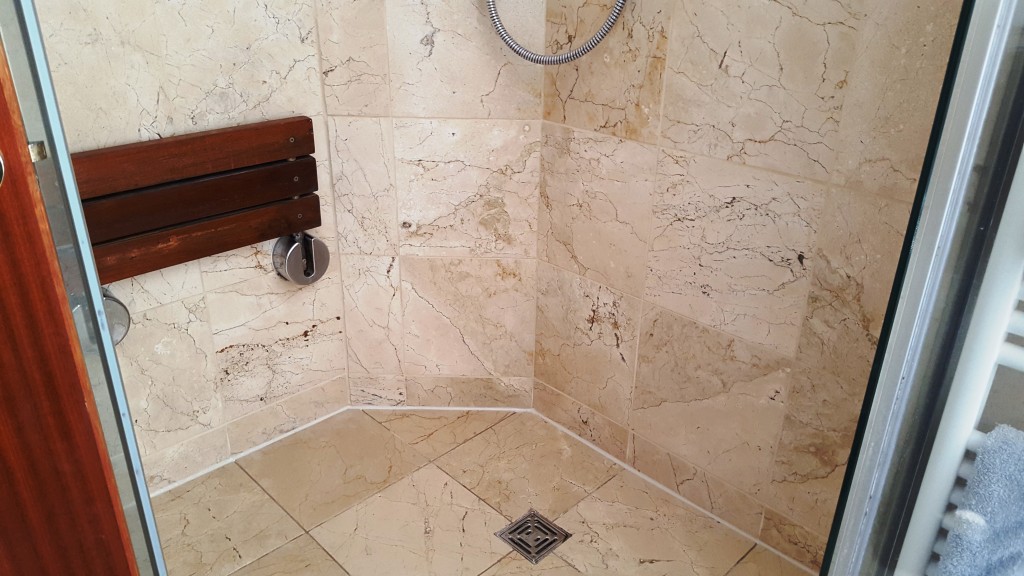
I added the finishing touches to the restoration by removing all the mouldy silicone and replaced it with new silicone. Though this wasn't the easiest of jobs, the final result is one of which I am particularly proud. It certainly pleased the customer!
Source: Marble Tile and Grout Cleaning Service in South Wales

At this property in the small village of Beddau, near Cardiff, my customer had a particularly poorly maintained Marble tiled shower cubicle suffering from bad staining. Since Marble is an acid-sensitive stone it is especially vulnerable to damage when exposed to even slightly acidic shower products. The grout was also in a bad way, having turned from a pleasant off white colour to black. The entire area was now well overdue from some attention from the Tile Doctor.

Cleaning a Marble Tiled Shower Cubicle
To begin the restoration of these tiles I had to remove any old sealer. I did this by applying a combination of Tile Doctor Pro Clean, which is a versatile cleaner, stripper and degreaser, and Tile Doctor NanoTech HBU, which is a more powerful product designed for the removal of heavy soil buildup. As the old sealer came away, I left the two products to soak into the tiles to lift out the stains and ingrained dirt caused by the Marble's exposure to shampoo and soaps. This really helped to alleviate the grubby appearance previously held by the tiles. As previously mentioned, the grout lines were also in a really bad state. Undeterred, I attempted for three hours to clean the grout lines with unsatisfactory results, and so resolved instead to remove the old grout entirely and re-grout with a new Jasmine coloured grout throughout the bathroom. I did consider simply recolouring the grout with one of our Grout Colourants but, as an experienced tiler, I felt for me it would quicker and easier to achieve the required results by re-grouting.
Sealing a Marble Tiled Shower Cubicle
After leaving the grout and tiles to dry overnight following the cleaning and regrouping, I returned to the property to seal the area. To do this I opted to use two coats of Tile Doctor Colour Grow, our solvent-based impregnating sealer which fills the pores of the stone to act as a barrier against trapped dirt and stains, and to prevent further contamination. As a colour intensifying sealer it really emphasised the natural shades in the Marble. Colour Grow can achieve similar results on other types of unpolished stone, including Limestone, Flagstones, Quarry, Sandstone and Slate.
I added the finishing touches to the restoration by removing all the mouldy silicone and replaced it with new silicone. Though this wasn't the easiest of jobs, the final result is one of which I am particularly proud. It certainly pleased the customer!

Source: Marble Tile and Grout Cleaning Service in South Wales
Sunday, June 19, 2016
Restoring the Look of Badly Stained Terracotta Kitchen Tiles in Matlock
Having an effective sealer in place is essential for ensuring the long term condition of tiled floors in fact a lack of sealer can make cleaning the tiles exceptionally difficult as the sealer prevents dirt becoming ingrained in the tile. This property owner, living in the former spa town of Matlock in Derbyshire, was experiencing problems with their Terracotta tiled kitchen floor since they had applied some kind of wax to act as a sealer, and this had worn off within a few weeks. After
Read more...
Deep Cleaning And Sealing Stained Terracotta Tiles in Derbyshire
Having an effective sealer in place is essential for ensuring the long term condition of tiled floors in fact a lack of sealer can make cleaning the tiles exceptionally difficult as the sealer prevents dirt becoming ingrained in the tile. This property owner, living in the former spa town of
Read more...
Friday, June 17, 2016
Restoring a neglected Quarry Tiled Floor in Monmouthshire
It's almost inevitable that tiled floors which have been covered by carpet, paint, or linoleum for many years will be in a sorry state when they are finally unveiled. However, many property owners and renovators are keen to restore original tiled features, and in the majority of cases require
Read more...
Restoring the Appearance of Floor Tile Grout in Lancashire
Well maintained grout is fundamental to achieving a great looking tiled floor, whatever your choice of tile or stone. Even if the tiles themselves are in reasonably good condition, dirty and damaged grout lines can really upset the overall appearance of the floor. Such was the case with this
Read more...
Grout Cleaning and Colouring for a Ceramic Terracotta Tiled Floor in Preston
Well maintained grout is fundamental to achieving a great looking tiled floor, whatever your choice of tile or stone. Even if the tiles themselves are in reasonably good condition, dirty and damaged grout lines can really upset the overall appearance of the floor. Such was the case with this Ceramic Terracotta tiled floor in the bustling Lancashire town of Preston. The property owner recently had a new kitchen installed, but chose not to have new tiles fitted since the original tiles
Read more...
Wednesday, June 15, 2016
Extremely Dirty and Damp Quarry Tiled Floor Restored in Higham Ferrers
This red Quarry tiled floor was in the dining room of a house in the East Northamptonshire market town of Higham Ferrers. Despite being an original feature of the property, the floor had never been taken care of and looked to be completely beyond salvation and what must be the worst condition I have seen in a long time. When I first inspected the floor it became very quickly clear that it was suffering from severe damp problems, covering roughly two thirds of the entire surface area. I took
Read more...
Tuesday, June 14, 2016
Restoring a neglected Quarry Tiled Floor in Northamptonshire
This red Quarry tiled floor was in the dining room of a house in the East Northamptonshire market town of Higham Ferrers. Despite being an original feature of the property, the floor had never been taken care of and looked to be completely beyond salvation and what must be the worst condition I
Read more...
Restoring the Appearance of Quarry Tiles
This red Quarry tiled floor was in the dining room of a house in the East Northamptonshire market town of Higham Ferrers. Despite being an original feature of the property, the floor had never been taken care of and looked to be completely beyond salvation and what must be the worst condition I have seen in a long time.
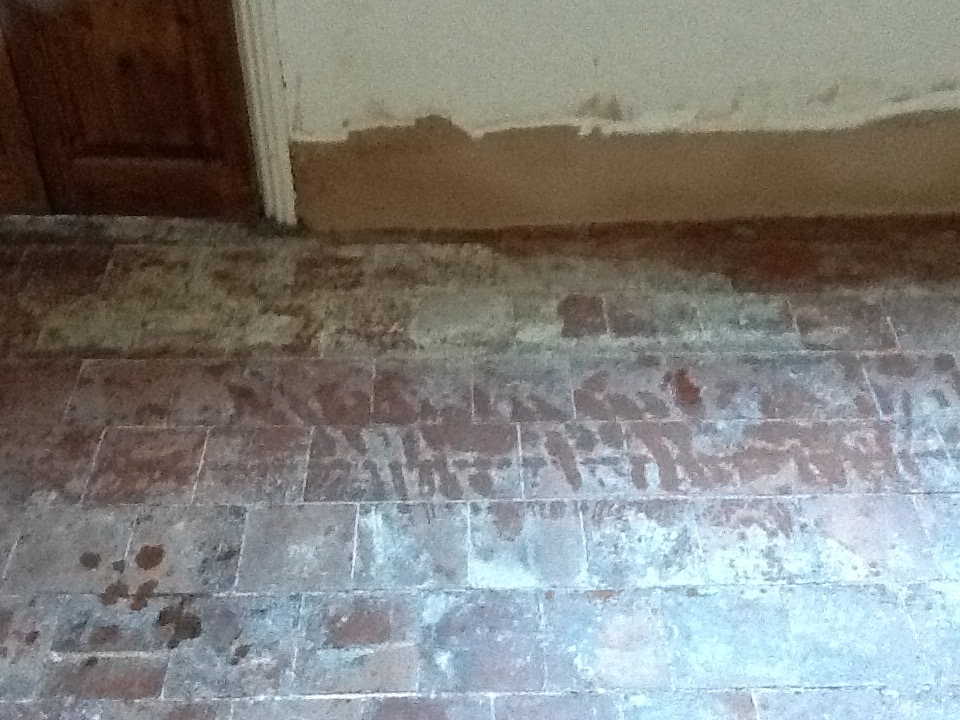
When I first inspected the floor it became very quickly clear that it was suffering from severe damp problems, covering roughly two thirds of the entire surface area. I took damp meter readings and discovered that the floor was saturated as there was no damp proof course installed. This problem was compounded by staining from the glue residue used to hold down the linoleum which previously covered the tiles. But while some floors look beyond salvation, I was certain I could restore this one to an acceptable appearance. A hallway in the property had the same Quarry tiles, but these had been painted with a red tile paint at some point in the past, which itself had worn off in the main traffic areas. These tiles had no damp problems and so it would just be a case of removing the rest of the paint and providing a thorough cleaning before sealing.
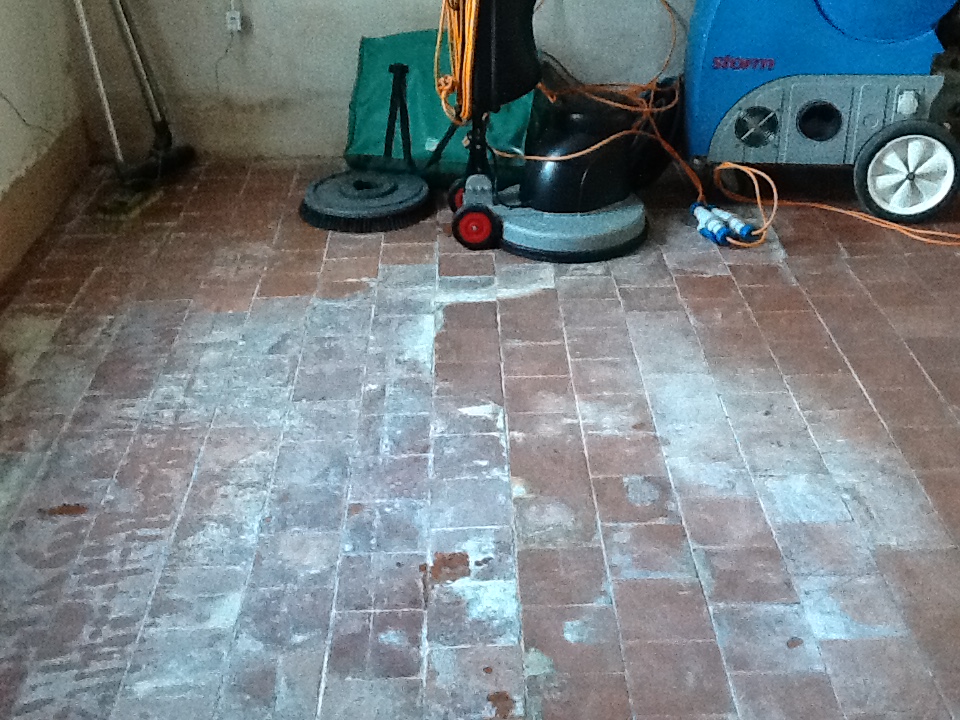
The customer was also keen that the dining room be restored as near as possible to the hallway tiles to try and achieve a uniform finish. I did inform the customer that due to the vast difference in condition this would be a challenge but I would do my best. A quote was given and work was booked in at the customer's convenience.
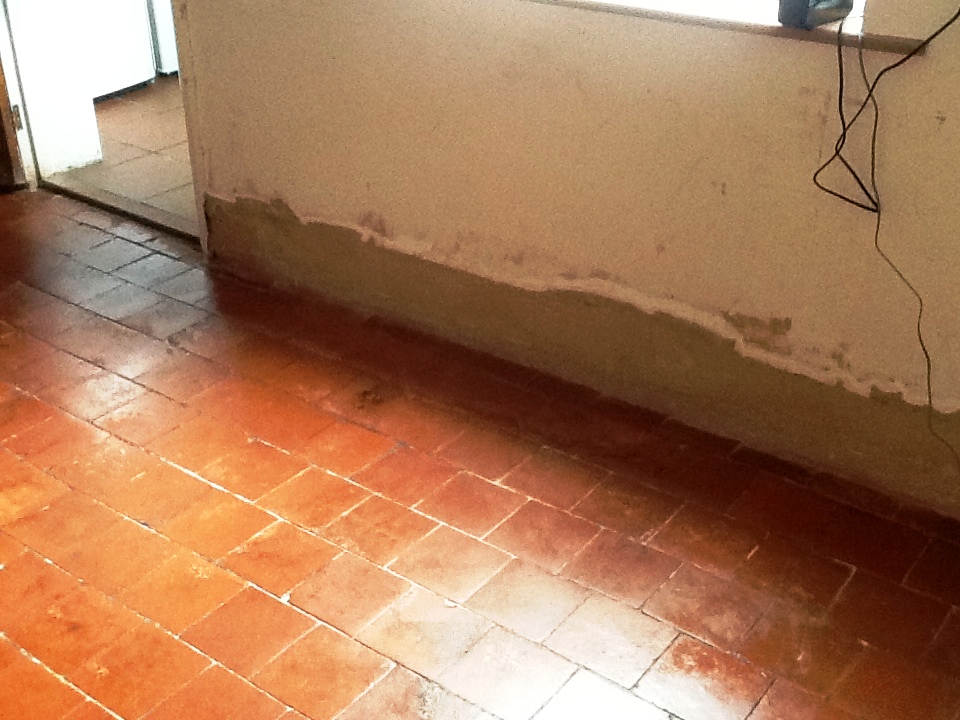
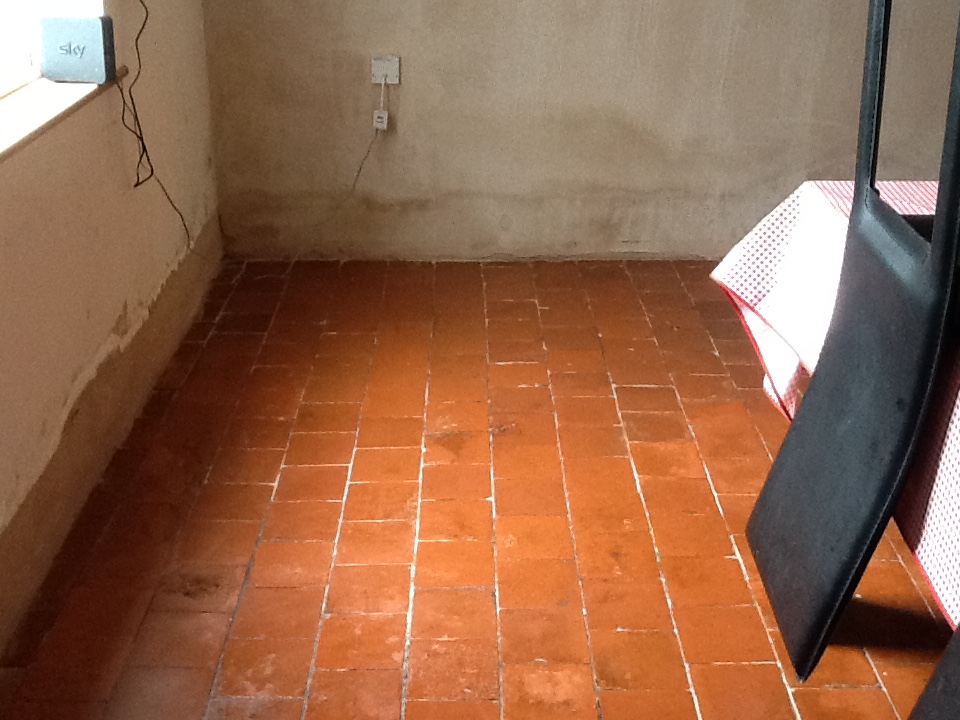
As the pictures show, there was a vast improvement in the floor and the customer was pleased with the results. It really goes to show that while a floor might look beyond salvation, wait can in fact be restored to an acceptable condition using the right methods and products. The customer was also given advice on maintenance of this type of floor to keep it looking its best for years to come.
Source: Quarry Tile Cleaning and Restoration Service in Northamptonshire

When I first inspected the floor it became very quickly clear that it was suffering from severe damp problems, covering roughly two thirds of the entire surface area. I took damp meter readings and discovered that the floor was saturated as there was no damp proof course installed. This problem was compounded by staining from the glue residue used to hold down the linoleum which previously covered the tiles. But while some floors look beyond salvation, I was certain I could restore this one to an acceptable appearance. A hallway in the property had the same Quarry tiles, but these had been painted with a red tile paint at some point in the past, which itself had worn off in the main traffic areas. These tiles had no damp problems and so it would just be a case of removing the rest of the paint and providing a thorough cleaning before sealing.

The customer was also keen that the dining room be restored as near as possible to the hallway tiles to try and achieve a uniform finish. I did inform the customer that due to the vast difference in condition this would be a challenge but I would do my best. A quote was given and work was booked in at the customer's convenience.
Cleaning Extremely Dirty Quarry Tiles
Before beginning the restoration, I carried out a patch test to see which products would achieve the best results on the tiles. After vacuuming and mopping the floor to remove the immediate layers of muck, I decided my best course of action would be to use the heavy duty stripper, Tile Doctor Remove & Go. Working in four separate sections, I applied the product then scrubbed it using a black stripping pad to a rotary machine. Remove & Go is designed to break down old sealers, paints and glues, making it an ideal product for use in this particular situation. This area was then rinsed off with a wet-vac machine and the process was repeated on the rest of the floor. I then inspected the floor and noticed a few shiny patches where the old sealer hadn't been fully removed, so I tackled these stubborn areas by hand with a second application of Remove & Go. A final rinse was given to the whole floor to make sure no excess cleaning products remained.Sealing Quarry Tiles
After completing the cleaning process and removing as much water as possible using a wet vacuum, I installed a dehumidifier and left the tiles to dry for an entire month. Upon my return to the property I took damp meter readings to ensure the tiles were fully dry prior to the application of the sealer. This is crucial as excess moisture can cloud the sealer, rendering it less effective at protecting the stone. I opted to use Tile Doctor Colour Grow to seal the floor primarily because is fully breathable and therefore ideal for floors that are prone to damp problems. It has the added bonus of being a colour intensifying sealer that really enhanced the natural reddish shades in the Quarry.
As the pictures show, there was a vast improvement in the floor and the customer was pleased with the results. It really goes to show that while a floor might look beyond salvation, wait can in fact be restored to an acceptable condition using the right methods and products. The customer was also given advice on maintenance of this type of floor to keep it looking its best for years to come.

Source: Quarry Tile Cleaning and Restoration Service in Northamptonshire
Monday, June 13, 2016
Polishing a Travertine Tiled Kitchen in Derbyshire
This customer had some real difficulty in getting their fantastic Travertine tiled kitchen area looking as good as it should. The cleaning methods they had previously employed were unable to prevent the tiles from appearing dull, and the customer was also unable to deal with the displeasing
Read more...
Laminate Flooring: Installation (Part 2)
In the first part of this series, we discussed laminate flooring – what it is, its applications and its advantages. Here, we discuss installation of a laminate floor.
Where To Install
Because of the nature of design, there are rooms where you shouldn’t install laminate flooring. Installation of laminate in bathrooms or saunas is not a good practice, because the core of the laminate will swell and warp. Any room where there is an excess of water and humidity is a poor choice. However, if care is taken, it can be installed in bathrooms, following special installation practices. Discuss these issues with your installer.
Floor Preparation
- Installation is straight forward and only requires certain precautions to insure a beautiful floor. Because laminate flooring is 5/16” to 3/8” thick as compared to hardwood flooring, which is 3/8” to 3/4”, the sub floor must be clean, smooth, and dry. The beauty of laminate is that it can be installed over concrete, wood flooring, vinyl tile, linoleum, tile, or virtually any other hard, flat surface.
- An underlayerment/vapor barrier is installed on the floor prior to installation. This sheet works in two ways – it will keep moisture from coming through the sub floor if installed on concrete, and acts as soundproofing. If laminate is to be installed over a radiant floor, be sure to read any instructions from both the laminate flooring and radiant heat manufacturer before proceeding.
- Always allow the flooring to acclimate to room conditions for at least 48 hours. Before beginning installation, inspect each piece for defects or damage. Insure that room temperature is at least 65 degrees.
The Installation
- Laminate flooring uses unique edge joining systems for installation. There are several different types, so be sure to familiarize yourself with the brand you have purchased. Some types are simple snap together types, while others use a tap with a mallet at the end of the panels. Glue is used less often now than it used to be, making the installation much quicker and easier.
- To determine the orientation of the flooring, experts say to determine the source of incoming light. The laminate planks should run parallel to the light from windows or glass doors.
- A 1/8” gap is used on the beginning of installation to allow for expansion. The first row is started with a full plank. It is absolutely imperative that this first plank be straight, because any deviation from straightness is magnified over the entire installation. Planks are staggered, with second row a 2/3 plank and the third row a 1/3 plank. The finished installation should reveal the expansion gap around the perimeter.
- A base shoe molding is then installed that covers the expansion gap. End moldings are used at doorways to cover the end installation. A T molding is utilized to join the laminate at doors or thresholds to other rooms on the same level.
Installation of laminate flooring is relatively easy. Follow these simple guidelines to insure proper installation.
Source: www.DoItYourself.com
Laminate Flooring: Cheaper Options with Lasting Appeal
If you want the look of marble or bamboo flooring in your home, but cannot justify the cost, then laminate flooring is what you are looking for. Probably the biggest advantage of laminate flooring is its cost. Here, we discuss laminate flooring, both advantages and disadvantages, and what to look for in laminate flooring.
The Case For Laminate Flooring
For remodeling a kitchen on a budget, laminate flooring is often the best choice. It is durable, easy to clean, and the many styles and colors can almost duplicate more expensive floor treatments. Because of its versatility, it comes in different grades for the home. These grades, which are approved by The Association of European Producers of Laminate Flooring (ELPF), are guidelines for every area of the home. Called AC hardness ratings, they range in number from AC1, which is designed for low traffic areas such as a bedroom, to AC5, which can be used in heavy traffic areas such as a commercial enterprise. Your choice is determined by the area of the home in which you would install the flooring – for example an AC3, which is suitable for just about any high traffic area of the home. Here, price is the guideline.
Laminate flooring is made up of several layers of material, which include a moisture resistant layer under a layer of high density fiberboard. The process is finished with a high resolution photographic image of natural wood flooring, making it almost undetectable from actual hardwood flooring. The good thing about laminate flooring is that it does not need to be installed above grade, as hardwood or other types of flooring must.
Maintenance
Laminate flooring does not require special cleaners or polishes to maintain it. In fact, manufacturer’s recommend that you don’t use abrasive cleansers or soap based detergents on this flooring. A dust mop or a vacuum cleaner with a soft brush is sufficient to clean it, followed by a damp mop and drying with a soft cloth. Stubborn stains such as tar or oil can be cleaned with acetone, or fingernail polish, followed by wiping with a damp cloth.
Because of the nature of its design, manufacturers recommend that some caution be used on a laminate floor installation. You should not wear stiletto heels when walking on the floor. Tables and other objects with concentrated weight on the flooring should utilize felt pads to avoid denting of the surface. If heavy appliances must be moved, care should be taken to avoid damage, and a sheet of plywood placed on the floor to protect the laminate.
In Conclusion
Although this may sound like a lot of extra work in the home, the cost savings are well worth the extra effort to maintain a laminate floor. A beautiful floor is the key to the ambiance of a room, and laminate flooring fits the bill. In the next part of this series, we discuss the installation of laminate flooring.
Source: www.DoItYourself.com
Sunday, June 12, 2016
Dull Travertine Kitchen Floor Burnished and Polished in Ashbourne
This customer had some real difficulty in getting their fantastic Travertine tiled kitchen area looking as good as it should. The cleaning methods they had previously employed were unable to prevent the tiles from appearing dull, and the customer was also unable to deal with the displeasing marks and small cracks damaging the stone. Keen to get the floor back to looking its best, the customer called me down to their property, which overlooks the beautiful countryside area of Ashbourne, to
Read more...
Saturday, June 11, 2016
Fantastic 1920's Victorian Tiled Floor Unearthed and Restored in Derby
Victorian tiled floors are timeless - despite first coming into popular use in UK houses during the 19th century, they've remained stylish in the eyes of many homeowners and interior designers. This fantastic black and white patterned example at a property in Derby dates back to 1929. However, the owners only recently discovered the floor, it having being hidden under carpet for many years. Discovering a tiled floor beneath carpet like this is, in my experience, a relatively common
Read more...
Friday, June 10, 2016
Restoring Victorian Tiled Lobby in Derby
Victorian tiled floors are timeless - despite first coming into popular use in UK houses during the 19th century, they've remained stylish in the eyes of many homeowners and interior designers. This fantastic black and white patterned example at a property in Derby dates back to 1929. However,
Read more...
Laminate Flooring Installation Tips
Every laminate flooring manufacturer has their own installation procedures. We strongly recommend you read, and follow, the manufacturer's installation procedures for the flooring you purchase. You may notice how similar they are, yet there are subtle differences in certain aspects such as gluing. It is important to realize that failure to follow the instructions supplied by your manufacturer, or failure to use their recommended products may void their warranty.
Although each manufacturer has their own guidelines, here are a few things common among all. First, you need a level, no bounce sub floor to lay the planks over. Typically the floor should be sound and flat with no voids greater than 3 inches. High spots must be ground off and low spots filled to make the floor flat (1/8" in a 48" length). You must account for a 1/4" gap along the whole perimeter of the installation. If the floor is touching or too close to a wall, it will undoubtedly fail.
All the laminate floors must be allowed to acclimate to their final surroundings. Two or three days is usually appropriate. Do not bring a floor home and install it. Allow the flooring to adjust to its new environmental conditions before you start the installation.
In our forums, many people have placed comments about laminates. In order to avoid seeing the seams near a patio door please consider running the planks at a right angle to the door, or at a 45 degree diagonal angle - which is more work, but quite attractive.
Source: www.DoItYourself.com
Worn and Dirty Victorian Tiled Lobby Rejuvenated in Swindon
Victorian tiled floors are a popular feature in period houses and new builds trying to get that classic look. While they originated in the 19th century, they have a certain timeless quality that property owners love. Historically due to their hard wearing qualities they were most commonly used for flooring high traffic areas such as lobbies and hallways, however Victorian tiles are porous and without the correct maintenance the tiles can start to lose their appearance very quickly. This
Read more...
Thursday, June 9, 2016
Ceramic Tiled Floor Cleaned and Grout Recoloured in Mold
Moving into a new home is a stressful but rewarding experience. This customer had just recently moved into a property in the neighbouring and historic Flintshire town of Mold, and was keen to make some renovations. High on the agenda was the restoration of a large number of Ceramic floor tiles spread throughout multiple downstairs rooms. Although undecided as to whether to keep the tiles for the long-term or have them removed, the customer did resolve to have them professionally cleaned,
Read more...
Refreshing the look of Victorian Floor Tiles
Victorian tiled floors are a popular feature in period houses and new builds trying to get that classic look. While they originated in the 19th century, they have a certain timeless quality that property owners love. Historically due to their hard wearing qualities they were most commonly used for flooring high traffic areas such as lobbies and hallways, however Victorian tiles are porous and without the correct maintenance the tiles can start to lose their appearance very quickly.
This customer from Swindon has an original Victorian tiled lobby at the front of their house that was suffering from this very same problem. Years worth of ingrained dirt and muck had completely sapped all colour and character from the tiles, and the customer was keen to get them back to looking their best.
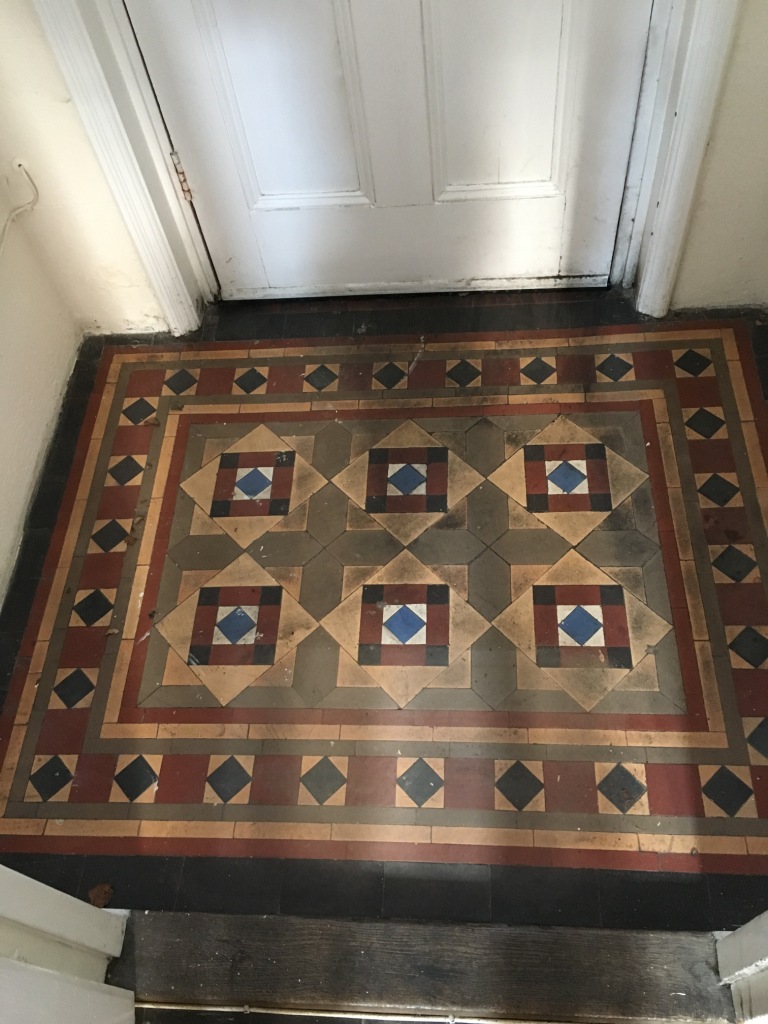
Whilst I was there inspecting the floor I agreed to run a test on the tiles to ascertain the results that could be achieved, this worked out well and the customer quickly booked me to carry out the full restoration.
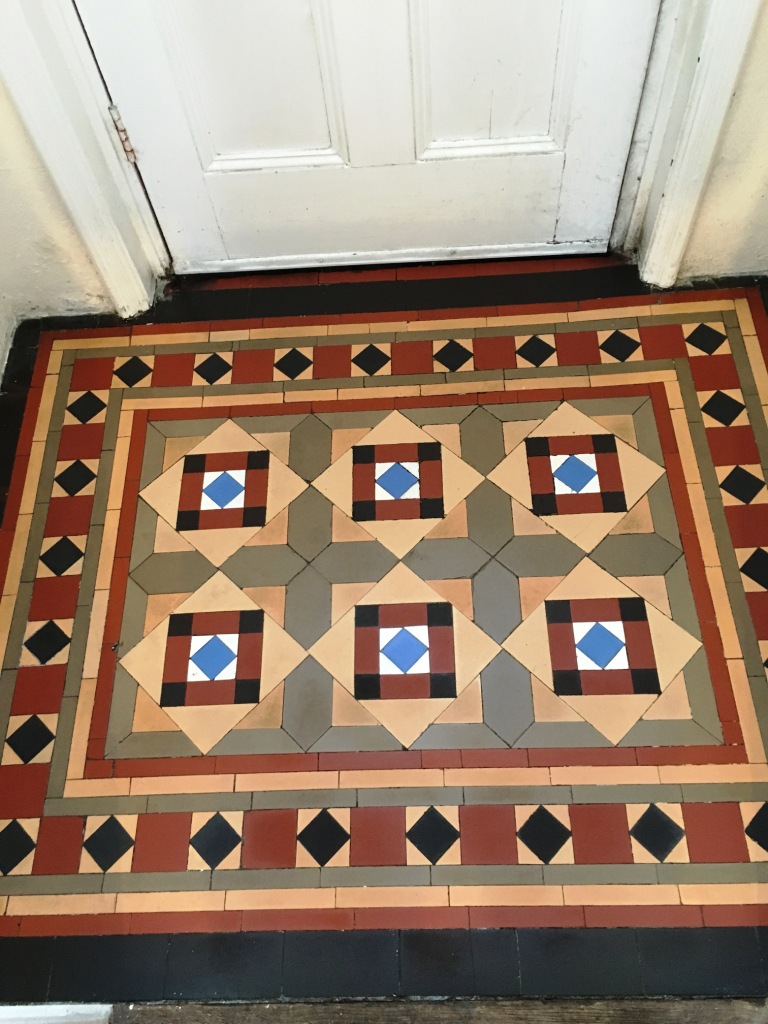
With a thorough clean and a fresh seal applied, these tiles are now well prepared to endure further wear and tear, which is especially important in this high traffic area of the house. Certainly the customer was relieved and pleased to know that their fantastic Victorian tiles are protected for the long-term. Another satisfied customer for the Wiltshire Tile Doctor.
Source: Victorian Tile and Stone Cleaning and Sealing Service in Wiltshire

Whilst I was there inspecting the floor I agreed to run a test on the tiles to ascertain the results that could be achieved, this worked out well and the customer quickly booked me to carry out the full restoration.
Cleaning Dull and Dirty Victorian Tiles
To provide the deep clean these tiles desperately needed, I opted to use a strong solution of Tile Doctor Pro Clean. Pro Clean is our go-to cleaner for most natural stone tiles since it is highly versatile. It is alkaline-based and therefore can be used on acid-sensitive tiles to break down ingrained dirt and any existing seal. We soaked the floor completely with the product and left it to dwell for roughly 15 minutes. This allows the Pro Clean to seep into the pores of the stone, get underneath and lift any ingrained dirt to the surface to be easily removed. I then attached a soft brush to a rotary machine and scrubbed the area throughly, with the tiles coming up very well. Once satisfied with the appearance of the tiles, I removed the dirty cleaning slurry with a wet vacuum and rinsed. Having removed many layers of muck it came as a surprise to find that there were a number of paint splashes that have previously had been hidden. I was able to promptly remove them using a hand razor scraper, before rinsing the area again several times to remove any surface contaminants and neutralise the area. I then left it to dry fully overnight.Sealing Victorian Tiles
Upon my return to the property the next day I ran a few damp tests to check for excess moisture in the area. This is really important to check for as excess moisture can cloud the sealer and damage its ability to provide protection for the tiles. Once satisfied that the floor was completely dry, I sealed the floor with two coats of Tile Doctor Colour Grow. Colour Grow is an impregnating sealer that penetrates into the pores of the stone to act as a robust barrier against ingrained dirt. It also contains colour intensifying properties that really worked to enhance the fantastic coloured patterns of these Victorian tiles.
With a thorough clean and a fresh seal applied, these tiles are now well prepared to endure further wear and tear, which is especially important in this high traffic area of the house. Certainly the customer was relieved and pleased to know that their fantastic Victorian tiles are protected for the long-term. Another satisfied customer for the Wiltshire Tile Doctor.
Source: Victorian Tile and Stone Cleaning and Sealing Service in Wiltshire
Wednesday, June 8, 2016
Install a Floating Floor
Installing a floating floor may seem like a daunting task, but with some basic knowledge and small array of tools, the average homeowner can install a floating floor in a relatively short amount of time. It is important to assess your flooring needs before engaging in any kind of flooring remodel, and this assessment should include the amount of foot traffic the intended area will incur. In this instance, we assume the area sees moderate usage and a floating floor is appropriate.
Laying Out the Flooring. Preparation is key; gauging and laying out the space to be floored is an all important element that should be given the utmost attention. It's devastating to run out of material mid-job or to find that the layout was done hastily and the result is an unsightly, uneven joint pattern. Take the few extra minutes to prep and lay out properly, and it will save you a tremendous amount of time in repair work.
When measuring for a layout, be sure to take into consideration cut outs and unevenness of a room. For example, in a 10"x10" room with a 2"x2" cut out, the area of the floor surface is 96 sq. ft. Be careful not to neglect closet spaces, though, as they will need to be covered as well. When sourcing materials, it is generally good practice to buy a 20 percent overage on all materials - meaning if you need 100 sq. ft., buy 120 sq. ft. This is done to insure that there is plenty of material in case of mid-work mishaps, or any damaged or discolored pieces. Additionally, it is a good idea to keep several pieces after the job is completed, in case anything should happen down the road that would require a repair of the floor. In some cases, a manufacturer might discontinue a type or color of floating floor, leaving its prior customers scrambling to find replacement pieces during a repair.
Preparing the Subfloor. First decide the substrate, or subfloor, you intend to use. The beauty of a floating floor is in its adaptability. A floating floor can be placed over nearly any substrate, including concrete, wood subfloor, or existing flooring. The floating panels can mask some irregularities in the substrate, such as embossing in vinyl flooring, but any major dips, dents, or lumps should be eliminated before installing the panels. If concrete is to be used, verify the dryness year round, and if unsure, apply a concrete sealer prior to the installation.
To test for humidity if you don't have a moisture meter available, tape a 2'x 2' section of clear plastic to the concrete slab, forming an airtight seal. If condensation or discoloration appears on plastic after 24-48 hours, the moisture content is likely too high for most wood products. As an added precaution, you can lay down plastic sheathing as a vapor barrier between the slab and the flooring.
Installation. With your flooring area properly laid out and prepared, it’s time to install your floating floor. It's important to remember to leave a gap of 5/16” from the wall. Use wood or plastic spacers to maintain the expansion space until the installation is complete. This expansion space is integral to proper installation, as it insures that if the floor should swell at all - as wood is known to do when introduced to moisture - there will not be any incidents of crowding or misalignment on the floors overall surface area.
Working from the point determined in the layout, typically the furthest point from a doorway, begin to lay your floor. Start the first row with groove side against the wall and with a half panel in order to facilitate a stagger effect of end joints row to row. Apply conservative amounts of wood glue lightly on the tongue joints, and insert into the groove of the subsequent courses. Gently tap panels into place with a white rubber mallet to attain an even, smooth joint.
When installing over a large area, a 3/8" expansion joint should also be provided every 30-40 linear feet. Intermediary expansion joints may be filled with expansive joint sealant in order to mask their appearance. Joints between boards may be sealed with expansive joint sealant. Surfaces must be clean and dry prior to application of the sealant.
Should a situation arise where a cut needs to be made to accommodate a pipe or other round obtrusion, you may need to drill. Make sure that the hole is about 3/8" larger than the diameter of the pipe. Cut off the area behind the pipes, trim the holes and glue again. It is advisable to cover the pipes with sleeves and fill the expansion space around the penetration with expansive joint sealant. It is also recommended that a sealant be used around such areas as bathroom fixtures and kitchen appliances in order to eliminate potential seepage.
Finishing Up. To finish up the installation of your floor, saw the last board to the appropriate width, gluing both the groove and the tongue. When the glue is hardened, remove all wedges. The last few steps are to reinstall the baseboards, and install any transition pieces or thresholds. Before allowing anyone to walk on your handy work, be sure to allow at least 24 hours for glued joints to dry and to let the floor settle. Then, sweep the floor to remove any debris left over from the installation process, and inspect all the joints for evenness.
Congratulations - you have completed the installation process! Now, step back and admire your hard work. The end result should be a beautiful floor that is sure to add style and grace to your décor.
Source: www.DoItYourself.com
Subscribe to:
Comments (Atom)