Wednesday, February 17, 2016
Restoring the Appearance of Limestone Floor Tiles
The owner of this house in the town of Kislingbury, Northampton called me in because her sealer wasn't performing very well and the floor had only been cleaned and sealed 6 months previous by her builders contractor. Although the rest of the floor was in very good condition there were quite a
Read more...

Tuesday, February 16, 2016
Poorly Sealed Limestone Tiled Floor Restored in Kislingbury
The owner of this house in the town of Kislingbury, Northampton called me in because her sealer wasn't performing very well and the floor had only been cleaned and sealed 6 months previous by her builders contractor. Although the rest of the floor was in very good condition there were quite a few tiles that were being easily scratched from day to day use and stained from liquid spills which should have been easy to remove. It isn't always the case that a whole floor is in poor condition, it
Read more...
Sunday, February 7, 2016
Limestone Tiled Kitchen Floor Restored in Cardiff
This client from the historic city of Cardiff was eager to see what Tile Doctor could do to put some life back into their treasured Limestone kitchen floor. My first observations were mainly focused on the terrible condition of the surface which although adequately sealed initially the floor had not received any subsequent maintenance and its condition had deteriorated over time. The light shining in from the patio doors highlighted all the imperfections in the floor caused by surface wear and tear commonly seen in high traffic areas such as a kitchen.
Upon inspection, there were problems: the floor was stained and scuffed, and in some places the sealer had worn off completely allowing the dirt to become ingrained into the pores of the Limestone. Additionally the grout was recessed but was now flush with the tile surface due to dirt build-up. Other areas were contaminated with grease and kitchen cooking oil.
The Limestone floor tiles were 20mm thick French Limestone, and had been laid very well so there was no requirement to carry tile or grout repairs however to get this floor back to its former condition the surface would need to be reconditioned using the Tile Doctor four stage burnishing system.
Restoring the Limestone Floor
I commenced by giving the floor a wash with a medium dilution of Tile Doctor Pro-Clean, focusing mainly on the grout lines in order to remove the muck that had built-up there. I used a special stiff grout brush for this process; it’s quite narrow and ideal for grout scrubbing.
This did the trick, but the significant build-up of dirt along some of the grout lines meant more work was required. I handled this problem with a hand scraper assisted with steam. At the end of this process, the whole floor was then rinsed down with water to remove any soil and the resulting slurry was then extracted using a wet vacuum.
Burnishing French Limestone Tiles
The next step was to start the burnishing process, which basically involves applying four diamond encrusted floor pads in sequence over the floor. Each pad is a different grade, starting with the most abrasive coarse pad and moving through to the finer grades using a little water to lubricate and rinsing away any slurry between each pad.
I eventually finished with the extra fine pad which builds up shine and lustre on the tile; it had taken two days to clean the grout and burnish the Limestone but the floor was much improved and so after a final rinse down I left the floor to dry off overnight with the aid of the underfloor heating.
While I'm in it, I also addressed the stained Limestone in the area of the kitchen where the dustbin was placed. This had been a major upset for the customer and I’m happy to report I was able to deal with it. However, it was quite an involved process, so I’ll write about this in a separate post.
Sealing a Limestone tiled kitchen floor
On the third day I came back to seal the floor, checking first that it had dried completely with a damp meter. Luckily, the underfloor heating had done a great job of drying the stone and I was able to seal the floor using three coats of Tile Doctor Colour Grow sealant. This sealant not only provides a durable seal but also penetrates deep into the pores of the stone protecting it from within and enhancing the natural colours of the Limestone in the process.
After the final layer of sealant, I worked over the floor again with the extra fine burnishing pad both to add shine again following sealing, and to ensure that no smear marks were visible as the lighting conditions were unforgiving and highlighted any imperfections.
The customer was delighted with the results: so much so, in fact, that they booked me in to restore their Victorian hallway floor as well but that’s a story for another time!
Upon inspection, there were problems: the floor was stained and scuffed, and in some places the sealer had worn off completely allowing the dirt to become ingrained into the pores of the Limestone. Additionally the grout was recessed but was now flush with the tile surface due to dirt build-up. Other areas were contaminated with grease and kitchen cooking oil.
The Limestone floor tiles were 20mm thick French Limestone, and had been laid very well so there was no requirement to carry tile or grout repairs however to get this floor back to its former condition the surface would need to be reconditioned using the Tile Doctor four stage burnishing system.
Restoring the Limestone Floor
I commenced by giving the floor a wash with a medium dilution of Tile Doctor Pro-Clean, focusing mainly on the grout lines in order to remove the muck that had built-up there. I used a special stiff grout brush for this process; it’s quite narrow and ideal for grout scrubbing.
This did the trick, but the significant build-up of dirt along some of the grout lines meant more work was required. I handled this problem with a hand scraper assisted with steam. At the end of this process, the whole floor was then rinsed down with water to remove any soil and the resulting slurry was then extracted using a wet vacuum.
Burnishing French Limestone Tiles
The next step was to start the burnishing process, which basically involves applying four diamond encrusted floor pads in sequence over the floor. Each pad is a different grade, starting with the most abrasive coarse pad and moving through to the finer grades using a little water to lubricate and rinsing away any slurry between each pad.
I eventually finished with the extra fine pad which builds up shine and lustre on the tile; it had taken two days to clean the grout and burnish the Limestone but the floor was much improved and so after a final rinse down I left the floor to dry off overnight with the aid of the underfloor heating.
While I'm in it, I also addressed the stained Limestone in the area of the kitchen where the dustbin was placed. This had been a major upset for the customer and I’m happy to report I was able to deal with it. However, it was quite an involved process, so I’ll write about this in a separate post.
Sealing a Limestone tiled kitchen floor
On the third day I came back to seal the floor, checking first that it had dried completely with a damp meter. Luckily, the underfloor heating had done a great job of drying the stone and I was able to seal the floor using three coats of Tile Doctor Colour Grow sealant. This sealant not only provides a durable seal but also penetrates deep into the pores of the stone protecting it from within and enhancing the natural colours of the Limestone in the process.
After the final layer of sealant, I worked over the floor again with the extra fine burnishing pad both to add shine again following sealing, and to ensure that no smear marks were visible as the lighting conditions were unforgiving and highlighted any imperfections.
The customer was delighted with the results: so much so, in fact, that they booked me in to restore their Victorian hallway floor as well but that’s a story for another time!
Friday, February 5, 2016
Restoring and Repairing Victorian Tiles
Victorian tiled floors are known for their interesting and unique mosaic patterns - and this one was no different. It was installed at a house in the historic West Midlands town of Stourbridge (famous for its glass industry). Unfortunately it was now looking worse for wear and was in dire need
Read more...
Fantastic Victorian Tiled Floor Restored to New in Stourbridge
Victorian tiled floors are known for their interesting and unique mosaic patterns - and this one was no different. It was installed at a house in the historic West Midlands town of Stourbridge (famous for its glass industry). Unfortunately it was now looking worse for wear and was in dire need of not just cleaning and sealing, but also some minor repairs and the owner was keen to have it restored back to its former glory. Repairing Victorian a Tiled Floor This particular Victorian tiled
Read more...
Restoring the Appearance of Victorian Floor Tiles
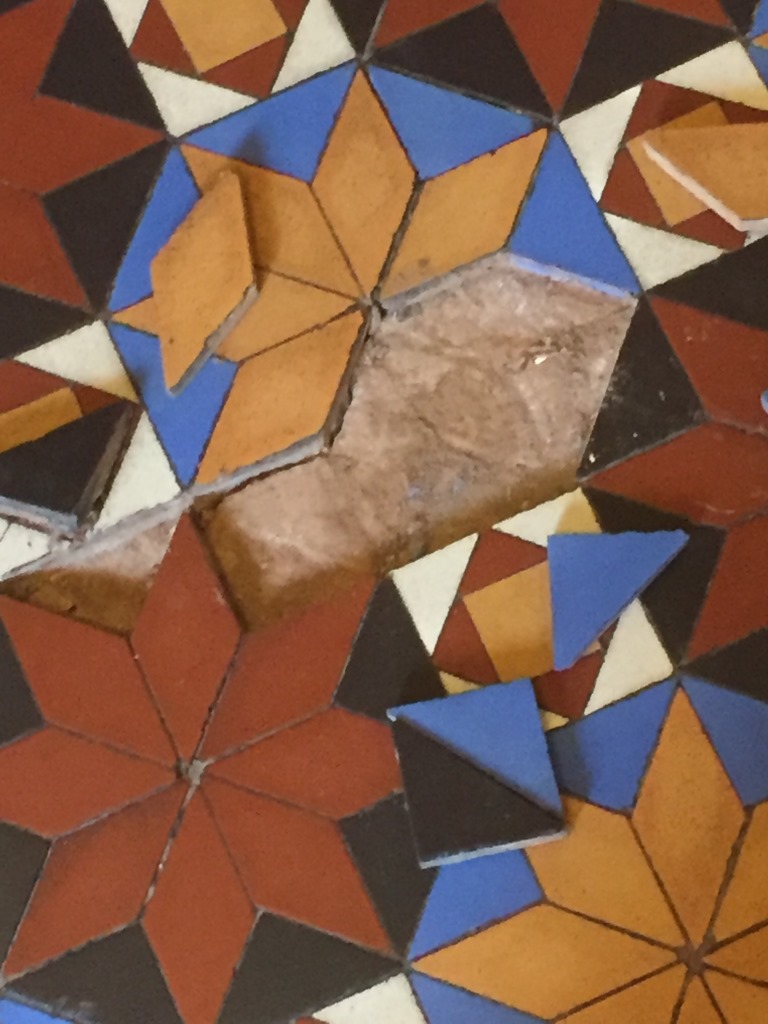
Victorian tiled floors are known for their interesting and unique mosaic patterns - and this one was no different. It was installed at a house in the historic West Midlands town of Stourbridge (famous for its glass industry). Unfortunately it was now looking worse for wear and was in dire need of not just cleaning and sealing, but also some minor repairs and the owner was keen to have it restored back to its former glory.


The next step was to give the floor an acid wash using Tile Doctor Acid Gel, this product can remove old grout haze and other mineral deposits, additionally being in a gel form makes it easy to control and although primarily designed for use on walls it works really well on floors as well. Following this I gave the floor a thorough rinse, dried as much as possible with a wet vacuum and left it to dry overnight, ready to be sealed the next day.
Source: Tile, Stone and Grout Cleaning Service in Worcestershire
Repairing Victorian a Tiled Floor
This particular Victorian tiled floor had been arranged in a fantastic pattern comprising tiles in shades of yellow, blue, red and white. There were, however, some missing tiles but fortunately I know a number of specialist suppliers where I can source replacements. I spent the first day making minor repairs and replacing the missing tiles, including the grouting, and then left the treated areas to set overnight.Cleaning a Victorian tiled floor
On the second day I returned to the house to complete the cleaning process starting with a combination of Tile Doctor Remove & Go - a powerful sealer stripper - and Tile Doctor NanoTech HBU cleaner to lift out ingrained dirt and break down old layers of sealer. NanoTech HBU is particularly effective as it utilises tiny nano sized particles to penetrate deep into the stone and lift out the dirt. The resultant slurry was rinsed off the floor and removed using a wet vacuum.The next step was to give the floor an acid wash using Tile Doctor Acid Gel, this product can remove old grout haze and other mineral deposits, additionally being in a gel form makes it easy to control and although primarily designed for use on walls it works really well on floors as well. Following this I gave the floor a thorough rinse, dried as much as possible with a wet vacuum and left it to dry overnight, ready to be sealed the next day.
Sealing a Victorian tiled floor
Upon my return to the house on the third day I set about sealing the floor, checking first that the area was completely dried by running damp tests with damp meter, all was well so I able to start applying the sealer. The sealer chosen for this floor was Tile Doctor Seal and Go which is a water based product which is a popular choice as it gives the floor a nice sheen and doesn’t leave the smell that the solvent based sealers do; three thin coats were applied to provide a robust surface seal and to achieve a semi-shine finish, as per the client's requested. My client was extremely pleased with the results, with a lot achieved over the space of roughly two and a half days. They left the following feedback: "Mick did a fantastic job. He was polite and friendly and kept us informed at every stage of the work. He is extremely professional and it is obvious that he takes a great deal of pride in his work. We are thrilled with our 'new' floor." |
 |
Source: Tile, Stone and Grout Cleaning Service in Worcestershire
Thursday, February 4, 2016
Restoring the Appearance of Travertine Tiles
Here's a job I completed recently at a house in the tiny town of Kirkby Lonsdale, situated in the South Lakeland district of Cumbria. My client had a large area of Travertine tiled flooring that was in certain need of a deep clean and reseal. Additionally, the floor suffered from a number of
Read more...
Subscribe to:
Posts (Atom)