Monday, February 16, 2015

Floor Tiling Patterns

When it comes time to redo your floor tiling, or if you are adding new floor tiling for the first time, coming up with a design might seem a little daunting. It doesn’t have to be intimidating or a chore though. In fact, it can be fun to come up with a design style that is unique to your home. There are a few things to think about before you begin.

First Things First

Before you start to get creative you need to be practical. You will need to figure out the amount of tile you will be working with and this comes down to the amount of space. If you are tiling a large kitchen area the design should be different than if you are tiling a small bathroom area.
You must measure your area and choose the size and style of the tile first.

Checkerboard Design

The most common design for floor tiling is the simple checkerboard style. You can choose two colors that complement each other and then place the tiles in the alternating pattern. This design is simple to plan for as it requires an even amount of just two types or colors of tile.

Basket Weave Design

Another popular design to think about is the basket weave pattern. With the basket weave floor tiling pattern you can use different sized and colored tiles to create a lovely pattern across your floor. The basket weave pattern uses long and short tiles to create the look of interwoven tiles. This pattern takes a little more planning and you will need to draw out the plan to scale before actually installing.

Pinwheel or Squared Pattern

A more complex design for your tiled flooring is the pinwheel or squared pattern. Both of these patterns involve a larger tile surrounded by smaller tiles. These patterns will require a design plan blueprint and calculated amounts of each type of tile. You can be creative with the color, design and size of the tiling so the floor is unique to your home. It’s important to remember that too much color or too busy of a design will create the wrong effect and won’t look attractive.

Creating a Bordered Pattern

A great pattern idea for kitchens is the bordered design. This is a pattern that is quite simple yet can have a unique look and style to it. The base of the floor tile can be all the same tiling or can alternate, as with the checker board pattern. The border of the tiling can be as simple as a different size tiling or a different color. Or, the border can be a complex design and the real focus of the floor. You can make the border anywhere from one to three tiles thick, depending on the size of the tiling. Too much of a design or too thick of a border and the effect can be overwhelming instead of beautiful.
The point is to consider your tastes, the expense, the effort and the effect the design will have on the room. Go to show rooms to see designs or check out home remodeling books for ideas before you do the actual installation.


Source: www.DoItYourself.com

Sunday, February 15, 2015

Dealing with Rust on tiles around a swimming pool

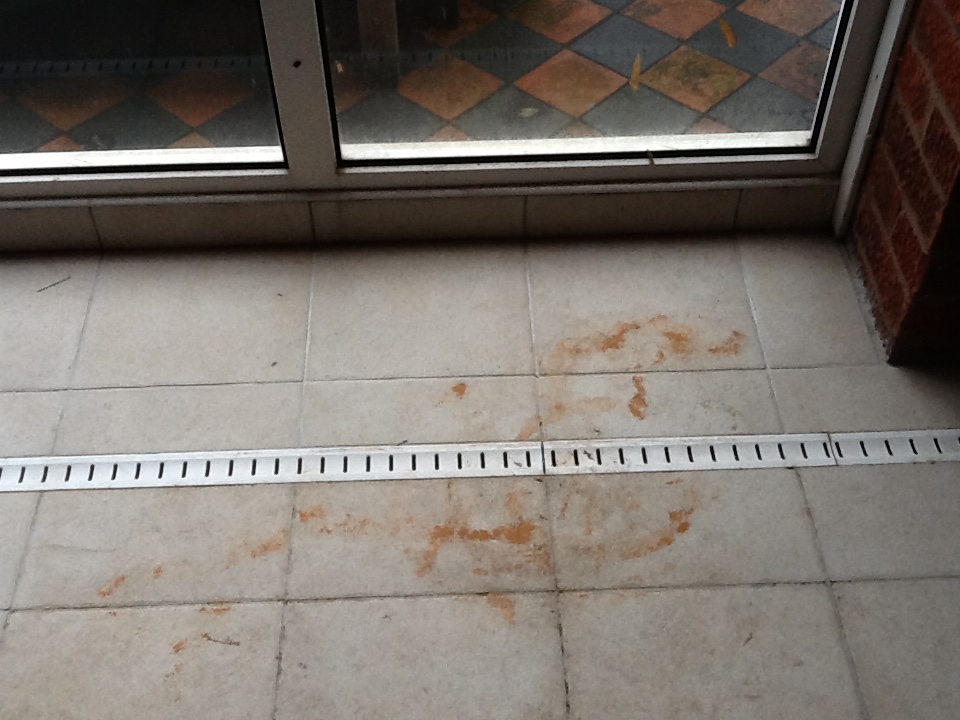
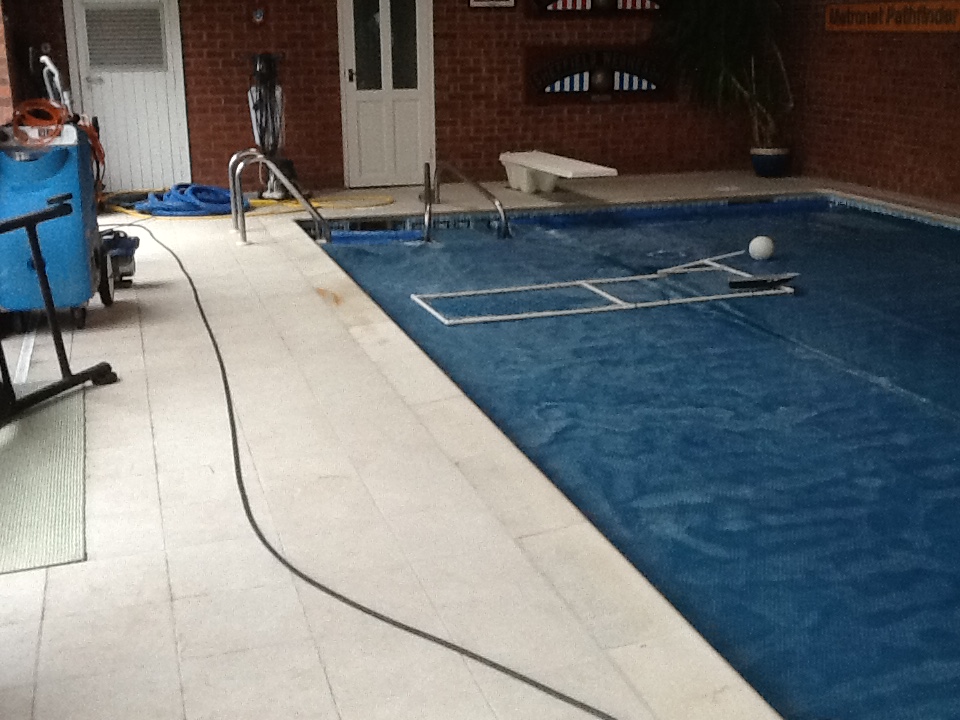
The photographs below were taken at a privately owned swimming pool in the historic village of Naseby an area famous for the civil war battle that tool place there in 1645. The pool was surrounded by Anti-Slip safety tiles which have a roughened texture to improve traction around the water’s edge, this does have the side effect however that they trap dirt more easily. The tiles were overdue a deep clean and had become very dirty and additionally there were rust marks from metal furniture and blackish grout lines.

Rust Stains on Swimming Pool Tile Cleaning Naseby

Cleaning Pool Tiles and Removing Rust Stains

Working one area at a time and taking care not to contaminate the swimming pool a dilution of Tile Doctor Pro-Clean was applied to the tiles and then worked into the tile, especially the rust stains before being washed off using a Rotovac machine which applies hot water at high pressure and then removes it to a remove tank using suction. It’s an ideal machine for this sort of job as it’s very self-contained. Stubborn areas were treated with Tile Doctor Remove and Go which is a powerful product designed to deal with sealers and other surface coatings. Once done another rinse with the Rotovac ensured the soiled cleaning solution and any trace of cleaning product is removed from the surface.

Rust Stains on Swimming Pool Tile Cleaning Naseby

Sealing Ant-Slip Porcelain tiles

Once the tile and grout was clean it was left to dry so it could be sealed which will prevent the tile and grout becoming dirty so quickly. For this we used Tile Doctor Pro-Seal which is a no-sheen, natural look, water based penetrating sealer.

Swimming Pool Tile Cleaning Naseby

It makes a significant difference if you have the right tools for the job and this resulted in the tiles looking as good as new in no time.


Source: Commercial Tile Cleaning Services

Sunday, February 8, 2015

Types of Residential Rubber Flooring

Being aware of the different types of rubber flooring available on the market can be useful, allowing you to make an informed decision for your home. Bear in mind the benefits of this type of flooring and what it can bring to your home.

Textured

Where you are selecting flooring to fit in your bathroom, you may want to consider a textured variety. This type of flooring is beneficial for wet environments to prevent the accidents that arise from slipping. They are available in different colors and styles, such as dots or waves raised from or embedded into the surface, which can enhance the décor of your bathroom. Using this type of flooring in the kitchen over tile or slate can help to prevent breakages in the event of crockery or glassware being dropped.

Tiles

Where you are fitting the flooring yourself, you may find the task easier with the use of tiles. These will often be backed with adhesive and of a size that makes them easy to manipulate and fit together. This method will also reduce the amount of cutting to size that is required. Be aware that failing to fit these tiles properly can result in water seeping between the joins and damaging the surface of the sub-floor beneath.

Sheeting          

Purchasing rubber flooring in the form of a single sheet is the most common way in which to obtain this type of flooring. After measuring the dimension of the floor, you can easily obtain the precise size that you require in whatever color and style that is suitable for your room. An increased level of comfort can be obtained with a brand of flooring that comprises a thick cushioning to absorb impact and reduce pressure to the joints as it is being walked on. When these are used with a design, you should be careful that you are capable of matching the design up during the installation process.

Slip-resistant

Plain rubber flooring that doesn’t comprise any texture can still be made slip-resistant by its surface being treated. This will give you the clean look of a solid sheet while not taking away the peace of mind you get from knowing that you and your family will be safe.

Special Finish

Rubber flooring can be obtained with a specific finish, which makes it a more suitable option if you are planning a wet room rather than a standard bathroom. This will also provide an effective barrier to prevent water leaking to the surface below and is a stable enough material to not sustain damage as a result of contact with water. It is also a convenient and hygienic option for a bathroom as it is easy to clean.

Faux Effect

Though you may like the look of wooden floorboards, this is not the most convenient or suitable option when it comes to the bathroom. Solve this problem by opting for rubber flooring which has a wood floor effect. You can also obtain slate and tile effect rubber. Other designs which comprise random flecks of color or patterns.


Source: www.DoItYourself.com

Types of Floor Covering for Stairs

There are many different types and styles of floor coverings that can be added as part of your stairway. Floor coverings for your stairs not only add to the decor appeal of the room, but it also is an important consideration when you think about the durability and overall care you will need to take on based on your flooring selection. Many of the flooring types can be laid by any do-it-yourselfer. All you need are a few tools and the time to have a great set of stairs. Below are several options for you to consider.

Hardwood Flooring

A very elegant choice for your stairs is hardwood flooring. Hardwood can be laid on different angles. You can purchase different colors, styles and hardwood types for your stairways. Pick anything from dark hardwood to light hardwood. Use solid pine to an aesthetic teak or cherry wood. There are many different options and you will be sure to find something that fits your needs and tastes. Remember, hardwood is easy to clean and will stand the test of time. One word of caution: hardwood can be slippery to walk on with socks.

Carpet Runner

For any hardwood surface consider adding a carpet runner to your stairway. You can add the carpet runner to coordinate with the interior of your home. You can also pick from different types of materials for your carpet runner. A carpet runner is a great addition because it helps to create a slip resistant surface over your stairs.

Carpeting

You can choose to carpet the entire surface of your stairs. The carpet you choose can coordinate with other rooms in your home. You also have the option choosing from different types of carpeting.

Tile

Picking tile for your stairways gives the stairs a different look. Try using a slate tile. This adds a lot if you are covering exterior stairs or if you are covering a small set of stairs from the entry way. You can use different sizes of tile. Generally, anything under four inches squared would be the best type of tile to use for the stairways.

Laminate Flooring

There are different types of laminate flooring available. Laminate flooring can be purchased in different types. You can purchase laminate that looks like hardwood (you can even find one that looks like knotty pine) and you can buy rolled laminate that you would use in the kitchen. Laminate is a cheapest form of floor covering. It is easy to lay and easy to maintain. You can also replace the laminate for less cost than you can with other forms of floor coverings for your stairs.

Glass Tiles

Rather than picking a generic type of ceramic tile, try to use something a little different. Glass tiles give you a great deal of extra reflection in the room. They can be purchased in different types of colors and reflective capabilities. You can also lay glass tile to look like a mosaic pattern.


Source: www.DoItYourself.com

Thursday, February 5, 2015

Polishing a Limestone Tiled Floor

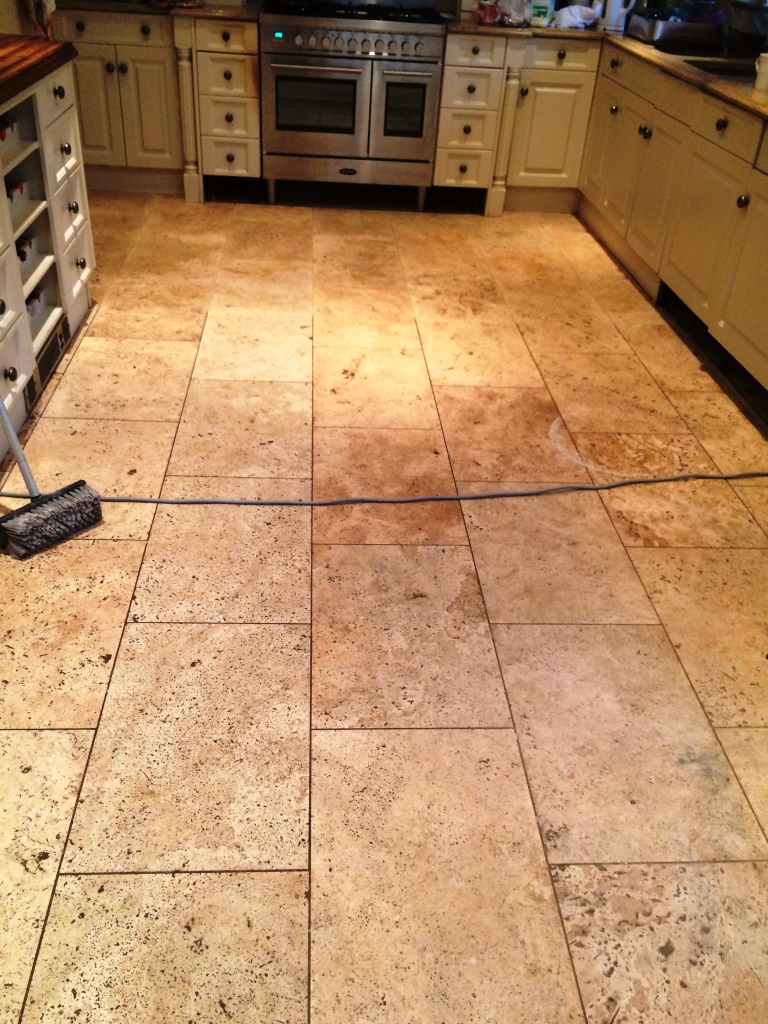
We were asked by the new owners of this property in Marlow to clean and seal the Limestone tiled kitchen floor which was in a heavily soiled condition and it was apparent that the tiles and the grout lines hadn’t been professionally cleaned for some time.

Limestone Tiled Kitchen Floor Before Cleaning in Marlow Limestone Tiled Kitchen Floor Before Cleaning in Marlow

Cleaning a Limestone Tiled Floor

To lift the ingrained soiling and restore the grout we started by applying a dilution of Tile Doctor Pro-Clean which was hand scrubbed into the grout lines with a stiff grout brush, this was followed up with Tile Doctor Grout Clean-Up which returned the grout lines to the original colour. The resultant soiled solutions were then removed from the floor with the aid of fresh water and an industrial wet vacuum.

Polishing Limestone Tiles

Our next task was to re-hone the stones using the Tile Doctor Diamond encrusted burnishing pad system which cleans and polishes natural stone returning it to its original condition. The pads come in a set of four and you start with the coarse pad together with a little water. This this cuts through and removes surface grime, dirt and any remaining sealer. The floor is then rinsed and you move on through the remaining pads until the polish has been restored to the tiles. This process took up much of the first day so the floor was given a final rinse and left to dry overnight.

Sealing Limestone Tiles

On the second day we returned to find the tiles had dried and as expected and we started to seal the tile which we did with two coats of Tile Doctor Colour Grow which is a colour intensifying sealer that soaks into the pores of the stone bringing out the natural colours whilst providing that all important lasting protection.

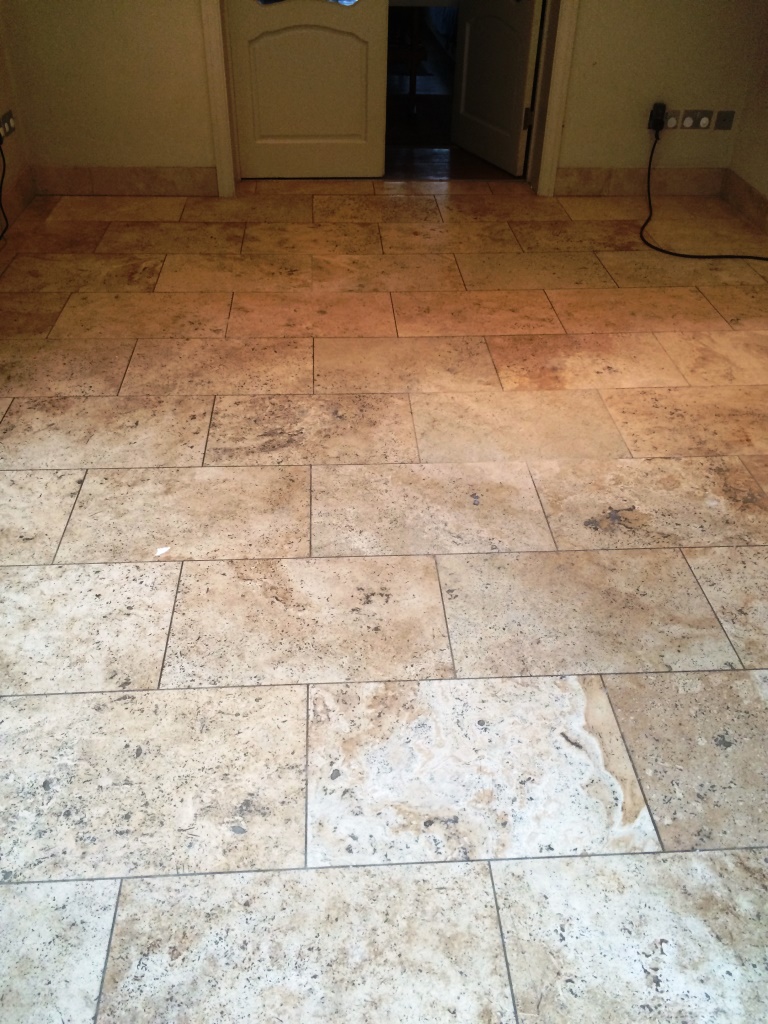
Limestone Tiled Kitchen Floor After Cleaning and Sealing  in Marlow Limestone Tiled Kitchen Floor After Cleaning and Sealing  in Marlow

The customer was amazed with the clean appearance of her tiled floors and said it had transformed her house ready to live in.


Source: Limestone Tile Maintenance Advice

Wednesday, February 4, 2015

How to Fix Squeaky Chipboard Flooring

Chipboard flooring is a sub-flooring material that is made of coarse sawdust or wood chips mixed with resin. It can also be called particle board or oriented strand board (OSB). The resin and wood mixture is pressed and processed through heat to form large sheets. Chipboard that is high in density is used for sub-flooring, usually used as a base for carpet or other flooring because it is more economical than plywood but it gets the job done. Chipboard flooring sheets bond as one in a tongue and groove method. Squeaky chipboard flooring may be cause by a lot of things. Settlement is one reason why floor boards creak. Poor installation is another, when there are rogue nails or the floor boards do not meet where they are supposed to, thus not supporting the weight that need to resulting to a creaking noise. This article aims to help you remedy creaking chipboard flooring.

What You'll Need
  • Safety goggles
  • A flat head screwdriver
  • A claw hammer
  • A light-weight hammer
  • Cross head screw driver
  • Screws


Step 1 - Find the Squeaky Location

Walk around the area where the creaking noise is present and distinguish exactly which floor board makes the creaking noise. You have to make sure that the carpet is out of the way when you do this.

Step 2 - Raise the Nail from the Chipboard

Using the flat head screw driver, gently scrape away at the spot around and under the head of the nail on the creaky floorboard. Your goal is to try and raise the nail a little from the floor board.

Step 3 - Remove the Nail Gently

When you have done Step 2 successfully and there is a slight gap between the head of the nail and the floor board, you can either remove the nail with the back end of the hammer or a claw hammer or you can use the flat head screwdriver to gently remove the nail by putting the flat head screwdriver in between the floor board and the nail of the head and gently pushing it up and down to make the nail loose. Take note that this has to be done gently so that you will not cause any damage to the floorboard.

Step 4 - Screw It

Now that the nail has been removed, fit the screw into the hole. Note that the screw should be 5mm shorter than the nail, if the screw is longer than that it might cut into pipes or run into joists and this will cause more than creaky floor boards, so make sure of the size. If the screw is too long you can cut the ends with a pliers or a small hack saw. Once the screw is in place, you shouldn’t have any more problems with creaky floor boards. Repeat the process in other areas of the house where there are creaking noises on the floor boards.


Source: www.DoItYourself.com

Tuesday, January 13, 2015

Removing Limescale from Tiles

The owner of this swimming pool at a large residence in the suburban village of Oxshott had put the property on the market and naturally wanted the pool area to look its best. The pool was surrounded by Porcelain tiles which are very resilient and generally a good choice for a swimming pool surround, additionally the slate effect tiles in this post had a riven surface which would make them less slippery than the highly polished variety. The chemicals used in swimming pools however are quite strong and I suspect this has contributed to the build-up of Limescale on the surface of the tiles.

Cleaning Porcelain Tiles

The first job was to give the tiles a deep clean and this was done by scrubbing in Tile Doctor Pro-Clean diluted 1 part cleaner to four parts hot water using a black scrubbing pad fitted to a rotary machine. Once scrubbed the soiled cleaning solution was removed using a wet vacuum and the tiles given a thorough rinse. There were a lot of tiles to clean and naturally care has to be taken to avoid getting any cleaning solution in the pool.

Porcelain Pool Surround Oxshott Before Cleaning Porcelain Pool Surround Oxshott Before Cleaning

After rinsing the tiles were dried with the assistance of an air mover so we could get an idea of what other remedial work would be required and in this case it became clear where the areas with Limescale staining were.

Porcelain Pool Surround Oxshott During Cleaning

Removing Limescale from Porcelain Tiles

To remove the Limescale each stain was spot treated using Tile Doctor Grout Clean-up which is a strong acid based cleaning product normally used to remove grout smears from tiles but also equally useful at dealing with mineral deposits such as Limescale. You have to be very careful with acids on tiles, especially natural stone so once it had done its job the tiles were thoroughly rinsed and the whole floor rinsed again once we have completed everything.

Porcelain Pool Surround Oxshott After Cleaning Porcelain Pool Surround Oxshott After Cleaning

When we had finished the client couldn't believe the transformation we have managed to achieve.

Porcelain Pool Surround Oxshott Before And After


Source: Commercial Tile Maintenance Services