Tuesday, June 25, 2024

How to Polish a Marble Floor by Cumbria Tile Doctor

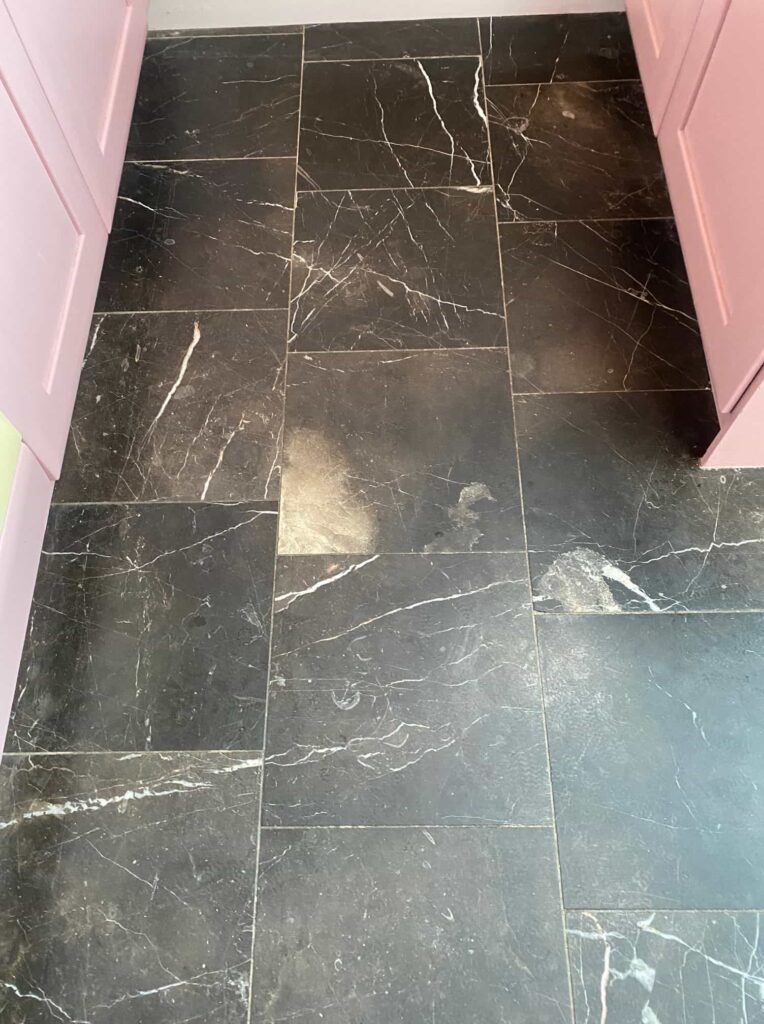
This client from Barrow in Furness contacted Tile Doctor about their polished black marble floor which had been installed 20 years ago. Its polished appearance had diminished with use over that time, and they had wasted money on different products sourced from DIY shops and the internet to rectify it.

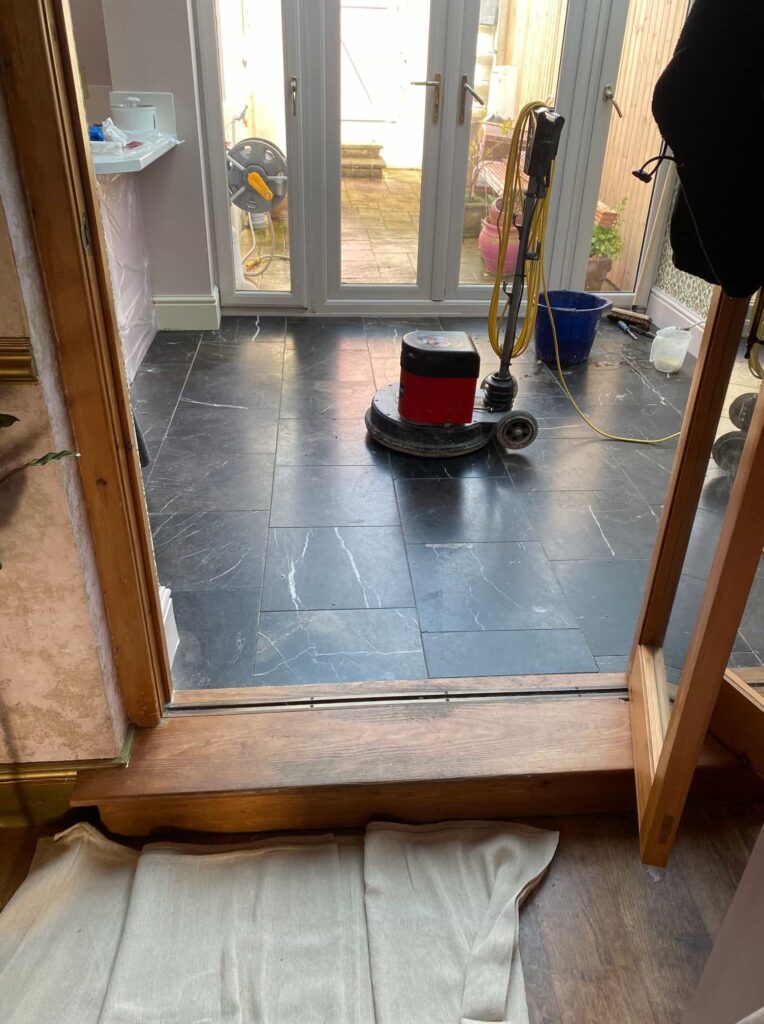
Polished Black Marble Floor Before Cleaning Barrow in Furness

Many of these products were unsuitable for this type of tile and as such the top surface was quite tacky to walk on and had done nothing to improve its appearance. Happy I could resolve the problem they accepted my quote to re-polish the floor and a date was agreed to commence the work. 


Cleaning a Polished Black Marble Dining Room

My first task was to protect the woodwork by applying a bead of clear waterproof mastic between the wood and the floor, this prevents water being soaked into the wood through capillary action, this can cause water staining and worst-case blow MDF skirting and doors.

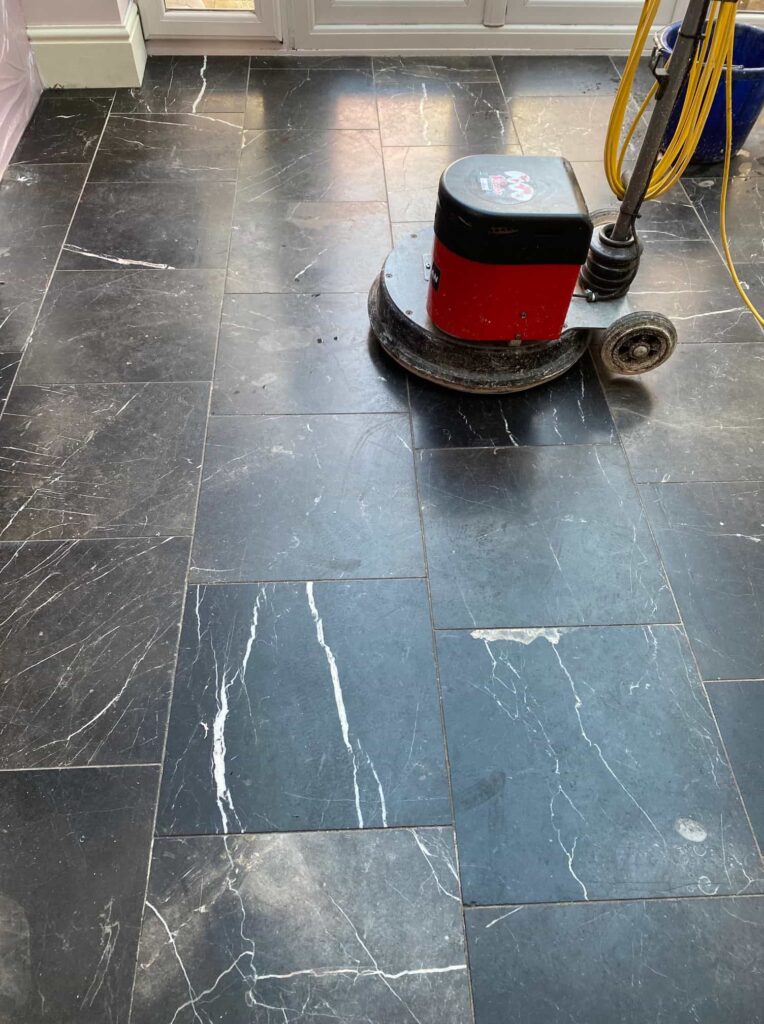
Once done work started on polishing the marble floor using a 200-grit 17-inch diamond pad fitted to a rotary floor machine. This pad removes encrusted sealers, old polish and other products that were upsetting the stone finish. Applied with water for lubrication this pad does a good job of cleaning up the stone but leaves it looking dull with a matt finish.

To bring back the finish, finer grit diamond Burnishing pads are applied in sequence starting with 400 then 800 and 1500-grit. These pads clean and rebuild the polish on the Marble slowly brings the stone back to life again. The floor is rinsed off with water after each pad and the soiling extracted with a wet vacuum. The edges were then completed with a small handheld machine using smaller pads of the same grits.

After this work, I started on the grout lines which were scrubbed by hand using Tile Doctor Pro-Clean which is an alkaline cleaner and will not upset the marble. I find it best to do this work by hand as the pads can struggle to reach into the recesses of the grout line.
   
Polished Black Marble Floor During Cleaning Barrow in Furness Polished Black Marble Floor During Cleaning Barrow in Furness

A final rinse with clean water which was then extracted with the wet vacuum and the floor left to dry off overnight.

I called back the next day and started work by checking the stone and grout was nice and dry and ready for a final polish using a 3000-grit diamond pad. This pad brings up the polish on the floor even further and is applied using a tiny amount of water from a spray bottle which aids in the final polish.


Sealing a Polished Black Marble Dining Room

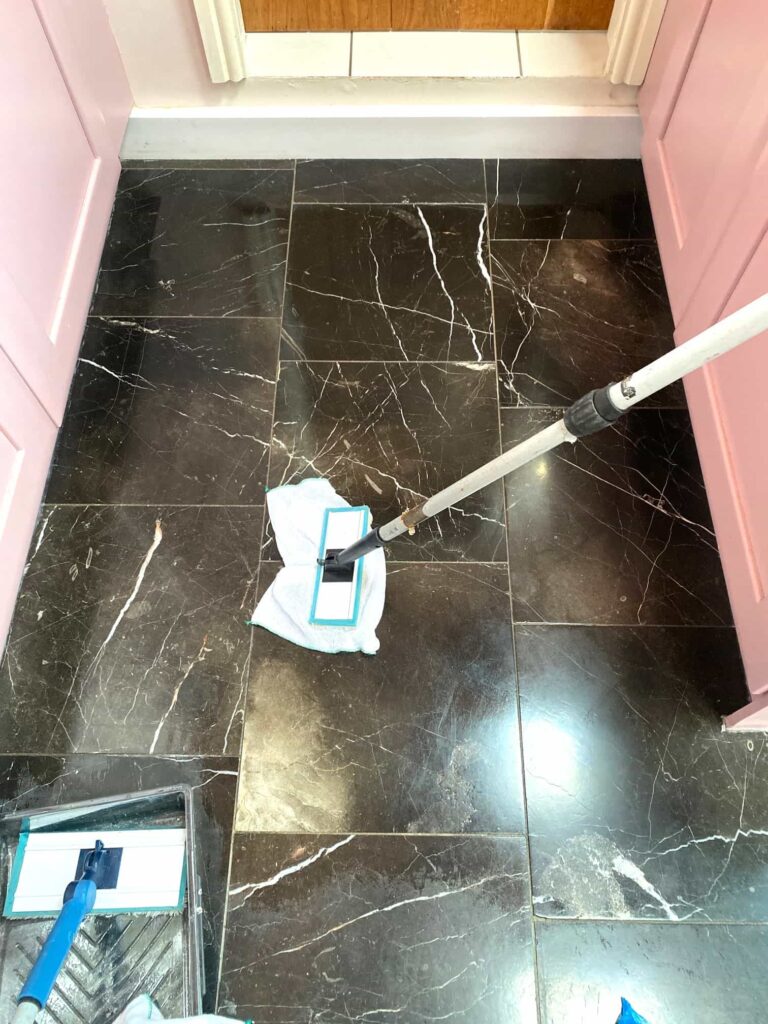
Once the whole floor was polished including all the corners and edges it was time to start applying the sealer. With this being a Black Marble floor with more than a few marks on it from the wear and tear over the last twenty years, I opted to use a sealer normally designed for outside areas called Tile Doctor X-Tra Seal. This is an oil based breathable sealer that soaks into the pores of the stone protecting it from within and ensuring any dirt remains on the surface.

Polished Black Marble Floor During Sealing Barrow in Furness

We don’t normally recommend X-Tra Seal for polished surfaces as the oil takes a lot to cloth off, however in this case I felt the extra work would be justified as the oil works well on Black stone.

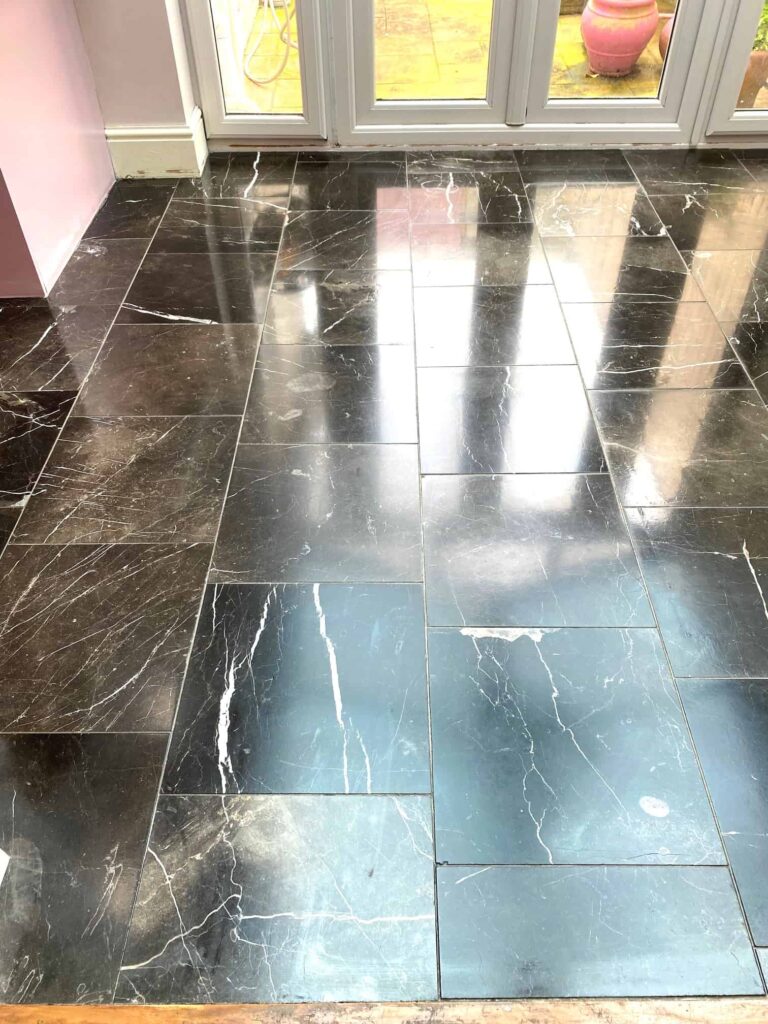
Polished Black Marble Floor After Cleaning Barrow in Furness

Once done the Marble tiles were transformed by the work much to the relief of the owner who had really struggled to maintain the floor. Before leaving I made sure to spend time discussing future cleaning and recommended, they use Tile Doctor Stone Soap going forward. This is a mild but effective cleaner which helps maintain the patina on the Marble.


Monday, June 24, 2024

How to Clean Berber Carpet

Many people aren't sure how to clean Berber carpet. Generally, you want to follow the cleaning and maintenance that you would for cleaning other carpet, but because Berber carpet refers to a type of weave pattern used to make the carpet, there are some difference in the cleaning process. Follow this article's suggestions to clean and maintain your carpet.


First Contact Your Manufacturer

Before beginning the cleaning process, contact the manufacturer or store where the carpet was purchased. The store personnel should be able to give you some advice on cleaning your particular carpet, in case the specific kind of Berber carpet requires a different process.

Also contact the manufacturer or read through the user manual for your vacuum cleaner and shampooer, as some models are not suited for Berber carpets. You will need to set your vacuum to “suction only,” as using the beater bar on Berber carpet will tear at the carpet’s loops and cause fuzzing and shedding.


Cleaning the Carpet

There are a couple different options for providing a deep cleaning to your Berber carpet, but whichever route you choose, you should plan on cleaning your carpet at least once per year.

One method is using a steam cleaner with cleaning chemicals. Because of the tight weave of Berber carpet, the moisture will take longer to dry than other kinds of carpet. If you plan on steam cleaning, be sure to plan for plenty of drying time and select a warm day to undertake the cleaning.

Another method that is particularly suited to wool and nylon Berber carpets is a low-moisture cleaning using dry foam. This will give your carpet a very clean finish and greatly reduce the drying time.


Perform Preventative Care

There are several things you can do to extend the life of your carpet and lessen the frequency of a need for shampooing. The main thing is to clean spills and stains as they happen (before they set) so that they are easier to remove.

Placing some rugs atop the Berber carpet on high traffic areas or near doors can also save on wear and tear. It is also recommended to wear socks or slippers on the carpet, as bare feet and outdoor shoes can also accelerate the deterioration of your carpet.

Determine a schedule to vacuum the carpet. Most people will find that if you pick up pebbles and other debris from the floor daily that you only need to vacuum once a week, or even less is it is a low traffic area.

Source: www.DoItYourself.com

Monday, June 10, 2024

DIY Flooring Systems & Installation

Over the past decade, there has been an explosion in the popularity of do-it-yourself projects and renovations. From kitchen remodeling to bathroom transformations, you name it; homeowners everywhere are trying to save money by tackling these projects themselves. And one of the greatest money-saving parts of the job is choosing and installing your own flooring.

Flooring, like the plumbing or the electrical work, is often subcontracted out by homeowners primarily for two reasons – (A) they have no idea what type of flooring will work best in the room and (B) they don’t want to “mess up” the installation. But these days, installing flooring is easy to work and the choices of flooring available allow you to customize the look of your room so it not only looks complete, but it turns out exactly as you imagined it.

In this guide, we’re going to take a look at your flooring options and go over some of the installation guidelines for each. When it comes to choosing the flooring for your project, knowing what’s available is half the work.

Laminate Flooring

Laminate flooring is strong, versatile, and can last for years with proper upkeep. Not long ago, laminate flooring was basically viewed as an inexpensive alternative to installing natural hardwood floors, but in recent years, laminates have become a popular choice as the variety of flooring styles has greatly increased. Today, one can purchase laminate flooring that resembles cork, stone, marble, bamboo, and of course, wood. And best of all, laminate flooring can be installed directly over your existing sub-floor and installation is as easy as “snap-and-click.”

Installing Laminate Flooring

When installing laminate flooring, it is critical for the surface it is being installed over to be flat. It doesn’t have to be a level surface, but it does have to be flat. If you’re installing over concrete, use a surface grinder to get rid of high spots and if you have an area that’s at least 1/8” lower than the rest of the floor, use a self-leveling compound to fill in the gap. Of course, always be sure the compound is completely dry before installing the flooring.

Laminate flooring is sometimes called a “floating floor system” because it is not glued, nailed, or stapled to the sub-floor. A foam underlay is laid on top of the sub-floor and the laminate planks are then laid directly on top of the underlay.

One of the most important keys in a successful laminate installation is to lay only a portion of the underlay at a time and then install the laminate over that area before moving on. This will help protect the underlay from getting damaged as you work. Lay the laminate planks in a staggered fashion, meaning start one row with a full-length plank followed by a row that starts with a half-plank. For the best visual result, the planks should be laid in the same direction as the light that enters the room through the primary window.

Vinyl Flooring

Vinyl flooring falls under the umbrella of “resilient flooring,” which also includes such flooring solutions as rubber, linoleum, and cork. Vinyl flooring was at one time, the inexpensive “do-all” generic flooring solution for just about every room. Style selection was weak and the overall look of it was pedestrian. But these days, vinyl flooring is available in a wide range of styles and textures, from faux wood to slate or marble.

Vinyl flooring offers a wealth of benefits. Besides being an inexpensive flooring solution, vinyl is long-lasting, easy to install, resistant to water and bacteria and it can be custom-ordered for an original look. Vinyl flooring is available in single tiles or in larger sheets, and in different thicknesses. Thicker tiles are more expensive, but they last much longer than thinner tiles.

Installing Vinyl Flooring

When installing vinyl flooring, it is essential that you only use an adhesive that’s made for vinyl. Do not use “tube” construction adhesives as they can produce lumps in your tiles from un-flattened thick gobs of glue. Of course, many vinyl tiles come with pre-glued backing so this may not even apply to your particular installation.

When purchasing vinyl tiles it is wise to use "the extra 10% rule" and buy more than what you need. You may have an occasion where you need to make a repair, and having the exact tile on hand can allow the fix to be performed easily and quickly.

Before you start installing, you need to make sure the sub-floor is flat, clean, and dry. Install one tile and wait 72 hours, then return and try to pull the tile up. If it comes up, then the floor is too damp and you will have to use a special adhesive for damp locations (or wait for the floor to be completely free of moisture). Once the floor is laid, avoid walking on it until the glue is fully dried or you may cause the tiles to shift.

Hardwood Flooring

Hardwood flooring is the Mac-daddy of flooring options. It’s the warmest and most luxurious type of flooring, but with that prestige comes a very high price tag and costly maintenance. Depending on the look you’re going for, hardwood is available in oak, maple, pine, cherry, mahogany, fir, beech, ask, teak, birch, and bamboo (not really a wood, but it still applies here).

When it comes to installing hardwood floors, due to the cost of the materials, many homeowners may be better off trusting their installation to a professional. Installing hardwood flooring is not a weekend project and the tools required to complete the job are quite numerous.

Cleaning and maintaining hardwood flooring is not as easy as many would have you believe. Some chemicals can badly damage hardwood and of course, too much water on the surface will also wreak havoc. If you want your hardwood (and your investment) to last for years, use only a specially-designed maintenance product, like the one available from BonaKemi. Cleaning and maintaining your hardwood flooring with the right product is essential because if you use too much water or acidic chemicals, you will need to refinish the flooring sooner than expected.

Refinishing Hardwood Flooring

Refinishing hardwood floors is a time-consuming, labor-intensive job. Careful attention must be made as sanding one area too long can create shallow spots that are irreparable. Here are a few tips for making the process a little easier:

1. Remove all of the furniture and rugs from the room.

2. Check the floor for any nails, tacks, or staples that may have popped up. If you find any, hammer them back down.

3. Choose an orbital sander over a drum sander as they are lighter and easier to maneuver.

4. Ask an employee at the equipment rental shop for a demonstration on how to use the sander. You don’t want to “test” it out on your flooring.

5. Run the sander WITH the wood’s grain, NOT across it.

6. As long as the sander is on, it should be moving. Never allow it to sit stationary while running.

7. Vacuum up the dust each and every time you change sanding paper.

8. Start sanding with the highest grit sandpaper (36 grit) and with each pass, increase the grit, from 36 to 60 to 80 and then finally to 100 or even as fine as 120 grit.

9. Clean the floor thoroughly before applying stain and/or polyurethane finish.
Thursday, June 6, 2024

Carpet Pad: Determining the Necessary Thickness

 Carpet pad comes in a variety of styles that differ in terms of material, thickness, and density. Padding is used to provide cushion and support for carpeting, and is a necessity in almost all installations. Depending on the type of room and how it is used, the right carpet padding is a vital component, providing comfort while helping to increase the life of the carpeting. Residential carpet padding is first categorized according to class.

Class I padding is suitable for low-traffic areas, while class II padding can be installed in either low- or high-traffic areas. It's important not to choose carpet padding based on how comfortable it feels. Instead, the right padding is determined by appropriate thickness, weight and the carpet manufacturer's guidelines.


Carpet Padding Thickness

Besides providing cushion when walking upon carpeting, the padding underneath supports the carpet and helps to increase its lifespan. Padding also contributes to warmth and noise reduction in a room. Padding is available in several materials with a thickness ranging from 1/4 inch to 9/16 inch. The right thickness for a given room largely depends on the traffic and the type of carpet that is installed. Padding should not be too thick in rooms that get a lot of use. Thick padding can impair the carpet from properly stretching upon installation. This can be exacerbated by a lot of foot traffic, which in turn can cause the carpet to form ripples.


Pad Density or Weight

An equally important consideration is the density or weight of the carpet padding. Rated in pounds, 5-pound to 8-pound carpet padding are by far the most common weights used in homes. Carpet padding derives its rating based on the scale weight of 1 cubic foot. Even if carpet padding is thick, if it is not sufficiently dense, the padding can break down faster which helps speed up the breakdown of carpeting.


Combining the Factors of Thickness and Weight

An optimal combination of carpet padding thickness and density will deliver the best, longest-lasting results. In high-traffic areas such as hallways, rec rooms, or stairways, carpet padding should be no thicker than 3/8 inch yet on the denser side. Thinner padding helps prevent the carpet backing from falling apart, while the high density provides comfort and stability. Thicker, more cushioned padding is best in bedrooms and other lower-traffic areas.


Pad Material

Another factor to consider with carpet padding purchase is the material. Carpet padding may be foam or sponge rubber, urethane, or rubberized or latex felt. Urethane and rubber padding are superior to felt in terms of overall resilience, resistance to moisture absorption, flammability, and hypoallergenic design, hence they are the most commonly used types.

Special Considerations


It's important to install padding that matches the carpeting in quality. Inexpensive padding will accelerate the decline of the carpet. Plus, if the carpeting has a warranty, adhering to the manufacturer's guidelines is necessary, or else it could be voided. Specialty installations such as carpeting over a radiant floor heater call for thinner, lower-density padding. Padding installed to improve heat retention or sound absorption should be as thick and dense as possible without exceeding the manufacturer's recommendations.