Thursday, March 17, 2022

Cheshire Expert Details how to Renovate a Carpet Covered Quarry Tiled Floor

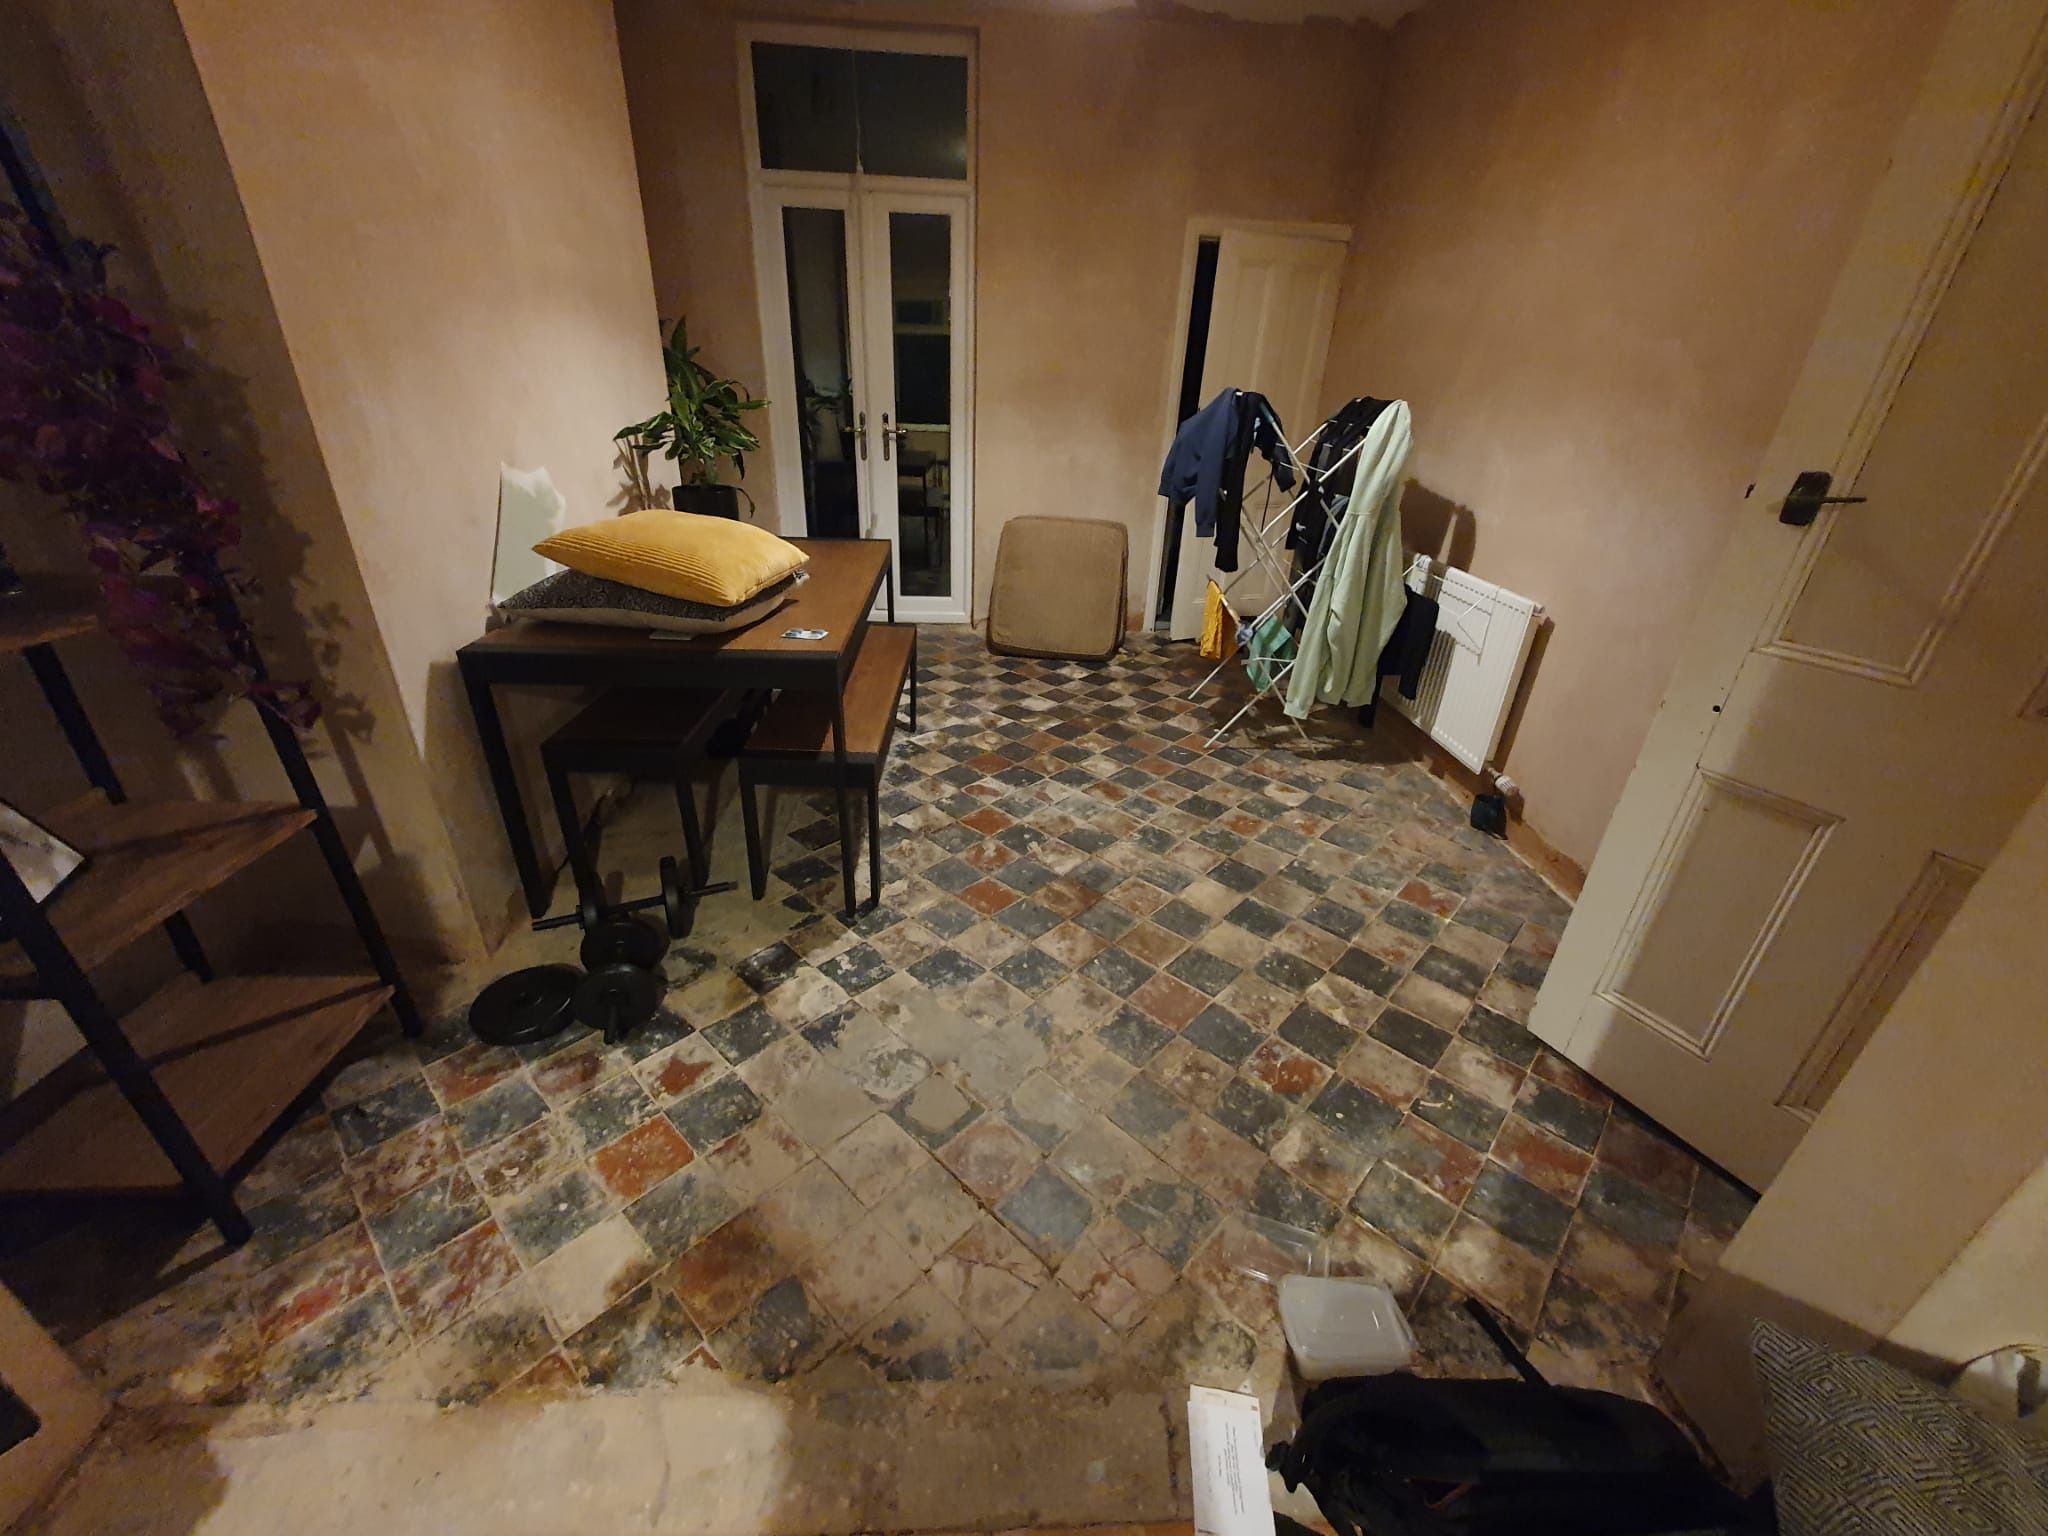
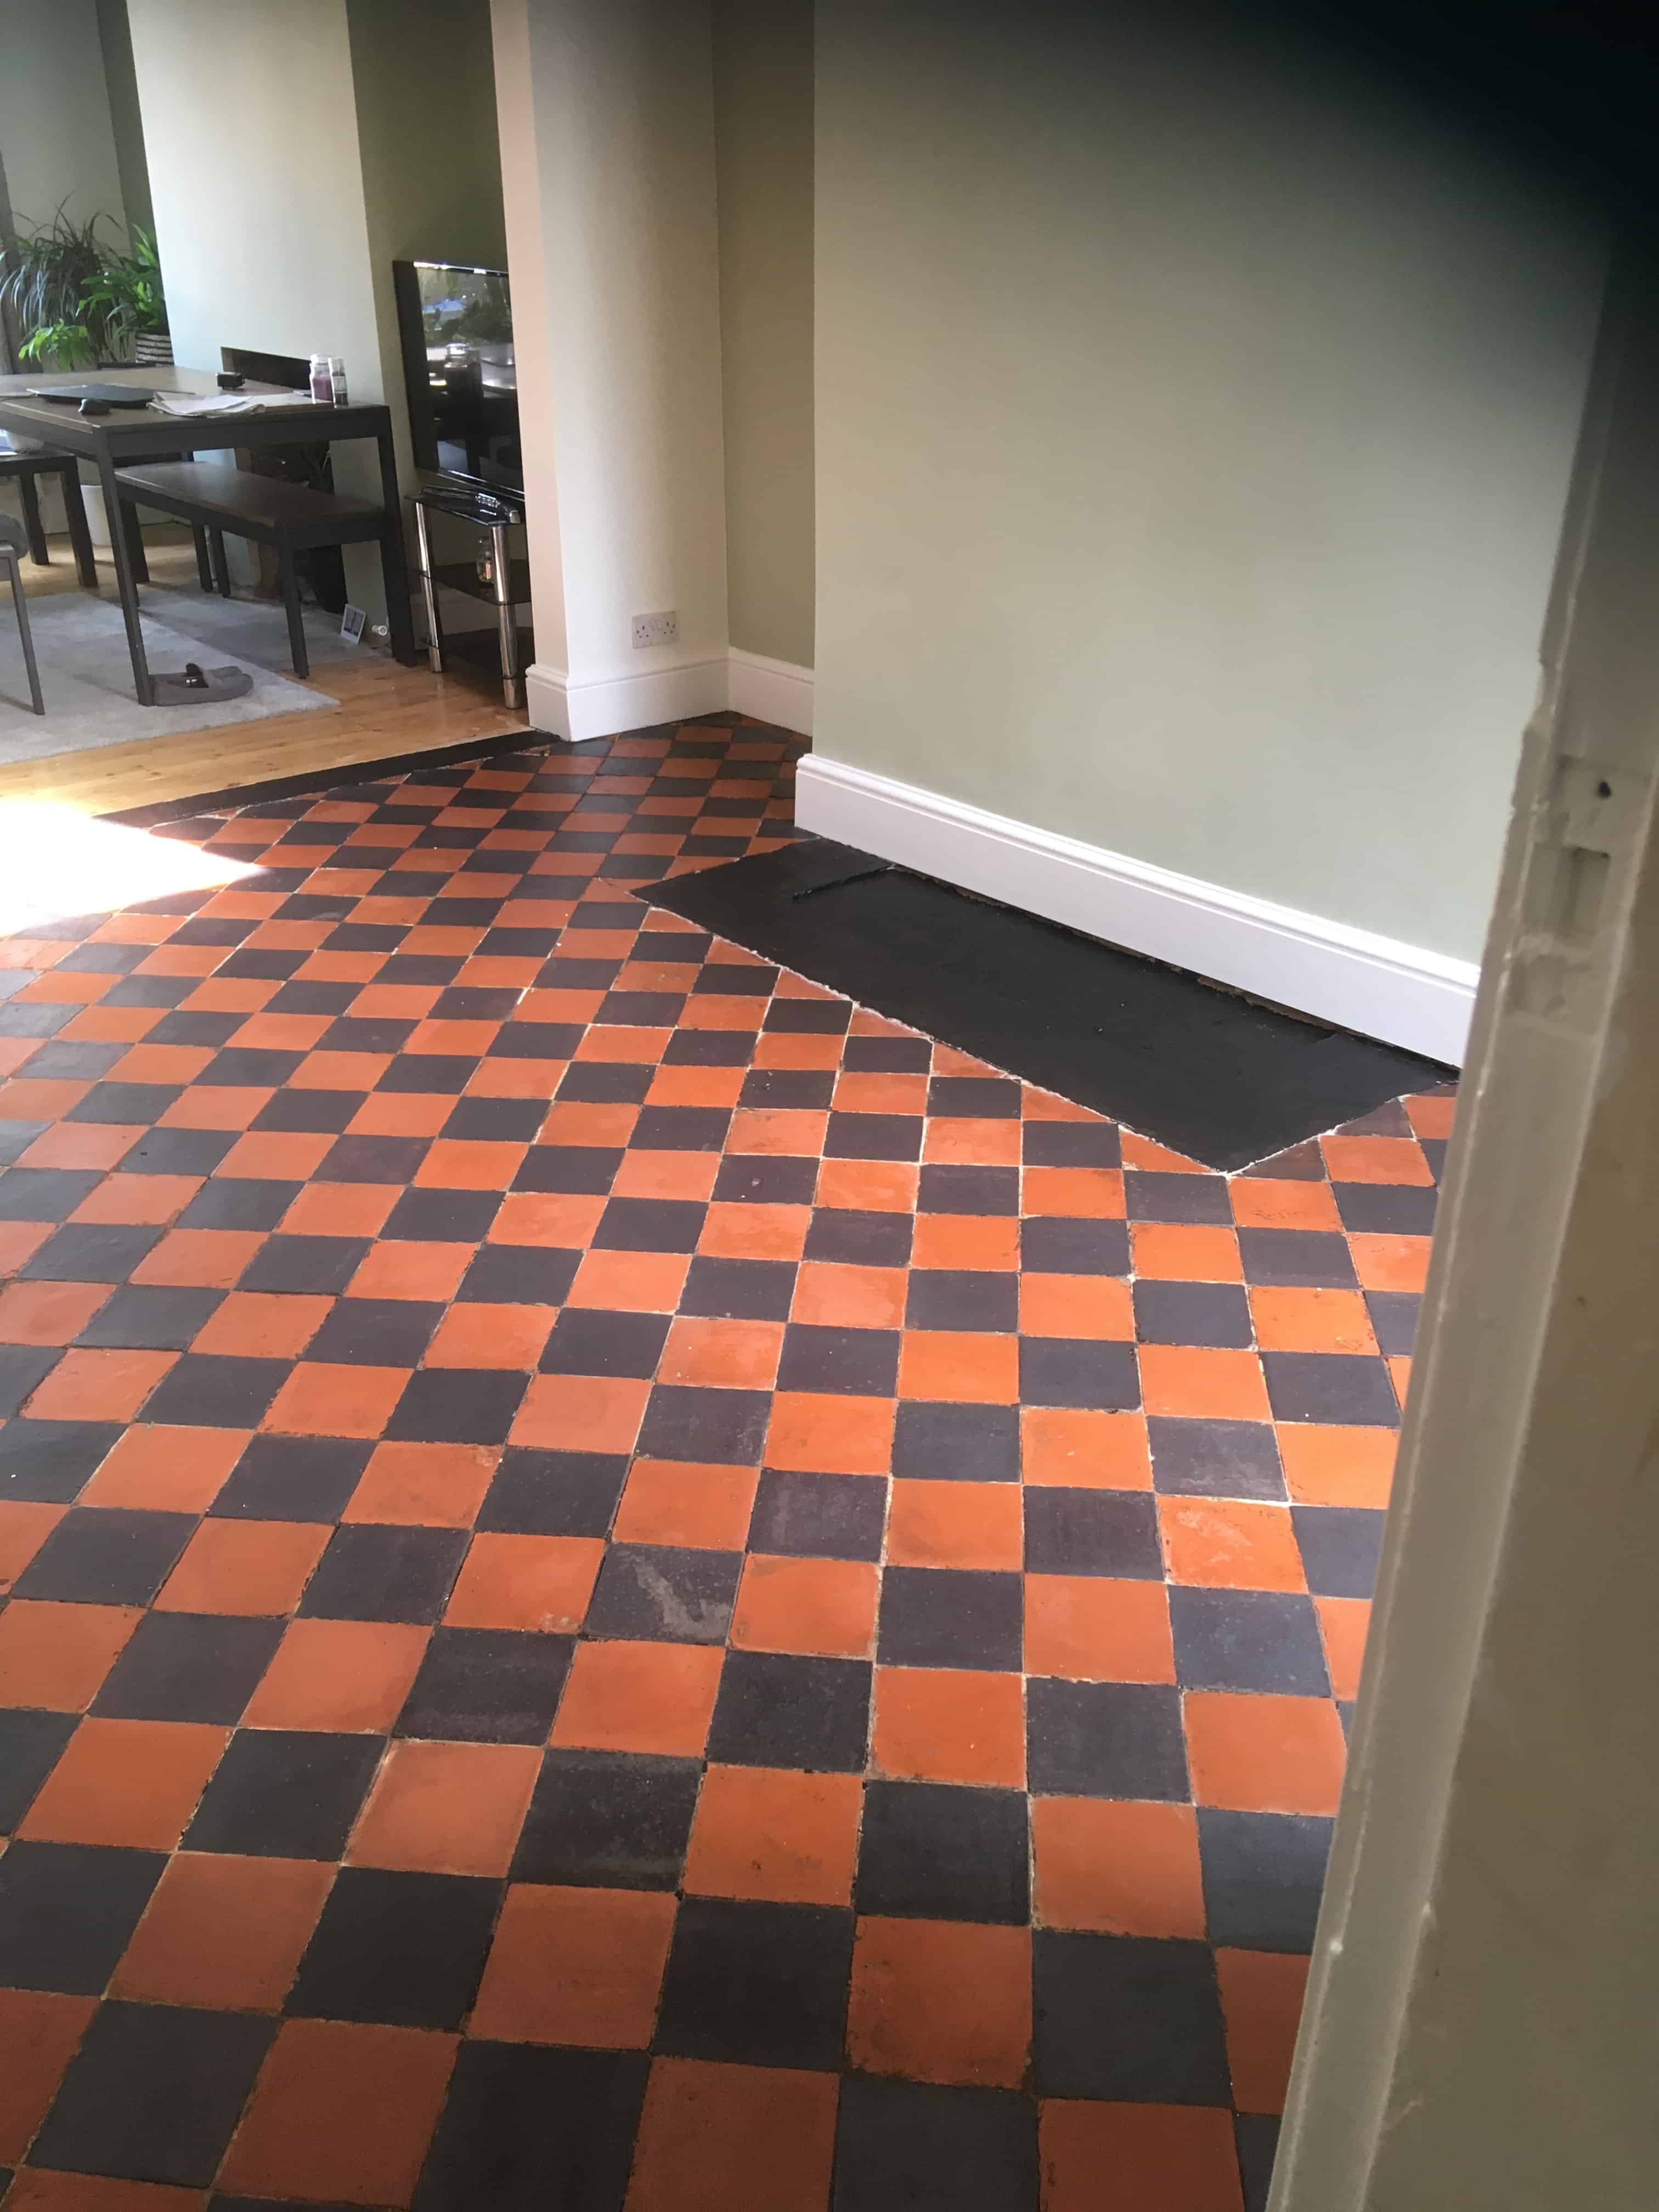
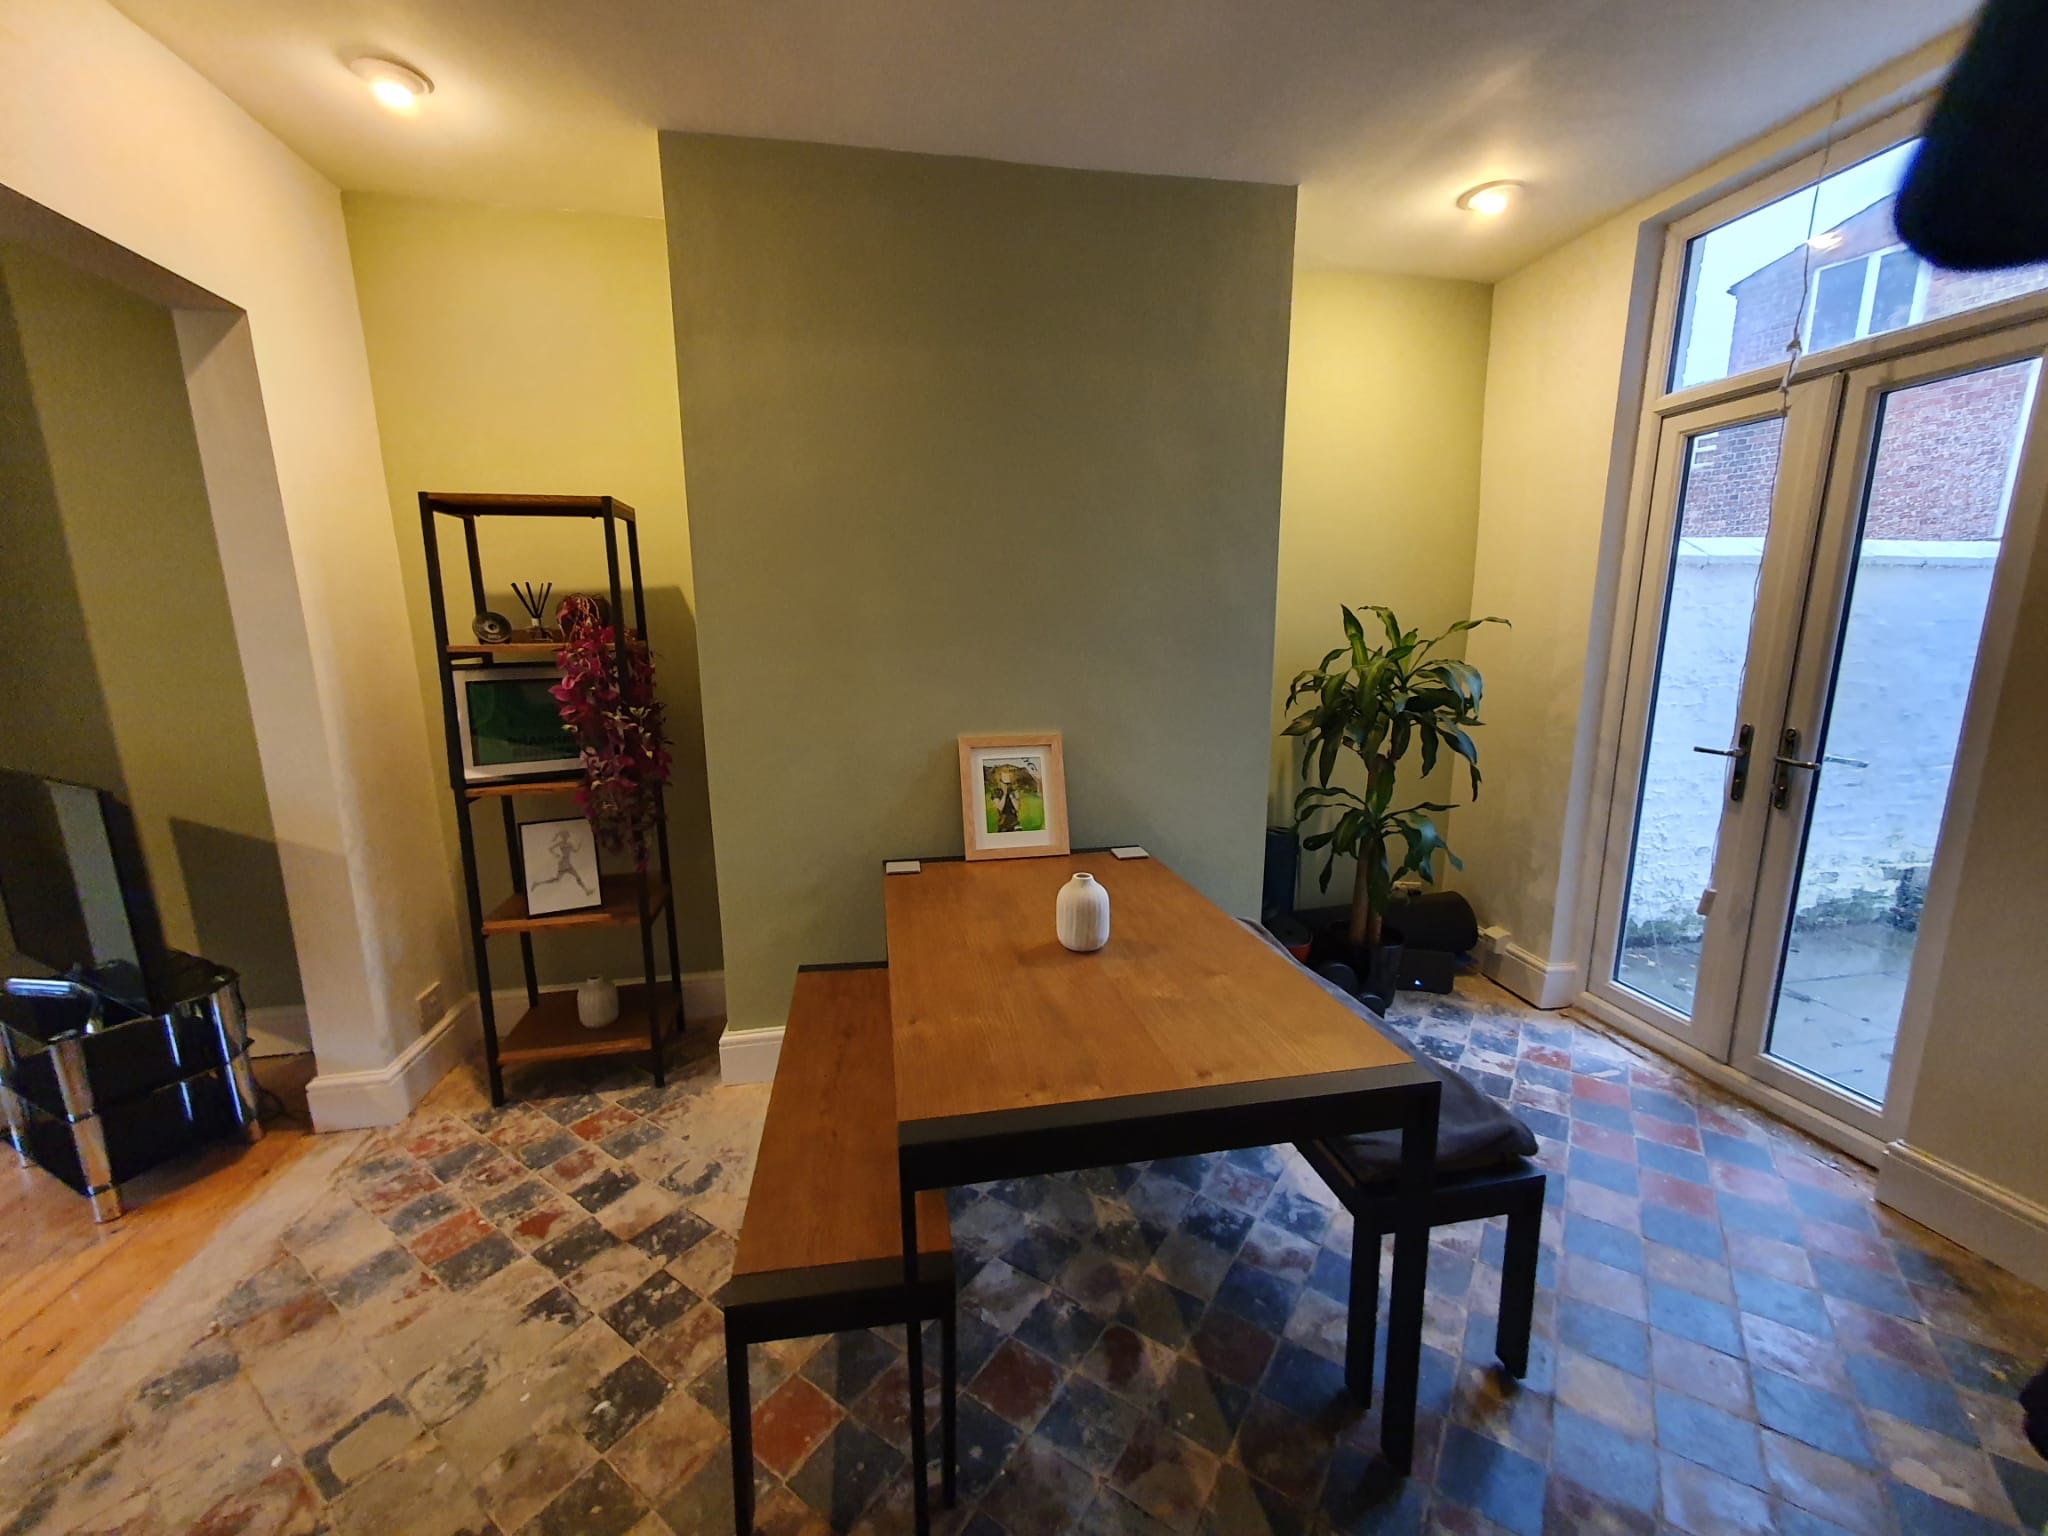
These photos are from a house in Cheadle Hulme where the owner wanted the 120-year-old quarry tiles in the dining room restored as an original feature. The tiles had been discovered when a carpet was removed and as well as being very dirty had been covered with a cement based self-levelling compound.

 
Old Quarry Tiled Floor Before Restoration Cheadle Hulme

It’s not unusual to find tiles covered in self-levelling compound when a carpet or lino is fitted. It’s done to smooth out the grout depressions which otherwise would eventually show through. Fortunately, it can be removed however it does require a lot of work.

 
Old Quarry Tiled Floor Before Restoration Cheadle Hulme


Removing Cement from a 120-Year-Old Quarry Tiled Floor

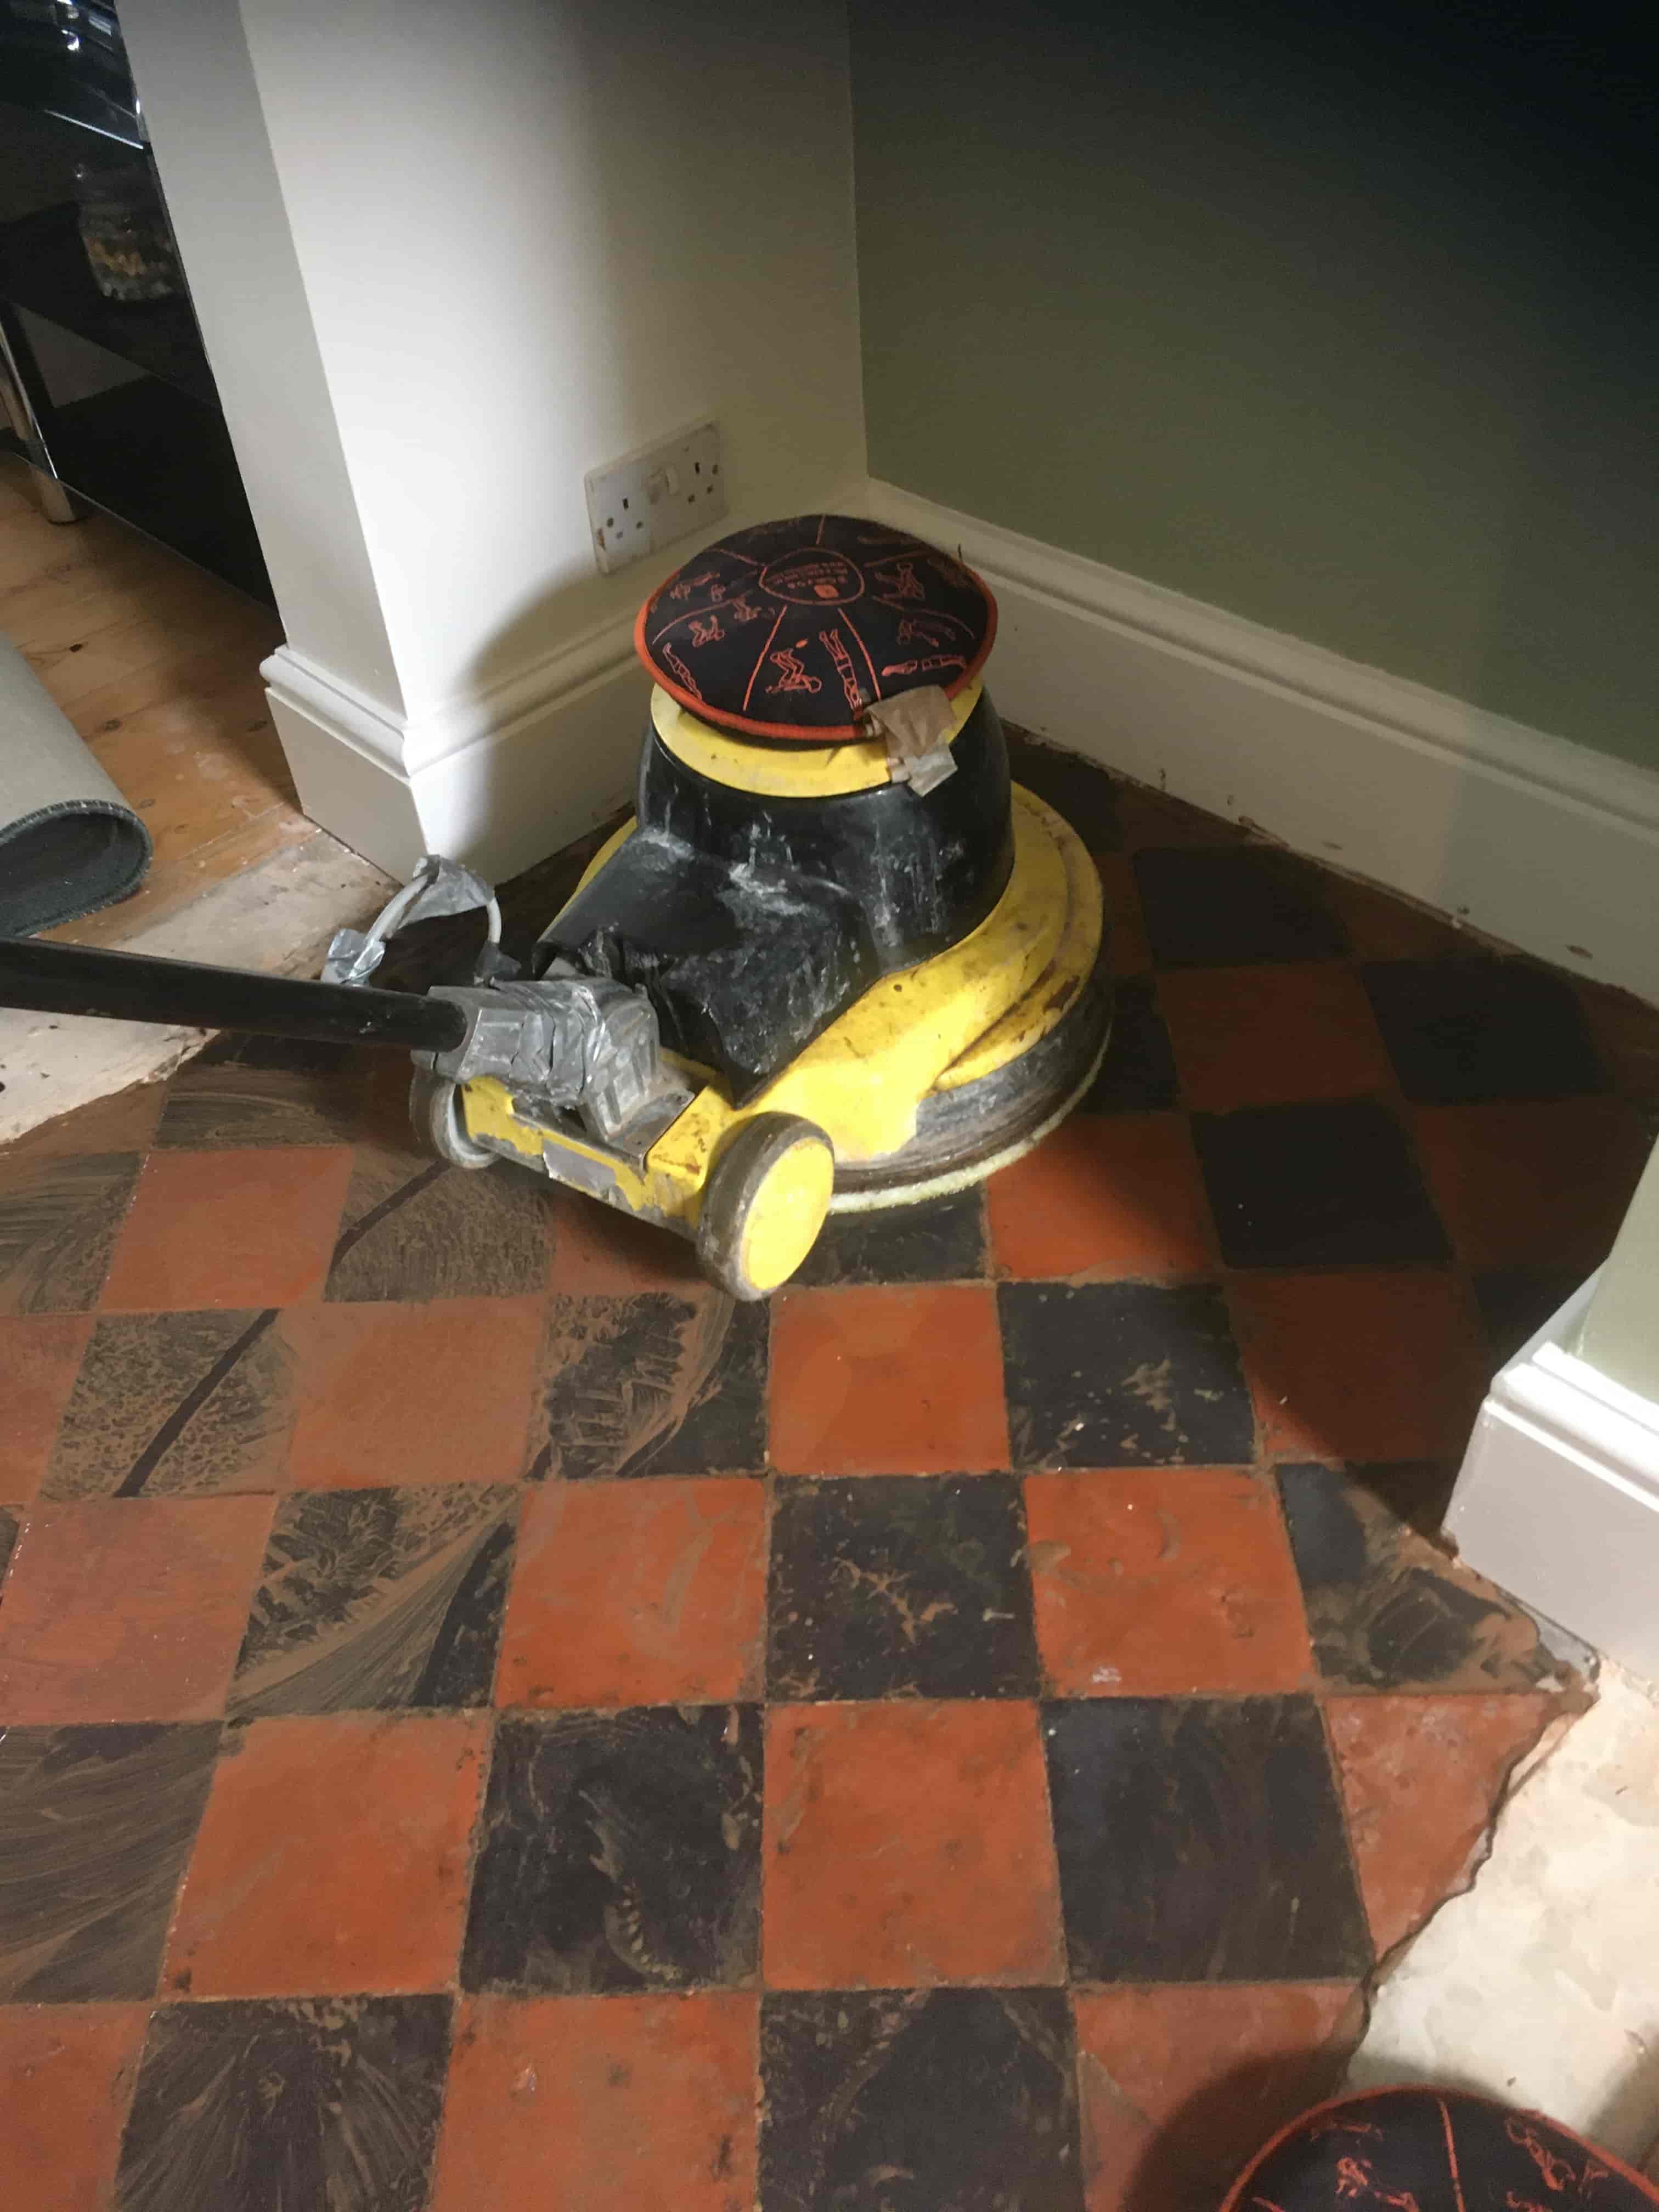
To deal with the cement I treated the Quarry tiles with neat Tile Doctor Acid Gel and left it to get to work on the cement for ten to fifteen minutes. I then ran over the floor with an abrasive 200 grit milling pad fitted to a weighted rotary floor buffer. This action loosened the cement so it could be removed although in some of the stubborn areas I had to use a little extra force with the careful application of a hammer and chisel. I also used handheld abrasive diamond encrusted blocks which came in very handy near the skirting boards and corners.

 
Old Quarry Tiled Floor During Cleaning Cheadle Hulme

It took a lot of effort to get all the cement off the tiles, but they responded well to the treatment, and I could see the floor slowly transform in the process. A lot of water was used to provide lubrication and during rinsing for which I used a wet vacuum to extract the resultant slurry off the floor. The Acid Gel also removes old grout smears from the tile and neutralises any efflorescent salts in the floor which can be a problem with floors of this age with no damp proof membrane.


Sealing a 120-Year-Old Quarry Tiled Floor

The floor was left to dry off overnight and I came back a few days later to check the moisture levels in the floor with a damp meter. Unfortunately, the readings were still too high to apply a sealer, so I re-arranged my return. In fact, it took weeks for the moisture level to drop below 25% which was the minimum acceptable level before sealing.

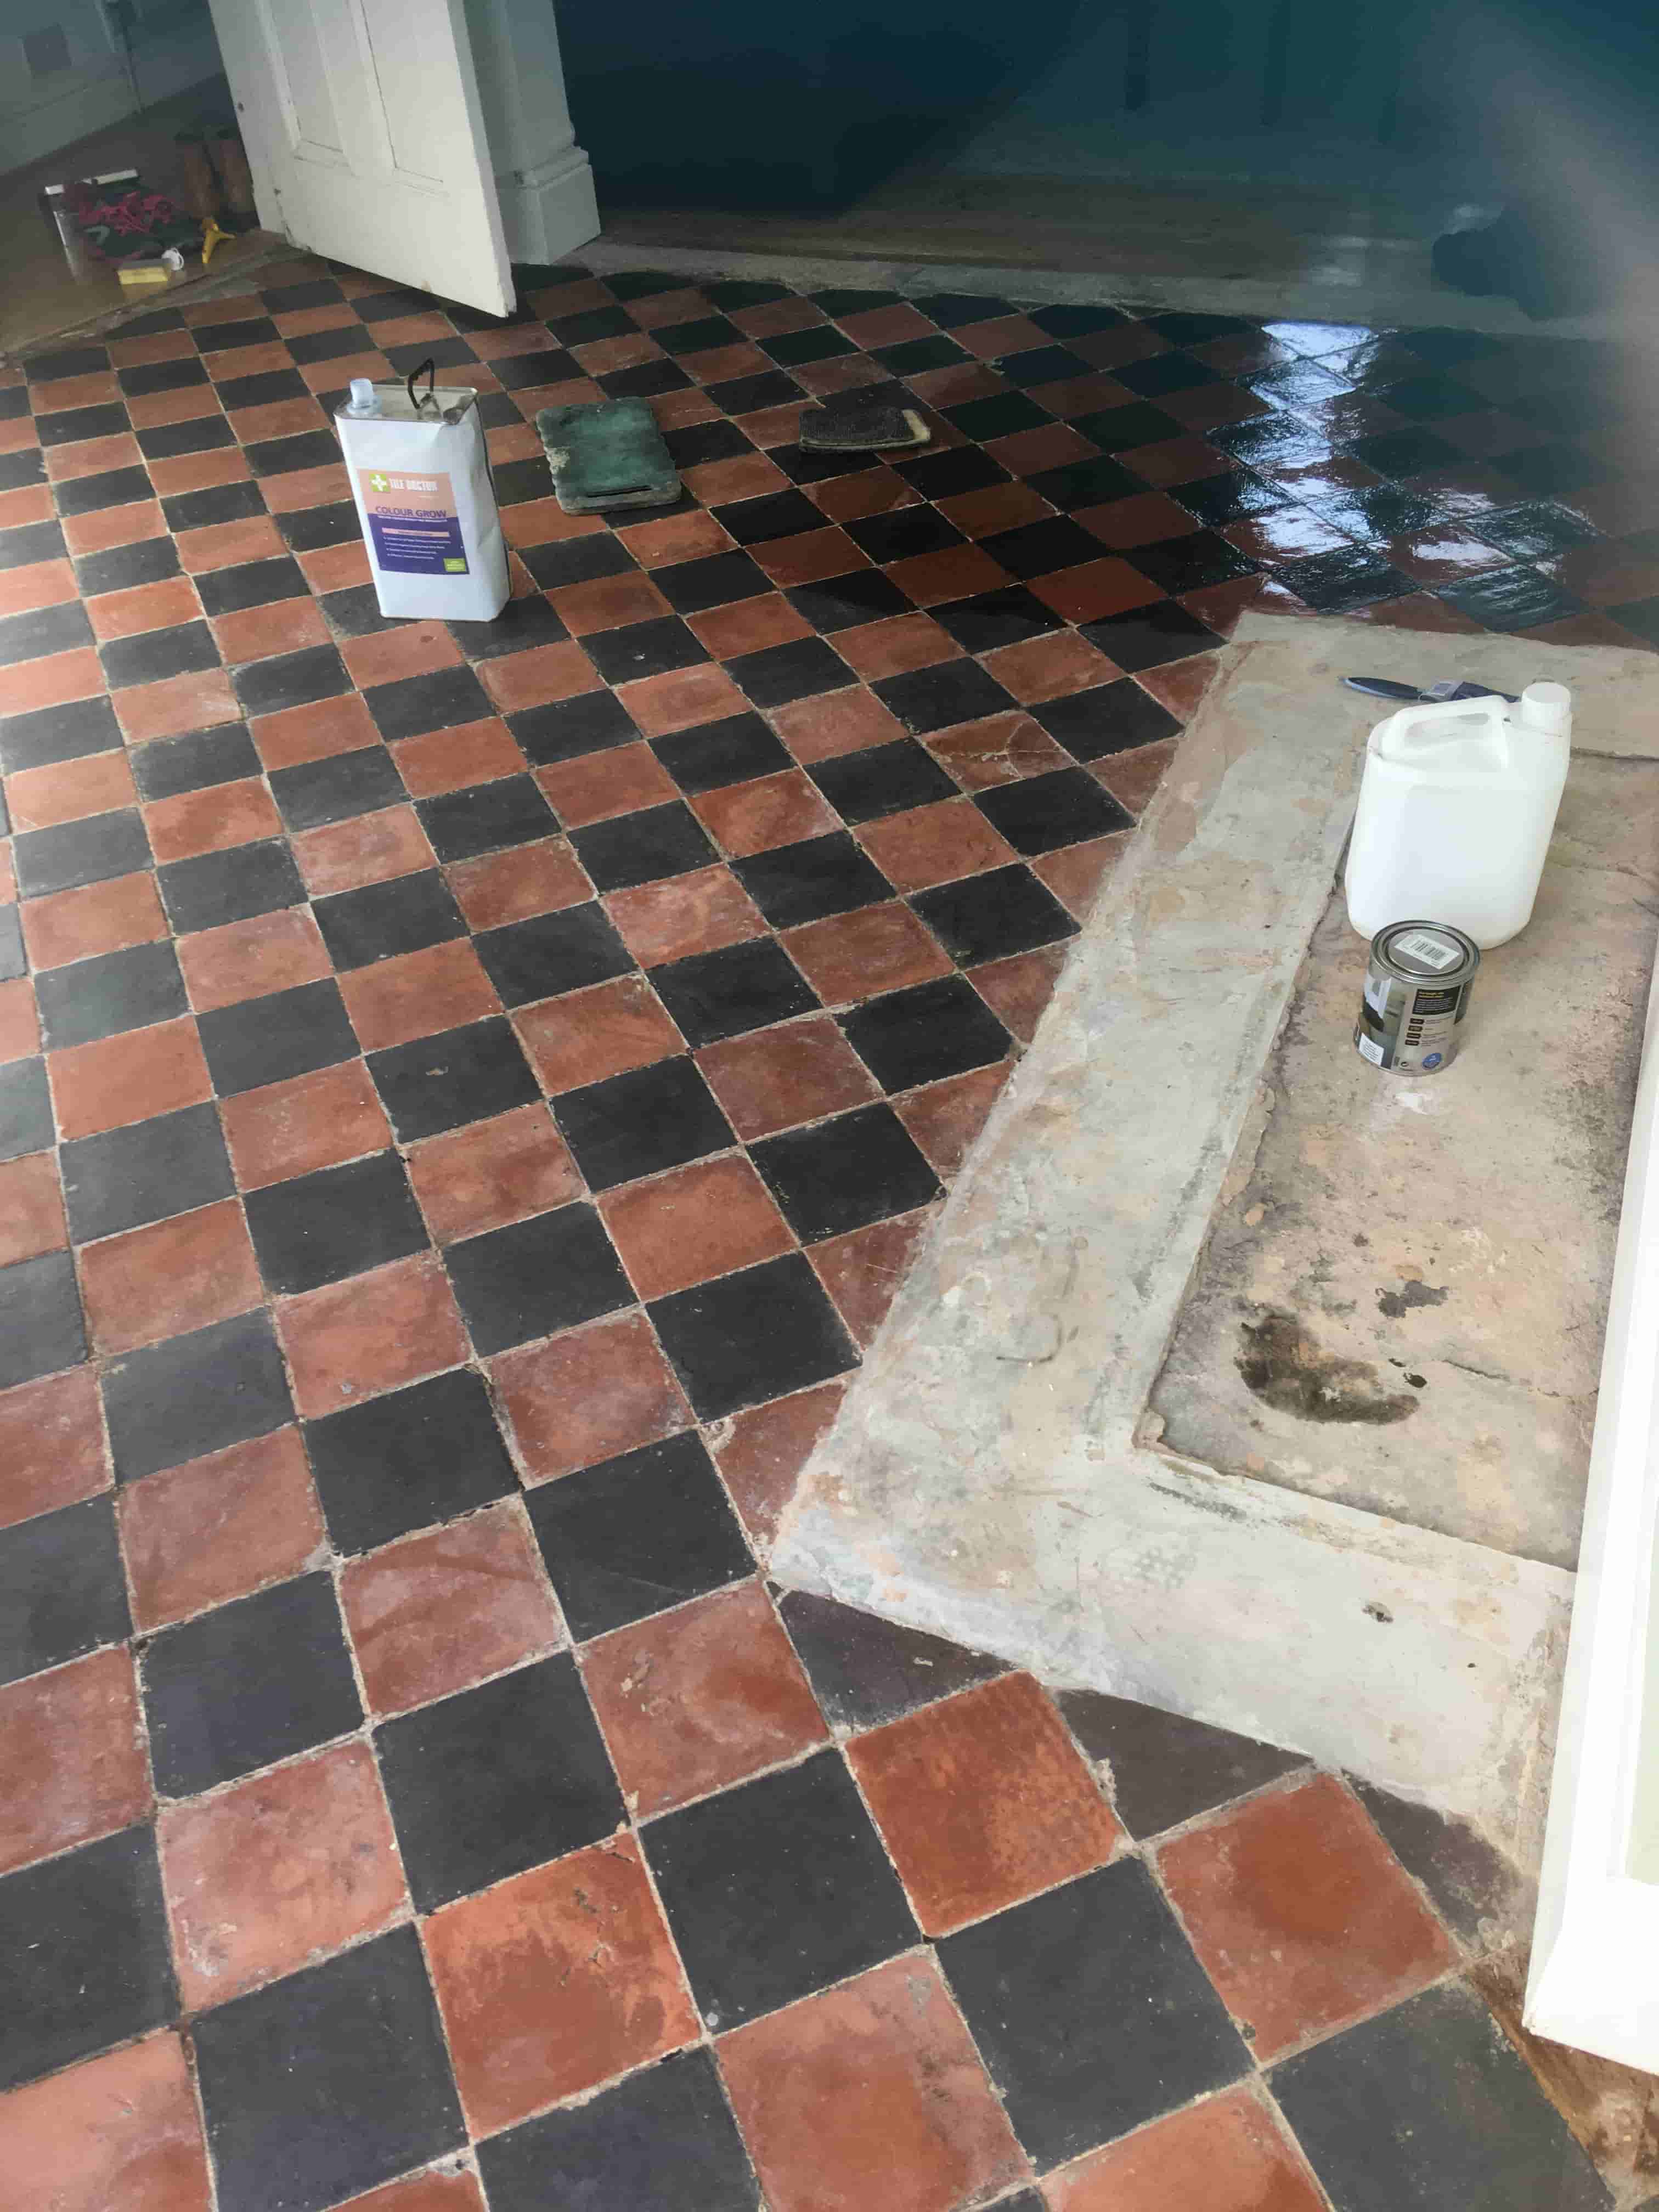
The sealer I used on this floor was Tile Doctor Colour Grow. It's a fully breathable colour enhancing impregnating sealer that will cope with any damp moisture rising through the tile and being a colour enhancer really brought out the red and black colours in the tiles.

 
Old Quarry Tiled Floor During Sealing Cheadle Hulme

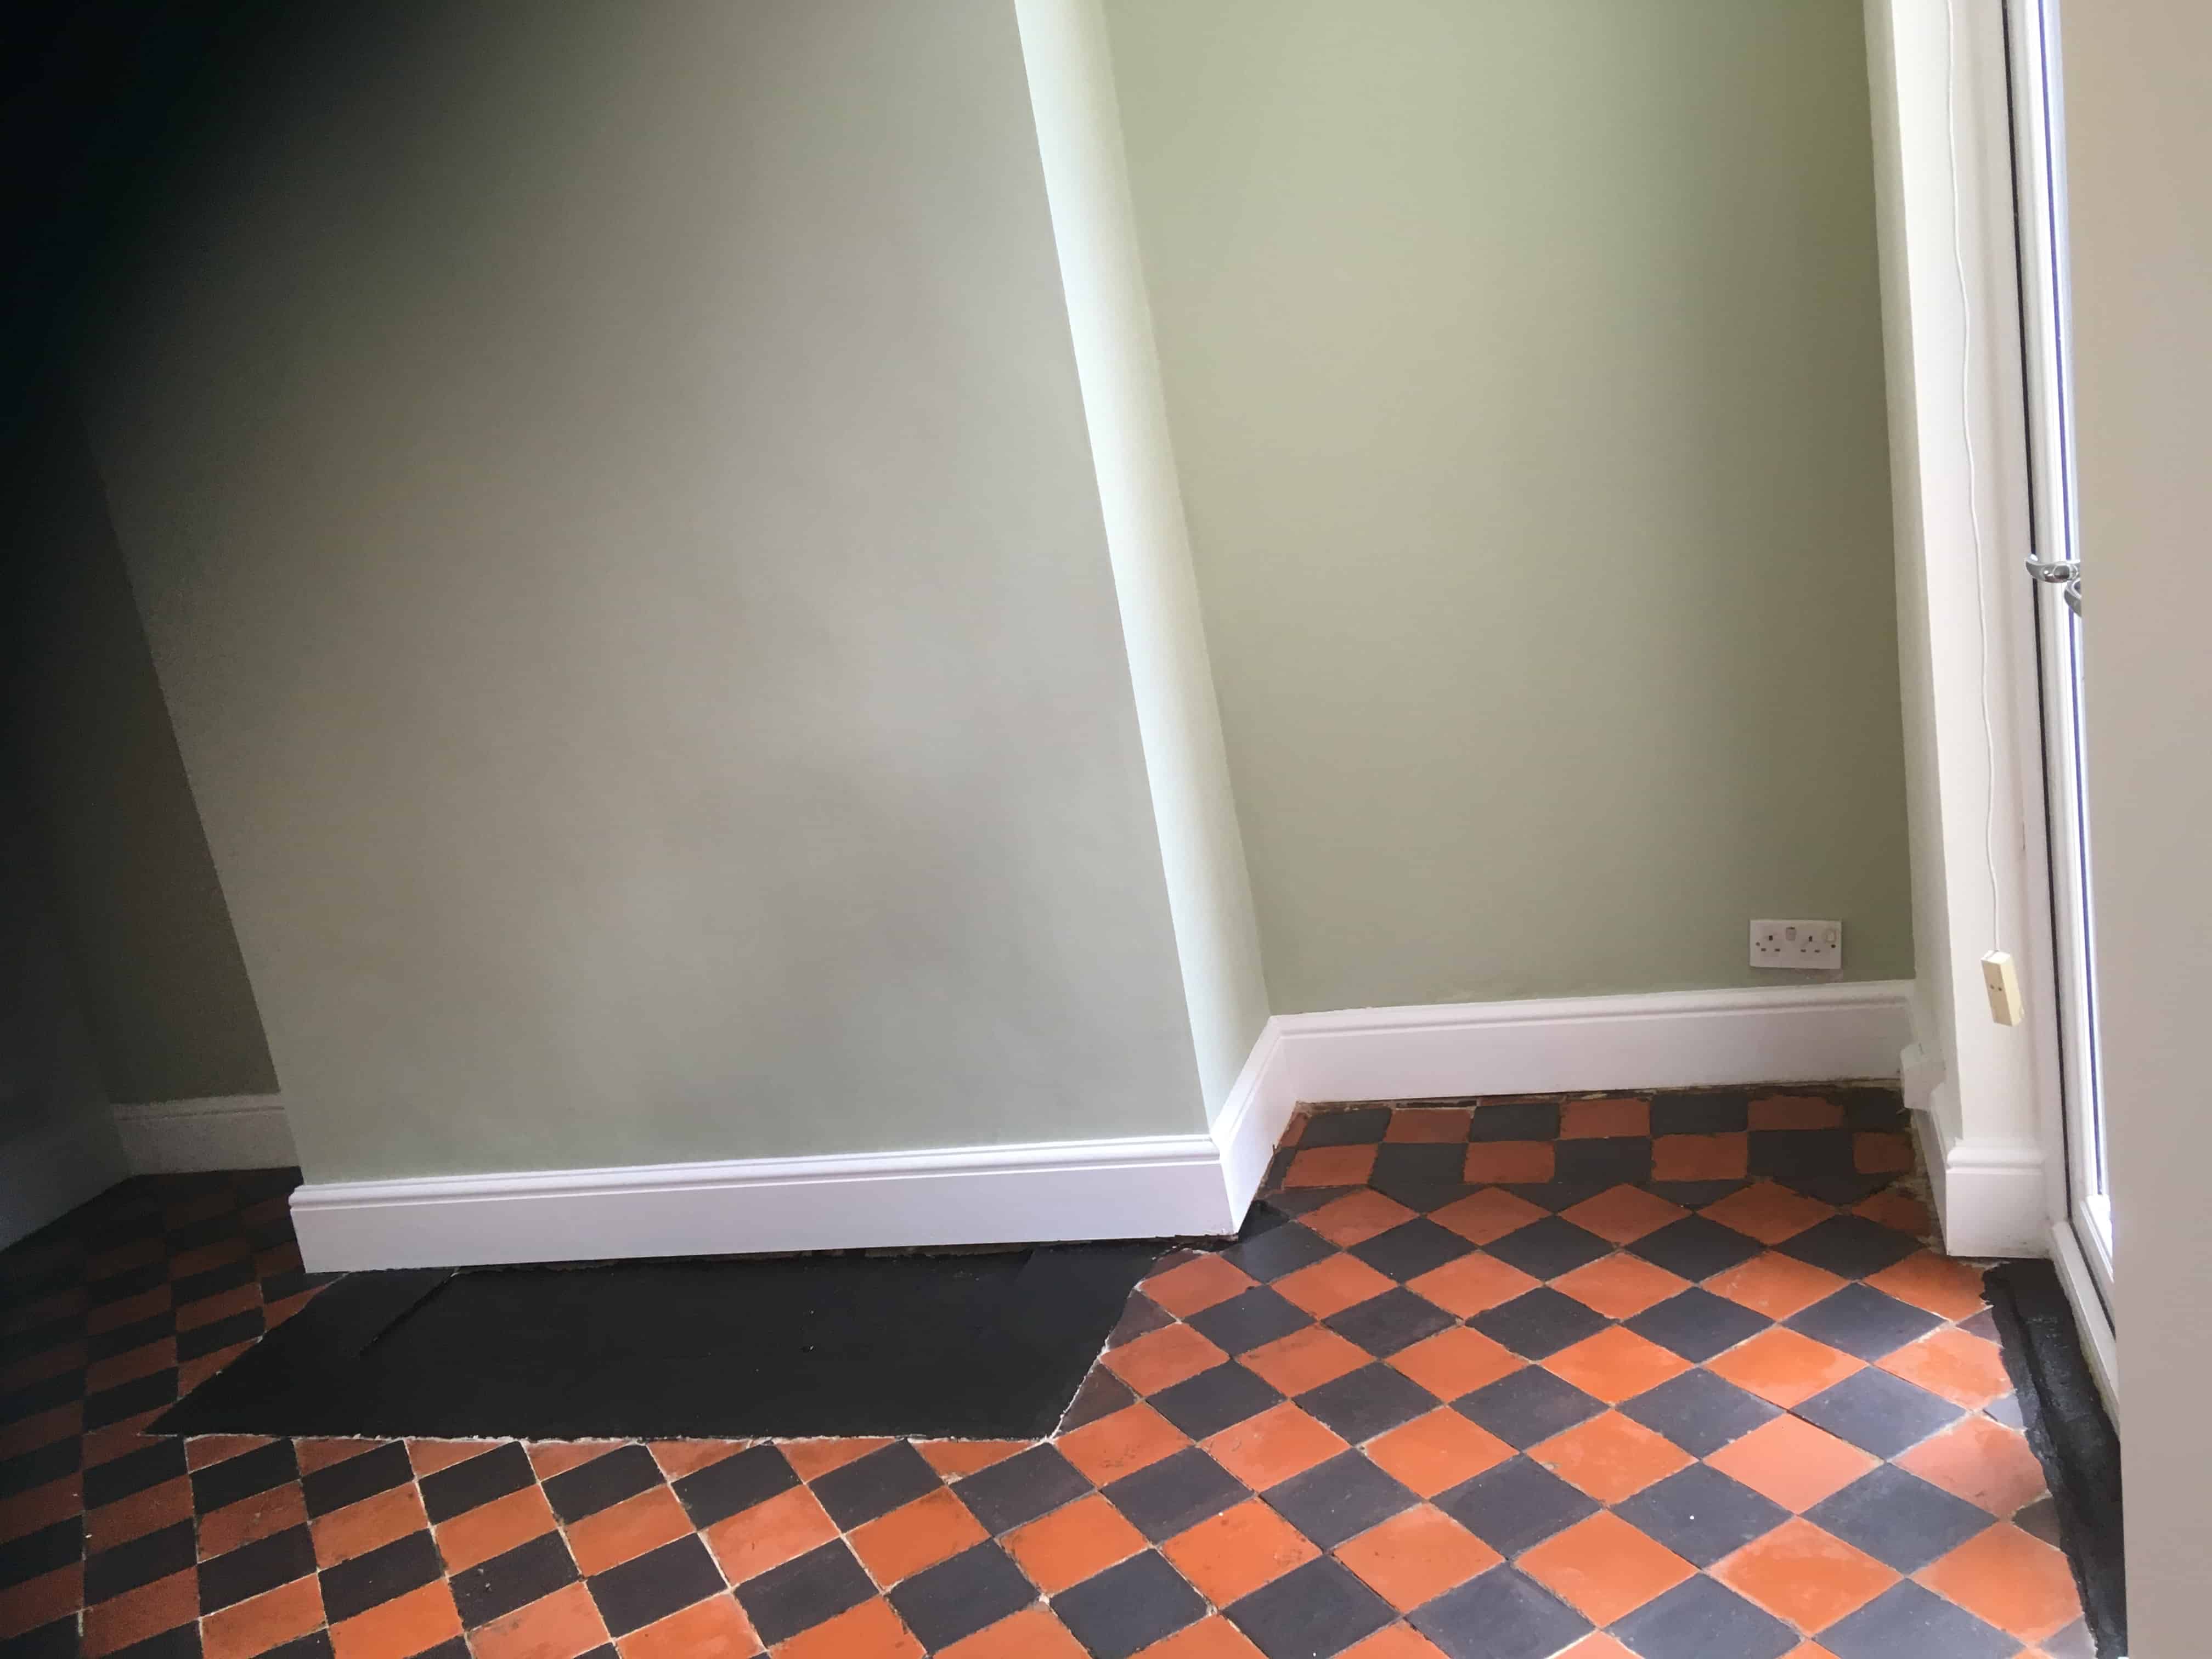
Whilst the sealer was drying, I painted the fireplace hearth with black paint, this really tied it in with the Black Quarry tiles and neatly finished off the appearance of the room. Needles to say by the time I had finished the floor it looked great, and my client was very happy with their newly restored Quarry tiled floor, so much so they took time to leave the following feedback which is always appreciated:

 
"Within hours of sending in an enquiry on the tile doctor website I was contacted to say that the local rep would be in touch. Within another couple of hours, Kamila got in touch. Right from the start Kamila was accommodating to suit my needs, carrying out a trial 'out of hours' to suit me. Her communication was fantastic, regularly keeping me updated. She is a lovely lady who is trustworthy. I had to leave Kamila a few times and she locked up and posted the key as agreed. I am extremely pleased with the results of my refurbished quarry tiled floor, I never thought it would come up as well as it has done."

Old Quarry Tiled Floor After Restoration Cheadle Hulme

For aftercare cleaning I recommended they use the Tile Doctor Neutral Tile Cleaner. It is pH neutral tile cleaner that will not degrade the new sealer which is important as many supermarket cleaning products are simply too strong for use on sealed tiles. (Always check the label!)

Wednesday, March 9, 2022

Steam Cleaning Carpet vs Dry Cleaning Carpet

If you are trying to decide between asteam cleaning carpet method or achemical/dry cleaning system for cleaning soiled carpet, the following facts can assist you in making this decision to maintain the beauty of your carpet.

1. Chemical/Dry Cleaning

This method of cleaning carpets is sometimes preferred because the carpets dry quicker, even though a small amount of water is used to inject the chemicals into your carpet during the process.

Once the chemical has been placed and brushed into the fibers of the carpet, the chemical, the dirt, and debris mix together and form small crystals that, when dried, can be vacuumed up.

Unless you only want a surface cleaning of your carpet, this method is ineffective as only the dirt on top of your carpet is removed.

2. Steam Cleaning

The steam cleaning system cleans the carpet more thoroughly.

By using hot water on your carpet, the surface and the base of the carpet—after becoming saturated with water—then mixes with the dirt and debris and are then extracted by a powerful vacuum.

This type of system is capable of removing sand that sinks and collects at the base of your carpeting and matting, sand that can grind into the carpet fibers and eventually destroy it.


Tuesday, March 1, 2022

Victorian Tiled Hallway Floor Restoration Detailed by North London Expert

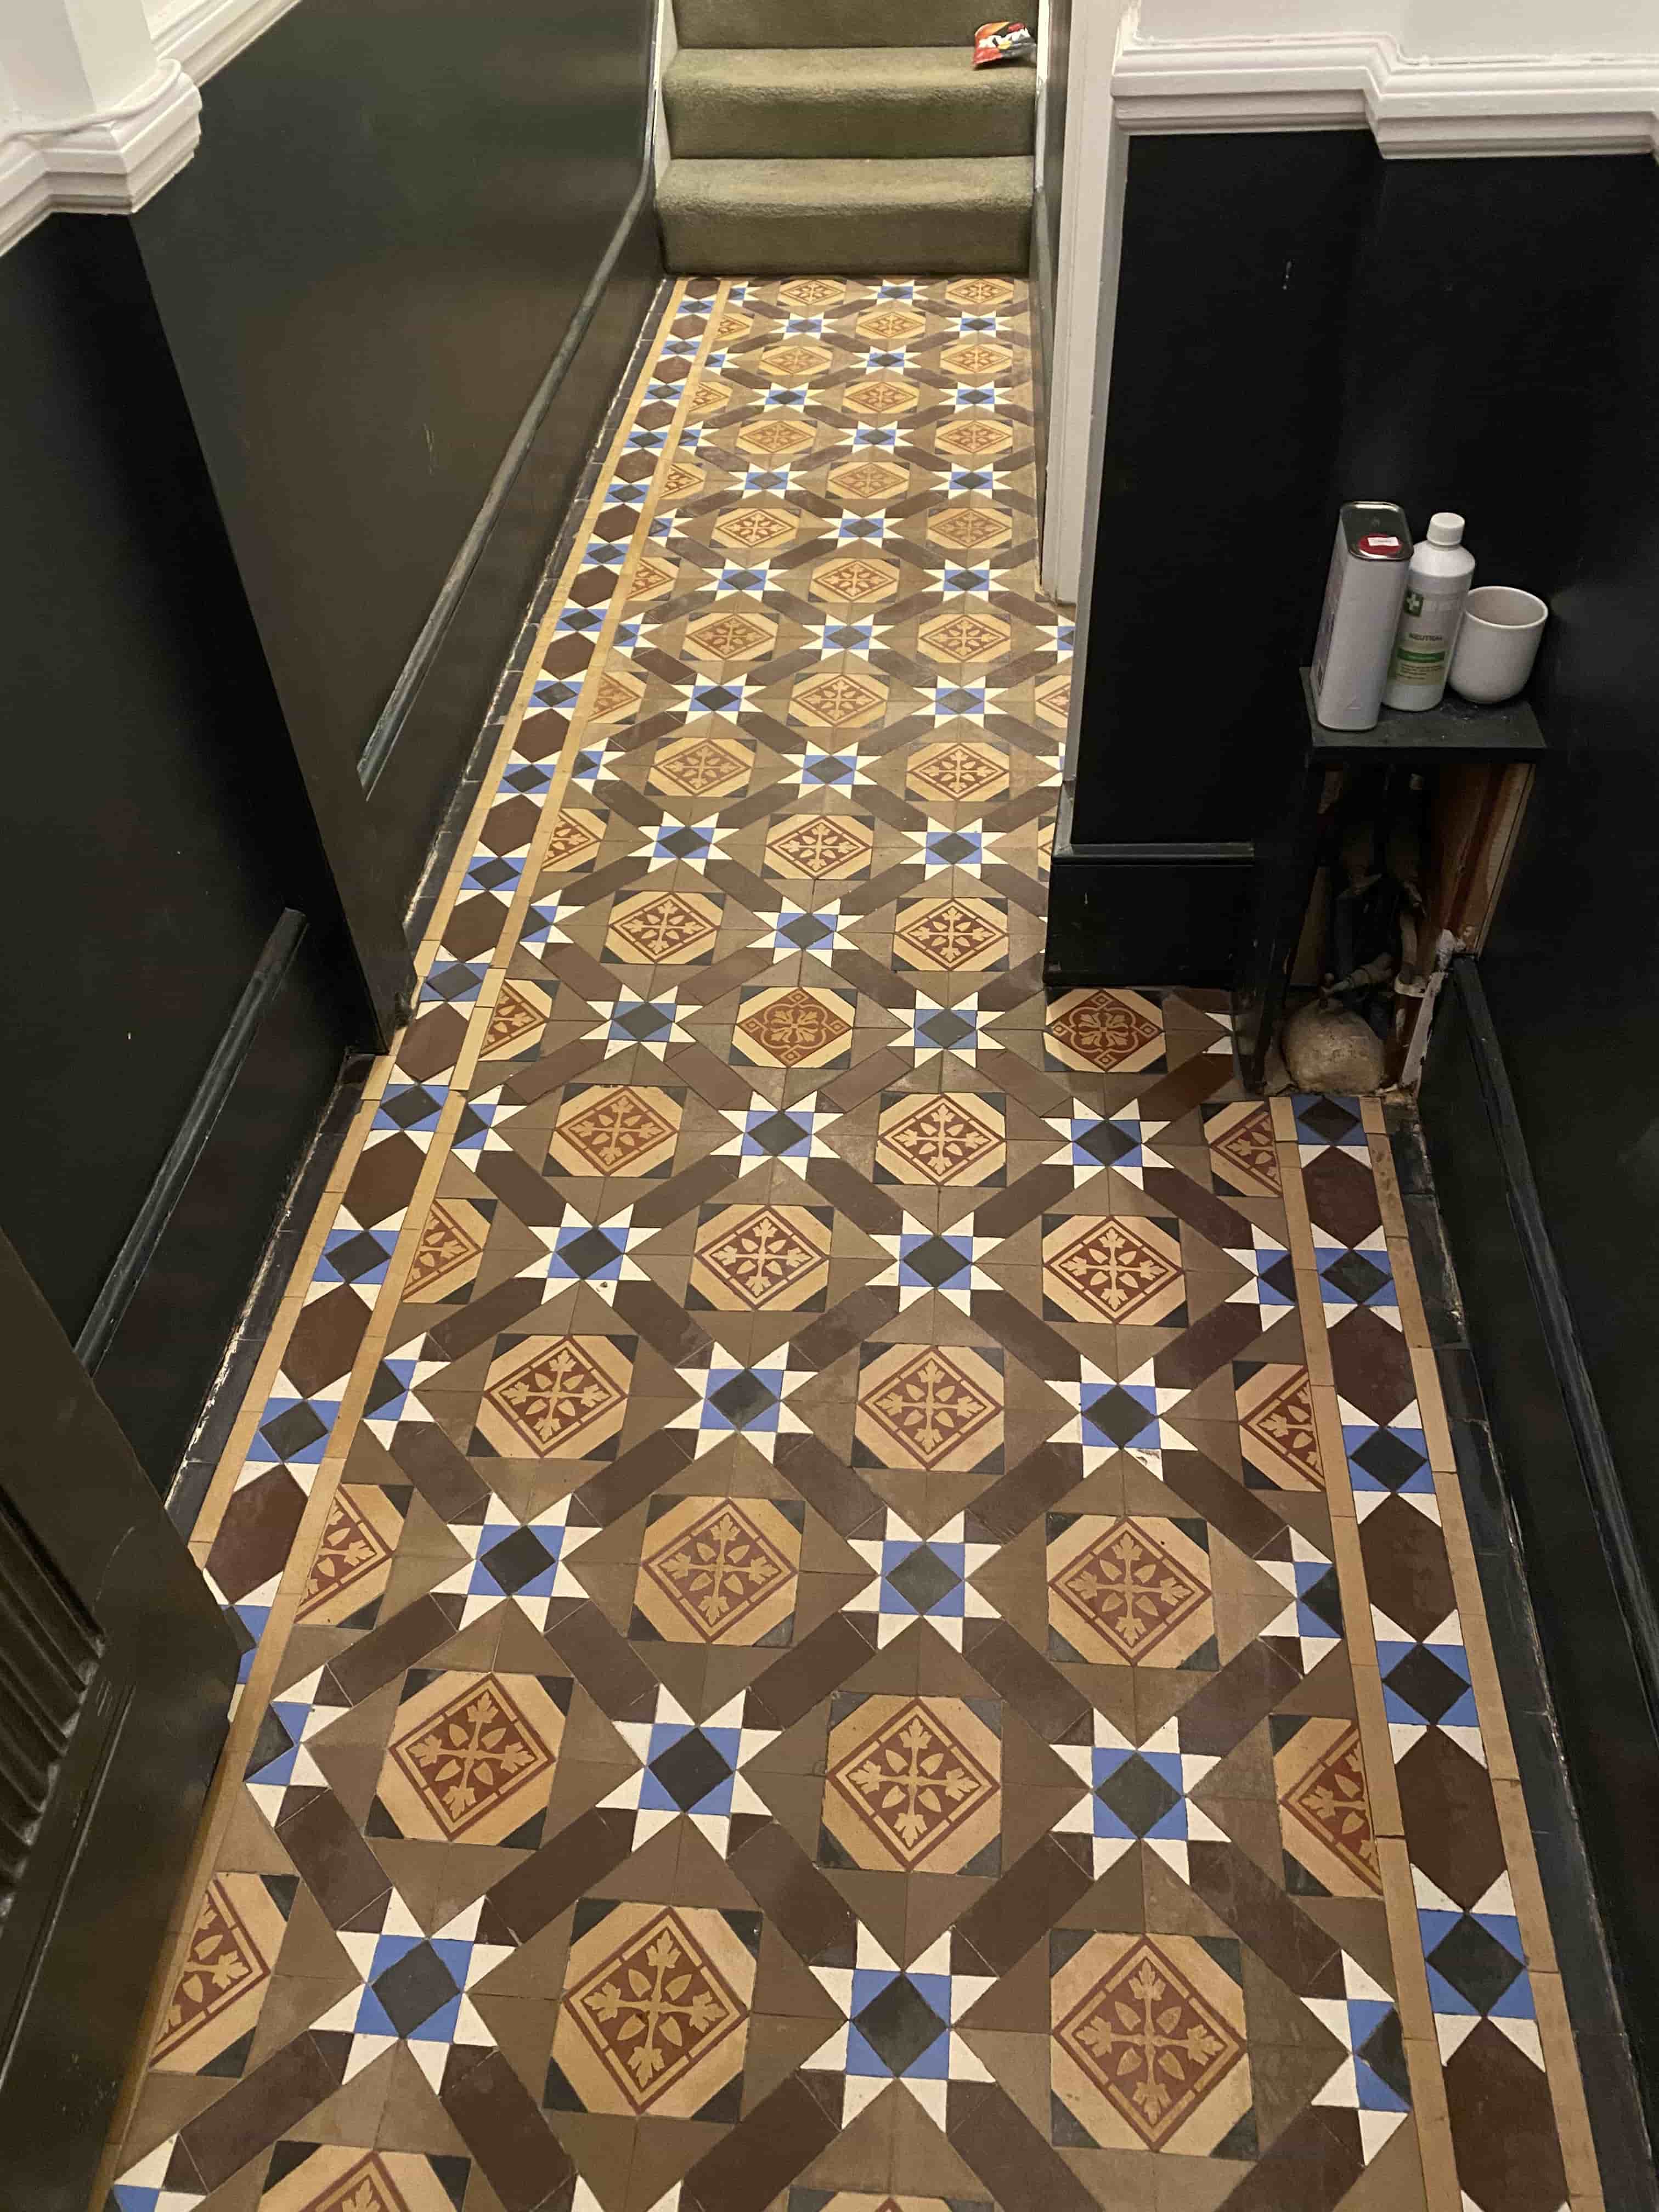
My client discovered found this Victorian tiled floor under the carpet of a communal hallway in a large Victorian house in Bounds Green. The property had previously been converted into three flats and it seems the developers of the property dodged the cost of having the floor renovated and opted to glue down a carpet instead. The floor was in quite a state and there was a section of tiles missing where a pipe had been laid under the floor.

 
Victorian Tiled Floor Before Restoration Bounds Green

I visited the property to survey the floor and prepare a quote for renovating the floor. With the floor in such a state I could see I would need to source replacement tiles. Whilst there I also carried out a small test clean to understand what it would take to ensure a good result could be achieved. Impressed with results from the test clean and happy with the quote my client agreed to have us back to do the work.


Cleaning and Repairing a Victorian Tiled Hallway Floor

Day one started by deep cleaning the floor using a strong dilution of Tile Doctor Remove and Go which was scrubbed in with a black pad fitted to a rotary machine. This product weakens the glue and allows it to be removed with handheld scrapers, a steamer also comes in handy during this process.

Next step was to tackle the thin layer of cement screed which had been applied in some areas to level the floor ready for carpet. To do this a 200-grit diamond pad was fitted to the rotary floor buffer and run over the tiles along with Tile Doctor Acid Gel both to lubricate and help clean away the cement residues. This process generates a lot of soil with is rinsed off with water and extracted using a wet vacuum.

The 200-grit pad was followed up with a finer 400-grit pad to improve the condition of the tile, again using Acid Gel. After another round of rinsing and extracting the cleaning process was complete. As well as removing the cement the Acid Gel will neutralise any potential efflorescent salt issues that are a common problem with floors of this age. The floor was then rinsed with water and the soiling removed with a wet vacuum.

The next step was to tackle the damaged section of tiling where the pipe had been laid. To do this the backfilled cement was carefully chiselled out and the rubble removed. The subfloor was then rebuilt to with fast drying cement ready for tiling the next day.

For this project we were unable find existing replacement tiles that fitted exactly so instead large square tiles in the colours required were obtained from Original Features (just down the road in Crouch End N8) and then cut down to size on site.

Victorian Tiled Floor During Restoration Bounds Green Victorian Tiled Floor During Restoration Bounds Green

After cutting all the tiles to match the existing pattern I laid them into the floor using a fast-drying flexible adhesive. The floor set over lunch and were grouted later that afternoon.

Sealing a Victorian Tiled Hallway Floor

The following day I returned and sealed the tiles with three coats of Tile Doctor Colour Grow which is a breathable impregnating sealer that will soak into the tile adding protection. This takes a while to apply as you have to wait at least half an hour between coats to dry before applying the next. 

Additionally, Colour Grow is a colour enhancing sealer and so was a perfect choice for this colourful floor. Being breathable it will also cope well with any moisture rising through the floor which is important for old floors like this which don’t have a damp proof membrane installed.

 
Victorian Tiled Floor After Restoration Bounds Green

My client was very happy with the newly restored Victorian tiled hallway which looked so much better than the previous carpet and had added so much more value to the property. For aftercare I recommended the use of Tile Doctor Neutral Tile Cleaner, which is pH balanced cleaner that will clean the tiles without being so strong that it impacts the sealer.


Saturday, February 12, 2022

What Kinds of Floors Keep Your House Cool?

 If yours is among the many homes with wall-to-wall carpet, you probably already know it isn’t always the best option for keeping the building cool in warmer months. While they look nice and can be wonderful in the wintertime, carpets retain heat. They can also hold allergens, along with moisture that could be brought in by wet feet from the swimming pool, the sprinklers, or the beach.

But don’t despair! There are some other flooring options that can keep you cooler than traditional carpet. While it’s best to start thinking about installing a new floor in the cooler months before temps climb, it’s never too late. Depending on your needs, personal style, and whether you have kids, consider one of the following options to help keep things cool in your home if you don’t have AC.

Natural Stone

Another option to keeping the house (and your feet) on the colder side is natural stone. This type of flooring can be made from any kind of rock—popular options include slate, granite, and travertine. Stone is non-porous and easy to clean, so it won’t soak in dust and bacteria. Plus it looks great! Not only is it a stylish design choice, it's available in many kinds of material and can be arranged in any pattern you like.

Ceramic Tile

Ceramic tile is often made from clay materials and is non-porous, like stone, which means it doesn’t retain heat like carpeting. It's cool to walk on, easy to maintain, and extremely durable. Tile won't stain or warp in water, and it's a little cheaper than stone, making it a popular choice for bathroom floors.

Bamboo

Bamboo has become more and more popular over the years as a sustainable, green material, partly because bamboo plants grow incredibly quickly in a wide variety of climates. Flooring made from bamboo can be a little more expensive than wooden alternatives, but it will hold up beautifully over the years if taken of properly.

It's attractive, easy to care for, and like regular wood it will keep the house a lot cooler than carpeting. Bamboo would doesn’t do well in areas with high humidly, though it is fairly water resistant.

Wood

One of the most popular flooring styles for today’s homes is wood. Homeowners like the overall look and feel of wood flooring, and find it easier to maintain than carpet. It can last for years, and yes, it will keep the house cool, because it's not a heat sink, unlike carpeting. There are many wood flooring options, from dark, rich cherry woods to lighter, elegant pines.

Vinyl

Gone are the days of your grandmother’s vinyl. Today, vinyl flooring has come of age. It comes in many attractive colors, designs, and styles, so it can suit any home’s interior. It's cool like wood, but easier to take care of—all you need is a mop and it’s clean in a breeze. Vinyl is also soft, well-cushioned and comfy to walk on with bare feet. And best of all, it's the cheapest option out there!

Laminated Fiberboard

Like vinyl, laminated boards, sometimes simply called "laminates," reduce the temp of any room they're in. In a nutshell, laminates are hard plastic shells around fiberboard cores. Because the plastic can be made with any color or design, they're another great option if you're looking to make a unique visual impact.


Source: www.DoItYourself.com
Friday, January 28, 2022

How to Lay Linoleum Kitchen Flooring

 Linoleum kitchen flooring is one of the most common types of floor options for this part of the home. Linoleum is both attractive to look at and highly functional. It is comfortable to walk and stand on and is easy to clean and maintain, making it the perfect foundation for your kitchen, where things are likely to spill and get messy on occasion.

While the process of installing linoleum flooring in your kitchen is somewhat involved, it is not particularly difficult. Read on for a brief overview of how to install linoleum flooring in your kitchen.

What You'll Need:

  • Linoleum sheeting
  • Broom and dustpan
  • Linoleum adhesive
  • Notched trowel
  • Linoleum shears and measuring tape
  • Steel floor roller

Step 1 - Prepare the Space
If you've removed the previous flooring in your kitchen, or if you're installing flooring for the first time, you'll first need to make sure that the area underneath the linoleum is perfectly clean. Sweep up any debris and remove any nails or other items which may stick out from the boards underneath the linoleum. This will ensure that the linoleum is able to go on flat and smooth and that it is less likely to suffer damage due to items underneath it.

Step 2 - Locate the Center of the Room
Locate and mark the center of the room using a measuring tape. This is important especially if you are using rolled linoleum, as you'll need to know how far each piece should be rolled out. If you're using precut sheets of linoleum, this will be the place that you begin to place the linoleum.

Step 3 - If Necessary, Cut the Linoleum
Measure out the kitchen floor space to determine how much linoleum you'll need. You'll place four sheets at the center mark, with one touching each corner. For rolled linoleum, measure the kitchen space two times and then double-check the length of the rolls, cutting where you need to with the shears. For sheet linoleum, calculate how many full sheets you can lay down and measure the remaining space so that you'll know how large the smaller pieces that you cut should be.

Step 4 - Apply Adhesive
Use a notched trowel to apply an even layer of linoleum adhesive beginning adjacent to the center mark in the room. Work quickly so that the adhesive doesn't have time to dry before you can lay the linoleum. Apply adhesive only to a small part of the room before you stop to lay linoleum.

Step 5 - Lay and Roll Linoleum
Lay the linoleum down over the adhesive, taking care to make sure that it's as flat as possible. Make sure that the linoleum is perfectly lined up the way that you'd like, because it's difficult to move after it comes into contact with the adhesive.

After laying down the linoleum, use the steel floor roller to roll it completely smooth and get rid of any air pockets that may exist underneath the linoleum sheet.


Sunday, January 23, 2022

Tips and Techniques - Victorian Floor Restoration in York, England

The owner of this beautiful period property on the outskirts of York was renovating the whole property and had uncovered a Victorian tiles floor in the hallway. The tiles were extremely dirty and stained with white paint spots from decorating at some point in its long history.

 
Victorian Hallway Floor Before Renovation York

I visited the property to survey the floor and come up with a renovation plan. It was indeed dirty but fortunately in reasonably good physical condition for its age. It needed a deep clean and there were some small repairs needed. I conducted a test clean on a small part of the floor which responded well and based on that I was able to give them an accurate quote for the renovation. They were happy to go ahead, and we arranged a mutually convenient time to complete the works.

 
Victorian Hallway Floor Before Renovation York


Cleaning and Repairing a Victorian Tiled Hallway Floor

The first thing needing attention was to re-set some loose tiles at the door entrance which is a common problem with old floors. The sub floor and old tile were cleaned and reset using a fast-setting adhesive and grout. This was left to set for a time before making a start on deep cleaning the hallway floor.

First up was to apply Tile Doctor Pro-Clean which is our go to Tile and Grout cleaner which is diluted before being mopped on to the tile and allowed to soak in for ten minutes before being scrubbed in with a black pad and rotary machine.

After rinsing off the now dirty cleaning solution I could see something stronger was required to really shift the deep-seated dirt, paint sports and who knows whatever else had been used on the floor over the years. So, to turn up the cleaning power a notch I applied a strong dilution of Tile Doctor Remove and Go using the same process and extracting the soil with a wet vacuum. This process where repeated and hand scrubbed some areas until I was satisfied the floor was clean.

The final stage was to give the tiles and acid wash by scrubbing in Tile Doctor Grout Clean-up, this process is designed to counter and salts in the tile, remove old grout smears and neutralise the pH level of the tile after using the alkaline cleaners earlier.

The floor was given a final rinsed and the wet vacuum was deployed for the las time until as much moisture as possible was taken out of the floor. The floor was left to dry naturally for a few days before returning to carry out the sealing.

Sealing a Victorian Tiled Hallway Floor

On returning to the property to carry out the sealing it was first tested for moisture using a damp meter. The tiles needed to be dry before sealing and any high readings can be resolved using a heat gun.

Once satisfied the floor was dry the floor it was sealed using four coats of Tile Doctor Colour Grow which will provide maximum protection from staining and enhance the colours in the tile. Additionally, Colour Grow is fully breathable which basically means it will allow any damp in the subfloor to rise through the tile and evaporate at the surface. This is an important consideration for old floors without a damp proof membrane as a non-breathable sealer can cause problems with damp building up under the floor.

 
Victorian Hallway Floor After Renovation York

The client was delighted with the result and was really pleased to see the floor restored to its former glory. As you can see from the photos the floor now looks clean and bright and this vastly improved the appearance of the hallway in keeping with the rest of this beautiful period property.

Monday, January 17, 2022

How to Take Care of a Teak Floor

 A teak floor is a beautiful option for flooring, both indoors and out. The straight lines in the grain and the variety of colors are striking. Although teak is very durable and low maintenance, you will need to give it some attention to keep it looking as beautiful as the day it was installed.

What You'll Need:

  • Vacuum
  • Bucket with warm water
  • Ammonia
  • Sponge mop
  • Cleaner for hardwood floors
  • Teak oil
  • Rags


1 - Picking Up The Dirt

As with any hardwood floors, you will need to vacuum regularly to keep the dirt and debris from shoes from being ground into the wood grain and dulling the sheen. To get the ground-in dirt out of the joints and wood grain, use your vacuum's brush attachment to loosen it.


2 - Thorough Cleaning

To wash all of the stuck-on dirt and debris, mix one cup of ammonia into a warm bucket of water. Use a sponge mop that has been squeezed to remove most of the water to mop the floor. A sponge mop is best for this step because you do not want to get your teak floors overly wet because it can cause water spots.

The ammonia will help to remove water spots if you have any from a prior spill.


3 - Bring Out The Luster

After cleaning thoroughly to remove stuck-on dirt, allow the floor to dry completely. Next, use a floor cleaner made especially for hardwood floors, again using your sponge mop. This will bring back the sheen of the teak wood, as well as bring out the grain in the wood.


4 - Teak Oil

Teak has natural oils that keep down mold, as well as act as a natural insect repellent that deter termites and other pests. Over time, your teak will lose its oils and this will need to be reapplied. Depending on the traffic that your teak floor gets will determine how often this will need to be reapplied.

In high-traffic areas, you will apply teak oil twice a year. If it is in an area that is free from traffic, or barely used, once a year will be fine.

Apply the teak oil with clean, old rags. Follow the wood grain in the application and rub in well. If you notice that the oil is pulling up old soil within the wood, get a clean rag so you are not rubbing the dirt back in. Allow the oil to sink into the wood before placing the furniture back on it so you don't get spots.


5 - Maintenance

Since teak is very durable, other than regular cleaning and the occasional application of teak oil being reapplied, there are just a few things to keep in mind in maintaining your floor. You will need to rearrange rugs so that the sunlight does not make spots where the rest of the floor is exposed to UV rays.

Also, do not let damp rugs sit for long. If you have a spill, clean it up as soon as possible to avoid spots. If you do get a spot, use a damp cloth with a little ammonia to rub it away.