Showing posts with label floor restoration. Show all posts

Tuesday, January 21, 2025

How to Remove Self Levelling Cement from Quarry Tiles

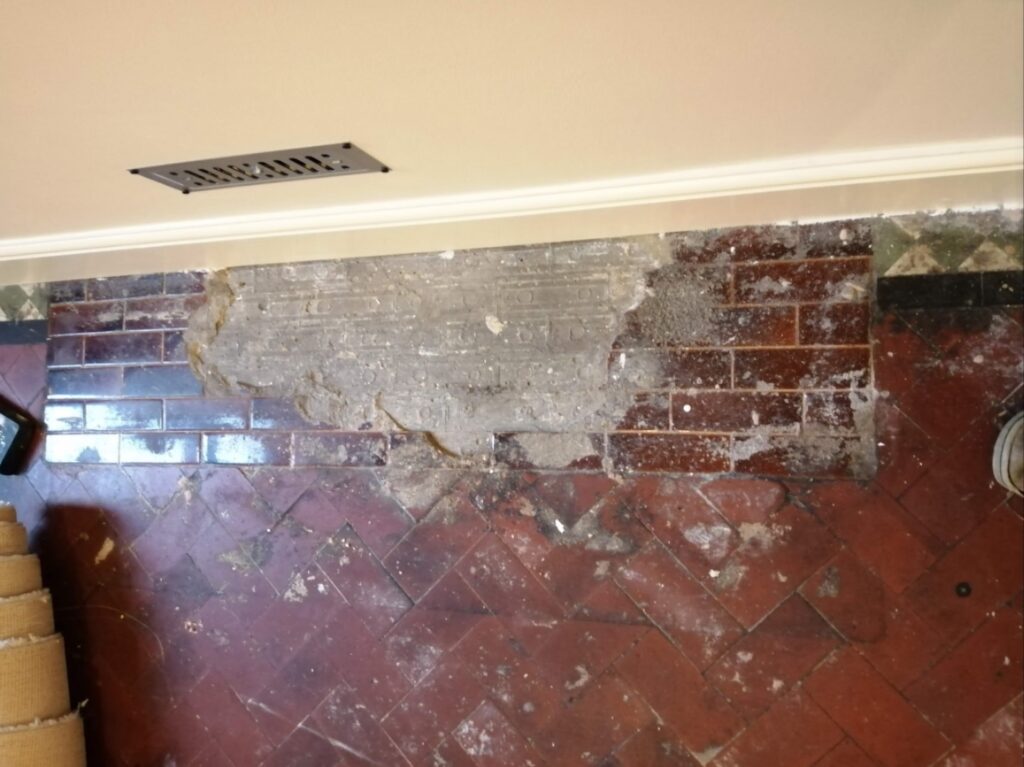
This Quarry tiled floor was discovered in an old cottage in the Surrey village of Cranleigh. The new owners had found the quarry tiled floor under an old carpet and wanted to have it restored as an original feature. Unfortunately, it also had a covering of concrete screed over a large percentage of it. This is a fairly common practice when laying vinyl or carpet over tiles as it ensures a completely flat surface.
Quarry Tiled Floor Before Restoration Cranleigh Quarry Tiled Floor Before Restoration Cranleigh
From experience, I knew returning the tiles to a decent state would be possible but it’s difficult and unpleasant work. None the less I was happy to do the restoration and having visited the property to survey the floor I came up with a restoration plan that I was happy with. This evolved into a quote which the owners were happy to accept, and a date set for the work to commence.


Cleaning a Quarry Tiled Living Room

To remove the screed, I started with a power chisel fitted with a serrated attachment and started to carefully chip away at the screed. This is noisy and messy work, so I shut myself off from the world wearing eye protection goggles and ear defenders. Slowly the cement screed came away and was bagged up for removal.

Once I’d cleared the area of screed, a heavyweight buffing machine was introduced to the floor. Heavy iron bars were attached to the front to increase traction with the tiles and make cleaning and burnishing more effective. With the machine ready the quarry tiles were covered in a strong dilution of Tile Doctor Pro-Clean, and this was left to soak in for ten minutes.

A coarse 200-grit diamond pad was fitted to the machine and then run over the floor to work in the cleaning solution. This abrasive pad cuts into the surface of the tile to remove the years of dirt and grime. This is an aggressive, wet process but the cleaning solution captures the dirt and dust minimising the mess. Once done the floor was rinsed with water and the soiling extracted with a wet vacuum.

Attention was then directed at the grout which had to be hand scrubbed for the best results using more Pro-Clean. The whole floor was then inspected and any stubborn areas of staining were spot treated using the same process. Once I was happy with the condition of the tiles the floor was left to dry out overnight ready for sealing the next day.


Sealing a Quarry Tiled Living Room

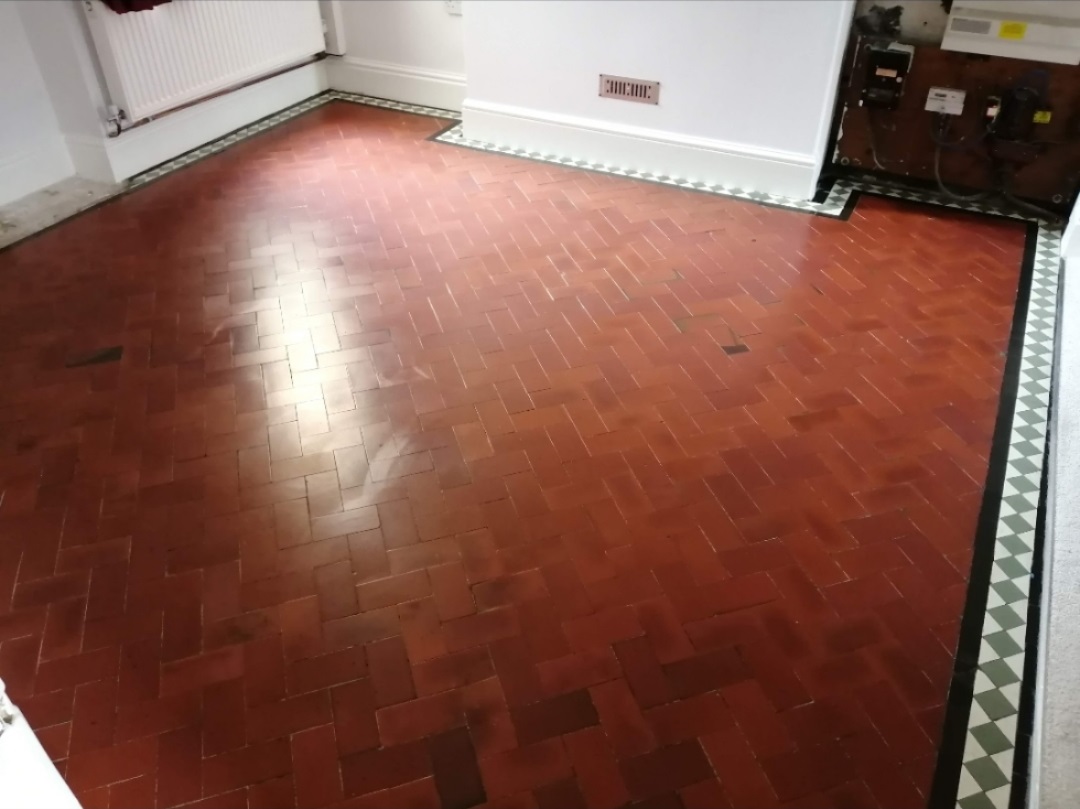
Quarry tiles don’t particularly like aggressive cleaning processes and it can cause their colour to fade, however there is little alternative when they are this bad. With this in mind, I had decided to seal them with a colour enhancing sealer called Tile Doctor Colour Grow. This product is an impregnator which works by soaking into the pores of the tile, protecting it from within and ensuring any dirt remains on the surface, it also leaves the matt finish the client had requested.
Quarry Tiled Floor After Restoration Cranleigh Quarry Tiled Floor After Restoration Cranleigh

Other sealers are available that offer a sheen or shiny finish however this client had a couple of dogs whose claws can damage a topical sealer, so an impregnator was the best option.

Quarry Tiled Floor After Restoration Cranleigh

I returned a month later with some reclaimed tiles to fit around the front of the fireplace For aftercare cleaning I recommended the use of Tile Doctor Neutral Tile Cleaner which is ideal for the regular cleaning of sealed tiles and won't impact the integrity of the sealer.

Wednesday, November 13, 2024

Cardiff Tile Doctor Details the Restoration of a Quarry Tiled Floor in Penarth

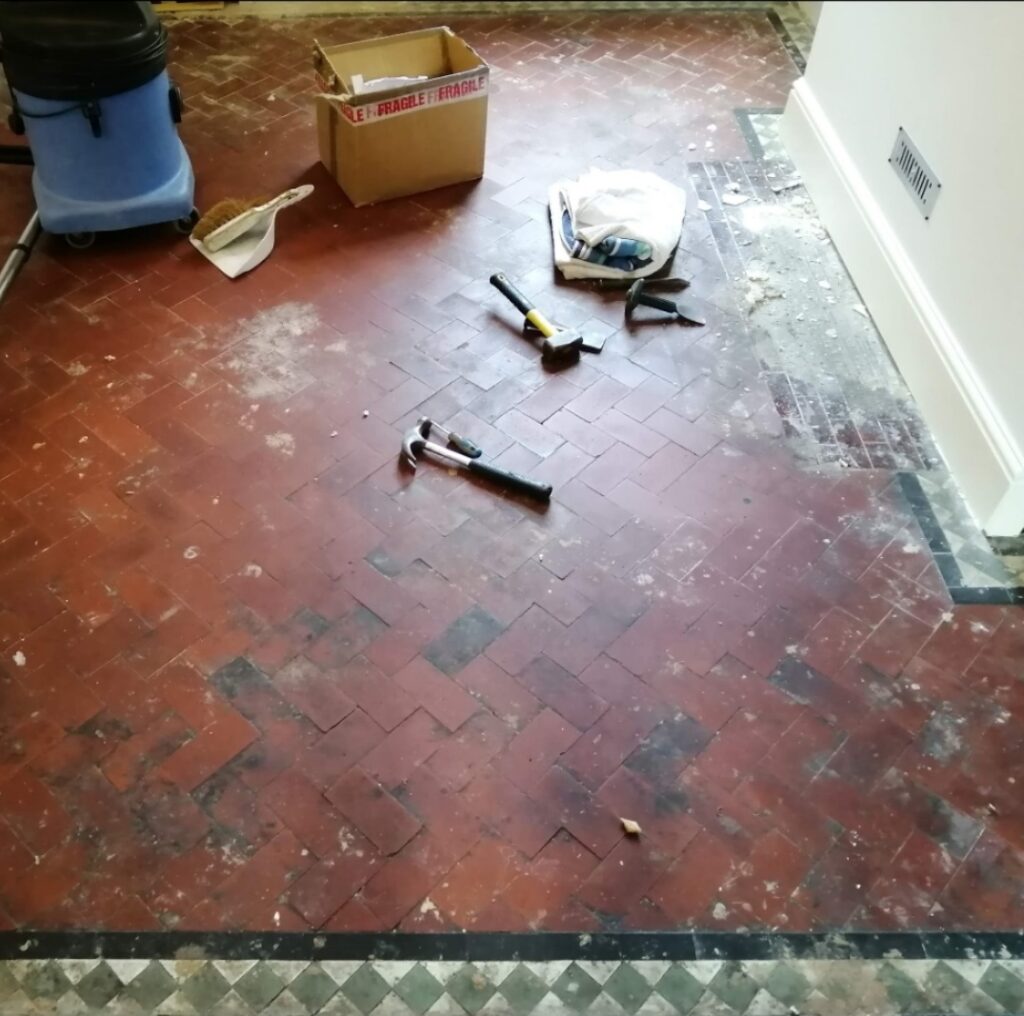
This client from Penarth contacted Tile Doctor to see if their 100-year-old Quarry tiled floor which had broken and missing tiles could be salvaged. The property dated back to 1890 and had experienced many years of wear and tear and it certainly showed. One of the biggest problems however would be to renovate the area in front of the old fireplace where a hearth was once situated.

Quarry Tiled Floor During Restoration Penarth

It was clear the area in front of the fireplace would need to be rebuilt using matching replacement quarry tiles more of which would be needed for the other repairs that needed doing. Once that was done the floor would then need a deep clean and a fresh sealer applied to give the whole floor a consistent appearance.

I worked out a comprehensive quote which included the repairs and renovation work. This was accepted by the client and a date set for the work to start.
   

Cleaning and Repairing a Quarry Tiled Room

Work started with the tile repairs which involved breaking out the damaged tiles and those in front of the old fireplace and then cleaning up the floor ready for the replacement tiles to be installed.

Quarry Tiled Floor During Restoration Penarth 

Quarry tiles are still very popular, so it wasn't a problem finding matching replacements which I had manage to source before work commenced. The replacements were then laid in-line with the existing tiles using rapid set adhesive and grouted in.

Once the tiles had set, I was able to start the cleaning process which started with scraping off as much cement, paint, and plaster residue off the floor as possible. This was then followed up with a deep clean of the tile and grout using a mixture of Tile Doctor Pro-Clean combined 50:50 with with Tile Doctor Nanotech HBU Cleaner.

After leaving these products to soak in for ten minutes I worked by hand scrubbing in 1m2 sections at a time, cleaning and rinsing with water and vacuuming up the waste with a wet vacuum as I progressed. Doing it this way ensures maximum attention to detail and ensures the floor is as clean as possible. 

Once done, the floor was given an acid rinse using Tile Doctor Grout Clean-up which was brushed onto the floor and extracted with the wet vacuum as before. Old floors like this don't have a damp proof membrane and are susceptible to efflorescence, giving the floor an acid rinse like this counters salts and helps further clean the tiles.

After another rinse and extraction with the wet vacuum the floor was left overnight to dry.
   

Sealing a Quarry Tiled Floor in Penarth

The next morning the floor was tested for moisture with a damp meter and the readings confirmed it had dried sufficiently to accept a sealer. I don’t recommend sealing a damp floor as it impacts the sealers’ ability to cure and leads to a patchy finish.

Sealing started with the application of a single coat of Tile Doctor Colour Grow which is a very durable and breathable sealer which being an impregnator provides an excellent base. The customer wanted a shiny finish so this was followed up with a couple of coats of Tile Doctor Seal and Go. This product further protects the floor and adds a subtle shine which together with the Colour Grow really brought out the colours in the Quarry tiles. As you can see the red colour of the floor looks vibrant and stunning after the two different sealers were applied.

Quarry Tiled Floor After Restoration Penarth

My client was delighted with the result and offered to recommended Tile Doctor to their family and friends which was nice. For aftercare I recommended the use of Tile Doctor Neutral Tile Cleaner which is a gentle but effective tile cleaner that's ideal for cleaning sealed floors.

Quarry Tiled Floor After Restoration Penarth

Sunday, October 2, 2022

How to Restore old Victorian Tiled Floors by South Yorkshire Expert

During renovations at this beautiful house in Sheffield the discovered an original Victorian tiled floor underneath the hallway carpet, incredibly they also uncovered access to a cellar, neither of which they knew idea existed and both were a massive bonus!
    
Victorian Tiled Hallway Before Restoration Sheffield

Once the floor had been fully uncovered it was in a pretty good condition, some repairs were needed but nothing too dramatic. There was damage around the radiators where the heating engineers have just chiselled through the tiles. Plus, the tiles were stained by adhesive where the carpet grippers had been glued to the tiles.
 
Victorian Tiled Hallway During Restoration Gripper Removal Sheffield

I discussed with the client the work needed to carry out a full restoration and gave them a quote. They were happy to accept and asked us to proceed as soon as possible.

 
Victorian Tiled Hallway Damaged Tiles Before Restoration Sheffield Victorian Tiled Hallway Before Restoration Showing Gripper Rod Sheffield

Cleaning and Repairing a Victorian Tiled Hallway Floor

Work started with the removal of the carpet grippers and scraping up as much of the glue as possible, it took some shifting, but it did come up. Any remaining glue was softened up with the application of neat Tile Doctor Remove and Go and then carefully scraped off. Tile Doctor Remove and Go is a multi-purpose stripper that is ideal for removing adhesives and other stubborn coatings such as sealers.

 
Victorian Tiled Hallway During Cleaning Sheffield

The repairs were done next which involved colour matching replacement tiles and cutting them to the right size. A fast-setting adhesive was used to fix them in place and once the floor had dried it was time to move onto the cleaning.

More Tile Doctor Remove and Go was applied, left to soak for ten minutes, and then worked in with a weighted 42kg buffer machine fitted with a very coarse diamond burnishing pad. This combination not only removed the old sealer but did a good job of removing ingrained dirt as well. The floor was rinsed with water and the soil extracted using a wet vacuum.

 
Victorian Tiled Hallway During Cleaning Sheffield

Once done the process was repeated using Tile Doctor Acid Gel, this removes stubborn staining and being an acidic product will counter any efflorescence which is a common problem with these old floors. Old floors like this one don’t have a damp proof membrane installed to prevent moisture underneath the tiles rising through the floor and depositing salt as it evaporates at the surface.

A wet vacuum was used to extract the soiling generated during the cleaning process and every tile was rubbed with microfibre cloths to remove the last of the residue.

 
Victorian Tiled Hallway During Remove Go Glue Removal Sheffield

A nice feature seen on a lot of Victorian floors is an upside tile left by the tiler on purpose, the picture shows the one on this floor. They believed it brought good luck.

 
Victorian Tiled Hallway Upside Down Tile Sheffield


Sealing a Victorian Tiled Hallway Floor

The floor was left to dry off overnight and I returned the following morning to continue with the final phase of the restoration. Before starting though, the first job was to check the floor was dry using a moisture meter. Once satisfied six coats of Tile Doctor Seal and Go Extra we applied leaving the floor with a beautiful sheen finish.

 
Victorian Tiled Hallway After Restoration Sheffield

The client was very pleased with the newly restored floor, and for ongoing cleaning I recommended the use of Tile Doctor Neutral Tile Cleaner. This product has a neutral Ph which is ideal for sealed surfaces; stronger bleach-based cleaners are simply too strong for use on sealed tiles and will erode the sealer prematurely.

Thursday, June 2, 2022

How to Restore the Appearance of a 500 Year Old Floor by Devon Stone Restoration Expert

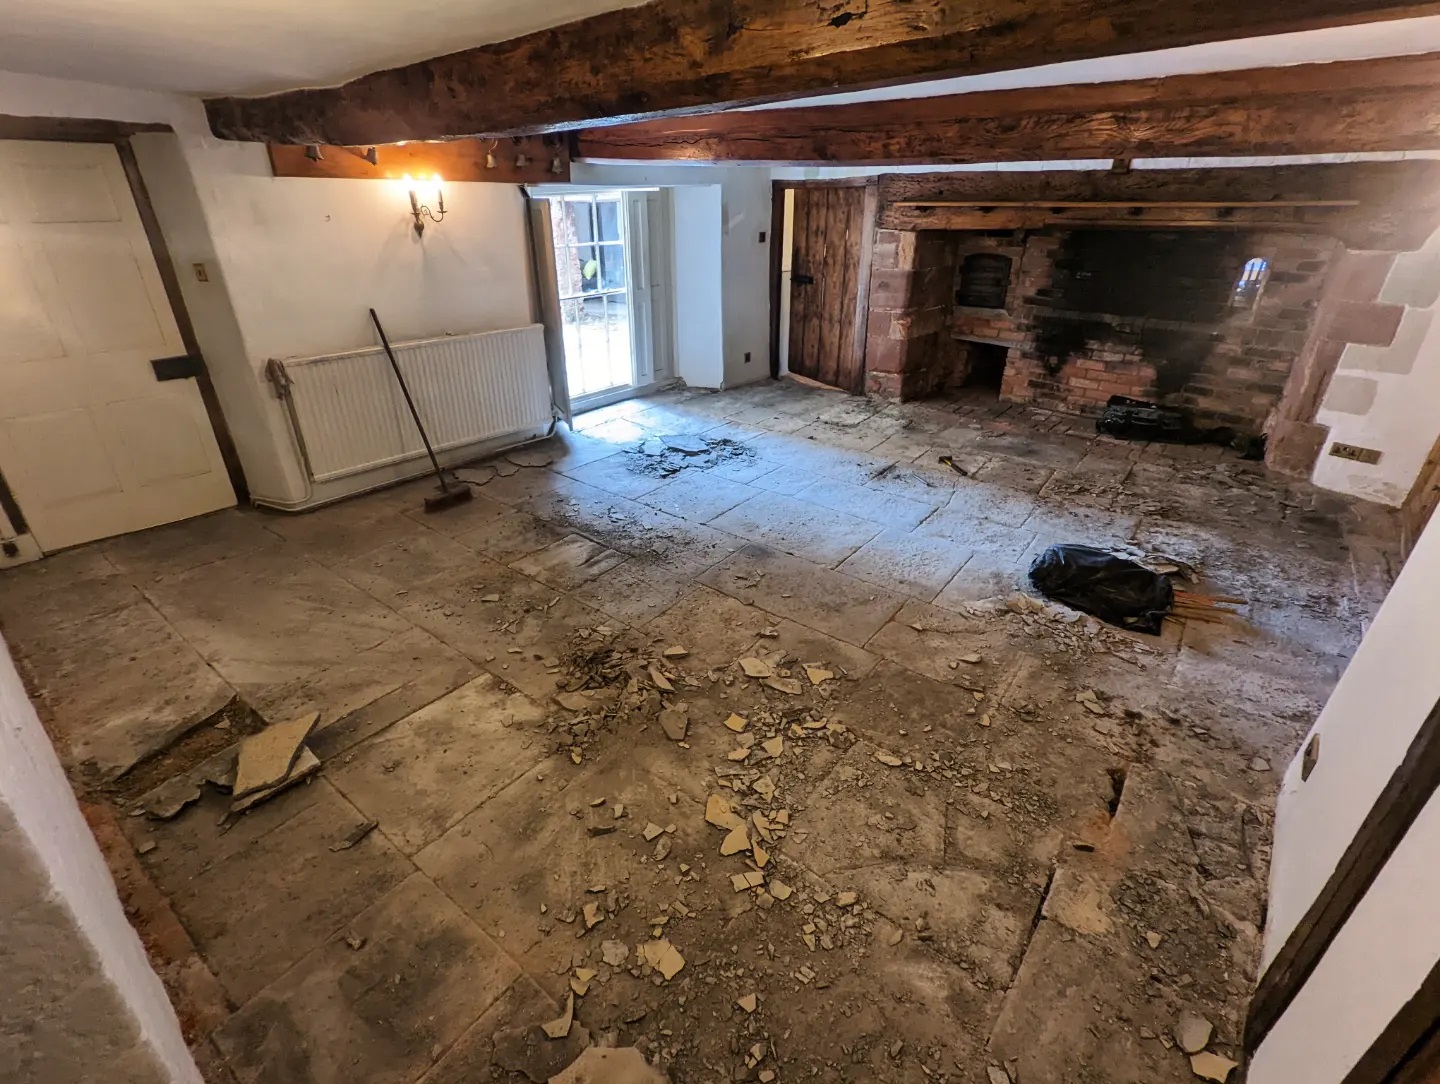
A customer in Tiverton uncovered this extremely aged and tired Blue Lias Limestone floor during renovation work. The floor was approximately 80m2 in size and they were keen for me to come and survey the large flagstones to find out if anything could be done to renovate it. They were keen to restore it, but really did not know where the start. The property in dated back to the 15th century and had a several period features that wanted to restore.

Blue Lias Stone is actually quarried in southern and western England including South Wales and has been used as a flooring and building material for over a century. These days you don’t come across it very often due to the large variety now available in the stone market.

 
Blue Lias Limestone Floor Before Restoration Tiverton

I headed over to the property to take a look and it was immediately apparent the floor would need a great deal of work to fully restore it. I could see some of the flagstones had heavily flaking and shaling in places, others were so damaged they would need replacing and the whole floor would need re-pointing. In addition, with the floor being so large I could see if would take a significant amount of time to restore.


Deep Cleaning and Repairing a Blue Lias Limestone Floor

To reveal the true beauty of the Limestone I had to remove a thin layer of stone from the surface. This was done by cutting back the stone using a very coarse 100-grit milling pad fitted to a Viper rotary buffer machine that was heavily weighted. This method also flattens the surface of the stone removing any excessive shaling in the process. Once I had a cleaner stone to work with, I set to work removing old jointing which needed replacing and then removing a couple of the broken stones.

Fortunately, I had been able to source replacement stones which were a close match to the original before starting work. They were then bedded in and then pointed with the rest of the joints with a German product called VDW800.

The next step was to deep clean the whole floor, removing deep seated stains and any remaining dirt and grime. For this I decided to go with Tile Doctor Remove & Go which is a powerful cleaning and coatings remover. The product is sprayed onto the floor, left to soak in for then minutes and then scrubbed in using a black scrubbing pad fitted to the rotary buffer. Once done the soiling is removed using a high-pressure industrial cleaning system that is mounted in my van; it’s a powerful machine which jets water out at 1000psi and then simultaneously vacuums up the dirty water and debris leaving behind clean, bare stone. This keeps the mess made to a real minimum and ensures the tiles are cleaned efficiently. The process had to be repeated three times before I was satisfied the floor was clean after which is was left to dry out thoroughly before sealing.


Sealing a Lias Limestone Tiled Floor

After the floor had dried over the course of a few days, we returned to seal the floor. The first job was to use a damp meter to check the moisture levels in the stone and verify it was dry enough to seal. Damp can be a big issue with older properties with no damp proof membrane and the stone has been laid directly onto soil. Satisfied with the readings I was happy to go ahead with the sealing process.

The sealer used on this floor was Tile Doctor X-Tra Seal, it’s a fully breathable formula which will allow any moisture under the floor to be able to rise through the Limestone and not become trapped where it could cause long term problems. It’s also an impregnating sealer which basically means that it soaks into the stone thereby occupying the pores and preventing dirt from becoming ingrained there. Lastly X-Trea seal has an oil-based resin formula which really improves the structure and colour of the stone.

 
Blue Lias Limestone Floor After Restoration Tiverton

With the application of the fresh sealer the floor really came alive, and the 15th Century Blue Lias limestone floor was transformed. The customer was delighted with the renovation and could not believe how well the floor had come up I only wish I had remembered to take more photographs.

For aftercare cleaning I recommended the use of Tile Doctor Neutral Tile Cleaner, this is a mild tile and grout cleaner which is pH balanced, so it will ensure the integrity of the newly applied sealer and will keep the floor in top condition.

Friday, August 10, 2018

Cement Screed Covered Victorian Floor Restored in Birmingham

This customer got in touch with me to see if there was anything I could do to restore a Victorian tiled floor they had discovered under carpet in their hallway. Interestingly they had been told previously that the floor was beyond repair and had been quoted thousands of pounds to have it completely ripped up and replaced.

Victorian Hallway Before Restoration Bearwood Victorian Hallway Before Restoration Bearwood

I visited the property in Bearwood near Smethwick, to take a look and could see that there was a section under a cement screed. The floor was in a truly sorry state, so I could see why the other company were not keen on restoring it. Undeterred I did a test clean to see if I could remove the screed which was encouraging however without removing all the screed it would not be possible to see what condition the tiles underneath were in. I agreed with the customer to order some replacement tiles which were needed along with extra ones just in case. The job would take a few days to allow for cleaning, repairing, drying out and sealing. The client wasn’t too optimistic, but I reassured them we could definitely get a good result.

Victorian Hallway During Restoration Bearwood

Cleaning and Repairing a Victorian Tiled Hallway

The first day was spent removing the cement screed which was quite thick in parts, so I went down the route of steaming it first to help soften the covering and then carefully scraping it off. This was quite labour intensive, but it did the job. Once the cement was removed I was left with some tiles that were ok but quite a few needed to be replaced.

Victorian Hallway During Restoration Bearwood Victorian Hallway During Restoration Bearwood

There were also two doorways, one that needed completely relaying and one needed part relaying. Some of the tiles needed to be cut to size, there were many tiles that needed resetting and re-grouting along with grout being applied to the new tiles.

Victorian Hallway During Restoration Bearwood

The next day the tiles were deep cleaned with a 50:50 combination of Tile Doctor Pro-Clean mixed with Nanotech HBU which stands for Heavy Build-Up Remover, which was quite appropriate in this case. This cocktail of tile cleaning products was left to dwell on the tiles for a while then worked in with a black scrubbing pad fitted to a weighted rotary machine. The floor was then rinsed off with water and then the soil extracted with a wet vacuum.

My next step was to give the floor and acid wash to remove any old grout smears and neutralise other mineral contaminates such as salts that can get deposited on the surface of the tiles as moisture evaporates as the floor dries. This is always a risk with old floors where no damp proof membrane exists. To do this I applied a dilution of Tile Doctor Grout Clean-Up which is scrubbed into the tiles with a deck brush and then rinsed off the floor with water and a wet vacuum. The floor was then left to dry out for a couple of days.

Sealing a Victorian Tiled Hallway Floor

I returned to seal the floor and after check it had dried sufficiently applied three coats of Tile Doctor Colour Grow sealer. This sealer seeps into the pores of the tile enhancing the colours and leaves a matt finish which the customer had previously specified. The floor was then buffed with a white pad and the customer left with a bottle of Tile Doctor Neutral Tile Cleaner to clean the floor with moving forward.

Victorian Hallway After Restoration Bearwood Victorian Hallway After Restoration Bearwood

The customer was delighted with the results and left the following feedback on the Tile Doctor feedback system.

"Kieron has done a fantastic job of our Victorian hallway tiles. We had been quoted several really high prices by other companies, but Kieron’s quote was a fraction of these. I initially wondered whether this meant the job wouldn't be as good but after 3 days of solid work the results are fantastic! He managed to transform it to its former glory, a hallway that was partly cemented over, had missing and loose tiles all over the place and was filthy. He definitely does a lot more than just cleaning! We couldn't be happier with the results!"


Victorian Hallway After Restoration Bearwood


Source: Victorian Tile Cleaning and Restoration Service in Birmingham

Wednesday, May 31, 2017

Victorian Tiled Hallway restored near Coventry

Popular as they are in the UK it wasn't long before I was called back to refurbish another Victorian Tiled Hallway Floor this time in the town of Allesley near Coventry. This tiles were heavily soiled and had been splashed with paint from decorating, on top of this there was evidence of Read more...

Tuesday, May 30, 2017

Cleaning Victorian Mosaic Tiles in Glasgow

These unusual period Victorian mosaic tiled floor at a residence in the west end of Glasgow were far from looking their best and well overdue for a deep clean and re-seal. Cleaning a Victorian Floor I'll try and keep the details short so as not to lose your attention but basically the tiles Read more...

Monday, May 29, 2017

Removing Glue From Victorian Floor Tiles

This Victorian Tiled Hallway at a house in Radford near Coventry had been well preserved under a carpet for many years and the owners of the house now wanted it brought back to life. Physically the tiles were in good condition however they did suffer from the usual issues of paint splashes and Read more...

Sunday, May 28, 2017

Victorian Tile Restoration in Wiltshire

This customer had just brought a house in Chippenham which they were renovating and it had come to their attention that Victorian tiles had been laid under the hallway carpet. Keen to restore them the customer called us in to see if we could enhance the appearance of their floor. Cleaning Read more...

To read more on this topic click here

Saturday, May 27, 2017

Victorian Tile Restoration Tips

This owner of this house built around 1900 in Cardiff had asked me if I could make their look any better following their attempt at renovating their original Victorian Tiled floor. I examined the floor and established that they had sealed the floor without testing for moisture also it seemed it Read more...

Friday, May 26, 2017

Matching old and new Victorian tiles

This particular Victorian tiled floor had been installed in the hallway of a house in Stow Park, Gwent around 130 years ago. Despite its age it was in a good condition and the detailed pattern although dirty was still very distinctive, the customer felt however that the floor was spoilt by the Read more...

Thursday, May 25, 2017

Cleaning up Victorian Tiles after building work

This Black and White Victorian Tiled hallway floor laid in a "Starburst" pattern at a house in Penarth which had been previous restored in 2011 by another Tile Doctor however the house had recently been subject to some renovations and unfortunately the builders did not cover the hallway floor Read more...

Wednesday, May 24, 2017

Removing Adhesive and Paint from Vistorian Hallway Tiles

The owner of this house located in the village of Holt had discovered a beautiful Victorian Tiled floor hidden underneath their hallway carpet and made contact with us to get it restored and brought back to life. Cleaning a Victorian Tiled Floor We started by making a strong dilution of Tile Read more...

Tuesday, May 23, 2017

Cleaning Original Victorian Floor Tiles in a Listed Building

This original Victorian Tiled floor was uncovered at the Grade 2 listed Salford Town Hall in Salford, Manchester. This public building which built around 1827 was the former Salford Town Hall and Magistrates Court; it's currently being turned in to luxury apartments and this amazing floor is Read more...

Monday, May 22, 2017

Restoring Victorian Tiles Hidden under Carpet

After removing the hallway carpet the new householders had discovered a Victorian tiled floor and being keen to restore it as an original feature made contact with Tile Doctor. Restoring original features can add a lot a value to a house so it's well worth pursuing. Restoring a Victorian Tiled Read more...

Sunday, May 21, 2017

Deep Cleaning and Removing Old Sealers From Edwardian Floor Tiles

This Edwardian tiled stone floor was installed in the hallway of a house in Richmond, Surrey. It had not been deep cleaned for a number of years and a number of layers of old sealer were visible causing a yellowing of the tile. The old sealant needed to be stripped off before cleaning could take Read more...

Grout Haze removed from Travertine Tiles in Henley-on-Thames

The photograph below taken at a house in Henley-on-Thames shows a Travertine tiled floor covered with grout haze smears across the surface of the tile. The tiler should of dealt with this after laying the floor however removing grout smears from natural stone is tricky as normally you would use acid but Travertine is very sensitive to acid so I suspect the tiler decided against it in-case the tiles were ruined. Refurbishing Travertine Tiles The first step was to give the floor a general Read more...

Friday, May 19, 2017

Removing Glue and Plaster From Period Victorian tiles

The pictures below are from a Victorian tiled floor installed in a period house in the coastal town Eastbourne. The tiles had been covered lino and carpet for years which the owner had only recently removed during renovation work, as it turns out this was unfortunate as they then became covered Read more...

Thursday, May 18, 2017

Putting the Shine Back On Old Victorian Tiles

I'm beginning to wonder if Tile Doctor has started a trend that has got people looking under their hallway carpets looking for period floors. Indeed this customer in Whitchurch has done exactly that and discovered a beautiful Victorian tiled floor which was with the exception of adhesive residue Read more...

Wednesday, May 17, 2017

Restoring 200 year old Victorian tiles

Details below of a Victorian Tiled floor I renovated in Penrith earlier this year. The floor had previously been hidden under laminate flooring and the mat well had been concreted over and other tiles were missing and replaced with concrete infill. Restoring Victorian Floor Tiles I carried out a Read more...