Showing posts with label victorian tile restoration. Show all posts

Wednesday, August 28, 2024

Newport Tile Doctor Details the Restoration of Victorian Floor Tiling

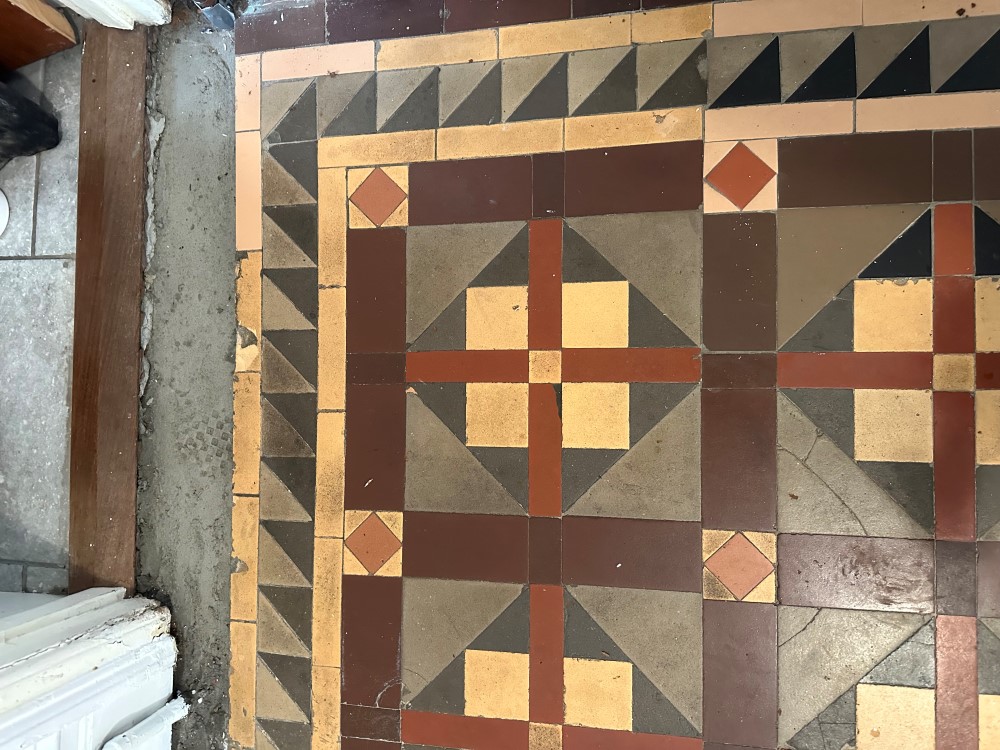
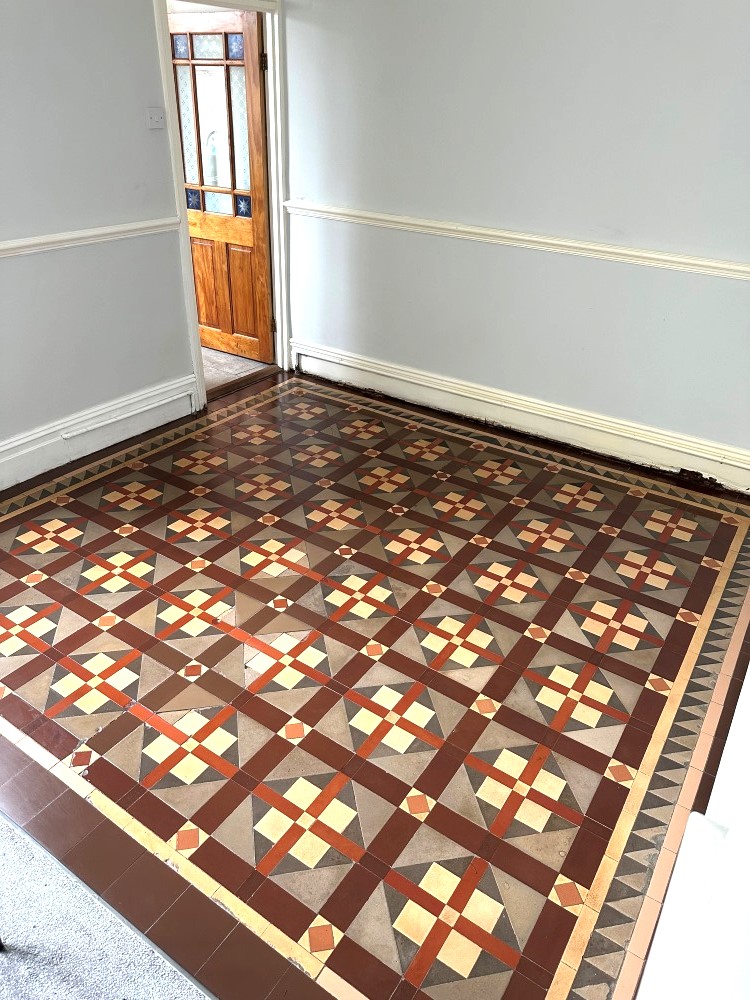
The client had lived at this property in Newport for a few years and decided that it was finally time to sort out the Victorian tiled floor in the dining room. Some repairs were needed in a few areas and the sealer was fading and due for replacement.

Victorian Tiled Dining Room Floor Before Renovation Newport

I went over to the property to survey the floor and advised that with repairs, cleaning and sealing the process would take two and a half days. Having worked on many many floors like these before I was very confident that we could repair the floor where needed and restore its appearance.

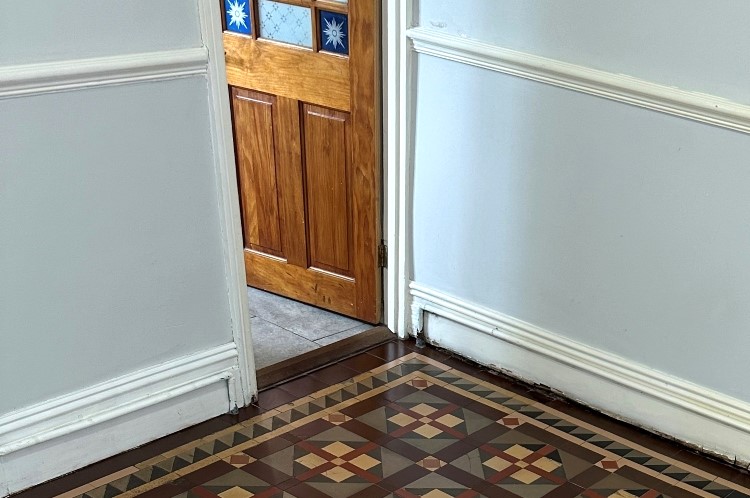
During the visit I noticed that at the door threshold leading into the kitchen, some of the tiles had been taken up for a gas pipe repair and back filled with cement, I suggested I could repair this section using matching tiles, so I included it in the quote. The quote to renovate and repair the floor was accepted and the job was booked in.

Victorian Tiled Dining Room Floor Before Renovation Newport


Cleaning and Repairing a Victorian Tiled Dining Room Floor

I began by addressing the tiling issues so my first course of action was to set matching tiles along the doorway border leading to the kitchen, as the previous tiles had already been removed by the gas company it was fairly straight forward job of carefully knocking out the cement. The tiles I had sourced were from a nearby reclamation yard and needed to be carefully cut to size to ensure a good fit with the original. After setting the tiles and grouting I left them to dry overnight.

The following day I began cleaning, using a combination of Tile Doctor Remove and Go and Pro-Clean, leaving the solution to dwell after being brushed into the floor. After around ten minutes the floor was scrubbed by hand with a stiff brush to release the dirt from the tiles. The resultant slurry was then vacuum away and with the floor cleaner I was able to get a better idea of which areas needed more attention.

I restored the perimeter of the floor with a 200-grit diamond block and this was followed up with a 200-grit diamond pad fitted to a rotary machine. These coarse pads cut into the tile surface removing years of grime and giving them a new lease of life. After another rinse and extraction with the wet vacuum the whole floor had a much brighter appearance. The process was then repeated with a 400-grit diamond pad to close the pores of the tiles.

The floor was then washed by hand with water and a sponge to make sure there wasn’t any areas missed, also to ensure there was no residue from the cleaning products left on the floor which could potentially disrupt the sealing process. The floor was then left to dry overnight ready for sealing the following day.


Sealing a Victorian Tiled Dining Room

To assist with drying I asked the client to leave a couple of air movers running during the evening and to put them back on in the morning. This worked well and by the next day I was able to confirm the floor was dry and ready for sealing with a moisture meter.

The client had requested a satin finish and so the sealer chosen was Tile Doctor Seal and Go, four coats were applied to the tiles a permanent wet look and gorgeous lustre. Another advantage of Seal and Go is that it’s a water-based sealer so it doesn’t give off a smell as it dries.

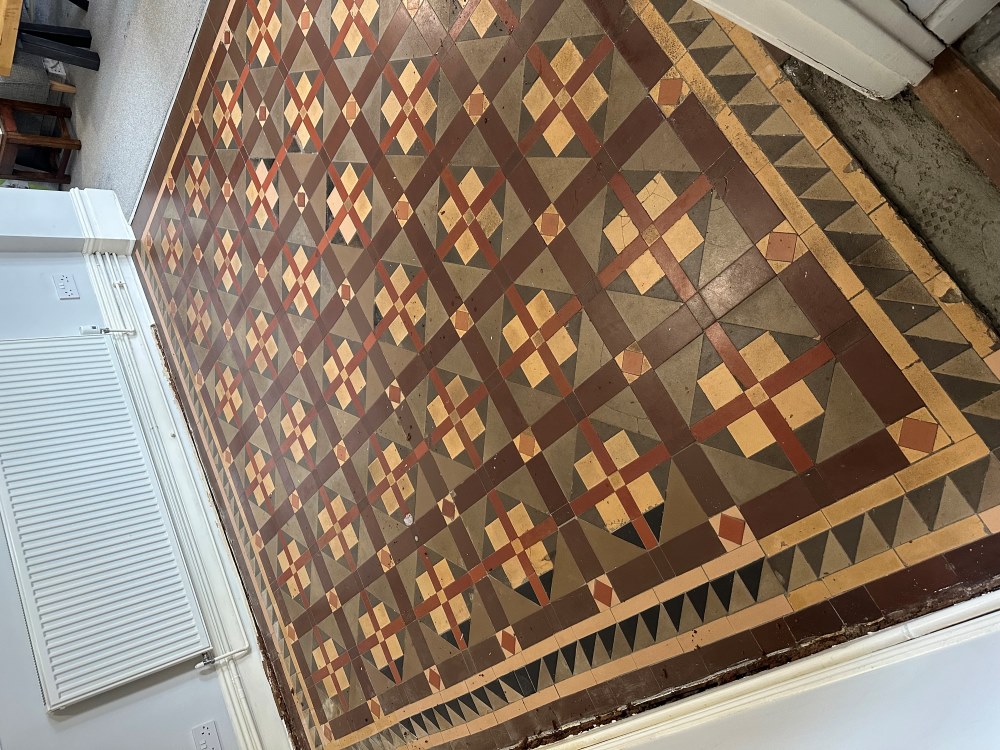
Victorian Tiled Dining Room Floor After Renovation Newport

For aftercare I left the client a bottle of Tile Doctor pH Neutral Tile Cleaner to help maintain the appearance of the floor. This is a gentle tile cleaning product that won’t harm the sealer, many of the products you find in supermarkets are simply too strong for a sealed floor.

Victorian Tiled Dining Room Floor After Renovation Newport 


Thursday, February 20, 2020

How to Remove Bitumen from old Victorian Floor Tiles

I was contacted by a client who recently bought a house in Leyton E10 and found an original Edwardian floor in the hallway under old lino. The house was built in 1908 making it well over 100 years old and from the Edwardian era.

The customer had decided to remove the linoleum, but it had been fixed down with bitumen which he struggled to remove as it is such a sticky substance. As well as the bitumen the floor was dirty with ground in dirt, I can only deduce the previous occupants must have decided just to cover it up with the lino rather than clean it. Also, there was some damage to the tiling in front of the stairs that needed repairing. It was clearly going to be more work and more involved than the new owner had initially thought so I was asked to take over the restoration.

Edwardian Floor Covered in Bitumen Before Restoration in Leyton E10 Edwardian Floor Covered in Bitumen Before Restoration in Leyton E10

After visiting the property for a site visit, I had a good idea of what would be needed and managed to find suitable replacement tiles from Original Style Tiles. They were keen to get the floor restored so they agreed my quote and I went ahead and purchased the replacement tiles on their behalf.

Edwardian Floor Covered in Bitumen Before Restoration in Leyton E10


Removing Bitumen and Repairing an Edwardian Tiled Floor

I used a combination of floor buffers, coarse 200-grit pads, hand scrapers and lots of Tile Doctor Nanotech HBU Remover to get the floor clean and clear of the bitumen. Rather a lot of elbow grease was required too! It was a long process which took up all of day one and continued into much of day two. The day ended by removing the damaged floor tiles and replacing with the newly sourced replacements. The floor was left overnight to dry and the new tile adhesive to cure before we could return to seal the floor.

Edwardian Floor Covered in Bitumen During Restoration in Leyton E10 Edwardian Floor Covered in Bitumen During Restoration in Leyton E10


Sealing an Edwardian Tiled Hallway Floor

I returned on Day 3 to seal the floor using a couple of coats of Tile Doctor Colour Grow. Old floors like these have no damp proof membrane and being fully breathable Tile Doctor Colour Grow will allow any moisture to rise through the tiles and not get trapped underneath where it could cause problems later. The sealer also gave the floor a nice natural sheen without being too shiny. Most importantly the new sealer would protect the floor going forward which is particularly necessary in a high traffic area such as the hallway.

Edwardian Floor Covered in Bitumen After Restoration in Leyton E10 Edwardian Floor Covered in Bitumen After Restoration in Leyton E10

My client was glad to see the floor restored back to its original state which I'm sure will add a lot of value to the property as original features are very sought after these days.

For aftercare I recommend they use Tile Doctor Neutral Tile Cleaner to clean the floor. It’s a pH neutral product so it will ensure that the newly applied seal stays in place and keep the new floor restoration looking good.

Edwardian Floor Covered in Bitumen After Restoration in Leyton E10


Source: Victorian Tile and Grout Cleaning and Renovation Service in East London

Wednesday, September 4, 2019

How to Repair and Restore a Victorian Tiled Hallway

Earlier this year I was asked to quote for repairing and restoring a Victorian Tile Hallway in St Neots. The floor was in good physical condition for its age however a section of tiling had been removed so facilitate the installation of a new pipe. The contractor was not very sympathetic to the old floor and after removing the tiles and installing the pipe they had simply back filled with concrete ruining the overall look of the floor.

Victorian Tiled Hallway Before Repair Restoration in St Neots

The rest of the Victorian Tiled Hallway had not been properly cleaned and sealed in some time and any protective sealer had long since worn off in the busier parts of the hallway. Without a sealer in place dirt had penetrated the pores of the tile leaving them looking dull and impossible to keep clean.

Victorian Tiled Hallway Before Restoration in St Neots Victorian Tiled Hallway Before Restoration in St Neots
Period features like this floor are very desirable these days and understandably the owner was every enthusiastic to have the floor fully restored back to its best possible condition.

I discussed with him the work we needed to do, which included repairing the concreted sections, deep cleaning the floor and then finish with the application of a protective sealer. I was confident I could source similar tiles and would be able to get the floor looking great again. We agreed a price and booked the work in to be carried out.

Victorian Tiled Hallway Before Restoration in St Neots


Repairing a Victorian Tiled Hallway Floor

I started by manually removing all the concrete at the back of the hall with a bolster and hammer. Once cleaned of rubble the hole was filled with a self-levelling compound to even out the area in order to get the surface to the right level ready for tiling.

Victorian Tiled Hallway During Restoration in St Neots

Fortunately, I had managed to source nearly identical tiles to replace the missing ones. There are a few places that keep stock, so it makes it easier to restore this type of floor. The border was laid first followed by filling in the middle with the correct pattern.

Victorian Tiled Hallway During Restoration in St Neots


Deep Cleaning a Victorian Tiled Hallway Floor

Once grouted the whole floor was stripped and cleaned using Tile Doctor Remove and Go which is a coatings remover that is designed to clean and remove old sealers from tile and stone. The product is diluted with water, sprayed onto the tiles and then allowed to soak in for ten minutes before scrubbing it in. The solution soon turns into a dark slurry as the dirt is released from the pores of the tile and this is then rinsed off with water and extracted with a wet vacuum.

Victorian Tiled Hallway During Restoration in St Neots

The next step was to treat any potential efflorescence problems that may appear later due to the lack of a damp-proof membrane under the floor. This is quite a common issue with old floors where moisture can rise through the tile carrying with it salts from the sub floor. To counter this problem and neutralise the alkaline salts the floor is further cleaned with Tile Doctor Grout Clean-up which is an acidic product. To remove the product another round of rinsing and extracted is carried out.

During the cleaning I noticed that some of the tiles had damage to the surface from being concreted over, so I renovated the surface using a 200-grit burnishing pad that hones the tile. Once I was happy the floor was clean, I left it to dry off for two days.

Sealing a Victorian Tiled Hallway Floor

I came back to seal the floor first checking with a damp meter that the moisture levels in the tile were below an acceptable level. All was well so I started the application of the sealer with a base coat of Tile Doctor Colour Grow which is an impregnating sealer that will deepen the colours and add an extra layer of protection.

Once the first dry coat of Colour Grow was dry, I followed up with five coats of Tile Doctor Seal and Go which adds further layers of protection and leaves the tiles with a nice subtle sheen.

Victorian Tiled Hallway After Restoration in St Neots

The job took five days in total, three days to sympathetically repair the floor followed by two days to clean and seal. You can see from the pictures that the repaired area looked very original and overall the floor looked great and the pattern is stunning. For aftercare I recommended they kept the floor clean using Tiles Doctor Neutral Tile Cleaner, this will keep the floor clean and ensure the sealant isn’t eroded prematurely which can happen with stronger floor cleaning products.

Victorian Tiled Hallway After Restoration in St Neots Victorian Tiled Hallway After Restoration in St Neots

The customer over the moon with the results and left the following glowing testimonial for me on the Tile Doctor feedback system.

”Tom was professional, meticulous, polite and hard working. We would have no qualms about recommending his service to others - especially with mosaic Victorian flooring like ours. Good value and plenty of expert advice and guidance thrown in for free. Thanks Tom. By Alden W, St Neots”


Victorian Tiled Hallway After During Restoration in St Neots


Source: Victorian Tile Repair, Cleaning and Sealing Service in Cambridge

Thursday, May 30, 2019

How to Repair a Classic Victorian Tiled Hallway

This property located near the pretty market town of Ulverston was built in 1874 as inscribed on the front of the building. The Victorian Tiled floor comprised of Cream and Black tiles was original from when the house was built so that made the tiles at least 145 years old, in fact this was one of the oldest Victorian tiled floors I have ever worked on.

Cream Black Victorian Hallway Floor Tiles Before Restoration Ulverston

The floor was in good condition for its age but had experienced problems with broken and loose tiles around two of the door thresholds which is a common problem with floors of this age. Unfortunately, those tiles had been lost over the years and now the customer wanted this part of the floor rebuilding as part of the restoration. Fortunately, these tiles are still popular so finding suitable replacements wasn’t a big of a challenge as you might think.

Cream Black Victorian Hallway Floor Tiles Before Restoration Ulverston

I discussed with the client what needed to be done and after finding a suitable supplier for the replacement tiles was able to produce a quote which was accepted, and we agreed a price for the work.


Repairing a Cream and Black Victorian Hallway Floor

My first task was to rebuild the areas of broken and missing tiles. For the larger areas I mapped out a suitable pattern and set about cutting the replacement tiles to fit. A thick bed of flexible rapid set floor adhesive was applied to the floor and the replacement tiles bedded into the old cement base. Once the adhesive had hardened the tiles were grouted, cleaned-up and left to dry.

Cream Black Victorian Hallway Floor Tiles Before Restoration Ulverston

There were several areas that needed this treatment, so the work took some time to complete.

Cream Black Victorian Hallway Floor Tiles Before Restoration Ulverston


Cleaning/Repairing a Victorian Tiled Hallway Floor

Returning the next day, I first checked that the replacement tiles had set and that there were no further problems that needed addressing. All was well so I began cleaning the floor using a 200-grit followed by a 400-grit Diamond pad fitted to a weighted buffing machine running at slow speed and lubricated with water. The floor was rinsed with water after each pad and then the soil extracted using a wet vacuum.

The floor was then given an acid wash using Tile Doctor Grout Clean-Up, which at this stage acts in two ways for these old floors:

1. The Tile Doctor Grout Clean-Up product is made from Phosphoric Acid (not a brick Acid, which is a lot cheaper, more widely available but too strong for use on tile.) The acid we use works with us not against us and gives us time to change the pH of the floor to a slightly acidic pH. This is important on old floors like these where no damp proof membrane has been installed and it’s important to counter any alkaline salts in the floor which could lead to efflorescence later.

2. The sealer will bond to the surface a lot better when it has had this treatment and as a result you get a sharper cleaner finish.

Cream Black Victorian Hallway Floor Tiles Before Restoration Ulverston

Once done the floor was given another rinse and extraction with water and the wet vacuum and then left to dry out for a few days,


Sealing a Victorian Tiled Hallway Floor

We returned as promised to seal the whole floor using a couple of coats of a breathable colour enhancing sealer called Tile Doctor Colour Grow. As you can see form the pictures this really brought the hallway floor to life. Colour Grow works from the inside by occupying the pores in the tile and will protect it from ingrained dirt staining going forward.

Cream Black Victorian Hallway Floor Tiles After Restoration Ulverston

It’s very important for a customer to use the correct cleaner after having there tiles cleaned and sealed professionally as using the wrong product can prematurely degrade the sealer. As a result, we recommend Tile Doctor Concentrated Neutral Tile Cleaner, its pH balanced and will not upset the sealer, thus getting maximum longevity out of the whole process.

Cream Black Victorian Hallway Floor Tiles After Restoration Ulverston


Source: Victorian Tile Cleaning, Restoration and Sealing Service in South Cumbria

Thursday, April 4, 2019

Whats Involved Restoring an Old Victorian Tiled Floor

A customer from Epsom called me regarding the restoration of her Victorian tiled hallway which was previously covered in carpet and in a poor state of health. Intrigued and having spoken on the phone I agreed a time to call in and survey the floor and work out a way forward. I visited the property and could immediately see considerable repair work including resolving problems with the sub floor and tile replacement would be required and all this before cleaning and sealing.

Victorian Tiled Hallway Floor Before Rebuild in Epsom

This house had undergone some serious renovations recently and the floor was left till last. I’m not a structural engineer so was unable to advise what had happened to the floor, but all the faults appeared to run in a line from the kitchen to the front door. It was an old house so who knows what might have caused it, it might even have been bomb damage from the 2nd world war.

There were three main problem areas. The worst was by the front door where an area of about a metre square was just loose tiles and laid on rubble. The family had got used to jumping across the threshold so as not to make the problem worse. Next was a strip through the middle that was totally exposed and a massive trip hazard. The floor boards were visible as was the floor base. There was another area by the front room entrance that had some loose pattern tiles that clunked every time someone entered the room. Finally, there was a small area to the entrance to the basement that had been patched in with cement.

Victorian Tiled Hallway Floor Before Rebuild in Epsom Victorian Tiled Hallway Floor Before Rebuild in Epsom

It was clearly going to be a challenging restoration for several reasons. Had the customer kept all the loose tiles? If not, could I source matching replacements? Would it be possible to level the floor that appeared to be sloping towards the front door? Could I remove loose and broken tiles without disturbing others? Could I manage the customers high expectations?

Having worked on numerous Victorian floor restorations in the past I knew where I could potentially source replacement tiles. I also had the full backing of the Tile Doctor network so knew I could always reach out to other Tile Doctors should I face any major problems. Undaunted we agreed a date for me to return and start the work and in the mean time I would talk to several specialist tile suppliers about replacements.


Rebuilding a Victorian Tiled Hallway Floor

Before starting any tiling work, I photographed the whole floor extensively from different angles so I would have something to refer to later. Then I removed all the loose tiles placing them in buckets for further cleaning. I now had three areas that I could see beneath the floor boards and another area of cement that I broke up using a chisel drill. In total I filled six buckets with rubble and broken tiles, all of which were taken off site and disposed of at a local recycling centre.

Victorian Tiled Hallway Floor During Rebuild in Epsom Victorian Tiled Hallway Floor During Rebuild in Epsom

The next step was to ensure I had a level and flat base in the newly exposed areas on which to lay the tiles. I managed this by laying down a self-levelling compound. The compound is mixed in a bucket and poured into the holes up to the required level allowing gravity to do the levelling work for you. It is then left to dry and harden overnight.

Victorian Tiled Hallway Floor During Rebuild in Epsom Victorian Tiled Hallway Floor During Rebuild in Epsom

The next day I started by re-fixing the loose tiles in areas where the subfloor was still solid. Close packed Victorian tiles are very tough but can be brittle, often removing a single tile can cause chips or break surrounding tiles. I always buy more replicas than the job requires for this very reason. This can be very frustrating work, so I find its best approach is to remove as few tiles as possible. I explained to the customer that the floor is over 100 years old and some chips and scratches give the floor character. Perfection is an unrealistic expectation where some marks are permanent.

Part of the other renovations included the removal of two antique radiators leaving some strips of carpet and adhesive attached to the floor. I removed this using a strong mixture of tile doctor remove and go and a little encouragement from a 50-grit diamond block.

The preparation continued with the cleaning up of the three buckets of tiles recovered at the beginning of the restoration. Old adhesive and cement must be removed before refitting to ensure they can be laid flush to the adjacent tiles. Luckily for me the weather was warm and sunny, so I sat on the garden wall for the afternoon using a combination of a wet tile cutter, Fein tool and diamond blocks to get them clean while I took in the sun.

Victorian Tiled Hallway Floor During Rebuild in Epsom

The next day was spent re-laying the tiles. The tiles are in an intricate pattern and in various shapes and sizes. The main area by the front door took all day. The difference in thickness between the original and replacement tiles made the work particularly difficult. Interested neighbours came and went commenting on my progress throughout.

Victorian Tiled Hallway Floor During Rebuild in Epsom


Cleaning a Victorian Tiled Hallway Floor

The next day I soaked all the tiles with tile doctor Acid Gel and left to dwell for 30 minutes. This was to work into the porous areas and to break down years of dirt. Then attaching a very coarse 100-grit diamond encrusted pad attached to a rotary floor machine I cleaned the tiles with a dilution of Tile Doctor Pro-Clean. This process skims away a small layer of the tiles thus the dirt too. All the soil was extracted from the floor using a wet vacuum. I repeated this process twice for maximum effect. The customer was amazed at the result and I wasn’t finished yet. When wet the contrast between the white tiles and dark were astonishing, however this was temporary so I made sure the customer aware that without a sealer they would look washed out and colourless. I left the scene overnight with a couple of warm air movers in place to fully dry out the tiles.


Sealing a Victorian Tiled Floor

The tiles need to be dry before sealing so the next day my first action was to test the floor for moisture using a damp meter. They passed and were ready to take a sealer, so I discussed the different options and finishes with the customer. It was a very interesting house, full of retro artefacts so we needed something that would blend in, more importantly she had four children and a husband who bought a cycle through the house twice a day. I recommended Tile doctor seal and Go Extra. It's super tough, offering great protection and gives a subtle sheen that I felt would suit the house. Three coats later and I was done, closing the door behind me as everyone was at school and work.

Victorian Tiled Hallway Floor After Rebuild in Epsom Victorian Tiled Hallway Floor After Rebuild in Epsom

I popped back later that evening to discuss the job. The newly applied sealer had intensified the depth of colour in the Victorian tiles and returned the brightness to the floor. She was very pleased and even gave me a carrot cake to take home with me.

Victorian Tiled Hallway Floor After Rebuild in Epsom


Source: Victorian Tile Cleaning and Restoration Service in Epsom, Surrey
Tuesday, January 8, 2019

Removing Stubborn Glue from Victorian Floor Tiles in South Yorkshire

Detailed below is the restoration of a beautiful Victorian tiled hallway that we completed for a ‘co-housing’ community who had purchased a large house in Nether Edge. Situated three miles south if Sheffield, Brincliffe House was built in 1850 and had been used as NHS offices since the end of the Second World War but had been empty since 2012. Built originally for Herbert Unwin who was the owner of Pond Street Brewery it was now subject to a three-million-pound conversion into fifteen apartments.

Victorian Tiled Hallway Before Restoration Brincliffe House Nether Edge

When we first visited the property to survey the floor, we were shown around the ground floor where they had discovered magnificent Victorian tiled floor. The new owners had no idea the floor was there as the NHS had covered it up decades earlier and glued carpet on top. Being a co-housing community, they were keen to do the restoration themselves however after several unsuccessful attempts to remove the strong carpet adhesive they thought better of it and called us in. We ran several tests and worked out the best way to remove the glue. The floor covered about 70 sqm in total so we knew we had our hands full.

Victorian Tiled Hallway Before Restoration Brincliffe House Nether Edge


Removing Carpet Glue from an Old Victorian Tiled Floor

I’d worked out that the best way to remove the carpet adhesive was a combination of coating remover products and abrasive burnishing pads, these are industrial diamond encrusted pads that are usually used to resurface stone however we find they work equally well on Victorian tiles as well.


Working in small sections the floor was treated with a Tile Doctor 200-grit 17 inch Diamond pad fitted to a rotary floor buffer using water as a lubricant. This stripped off a lot of surface dirt and glue which was then rinsed off with water and extracted with a wet vacuum. Next the floor was coated with a mixture of Tile Doctor Remove & Go and Wax Away, two powerful coating removers that are safe to use on Tile and Stone. The mixture was left to soak into the tiles for about twenty minutes before being scrubbed in with a black scrubbing pad which slowly released the glue and dirt from the pores of the tile. In some areas the glue was so thick we found it necessary to use hand scrapers as well. As before the soil was rinsed off with water and then extracted using a wet vacuum.

Victorian Tiled Hallway During Restoration Brincliffe House Nether Edge

Each section of flooring was inspected and retreated where necessary, then once happy with the result it was given a final rinse with water to remove any trace of cleaning product. After two days of hard work the results were truly amazing, and it was very satisfying to see the floor come back to life section by section.

Victorian Tiled Hallway During Restoration Brincliffe House Nether Edge


Sealing Victorian Hallway Tiles

The community were very happy with the results and thankful I had managed to achieve such an amazing transformation. They were however keen to do as much of the project as they could by themselves, so I advised them on the importance of protecting the tiles with a sealer and left that bit tot the community.

Victorian Tiled Hallway After Restoration Brincliffe House Nether Edge

With regards to sealing my recommendation was to apply a couple of coats of Tile Doctor Colour Grow as it would enhance the red and blue colours in the tiles even further. Also, being fully breathable it would be able to cope with any moisture issues which is important on these old floors which were laid without a damp proof membrane.

Victorian Tiled Hallway After Restoration Brincliffe House Nether Edge


Source: Victorian Tile Cleaning and Restoration Service in Sheffield, South Yorkshire

Thursday, February 8, 2018

Renovating a Small Victorian Tiled Entrance in Edinburgh

If you visit Victorian era houses throughout the UK, you will find that many them have colourful tiled entranceways (also sometimes known as vestibules). The tiles are commonly made from encaustic cement, stylised with distinct geometric patterns that really help to add character to the property.

The reign of Queen Victoria was a prosperous and confident time for Scotland – and many new houses and buildings were built in the well-known ‘Victorian’ style during the period. One of the best-known buildings to be built was Balmoral Castle, which is still in use by the Royal Family as a holiday home.

Homeowners who are fortunate enough to be in possession of original Victorian tiles will find that they are not easy to keep clean without the right products and methods. The entrance to any house of course is subject to high amounts of foot traffic, which means the tiles can become dirt and discoloured very quickly indeed.

Here is an example that we cleaned and sealed recently in Edinburgh, although in good physical condition for its age the sealer on the floor had worn off and dirt had become ingrained in the tile reducing its overall appearance.

Small Victorian Porch Before Cleaning Edinburgh

Cleaning Dirty and Discoloured Victorian Tiles

Having restored hundreds of Victorian tiled floors in the past, Tile Doctor has developed tried and tested methods for cleaning all types of tiled floors so tackling this small floor would not be a problem.

To begin, we gave the floor a deep clean to break down any old sealants and to cut through thick layers of dirt and grime. The cleaning solution we employed consisted of two products: Tile Doctor Pro Clean (which is a strong alkaline cleaner) and Tile Doctor Remove and Go (which is a stripping agent formulated for the removal of old sealants, synthetic coatings, glues, and paints). The solution is applied and left to soak into the tile for ten to twenty minutes before being scrubbed in, which for a small area such as this needs to be done by hand. The soiled solution is then rinsed off with water and this is then extracted using a wet vacuum. This deep cleaning process was repeated several times to make sure the tiles were as clean as possible.

Once we were happy that all the dirt and grime had been removed, we gave the floor a quick acid wash using Tile Doctor Grout Clean-Up to remove any old grout smears and to neutralise any potential salt efflorescence issues. The floor was then given a final rinse before leaving it to dry off fully overnight and a turbo air mover was left running to help speed up the process and ensure the floor was completely dry to be sealed the following day.

We are very conscious of the fact that many of these old Victorian tiled floors to have damp-proof membranes installed beneath them, so we wanted to guarantee there would be no damp issues that would prevent us from applying a fresh sealant. This is because even a small amount of excess moisture can potentially damage the performance of the sealant.

Sealing an Original Victorian Tiled Entrance

Returning to the property on the second day, we proceed to seal the tiles with three coats of Tile Doctor Colour Grow. This sealant soaks into the pores of the tile protecting it from within and providing long term protection, it also enhances the colours in the tile in the process.

The difference made by this two-day restoration is shown below. It is quite amazing how quickly these results can be achieved considering the age and previous condition of the tiles. Our customer was absolutely thrilled.

Small Victorian Porch After Cleaning Edinburgh


Source: Victorian Tile Cleaning and Sealing Service in Edinburgh