Showing posts with label cheshire. Show all posts

Monday, January 8, 2024

Maintaining a Historic 1850's Minton Tiled Floor in Cheshire

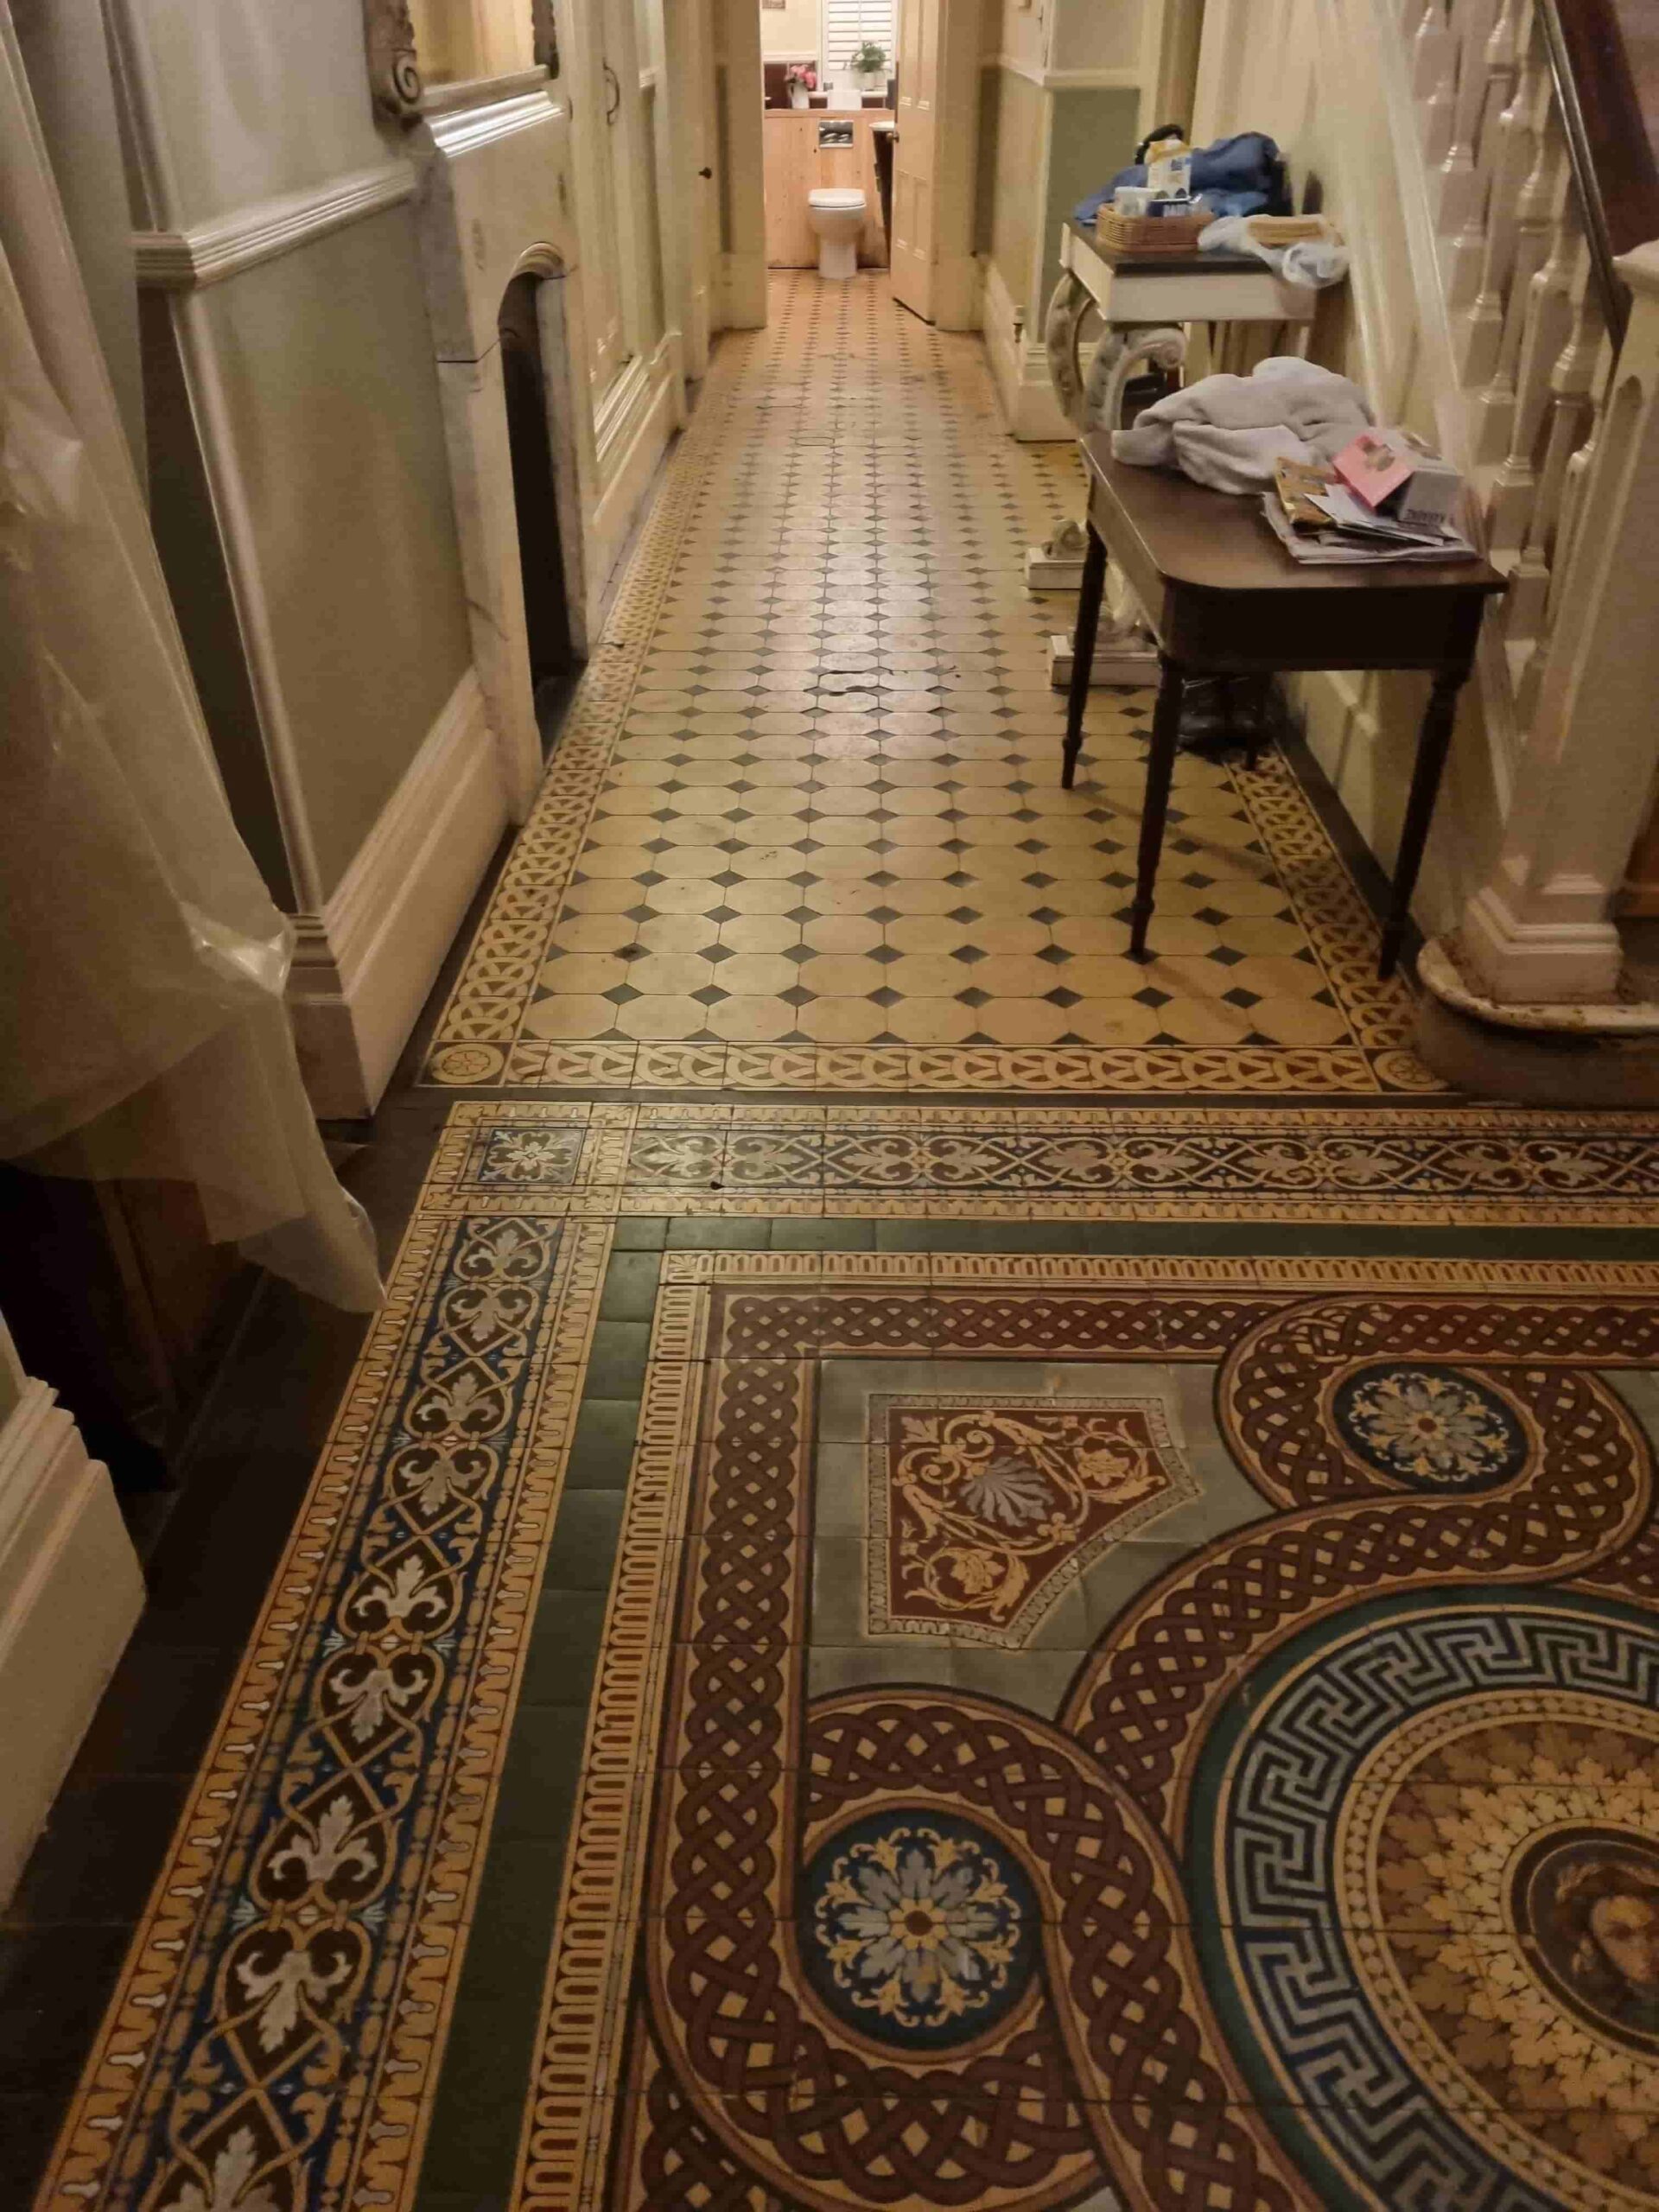
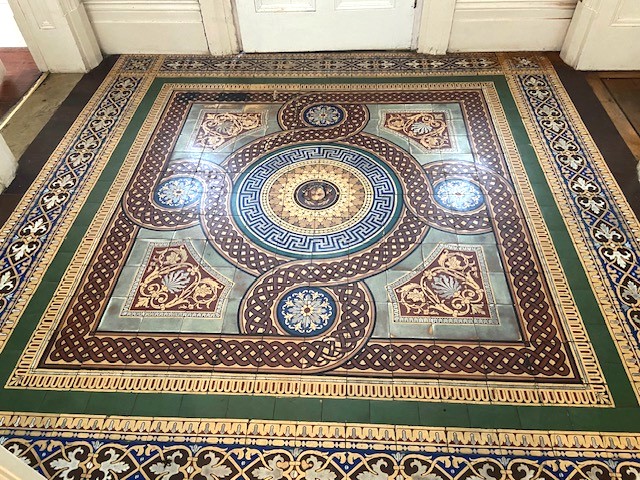
I was first asked to restore the large Victorian tiled hallway floor at this mansion type property in Handbridge, Cheshire two years ago. The floors had a lot of history and had been used as a template for the famous Minton Hollins encaustic tiled floor at St George’s Hall in Liverpool that was built in 1854. Unfortunately, however my work was put on hold as other restoration works including repairing dry rot took priority.

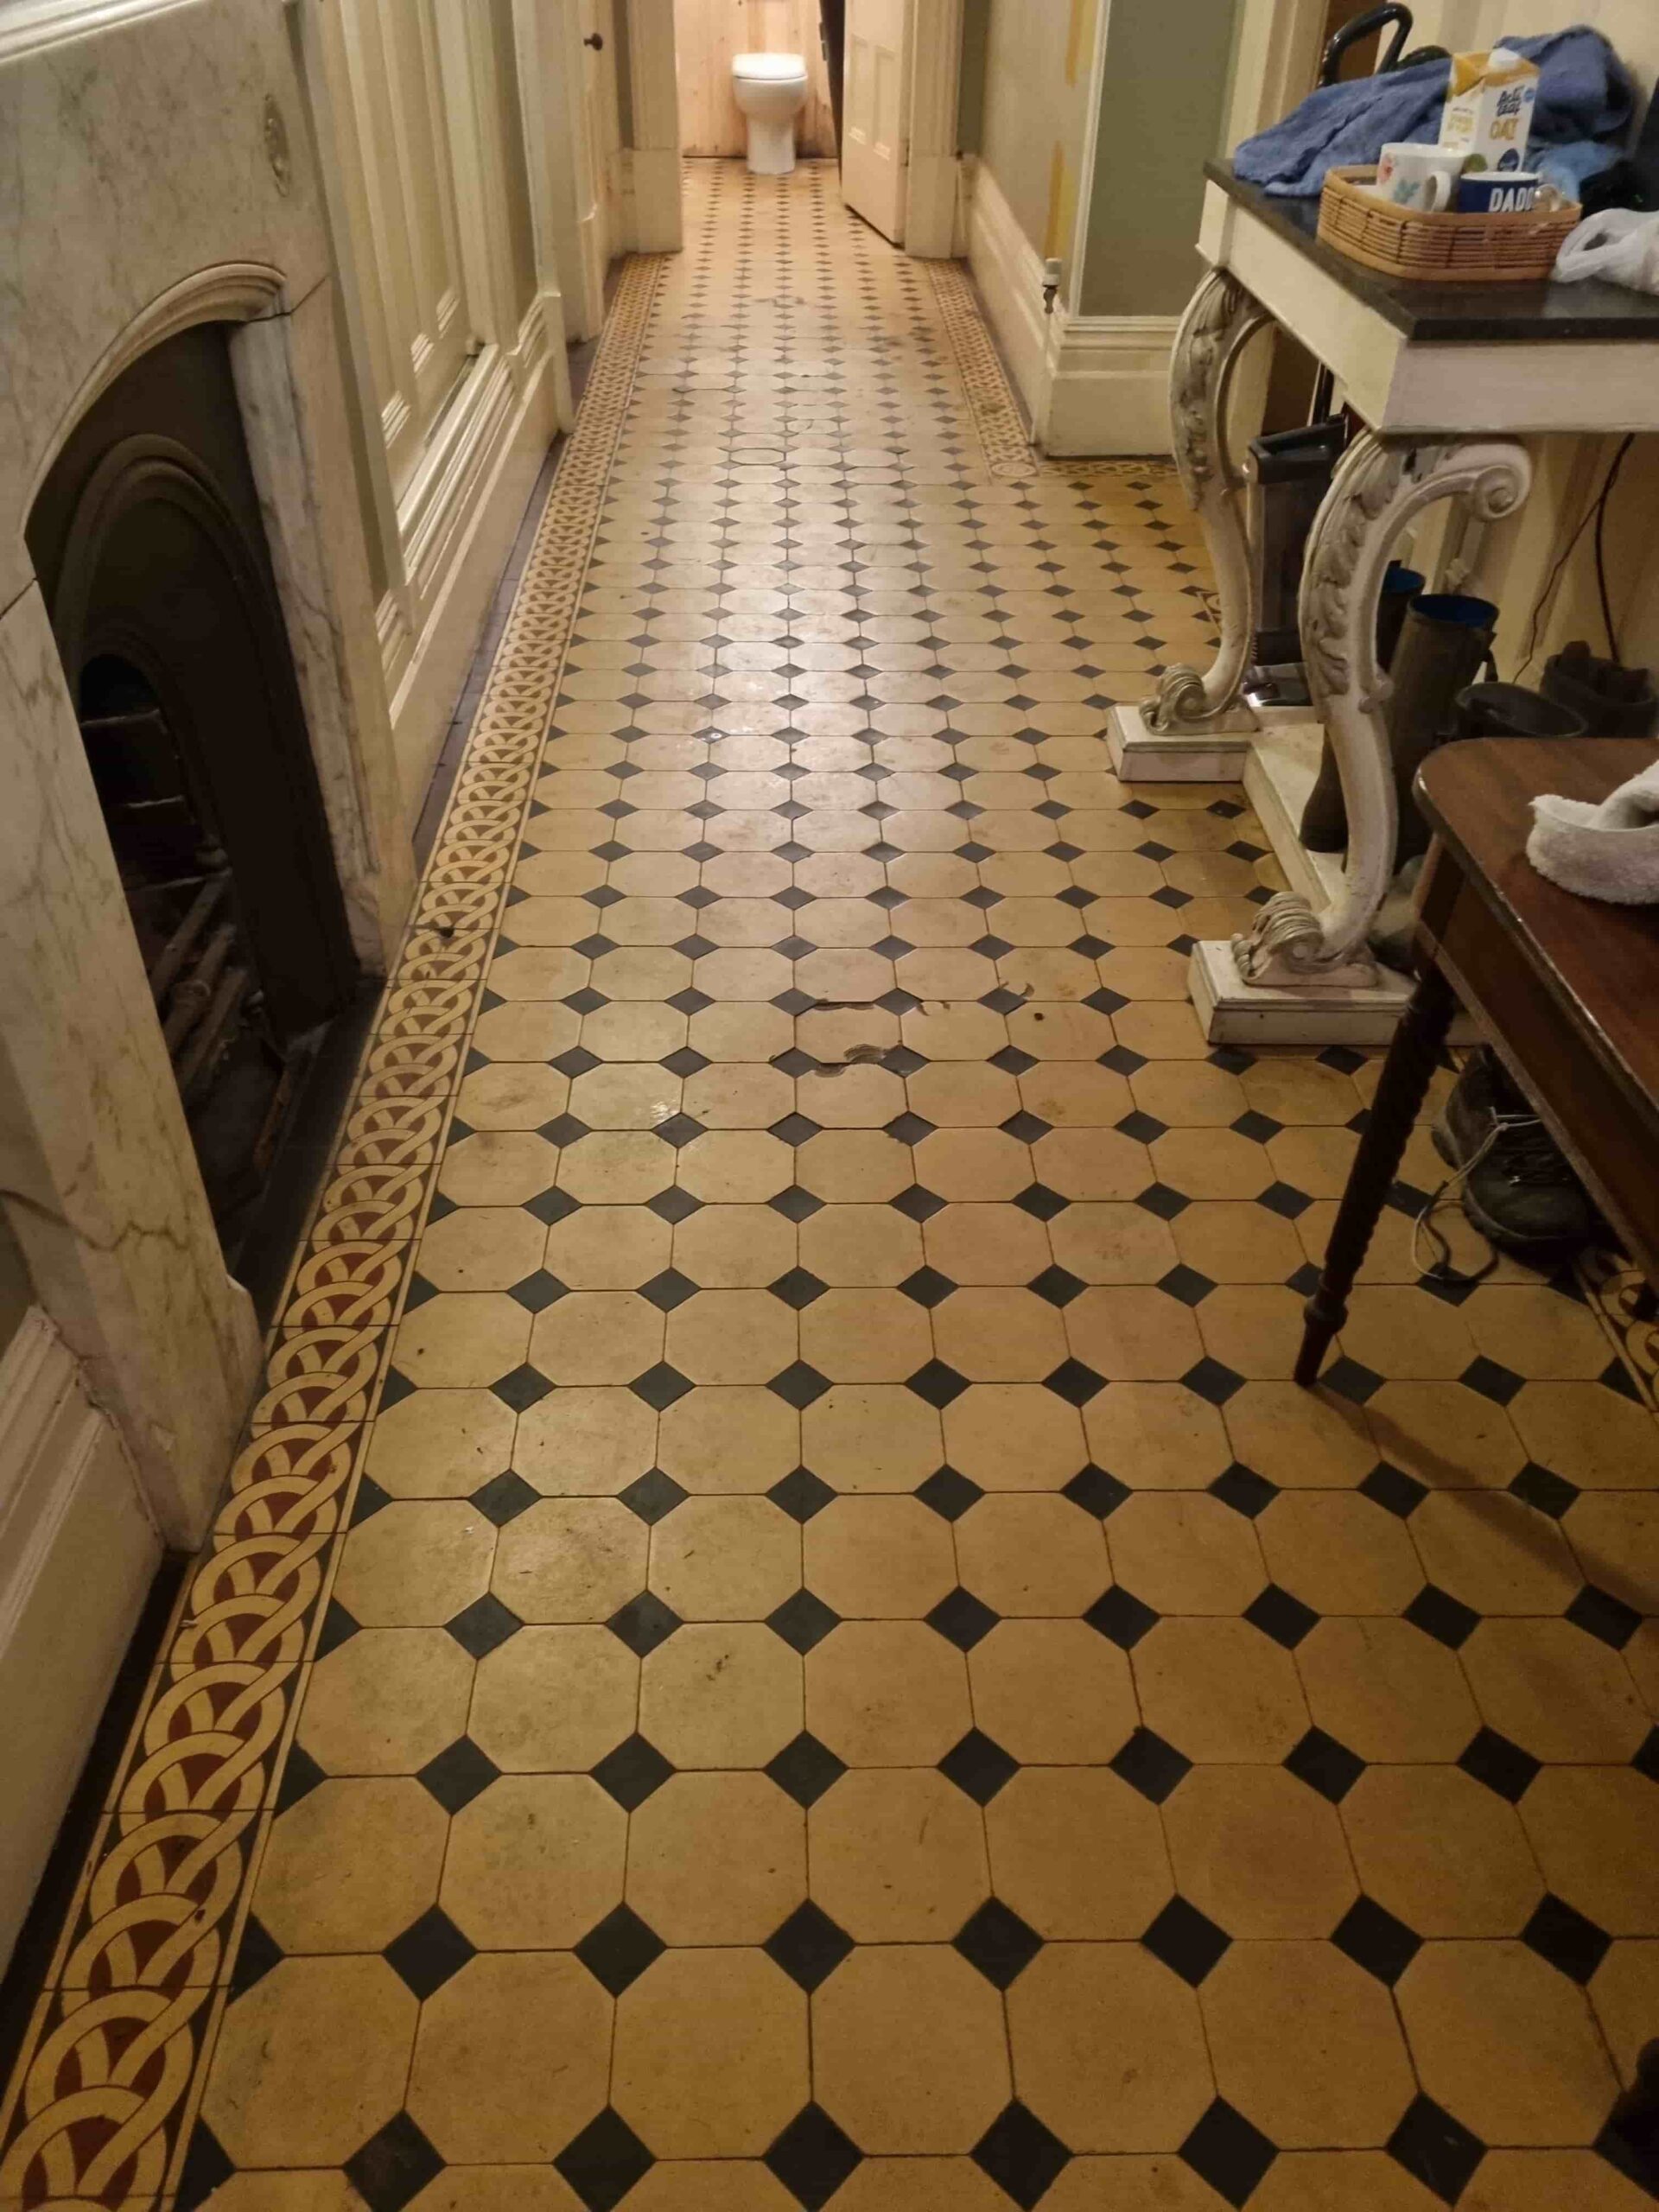
Victorian Tiled Floor Before Renovation Handbridge Cheshire

I kept in touch with the owners whilst the other works progressed and kept a look out for 22 beige Octagon shaped tiles that were needed to replace some of the damaged tiles in the floor. In fact, it wasn’t until later in 2023 that I was called back to start the renovation work to the floor, by which time I had managed to source all the replacement tiles needed.
     
Victorian Tiled Floor Before Renovation Handbridge Cheshire Victorian Tiled Floor Before Renovation Handbridge Cheshire
Handbridge is a district of Chester with a mixture of large Victorian mansion type properties on the South bank of the river Dee and workers cottages built to service the water powered factories that sprung up along the river.

Repairing and Cleaning a Victorian Hallway Tiles

Before starting the cleaning process my first task was to replace all the broken tiles. This needs to be done carefully so as not to dislodge any adjacent tiles and make more work for myself. Once removed the base is cleared of old cement and then the replacement tiles fitted using rapid set adhesive and cut to size where required.

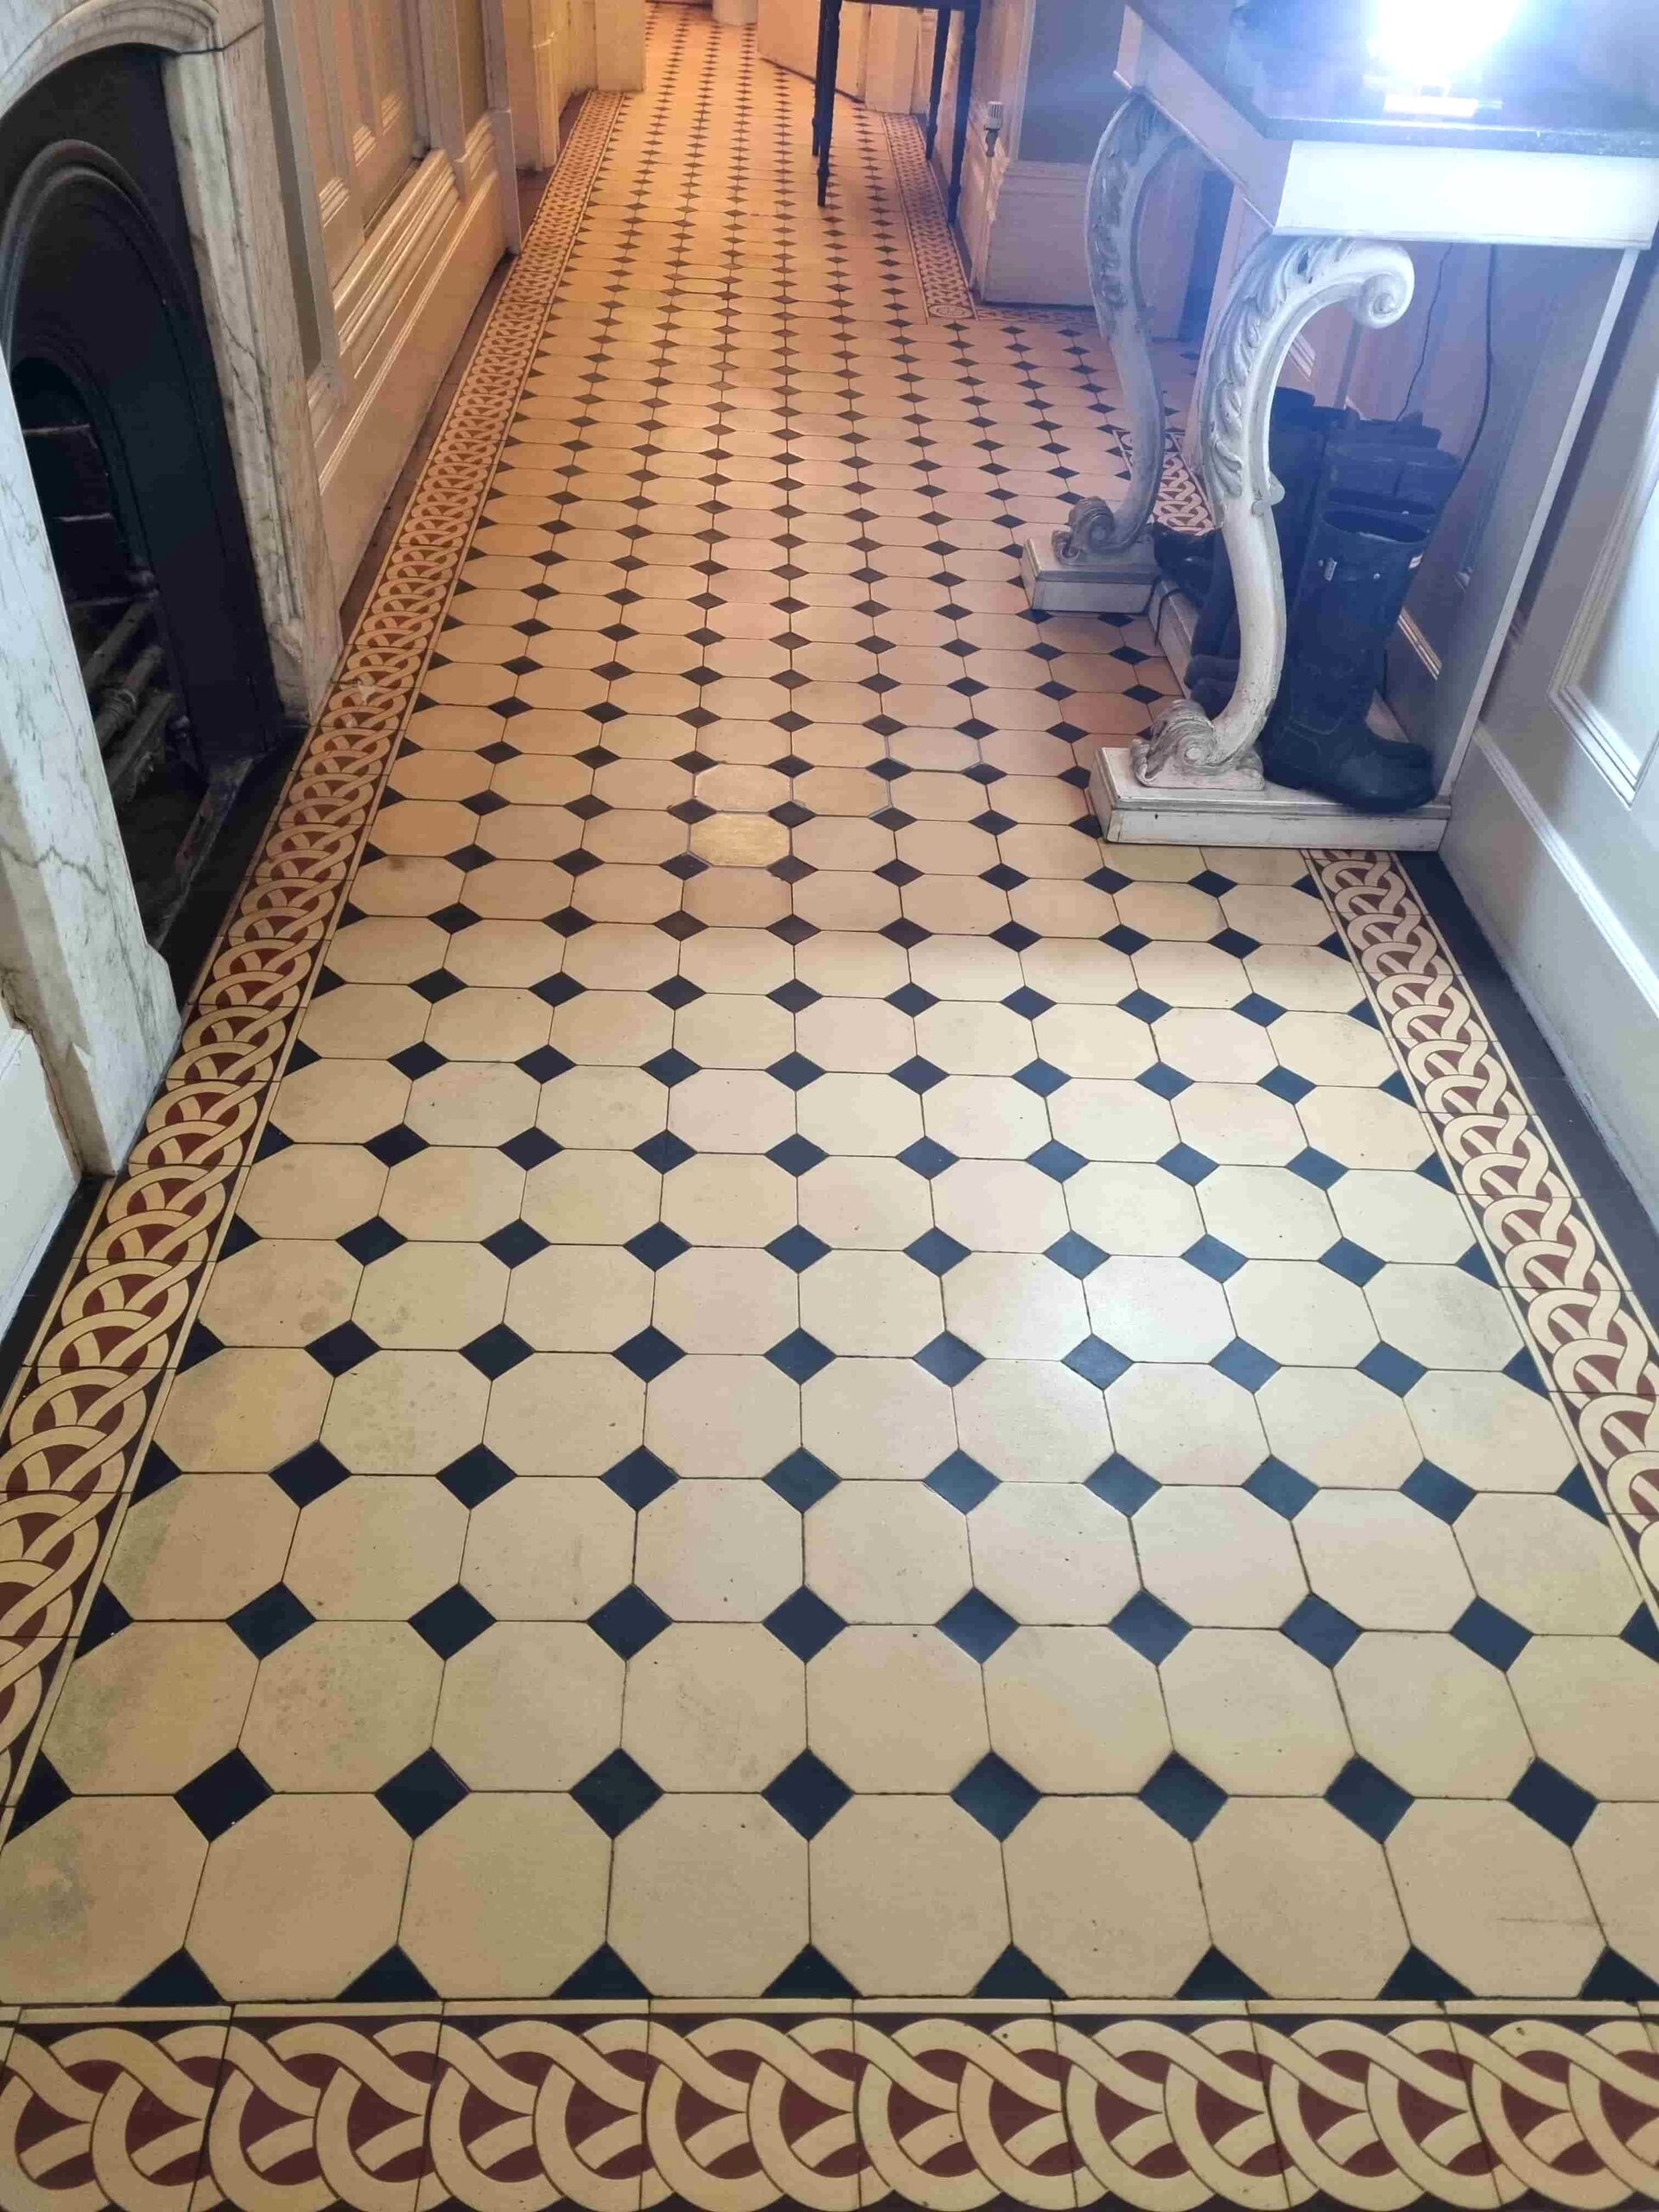
Once the repairs were complete and the adhesive set, I began the cleaning process which is designed to remove and remaining protective sealer and flush out ingrained dirt from the pores of the tile. This is done by applying a strong dilution of Tile Doctor Pro-Clean with a mop and then leaving it to soak into the tile for ten minutes. The floor was then scrubbed using a buffing machine fitted with a black pad and lubricated with water. The cleaning alkaline cleaning solution soon turns black with the dirt and then floor is then rinsed with water and the residue extracted with a wet vacuum.

Attention then turned to the decorative historical piece of flooring at the entrance to the hallway. This only needed to be cleaned with Tile Doctor Neutral Tile Cleaner which is used for regular cleaning and maintenance of tiled floors. this was applied with a two-minute dwell time before cleaning by hand using soft scrubbing brush then wiped down with damp microfiber cloths then left to dry.

Sealing a Victorian Tiled Hallway Floor

The next day damp meter readings were taken from both floors to make sure they had dried and were ready to be sealed. The readings were within tolerance so work could begin on applying the first of what would be three coats of sealer.

Tile Doctor Colour Grow was chosen to seal the tiles, it’s an impregnating colour intensifier sealer which is fully breathable so it will allow for moisture to rise through tile, an important consideration for old floors that don’t have a damp proof membrane.

The sealer was applied using a paint pad and any excess is wiped off after five minutes with microfiber cloths before leaving it to dry for twenty minutes. I use air blowers around the floor to increase the drying speed.
   
Victorian Tiled Floor After Renovation Handbridge Cheshire Victorian Tiled Floor After Renovation Handbridge Cheshire

The owner of the property was over the moon with the work and pleased that the work to restore the property to its former condition was nearing completion after what had been four years of restoration.
  Victorian Tiled Floor Before Renovation Handbridge Cheshire 

Wednesday, February 27, 2019

Aga Cooker encouraging efflorescence problems in Goostrey, East-Cheshire

Pictured below is an old Quarry tiled floor in the Kitchen of a house in the small farming village of Goostrey. I went over to survey the floor at the request of the owner who felt it was overdue a deep clean and seal.

Quarry Tiled Kitchen Floor Before Cleaning Goostrey

It was a classic floor that suited the kitchen and its Aga well however I’m sure it could tell a story. There were patches of white efflorescent salts in front of the Aga itself and another section of floor where the tiles were a slightly darker shade. I assume some replacements were made in this section at some point in the past. Efflorescence occurs when damp in the subfloor rises through the tiles depositing white alkaline salts on the surface of the tile as the moisture evaporates. This is quite a common problem in older properties where no damp proof membrane is present under the floor and more so where you have a warm Aga heating the space and encouraging evaporation.

As per usual the floor was survey noting all the points above and then I carried out a test clean on a small part of the floor. This helps me understand what products and process I need to follow in order to renovate the floor and thereby product an accurate quote for the work. This went well and the owner was happy for us to process so we agreed a date to start the work which would take two days.


Cleaning a Quarry Tiled Floor

To clean the floor and strip off any remaining sealer I first created a strong dilution of Tile Doctor Remove and Go which was sprayed onto the tiles and then left to soak in. Remove and go is a powerful stripper and cleaner that is safe to use on tile and stone. The product is designed to loosen paint stains, adhesives and many types of urethane and wax coatings so they can be easily removed.

After thirty minutes the solution was scrubbed into the tile and grout using a weighted rotary machine fitted with a black scrubbing pad and running at a slow speed. The resulting cleaning slurry was rinsed off with water and then extracted from the floor using a wet vacuum. I repeated this process until I was confident the tiles were clean and free of old sealer.

The next step was to neutralise the alkaline salts in the floor which could later lead to efflorescence by treating it to an acid wash using Tile Doctor Acid Gel. The gel was left to soak in for five minutes before washing it off using the wet vacuum to get the floor as dry as possible.

Quarry Tiled Kitchen Floor During Cleaning Goostrey


Sealing a Quarry Tiled Floor

The floor was left to dry out overnight and the next morning I returned to the property and took some readings from the floor with a damp meter. It’s important to check the floor is dry before sealing because any excess moisture can cloud the sealer and prevent it from doing its job properly.

Once satisfied that the floor was dry, I applied a single coat of Tile Doctor Colour Grow which is a breathable impregnating sealer that enhances colour and protects from within. I left the floor to dry for one hour and then followed up with four coats of Tile Doctor Seal and Go which provides both a robust surface seal and a long-lasting low sheen finish. The new sealer transformed the tiles and gave the whole floor a uniform appearance.

Quarry Tiled Kitchen Floor After Cleaning Goostrey

The customer was very impressed with our work and asked if we can come back later to remove the white tiles in front of the Aga and replace with Quarry tiles to match the rest of the floor.

Quarry Tiled Kitchen Floor After Cleaning Goostrey


Source: Quarry Tile Cleaning and Sealing Service in Goostrey, East Cheshire

Wednesday, October 31, 2018

Original 1901 Mosaic Floor Restored in Warrington, Cheshire

Around five years ago Tile Doctor was asked to quote for restoring the Mosaic tiled floors in the former Warrington Technical College which is a Grade II listed building that was built in 1901. Tile Doctor are the biggest restorative tile network in the UK and we often get asked to quote for restoring old floors like these. Although we quoted for the work, nothing happened, and it now appears the local borough council had put the work on hold until they could come up with a fully costed plan to fully restore it.

It took some time, but I’m pleased to report that a plan did evolve and a joint venture between the council and a developer has now restored the building to its former glory and is now home to several restaurants and bars spread across its three floors.

The Treasury Building Palymra Square The Treasury Building Palymra Square

The restoration plan included preserving the main stair enclosure along with the original features which includes oak panelling and thankfully the beautiful Mosaic floor tiles. Having previously quoted for the latter and with the main building works complete we were asked to return and restore the floors ASAP at what has since been renamed as “The Treasury Building of Palymra Square”.

On the first day I was given a large vase full of mosaic tile pieces which the developers had collected during the building works and figured would come in handy later.

Mosaic Tile Collection


Day 1 – Preparing and Cleaning the Mosaic Flooring

Starting at the top of the building my first job was to remove the builders rubbish and sweep both floors. I then washed both Mosaic floors with Tile Doctor Pro-Clean using a strong 1:3 dilution with water. After leaving the cleaning solution to soak in for a few minutes it was scrubbed in using a black scrubbing pad fitted to a weighted buffing machine.

Cleaning Mosaic Flooring Warrington Treasury Building Cleaning Mosaic Flooring Warrington Treasury Building

This process brought out the dirt and dust that had been ingrained in the tiles turning the cleaning solution into a grey slurry which was then removed with a wet vacuum. It was a large floor and I had to repeat the cleaning process a couple of times to remove the layers of dirt, but the result was worth it and by the end of the first day the colours and design of the floor was really standing out.

Cleaning Mosaic Flooring Warrington Treasury Building Cleaning Mosaic Flooring Warrington Treasury Building


Day 2 – Replacing Missing Mosaic Tiles on the Top Floor

On day two I started work to repair the floor where the mosaic pieces were missing using the collection of mosaic tiles the builders had kindly left me at the start of the restoration. It was quite a jigsaw that involved looking through the hundreds of pieces that had been collected, finding a suitable piece and if necessary shaping it with a grinder so it could fit in the pattern. I used a flexible tile adhesive and then left them to set overnight.

Repairing Mosaic Flooring Warrington Treasury Building Repairing Mosaic Flooring Warrington Treasury Building
Replacing the missing mosaics on the first floor was a slow process which ended up taking up much of the second day.


Day 3 – Replacing Missing Mosaic Tiles on the Top Floor

My plan on day 3 was to continue the restoration work on the top floor and ensure the repaired areas were level with the rest of the floor. I attempted to use a 50-grit milling pad fitted to weighted floor buffing machine for this but found the segments on the pad would catch the edge of the replaced pieces and knock them out of place. Clearly this was not going to work so I changed tack and smoothed them down using a set of graded hand-held Diamond burnishing blocks. Again, there was lot to do so this work took up much of the day; some might say I could have worked around this but I’m a bit of a perfectionist and I like to ensure a job is done right.


Day 4 – Burnishing Mosaic Tiles on the Top Floor

The next step was to use a set of Tile Doctor Burnishing Pads to clean and restore the finish of the mosaics. The pads which are encrusted with industrial diamonds are applied with a rotary floor buffer in sequence from coarse to extra fine. The first pad is a coarse 400-grit and is applied with only water for lubrication, it removes minor scratches, sealers, and the top surface dirt.

Cleaning Mosaic Flooring Warrington Treasury Building Cleaning Mosaic Flooring Warrington Treasury Building

Working in sections, I applied the pad across the floor, rinsing with water in between and picking up the soiled solution with the wet vacuum. I then repeated this same procedure with the medium 800-grit pad which is the first stage polishing pad again rinsing with water after use. The next two pads are a fine 1500-grit and extra fine 3000-grit which really build up a high-quality polish on the stone. This last pad is applied at the very end of the process when the floor is dry and is run over the floor using a small amount of water which is sprayed onto the floor.


Day 5 – Restoring Mosaic Flooring on the Ground Floor

The next day we started on the ground floor which consisted of a large main lobby and hallway running off it. The mosaic pattern in the lobby featured an impressive oval zodiac design with two restaurants looking on to it behind wood and glass panelling. It must have taken a long time to lay back in 1901 and we were quite often stopped by people that worked there saying how nice it was seeing the wonderful floor being restored to its former glory.

Cleaning Mosaic Flooring Warrington Treasury Building Repairing Mosaic Flooring Warrington Treasury Building

The ground floor Mosaics had the same issues as the first floor however the experience gained restoring the first floor meant I was able to crack on quite quickly and completed the repairs in a single day.


Day 6 – Burnishing Mosaic Tiles on the Ground Floor

On the sixth day I proceeded to burnish the Mosaic flooring on the ground floor and hall using the same system as before

Burnishing Mosaic Flooring Warrington Treasury Building Cleaning Mosaic Flooring Warrington Treasury Building

With two large areas to cover I found the burnishing of the ground floor and hall using the 400, 800 and 1500-grit pads as before took up the whole day. After finishing the floor was given a final rinse to remove the slurry and then left to dry out overnight.


Day 7 – Sealing Mosaic Flooring

I returned early the next day to complete the polishing process using the 3000-grit burnishing pad which further builds the polished appearance of the floor. Once this was done the floor was sealed using two coats of Tile Doctor Colour Grow which is an impregnating sealer that adds stain protection to the floor and enhances colour. With two floors to do I was able to work on one floor as the sealer on the other dried.

Sealing Mosaic Flooring Warrington Treasury Building Sealing Mosaic Flooring Warrington Treasury Building

The owners were very pleased with the work we did and have asked us if we can come back every two months to maintain the floor and keep it in tip top condition. Having a maintenance plan in place for busy tiled areas like these are a good idea if you want to keep your floor looking its best.

Polishing Mosaic Flooring Warrington Treasury Building Polishing Mosaic Flooring Warrington Treasury Building


Source: Mosaic Tile Cleaning and Restoration Service in Cheshire

Tuesday, May 15, 2018

Renovating Dirty Terracotta Tile and Grout in East Cheshire

We were asked if we could restore the appearance of a large Terracotta tiled floor in a kitchen/dinner that had not been cleaned for many years. The sealer had mostly worn off in the high traffic areas but was still fairly thick under the table. Terracotta tiles are made from soft clay making it very porous and likely to absorb anything that lands on it; as a result, it’s important to maintain the sealer to stop this happening. Now with the sealer worn off completely in the busy parts of the floor anything that landed on the floor was very quickly absorbed into it.

Terracotta Tiled Floor Before Cleaning Knutsford Terracotta Tiled Floor Before Cleaning Knutsford

The house was in Knutsford on the East side of Cheshire which was named as Best Place to Live in the North West” by the Sunday Times in 2017; being close to the Peak District and within easy reach of Liverpool and Manchester its easy to see why.


Deep Cleaning a Spanish Terracotta Tiled Kitchen Floor

My first task would be to completely remove the old sealer so the whole floor could be given a deep clean before resealing. It’s not a good idea to add a new sealer on top of another especially if you don’t know what was used before, it can also lead to a build of sealers on the tile which will darken their appearance. To do this I soaked the tiles in a strong dilution of Tile Doctor Remove and Go which is a powerful stripping and cleaning solution that’s designed to removes old coatings on tiles and draw out ingrained staining. After twenty to thirty minutes the solution was worked into the tiles using a black buffing pad fitted to a rotary buffer machine. I also used a wire hand brush along the grout lines to make sure they were cleaned as the scrubbing pad can fail to reach into the recess. It wasn’t long before the old sealer and dirt was released from the Terracotta which was then washed off the floor using water and a wet vacuum.

Terracotta Tiled Floor During Cleaning Knutsford Terracotta Tiled Floor During Cleaning Knutsford

I inspected the floor at this stage and retreated any stubborn areas using the same process. I did have a few problems removing some greasy marks however I managed to get rid of these by applying Tile Doctor Wax Away worked in by hand with a scrubbing brush. Once I was happy that the floor was clean and free of old sealers it was given a final rinse to remove any trace of cleaning product, dried with the wet vacuum and left to dry out fully overnight.


Sealing a Terracotta Tiled Kitchen Floor

On my return the next morning I took a few damp readings to check the floor was dry before starting with the next step of sealing the tiles. All was well so began to add the first of multiple coats of Tile Doctor Seal and Go which is a water-based sealer that works really well on Terracotta and leaves a nice subtle sheen to the tile. Being was based it has the added advantage of not leaving a solvent smell as it dries.

Terracotta Tiled Floor After Cleaning Knutsford Terracotta Tiled Floor After Cleaning Knutsford

The Terracotta took some time to seal completely, in fact ten coats of sealer were required to fully seal the tile. You can always tell when a tile is sealed by adding a small drop of water to the surface, if it forms into a bubble then its’ fully sealed.

Terracotta Tiled Floor After Cleaning Knutsford Terracotta Tiled Floor After Cleaning Knutsford

I’m not sure you can appreciate the difference from my photographs but hopefully you can see that Terracotta tiles now look much fresher and the grout cleaner and lighter in colour.


Source: Terracotta Tile Cleaning and Sealing Service in East-Cheshire

Wednesday, April 11, 2018

Renovating Terracotta Tile and Grout Found Under Carpet in Cheshire

I was contacted by a home owner in Appleton near Warrington who had a Terracotta tiled floor in their dining Room. The floor had previously been covered in carpet and they were keen to have the whole floor restored.

To complicate things further the Carpet had been stuck down with a strong adhesive and a local builder had advised them to remove the glue using brick acid. Although this was successful it had the side effect of discolouring the grout lines and no amount of rinsing with the floor with water to dilute and wash off the acid would resolve the problem.

Carpet Covered Terracotta Tiled Floor Before Restortion in Appleton

Happy for me to resolve the problem, my client informed me they were going on holiday and would like me to do the work whilst they were away. This was a great idea as it would guard against unwanted foot traffic during the cleaning and sealing process and it would also mean they would have a nice surprise waiting for them on their return.


Deep Cleaning a Terracotta Tiled Kitchen Floor

After protecting the Kitchen units and skirting boards with plastic sheeting my first job was to strip any remaining sealer off the Terracotta tiles using a strong dilution of Tile Doctor Pro-Clean. The solution was spread across the floor and then left to dwell for twenty minutes before scrubbing it in with a black scrubbing pad attached to a rotary floor buffer. I then used a wet vacuum to remove the now dirty cleaning solution from the floor.

The grout was also given a good scrub using more Tile Doctor Pro-Clean but this time it was scrubbed in with a narrow stiff brush until I was satisfied it was as clean as it could be. The floor given a good rinse and I then inspected the floor tile and grout to ensure it was clean and free of sealers, any areas that needed ore work were retreated and the floor given a final rinse and dry with the wet vacuum before being left to dry off fully overnight.


Sealing a Terracotta Tiled Kitchen Floor

I returned the next morning and tested the tiles with a damp meter to ensure they were dry before beginning applying the sealer. All was well, so I started by applying a single coat of Tile Doctor Colour Grow. Colour Grow is an impregnating sealer that seeps into the pores of the tile protecting it from within and enhancing the natural red colour of the Terracotta in the process.

Once the first coat had dried I followed up with two coats of Tile Doctor Seal and Go which is a compatible water-based sealer that works really well on clay tiles and adds a lovely sheen finish to the floor.

The last step was to resolve the problem with the discoloured grout lines by applying a white grout colourant to the grout. This gave the grout a fresh and consistent appearance throughout and also has the benefit of sealing the grout which will protect it from staining and also make it much easier to clean.

Last step was to finish the sealing of the floor by topping up the sealer with another three coats of Seal and Go to ensure the floor was fully sealed.

Carpet Covered Terracotta Tiled Floor Before Restortion in Appleton

The result was a huge improvement and now looked like a recently installed Terracotta floor. When my customer returned from holiday they were more than happy with the floor and the work I had done.


Source: Terracotta Tile Cleaning, Renovation and Maintenance Service in Cheshire

Wednesday, March 14, 2018

Cottage Floor Renovation at National Trust property in Cheshire

Quarry Bank Mill is an old textile mill just outside of Wilmslow in East Cheshire that dates back to the Industrial Revolution when it was used to produce cotton. The mill is now under the care of the National Trust who recently put together a £9.4 million project, supported by the Heritage Lottery Fund the further restoration of the mill and its gardens.

The 18th century mill is now a popular attraction and I was recently asked to clean and seal the Sandstone flooring in the Kitchen of the head gardeners cottage. The cottage is actually located in the formal gardens which were recently visited by HRH Price of Wales.

Sandstone Kitchen Floor Tile Before Cleaning Quarry Bank Mill Cottage

The Sandstone Kitchen floor was in good physical condition so unlikely to be the original however like any stone floor in constant use the sealer was wearing off and dirt was becoming ingrained in the pores of the stone detracting from its overall appearance.

Sandstone Kitchen Floor Tile Before Cleaning Quarry Bank Mill Cottage


Cleaning Dirty and Dull Sandstone Flagstones

Our first job was to protect the wooden kitchen units and other woodwork with tape. Next I set about cleaning the Sandstone and stripping any reaming sealer off in the process. To do this I applied a strong dilution of Tile Doctor Remove and Go, which is multi-purpose stripper and cleaner. The product strips away any old sealer on the tiles and draws out ingrained dirt, stains and heavy grease build-up.

I applied the product and left it to soak for roughly fifteen to twenty minutes to allow time to break down the old sealer and penetrate the pores of the stone to reach any embedded dirt. Next, I scrubbed the floor using a specialised buffing machine fitted with a black scrubbing pad swelled with water to get the stone clean. The resulting dirty cleaning slurry was quickly soaked up using a wet vacuum and after rinsing with water With the floor clear I was able to spot stubborn areas that need more work and repeated the process.

With the stone clean I turned my attention to the grout lines and scrubbed in a strong dilution of Tile Doctor Pro-Clean which was then rinsed off with water. I then completed another spot check of the floor whilst using the wet vacuum to get the floor as dry as possible. With the cleaning part of the job complete I left for the day to allowing the floor to dry off fully overnight.

Sandstone Kitchen Floor Tile After Cleaning Quarry Bank Mill Cottage


Sealing Sandstone Kitchen Tiles

Upon returning to the property the following day, I tested the floor with a damp meter, checking for any excess moisture that could prevent me from sealing the stone. The floor proved dry and so I began to seal the Sandstone starting with a single coats of Tile Doctor Colour Grow. Colour Grow is an impregnating sealer that is designed to fill the pores of the stone blocking dirt from becoming ingrained there whilst enhancing the natural colours in the stone at the same time.

Once the Colour Grow was dry I followed with the application of five coats of Tile Doctor Seal and Go which is a compatible water-based acrylic sealer which provides both a stain resistant surface seal and a durable low-sheen finish.

Sandstone Kitchen Floor Tile After Cleaning Quarry Bank Mill Cottage

The floor now looks much healthier and the new sealer show keep it looking that way for some years to come.


Source: Sandstone Tile Cleaning and Sealing Service in East Cheshire

Friday, October 6, 2017

Maintaining a Victorian Tiled Hallway Floor in Cheshire

The village of Grappenhall has a long history that goes all the way back to the bronze age and as a result has all periods of architecture including quite a lot of houses with Victorian tiled hallways . This particular floor at a house in the village had been well looked after well by the owner but had now lost its vibrancy, was looking dull and now needed a deep clean and reseal

Victorian tiles are porous and so need to be sealed to protect them from dirt becoming ingrained in the floor. However, hallway floors get a lot of foot traffic which over time wears down the sealer until it becomes so thin and patchy it’s no longer effective. As a result, you need to regularly top up the sealer or every three to four years it will need to be stripped off and reapplied.

Victorian Tiled Hallway Grapenhall Before Cleaning Victorian Tiled Hallway Grapenhall Before Cleaning


Deep Cleaning the Victorian Tiled Floor

I used clear plastic to protect the wood skirting boards from splashing and then gave the tiles a good scrub with a mixture of Tile Doctor Pro-Clean and Remove and Go to deep clean and strip off any remaining sealers. The cleaning solution was left to soak in for ten minutes before scrubbing it in with a black pad fitted to a heavy buffing machine.

Once the whole area had been scrubbed I rinsed off with water which was then extracted using a wet vacuum. With the floor now clear I was able to inspect it to ensure all the previous sealer and ingrained dirt had been removed. Any areas with stubborn stains were spot treated by reapplying the cleaning concoction I used earlier before leaving the floor to dry off fully overnight.

Sealing the Victorian Tiled Floor

When I returned the next morning my first job was to test the tiles for damp using a damp meter. This is important as damp tiles won’t take the sealer as well as dry tiles, however this time everything was fine. I then proceeded to seal the Victorian tiles with a single coat of Tile Doctor Colour Grow to enhance the natural colours in the tile before applying a further seven coats of Tile Doctor Seal and Go which leaves a sheen finish and is ideal for Victorian tiles.

Victorian Tiled Hallway Grapenhall After Cleaning Victorian Tiled Hallway Grapenhall After Cleaning

The hallway now looks fantastic and vibrant and then new sealer will protect them from ingrained dirt making them easier to clean and keep them looking good for some time to come.


Source: Victorian Tile Cleaning and Renovation Service in Cheshire

Saturday, June 17, 2017

Victorian Tiled Hallway Transformation in Cheshire

This fantastic chequered black and white Victorian Tiled Hallway was located at a house in the village of Prestbury north of Macclesfield in Cheshire. According to Wikipedia Presbury is part of the "Cheshire Golden Triangle" villages which include Wilmslow and Alderley Edge which are the most sought after and expensive places to live outside of London. It was a lovely building however a new stair case had been fitted which didn’t quite match the foot print of the original staircase leaving a gap in the hallway tiling. The owner of the property wanted matching tiles fitted and also to give the floor and good clean and seal so they would blend in.

Chequered Victorian Floor Prestbury Before Repair and Clean

Cleaning a Victorian Tiled Floor

To clean the floor and strip off any remaining sealer I first created a strong dilution of Tile Doctor Pro-Clean cleaning solution which is a versatile alkaline cleaner that’s designed for use on tile, stone and grout. reliably eradicates dirt on a wide variety of natural stone floors. The solution was applied liberally across the floor, and left to dwell for about ten minutes to allow time for it to soak into the Victorian tiles. It was then scrubbed into the tiles using a scrubbing pad fitted to a rotary cleaning machine. The resulting cleaning slurry was rinsed off with water and then extracted from the floor using a wet vacuum. I repeated this process until I was confident the tiles were clean and free of old sealer. The next step was to treat the floor to an acid wash using Acid Gel, this is especially important on old floors where there is no damp proof course to prevent damp rising through the tile leaving salt deposits on the surface. This problem is known as efflorescence and is neutralised by the acid. The gel was then removed and the floor given another rinse using the wet vacuum to get the floor as dry as possible. The last task of the day was to fix replacement tiles in the gap left by the original staircase. Fortunately, Tile Doctor keep a range of replacement tiles so I was able to source some that matched without too much problem. After grouting the hallway was left to dry off fully overnight so it could be ready for sealing the next day.

Chequered Victorian Floor Prestbury After Repair and Clean

Sealing a Victorian Tiled Floor

The next morning, I returned to the property and ran some damp tests. This is incredibly important to do before sealing any tiled floor because any excess moisture can cloud the sealer and prevent it from doing its job properly. Once satisfied that the floor was dry, I applied a single coat of Tile Doctor Colour Grow which is a breathable impregnating sealer that enhances colour and protects from within. I dusted off any excess sealer and then followed up with the application of four coats of Tile Doctor Seal and Go which provides both a robust surface seal and a long-lasting low sheen finish. I waited two hours for the sealer to dry and then the rotary machine fitted with a white buffing pad over the floor to makes sure everything was nice and tight.

Chequered Victorian Floor Prestbury After Repair and Clean Chequered Victorian Floor Prestbury After Repair and Clean


Source: Victorian Tile Cleaning and Restoration in Prestbury, Cheshire