Wednesday, August 23, 2023

How to Install Bamboo Click Flooring

 The beauty and efficiency ofbamboo click flooringmay depend on the installation process on some levels. At the onset of the development of bamboo floors, staples and glues were used to keep the floor in place. However, because of the evolution of technology, it is now very easy to install bamboo click flooring like a pro. Your flooring receives a professional touch without the professional price. All you have to consider is the space for the expansion in the bamboo planks.

As observed and attested by those who have already triedbamboo click flooring, installing them is quite easy and the following steps can help you further.

Step one

The area of the house where you would like to install yourbamboo click flooringshould be free from dust and debris. It should be meticulously cleaned with a broom or a vacuum cleaner. You should also remove nails, screws, pins, and other materials that might have stuck in the corners or side edges of the room. If there are noticeable gaps on the floor, it is necessary to fill these gaps with leveling compounds to even out the surface.

Step two

There should be a moisture barrier on the concrete sub-floors. This structure is needed to thwart the water from leaking and damaging the bamboo. It is advisable to have at least a six-millimeter layer of plastic. On the other hand, it is no longer necessary to use this layer of plastic if you have wooden sub-floors.

Step three

Check the moisture barrier. It should be evened out. After checking, spread a sheet of foam padding if you have a concrete sub-floor.

Step four

It is always good to start at the corner of your room. When you place thebamboo click flooring, make sure to use tile spacers so that they are placed close to the wall. After the measurement, place the first cut of bamboo flooring in the angle. A point that you should remember with bamboo flooring is that it expands more than the standard laminate so the gap between the bamboo tiles should be a little bit bigger.

Step five

Take the second piece of bamboo flooring and place its smaller end next to the head of the first piece. Glide the second piece carefully into the furrow on the next board. As you vigilantly place it, wait until you hear it click into place. Again, be reminded to make use of spacers to keep enough distance from the wall.

Step six

Cut your third tile using the table saw. This will help you create a staggered but beautiful natural look on yourbamboo click flooring. If you are done cutting, place the cut end of the tile in front of the wall. It should be lengthwise next to the first board. Then place the tongue into the furrow and gently lower it until it fits into place. Use a mallet or hammer to fasten the tile in place.

Step seven

Place the fourth tile beside the second board. Gently lower it in place as you slot the tongue into the furrow on the second board. Slip it along the groove until it runs a bit against the third board. The fourth tile should slip into the head of the third board. Then pat it in place using a mallet.

Step eight

Repeat the same process interchanging tiles from one row to the other until you arrive at the next wall. Cut the boards and shape them if needed. Do the tiling row by row until you reach the last part of the room. Always be mindful of the spaces between the tiles for expansion.


Source: www.DoItYourself.com

Thursday, August 17, 2023

How To Install Laminate Flooring On Stairs

Installing new laminate flooring on stairs is a good idea when covering stairs making them easier to maintain and keep clean than stairs covered in carpet. You should be warned though that laminating steps can make them more dangerous as they can be quite slippery (especially when wet) if you choose laminates of lower grade rating meant for lesser traffic areas.

There are a few ways to get around the slip and fall hazards by using a higher and more abrasive grade, another being the installation of an additional anti-slip device onto the threads. This being said, your laminate stair threads will hold up well and will not need to be replaced as frequently as carpet stairs.

What You'll Need:

  • Laminate
  • Construction adhesive
  • Measuring tape
  • Pencil
  • Square
  • Electric circular saw


Step 1 - Prepare the Stairs

If the stairs you want to refinish are carpeted, remove all of the carpet and the adhesive below. Clean the stairs completely to make sure your new laminate flooring will adhere well to the surface. Smooth out the surface of the stairs and pound down any nails that stick up.


Step 2 - Set the First Tile

Measure the top thread to determine its exact center and mark that point with a pencil. Put the first laminate tile over the mark, making sure that the center of the tile is exactly over the mark.


Step 3 - Work Your Way Outward

Installing laminate flooring on stairs will require much more stability than provided by a floating floor system, so don't use underlayment. On such installations, you should instead always glue the laminates down to the treads and risers with a good grade construction adhesive.

Moving your way from the center to the left and then the center to the right, cover the entire thread. Move to the riser face and continue the same process.

When you have completed the first thread and riser, move down to the next step and repeat the process. Continue all the way down the stairs until they are all covered.

Maintaining Your Stairs

Keep your new laminate stairs free from debris that can scuff or scratch the tiles when the stairs are in use. Stairs outside of a home should never be covered with laminate as this would leave them extremely slippery when getting wet from snow or from rain, and they should always be covered instead with a much more abrasive and safe alternative.

Laminate flooring has become one of the most popular choices in flooring because of its durability, ease of installation, and low price. It is a great way for homeowners to bring the look of hardwood into their home without the added expense and maintenance concerns.

Laminate floor tiles, such as the ones that are used on stairs, are resistant to many problems, but they still must be kept clean and free of loose debris. Keep the floors from becoming excessively wet to prevent water and moisture damage.

Sunday, August 13, 2023

How to Remove Excess Grout from Brick Slip Bathroom Flooring in Saxilby Lincoln

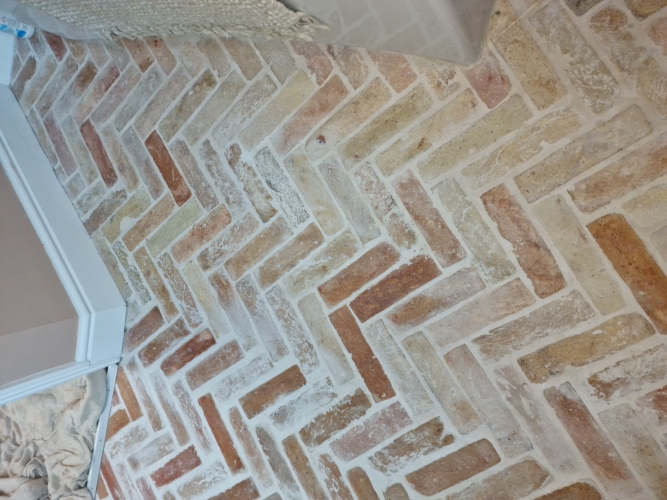
I was asked if I could improve the look of this new bathroom floor that had been laid with brick slips in a herringbone pattern at a property in Saxilby near Lincoln. The builder had done a solid job of laying the bricks but had been overzealous on the grouting and was unable to remove all of it resulting in a whitening of the red bricks due to grout haze. Unhappy with the appearance of their new bathroom floor and with little chance of resolution with the builder they contacted Tile Doctor to see what could be done to improve their appearance.
 
Brick Slip Tiled Bathroom Floor Before Cleaning Saxilby

Brick Slip tiles are basically a very thin brick which allows it to be laid like a tile, normally they are cut from an actual clay brick although there are other types. Thin like a tile and light weight they can be used to quickly create authentic looking brick walls and floors.

I visited the property to understand the problems and whilst I was there, I carried out a test clean to show the client what could be achieved. They were happy with what I showed them and booked me in to have the work done.
 
Brick Slip Tiled Bathroom Floor Before Cleaning Saxilby Brick Slip Tiled Bathroom Floor Before Cleaning Saxilby


Removing Grout Haze from Brick Slip Flooring

To remove the grout haze, I started off with an application of Grout Clean-up which contains phosphoric acid and is designed exactly for this purpose. It was a small space to work in so the product was scrubbed into the tile by hand until I got them as clean as possible. This was followed by a quick rinse and extraction with a wet vacuum.

I then inspected the floor and could see more work was required so this time I laid down Acid Gel which is a blend of Phosphoric and Hydrochloric acids and left it to dwell for ten minutes. After another scrub I was pleased to see I had managed to remove all the grout haze and the red brick was really starting to come through. I then gave the floor a thorough rinse with water and then removed the soiling and as much moisture as possible with the wet vacuum. I left the floor to dry off whilst I went to lunch leaving an air mover in place to assist with the drying.


Sealing Brick Slip Flooring

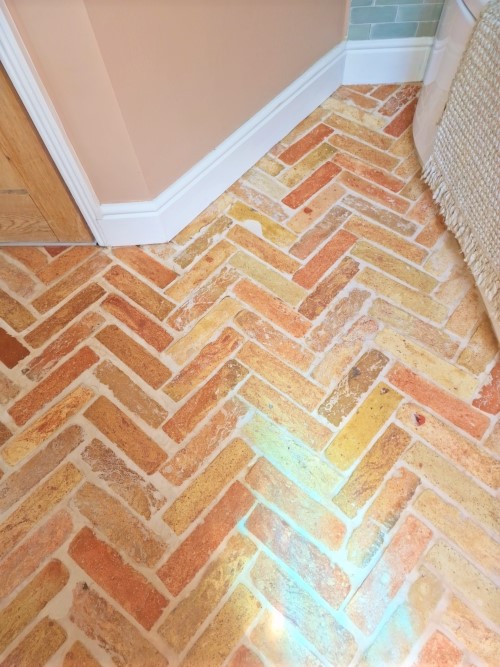
Once it had dried the floor was then sealed using Tile Doctor Colour Grow which is a colour enhancing product that as the name suggests improves colour in the tile, it’s also an impregnator which works by occupying the pores in the brick protecting it from within.
 
Brick Slip Tiled Bathroom Floor After Cleaning Saxilby Brick Slip Tiled Bathroom Floor After Cleaning Saxilby

The client was over the moon and said that is how they wanted it to look originally. For cleaning I made the client aware of the problem of using harsh cleaning products on sealed tiles and advised them to use Neutral Tile Cleaner which is a mild but effective cleaner that won’t erode the sealer with regular use.

Monday, July 10, 2023

How to Glue Engineered Hardwood Floors

Gluing engineered hardwood floors is not a difficult job. If you take your time and have everything ready, you should be able to lay a room in a day. Don't skimp on adhesive, buy a good hardwood floor glue.

Remove the Baseboards

Remove your baseboards as they will not usually be the right height to slide the new floor. Make a chalk line on the floor 31 inches from, and parallel to the longest wall (across the floor beams). Pre-sort the boards according to color according to your likes. You may need to trim the door casing if it will not swing easily over the new floorboards.

If you are installing your engineered floor over tiles, use a grinder or sander to smooth down the surface of the tiles and allow the glue to adhere to them. Sweep or mop up any dirt before filling in any holes or gaps. Vacuum any dust. If you are starting with a linoleum floor, remove the linoleum first.

Nail Down a Straight Edge

Take a straight-edged piece of plywood and nail it into place along the chalk line, on the inside of the line.

Spread the Glue

Trowel glue on a 20-inch strip according to the directions on the adhesive can, using the trowel. Don't spread more glue than you can cover within the open time of the glue or there will be a poor bond. It is better to do smaller areas at a time. If you get glue on your fingers, clean them immediately with solvent or you could get stuck to the wood. It will not come off easily when it has dried.

Glue Down the Boards

Kneeling in the 31-inch area, line up the tongues of the boards against the straight edge. Working from left to right, press the board into the glue. Before you use each piece, discard any ones that are warped or you are not happy with. If necessary, tap the boards into place with a rubber mallet. Make sure you only glue the bottom of the boards, the boards will not fit tightly if the grooves are filled with glue. Don't line up two end splices at the same place, they should be 6 inches apart. Cut the pieces at the end using the miter saw.

Fill the Original Gap

When you have finished the main section, remove the original straight edge and install the flooring to fill the gap. You will now be fitting groove into your tongue instead of the other way round as you work in the opposite direction.

Roll the Floor

There should be a rolling weight value on the adhesive can. It will probably be around 100 pounds. Don't let the glue get too dry before you roll. Rolling seats the wood firmly into the glue and squeezes out blobs; this is difficult if the glue has dried.

Cover the rollers with tape or foam sheets to avoid damaging the floor.


Source: www.DoItYourself.com

Tuesday, July 4, 2023

A Guide to Bamboo Flooring Hardness

The subject of bamboo flooring hardness is commonly debated in the market. Some people say that bamboo is extremely hard and durable. Others argue that it is easy to dent and is not very hard. Here are a few things to consider about the hardness of bamboo flooring.

Janka Scale

When looking at the hardness of bamboo or hardwood flooring, the industry uses a tool called the Janka scale. This is a scale that is used to compare the hardness of wood flooring against each other. In order to perform this test, they drop a steel ball bearing on the floor from a particular height. Depending on how it reacts to having a ball dropped on it, it will achieve a score on the scale. The higher the score, the harder the wood is.

Carbonized Bamboo

One type of bamboo that many people consider is carbonized bamboo. Carbonizing bamboo is a process that is used to change the color of the bamboo. If you see a dark, caramel color bamboo, generally it was made this way by carbonization. When a bamboo goes through this process, it is going to make it softer. This is the softest type of bamboo that you can purchase. On the Janka scale, it has a score of 1180. This is softer than red oak, as it has a score of 1290. This means that it is the most susceptible to dents and scratches of all of the different kinds of bamboo on the market.

Natural Bamboo

Another type of bamboo is natural bamboo. This is a very common type of bamboo that you frequently see in the market. You will be able to tell that it is natural bamboo by the yellowish, gold color in the floor. Natural bamboo is a little bit harder than carbonized bamboo. On the Janka scale it has a value of 1380.

Strand Woven Bamboo

The hardest and most durable form of bamboo flooring is called strand woven bamboo. This type of bamboo flooring is made differently than traditional bamboo flooring. In order to construct this, they use small slivers of bamboo fibers. They take the pieces of bamboo and mix it together with a strong adhesive and resin. They take this mixture and press it together very tightly. It is constructed under extreme heat as well. Once the mixture is pressed together, they allow it to dry and it forms a very hard board. On the Janka scale, it can achieve values as much as 3000. This is comparable to some of the hardest hardwoods in the world.

Compared to Hardwood

Although people use the Janka scale to compare hardness, there are other factors that you need to consider as well. Pieces of bamboo are held together with adhesive. If something sharp drops on the surface of the bamboo, it will be much more likely to scratch or dent when compared to a hardwood with an equal Janka scale rating.

Source: www.DoItYourself.com

Thursday, June 22, 2023

How to Lay Tile Properly

In order to lay tile properly, there are a number of steps that have to be followed. Laying tile is something that most people can do if they have the proper knowledge. Here are the basics of how to lay tile properly.

What You'll Need:

  • Tile
  • Adhesive
  • Trowel
  • Wet saw
  • Tile spacers
  • Grout
  • Grout float
  • Bucket
  • Tape measure
  • Chalk line
  • Concrete board
  • Hammer
  • Nails

 Measure

Start out by measuring the room in which you are going to install the tile. You need to get the dimensions of the room. Multiply the length and the width to get the square footage of the room. You will then need to add 10 percent to that number to allow for waste.

Prepare the Room

You will need to move everything out of the room and take up any old floor. You need to get down to the subfloor. If you have a concrete subfloor, you can lay the tile directly onto it. If you have a wood subfloor, you are going to need to install a concrete board. Put some tile adhesive on the bottom of the concrete board and then nail it down to the floor.

Mark Center

In most cases, you are going to want to lay the tile from the center of the room out towards the wall. This is going to center the tile and make it look more professional. In order to do this, you need to measure the center point of both walls and snap a chalk line in both directions. Where the lines cross is where you should start laying your tile.

Spread Adhesive

You will now want to spread out some of the adhesives onto the ground. Using your trowel, place some tile adhesive on the ground and spread it out evenly. Make sure that there are no uneven spots in the adhesive.

Place the Tile

Take your first tile and press it down into the adhesive firmly. Make sure that there are no gaps in the adhesive underneath and that it is solidly down in the adhesive. Put a tile spacer on each corner of the first tile.

Continue Laying

Take your next tile and press it directly up against the tile spacers from the first tile. Make sure that the second tile is pressed firmly down into the tile adhesive. Place tile spacers around the second tile as well. Continue putting tiles up against the previous tile and using the spacers for alignment.

Cutting the Tiles

When you get to a wall or the cabinet, you are going to need to make a cut. In order to do this, measure the appropriate size that you need and then place the tile in your wet saw to make the cut.

Dry

After the entire floor has been laid, you are going to want to allow the adhesive to dry overnight.

Grout

You will then need to remove the tile spacers and start grouting. Use your grout float to apply the grout to the grout joints. When you are done, use a sponge and water to clean the tops of the tiles. This will remove any extra grout and smooth everything out. Let the grout dry overnight before anyone walks on it.


Source: www.DoItYourself.com

Sunday, May 21, 2023

Putting the Shine Back on Encaustic Floor Tiles in Hemswell Cliff Lincolnshire

The photographs below are of an Encaustic Tiled Floor which had been installed some years prior in the kitchen of at a property in the village of Hemswell Cliff which is between Gainsborough and Market Rasen.

I paid a visit to the property initially to survey the floor and discuss the problem with the client. The main issue was the tiles had become dull and she couldn't keep them clean. I explained that Encaustic tiles are porous and need to be kept sealed to prevent the dirt from becoming ingrained in its pores; over the years since installation the sealer had simply worn down and now dirt was getting into the pores of the tile and once that happens it can be difficult to get it out. 

To prove my point, I carried out a demonstration on how I would clean them and explained the different sealer options available and how each sealer can have a different effect. She was pleased with the demonstration and was happy to accept my quote to deep clean the whole floor and then re-seal it.

Deep Cleaning Encaustic Kitchen Floor Tiles

I set about scrubbing the floor using a hot water dilution of Tile Doctor Pro-Clean Tile and Grout cleaner combined 50:50 with NanoTech HBU Remover which adds tiny abrasive particles to the solution to make a more effective cleaning product. The solution was worked into the tiles by scrubbing with a rotary machine fitted with a Black scrubbing pad.

The pads struggle to reach into the recesses between the tiles so to get the grout clean I scrubbed them by hand using a stiff brush. Once done the soiled solution was removed using a wet vacuum and floor inspected to ensure it was as clean as possible. Any stubborn areas were spot treated by hand and then the whole area thoroughly rinsed down with clean water to remove any trace of cleaning product.

Finally, the wet vacuum was used to dry the floor as much as possible with assistance from a Turbo Air blower to help reduce the drying time.


Sealing Encaustic Floor Tiles

It wasn’t a particularly large floor and a warm day so I was able to complete the cleaning process by lunch time and after a few hours later with the assistance of the air blower the floor was dry and ready to be sealed.

Having discussed sealer choice with the client earlier a decision had been made to seal the encaustic tiles with Tile Doctor Seal and Go which adds a nice subtle sheen to the tile. Five coats of Tile Doctor Seal and Go were needed before the tiles were fully sealed, it’s a water based protective sealer so it doesn’t give off any odour whilst it dries and it provided the finish the customer was looking for.

Once completed the colours in the tiles were really vivid and resulted in one happy customer with a clean easy to maintain floor. On the subject of cleaning, I recommended the use of Tile Doctor Neutral Tile Cleaner which is a mild but effective tile cleaner. The problem with many of the tile cleaning products you find in supermarkets is they contain bleach which is simply too strong for use on a sealed tile as it will strip off the sealer.