Showing posts with label Tiles. Show all posts

Wednesday, March 14, 2018

Cottage Floor Renovation at National Trust property in Cheshire

Quarry Bank Mill is an old textile mill just outside of Wilmslow in East Cheshire that dates back to the Industrial Revolution when it was used to produce cotton. The mill is now under the care of the National Trust who recently put together a £9.4 million project, supported by the Heritage Lottery Fund the further restoration of the mill and its gardens.

The 18th century mill is now a popular attraction and I was recently asked to clean and seal the Sandstone flooring in the Kitchen of the head gardeners cottage. The cottage is actually located in the formal gardens which were recently visited by HRH Price of Wales.
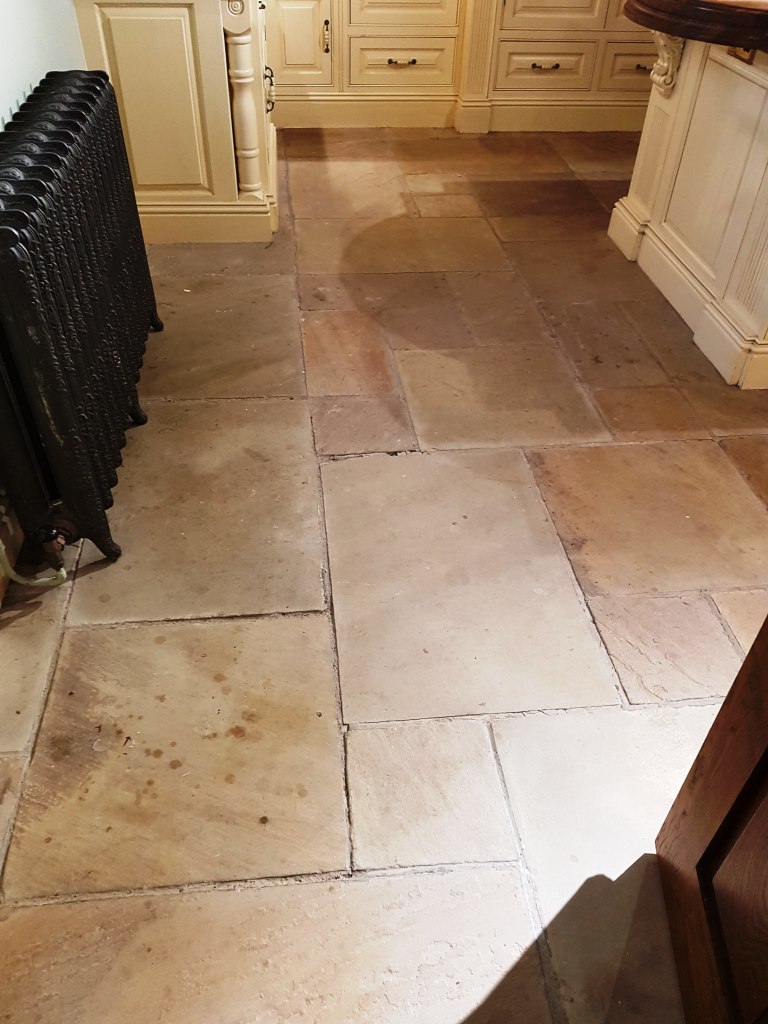
Sandstone Kitchen Floor Tile Before Cleaning Quarry Bank Mill Cottage

The Sandstone Kitchen floor was in good physical condition so unlikely to be the original however like any stone floor in constant use the sealer was wearing off and dirt was becoming ingrained in the pores of the stone detracting from its overall appearance.

Sandstone Kitchen Floor Tile Before Cleaning Quarry Bank Mill Cottage


Cleaning Dirty and Dull Sandstone Flagstones

Our first job was to protect the wooden kitchen units and other woodwork with tape. Next I set about cleaning the Sandstone and stripping any reaming sealer off in the process. To do this I applied a strong dilution of Tile Doctor Remove and Go, which is multi-purpose stripper and cleaner. The product strips away any old sealer on the tiles and draws out ingrained dirt, stains and heavy grease build-up.

I applied the product and left it to soak for roughly fifteen to twenty minutes to allow time to break down the old sealer and penetrate the pores of the stone to reach any embedded dirt. Next, I scrubbed the floor using a specialised buffing machine fitted with a black scrubbing pad swelled with water to get the stone clean. The resulting dirty cleaning slurry was quickly soaked up using a wet vacuum and after rinsing with water With the floor clear I was able to spot stubborn areas that need more work and repeated the process.

With the stone clean I turned my attention to the grout lines and scrubbed in a strong dilution of Tile Doctor Pro-Clean which was then rinsed off with water. I then completed another spot check of the floor whilst using the wet vacuum to get the floor as dry as possible. With the cleaning part of the job complete I left for the day to allowing the floor to dry off fully overnight.

Sandstone Kitchen Floor Tile After Cleaning Quarry Bank Mill Cottage


Sealing Sandstone Kitchen Tiles

Upon returning to the property the following day, I tested the floor with a damp meter, checking for any excess moisture that could prevent me from sealing the stone. The floor proved dry and so I began to seal the Sandstone starting with a single coats of Tile Doctor Colour Grow. Colour Grow is an impregnating sealer that is designed to fill the pores of the stone blocking dirt from becoming ingrained there whilst enhancing the natural colours in the stone at the same time.

Once the Colour Grow was dry I followed with the application of five coats of Tile Doctor Seal and Go which is a compatible water-based acrylic sealer which provides both a stain resistant surface seal and a durable low-sheen finish.
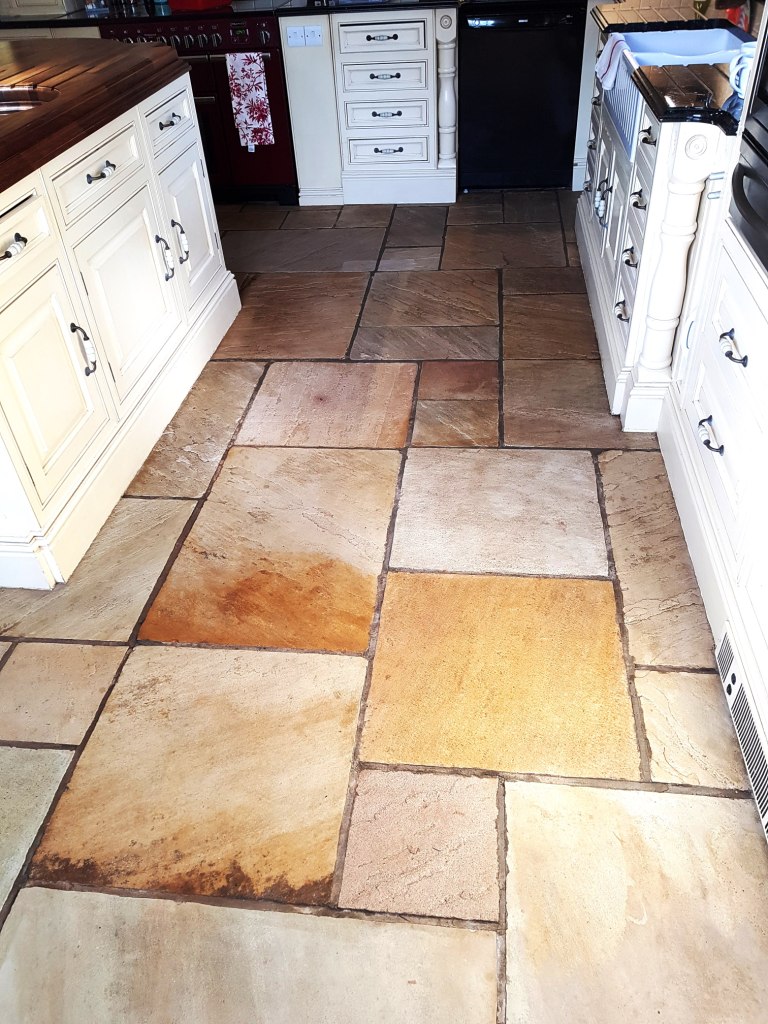
Sandstone Kitchen Floor Tile After Cleaning Quarry Bank Mill Cottage

The floor now looks much healthier and the new sealer show keep it looking that way for some years to come.


Source: Sandstone Tile Cleaning and Sealing Service in East Cheshire
Thursday, September 14, 2017

Restoring Stained Victorian Hallway Tiles in Lancashire

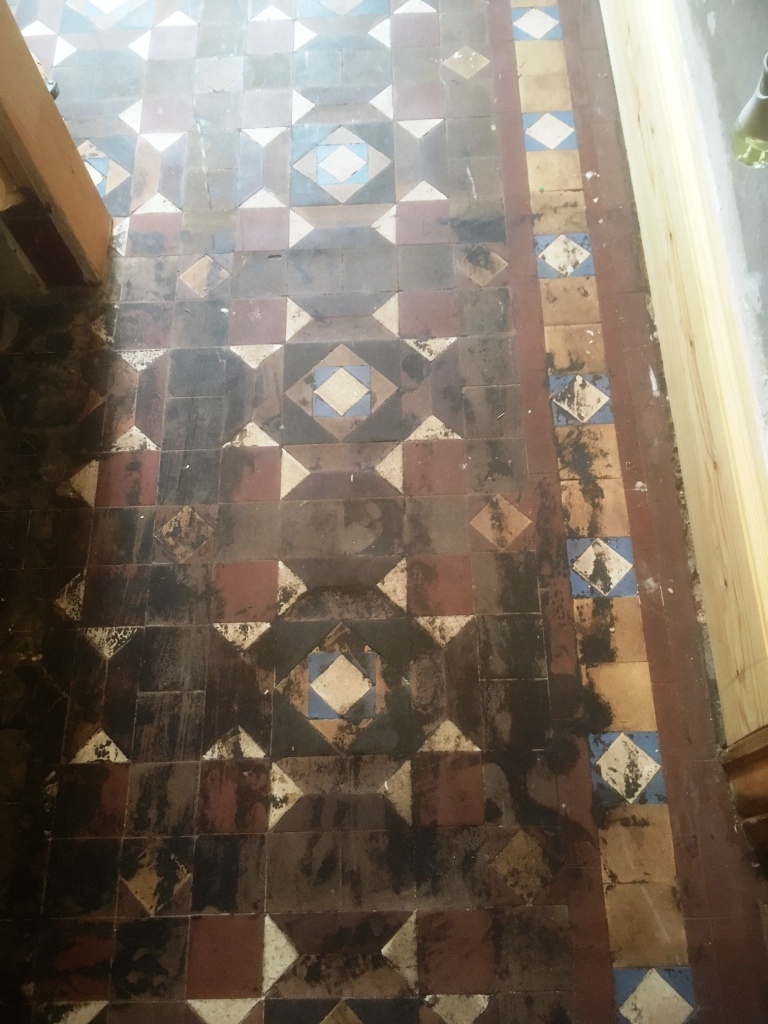
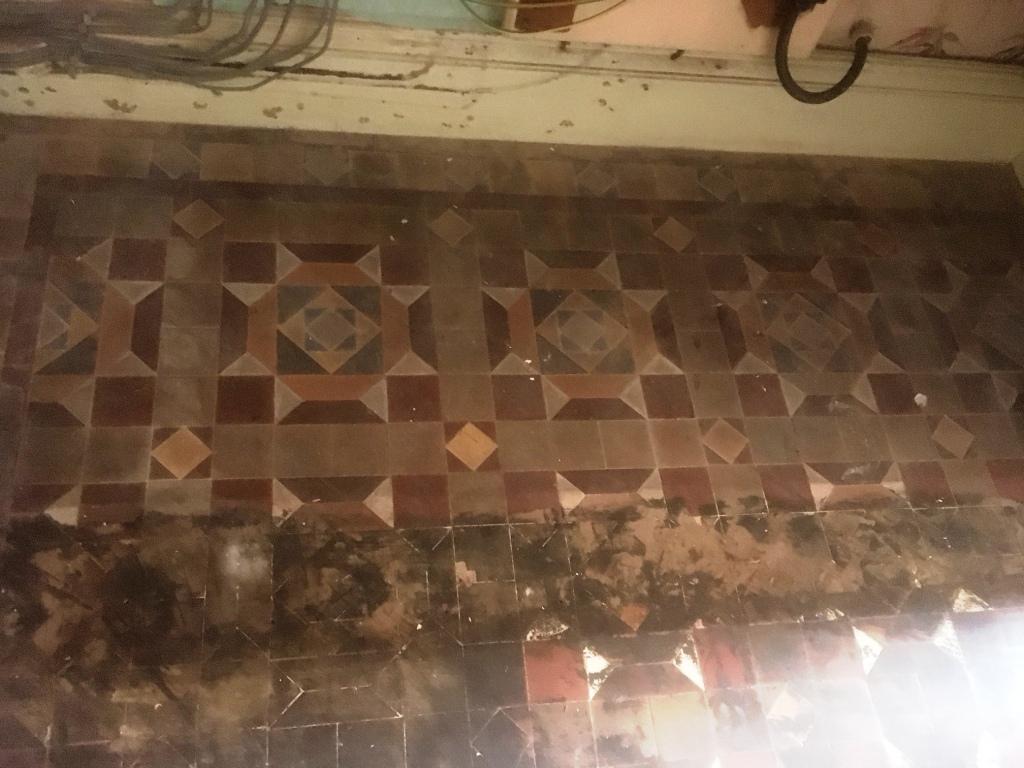
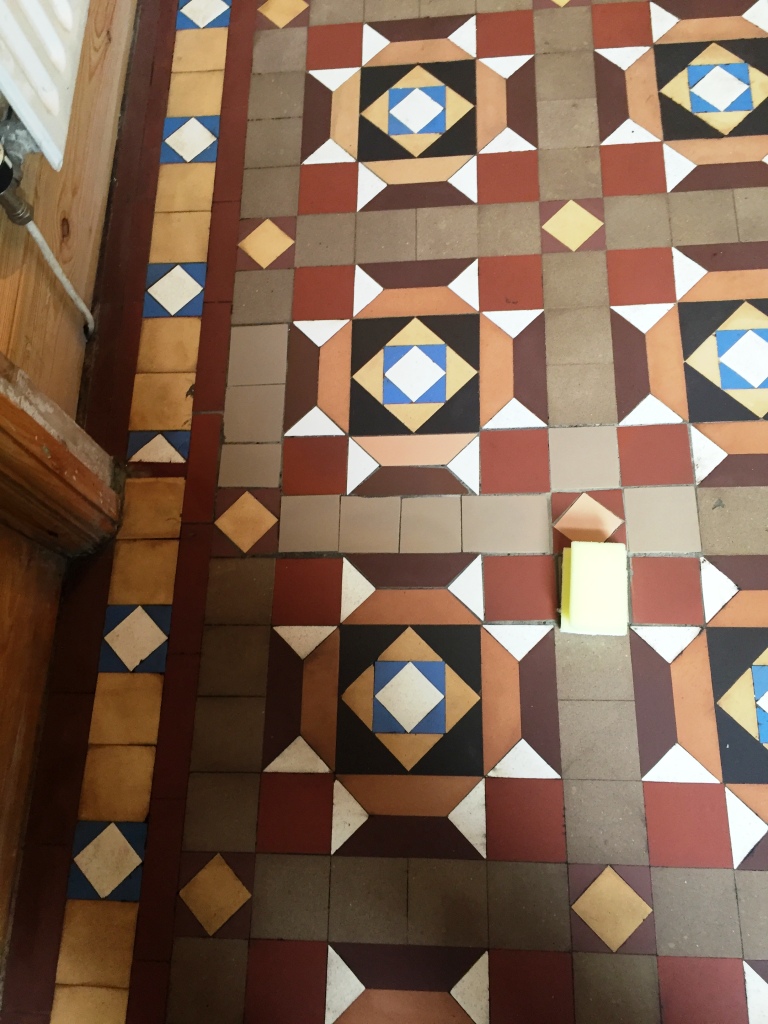
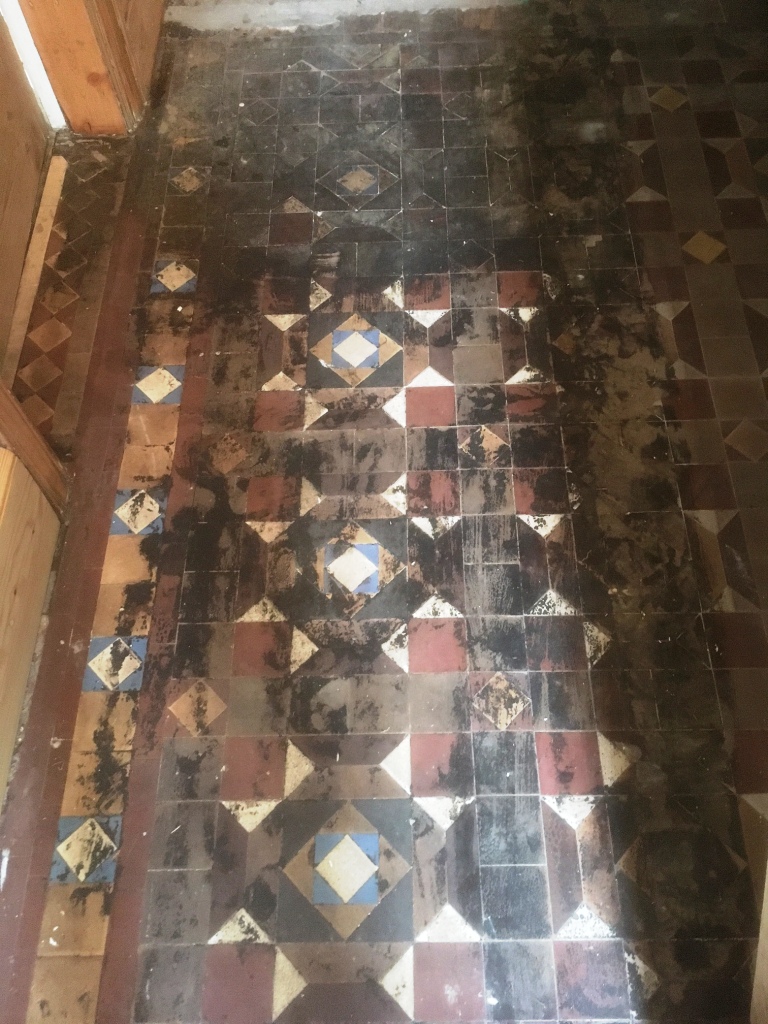
This old Victorian tiled Hallway floor, laid in a geometric pattern, at a house in Barrow in Furness was a challenging project. The tiles were extremely dirty and also stained with Black Bitumen which has been used as an adhesive, however we have come across these sorts of problems before and so I was confident it could be resolved.

Geometric floor before Restoration Barrow in Furness Geometric floor before Restoration Barrow in Furness

Deep Cleaning an Old Victorian Tiled Floor

I roped in Heidi and my son Lewis who spent a whole day cleaning with chemicals, steam, buffing pads and unfortunately the results were far from satisfactory; the customer wasn't happy and Heidi wasn't happy with it either. It was clear that the black bitumen had penetrated deep into the pores of the clay and becoming so embedded that no chemical or technique we were using would shift it fully.

Geometric floor before Restoration Barrow in Furness

To top it off I had gone out earlier to tile the old mat well with matching tiles before we started the cleaning but due to the depth of the floor matt. The matt well was at least 35mm so it was clear I couldn't use standard floor adhesive. I opted instead for a sand cement mix, similar to what the Victorians would have used originally. This filled up the depth and allowed me to tile and grout the same day, however overnight there was a bit of shrinkage and some of the new tiles settled unevenly.

Geometric floor before Milling Barrow in Furness

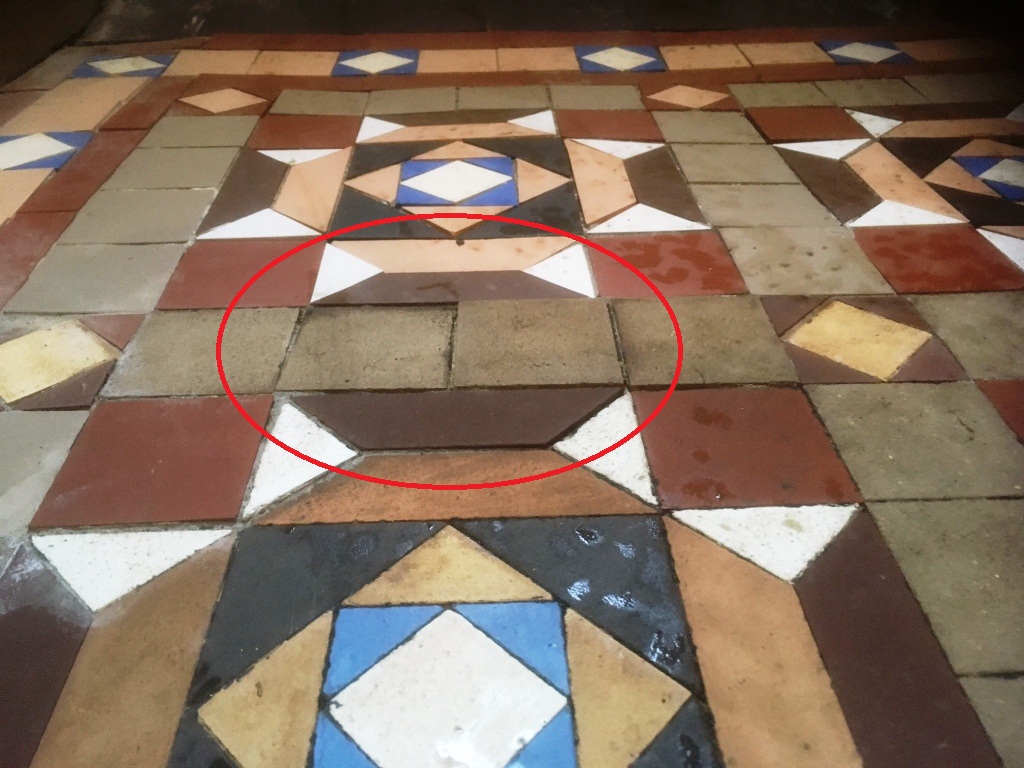
I racked my head for a solution to both issues and decided the best course of action would be to Mill the clay tiles to remove the Bitumen and smooth down the uneven effect of my tiling. This is not something we would normally do on a clay tile as this system can leave scratches which potentially would look worse that the dirt. After I had milled the Tiles down with a course pad fitted to a heavy buffing machine and removed all the issues I then counteracted any scratches left over using a higher grit milling pad. This solution fully resolved both issues leaving it ready for the final step of sealing.

Geometric floor After Milling Barrow in Furness

Sealing an Original Victorian Tiled Floor

The floor was left to dry off overnight and we returned the next day to seal the tiles using Tile Doctor Colour Grow, which is a matt finish, fully breathable and colour enhancing sealer which really lifts the colour of the stone or in this case clay tile. Colour Grow is impregnating – meaning that it penetrates the pores of the stone to fill them and prevent trapped dirt and stains. We recommend Colour Grow for both internal and external applications and especially for areas where no damp proof membrane is evident, since the sealer allows for the floor to breathe moisture.

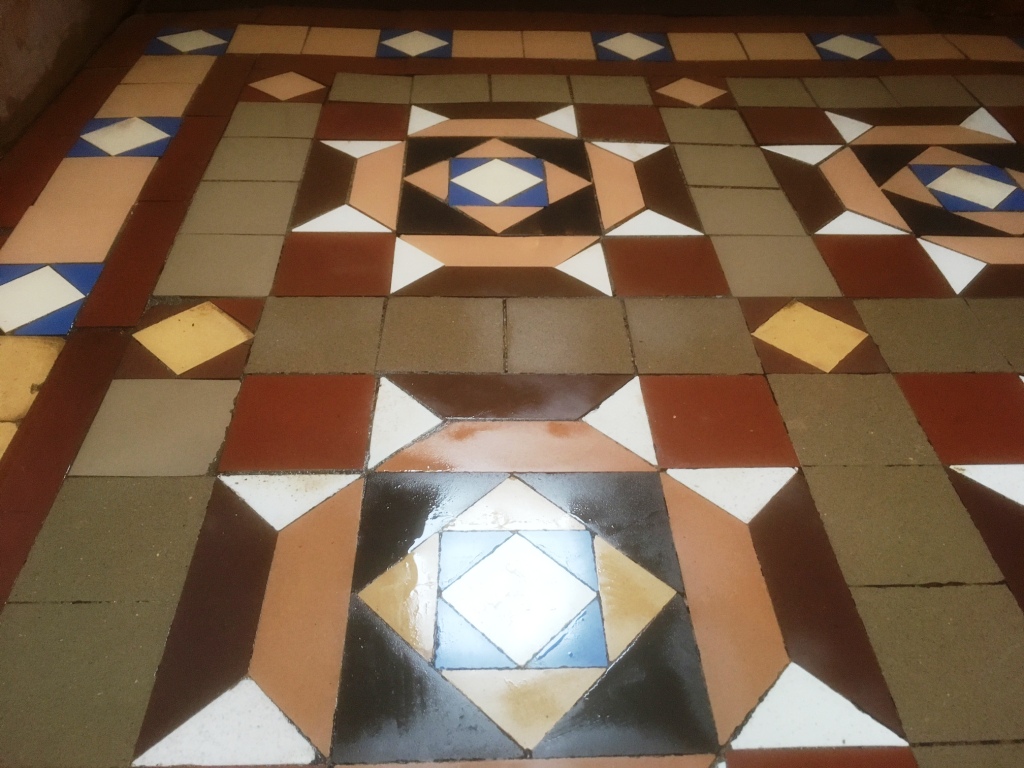
Geometric floor After Restoration Barrow in Furness Geometric floor After Restoration Barrow in Furness

There were plenty of problems to overcome and It took a lot of work but I’m pleased to say the floor was transformed by our efforts and now looks fantastic and I’m sure has added a lot of value to this period property.


Source: Victorian Floor Tile Cleaning and Renovation Service in Lancashire

Wednesday, August 9, 2017

Sealing Porcelain Tiles in Surrey

Photographs below from a lovely house in Windlesham where I was asked to do something about the Porcelain floor tiles which had become extremely dirty and were proving impossible to clean. Infact my customer was pulling her hair out about how to fix this issue of deeply ingrained muck and was on the verge of pulling the whole lot up.

Porcelain Tiled Floor Before Cleaning Windlesham

Porcelain Tile Cleaning

Normally Porcelain tiles are fairly easy to maintain and it’s just a question of keeping the grout clean however I have to confess these tiles were perplexing indeed. In fact to be honest...I tried every product in my van to get them clean, finally settling on Oxy Gel. I left it to soak on the floor for 30 minutes and then worked it in with an aggressive 200 grit pad. I’m happy to report the transformation was amazing, all the muck was released from the tile and I was able to extract it from the floor using a wet vacuum. My last step was to give the grout a good scrub using more Oxy Gel, rinse off with water and extract as much moisture as possible with the wet vacuum.

Porcelain Tile Sealing

I speed dried the floor with an air mover and once the floor was dry I applied a coating of Tile Doctor Ultra Seal. Now Porcelain tiles don't usually take a sealer however these tiles were unusual in that they were trapping dirt and it’s possible they were in fact micro-porcelain so a coat of sealer was added for good measure.

Porcelain Tiled Floor After Cleaning Windlesham

My customer was really pleased with the difference and left the following comment on the Tile Doctor feedback system:

“Here's what she said-
"Rupert was a total professional from start to finish. I was worried as to how good he would be able to make the floor - the floor consists of almost white porcelain tiles, that my tiler had failed to seal. This meant they had absorbed dirt over the last two years - even after me scrubbing the floor, they always looked dirty. The room was big - a 24 feet long kitchen/dining room. But Rupert assured me he could get it clean again - and he was as good as his word. When I saw the room for the first time, I said "I have my new kitchen back - the floor looks as good as it did the day the tiler had put the tiles down". He left everything clean and tidy after the job - I wish I had discovered your website 18 months ago ! Thank you, Rupert, brilliant work."”


Source: Porcelain Cleaning and Sealing Service in Surrey

Tuesday, August 1, 2017

Removing Coatings and Sealers from Stone

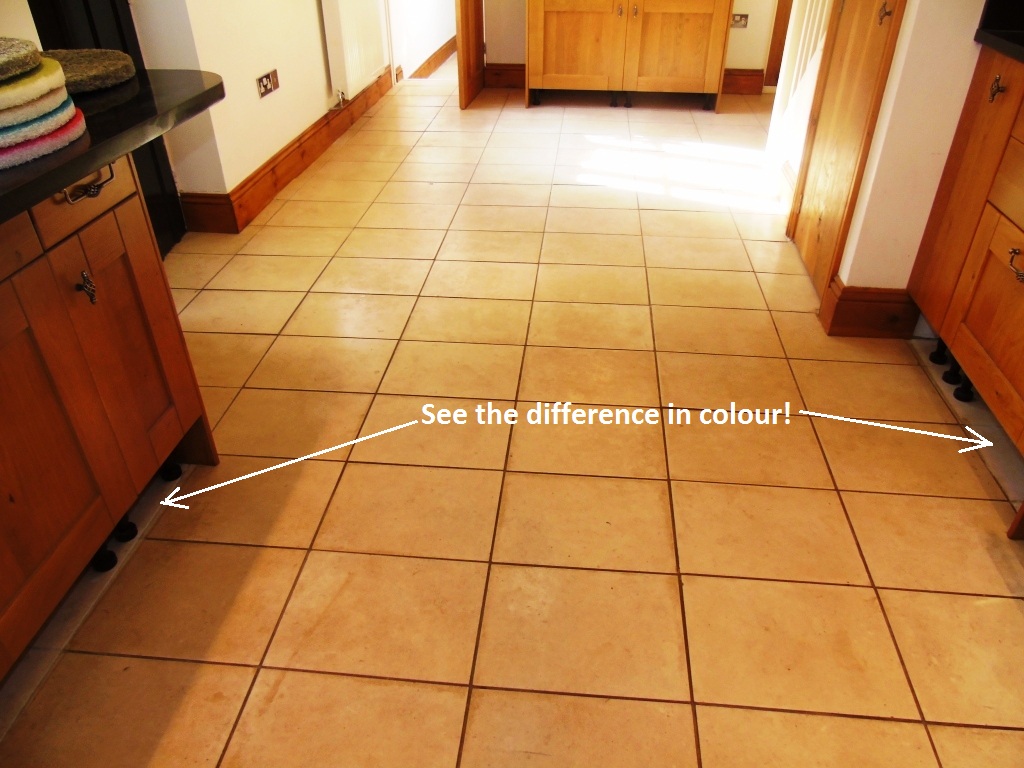
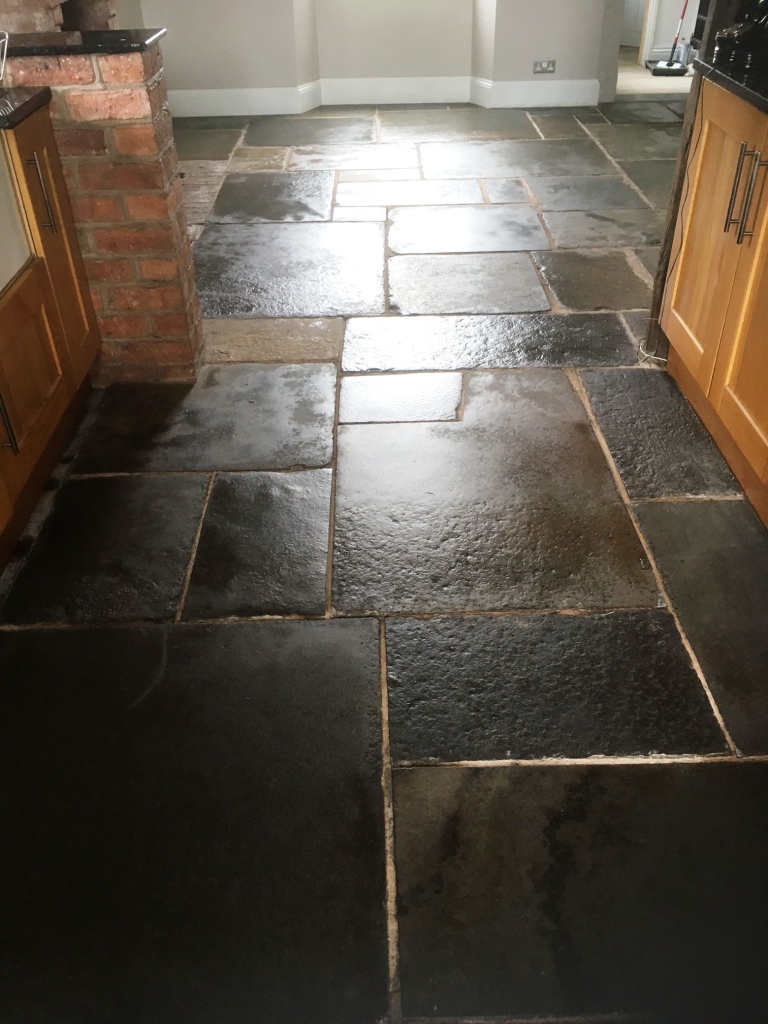
Slightly different story for you below; this time from the medieval town of Tewksbury which dates all the way back to the 8th century. A customer there had asked if there was anything that could be done to restore the appearance of their polished Limestone kitchen floor on which he had previously applied a wood sealer which had turned the tiles brown. I inspected the floor and ran a test clean on a small section of tile which successfully removed the wood seal. This gave the customer the confidence to book me into to complete the job which I estimated would take three days to strip off the old sealer, deep clean and reseal with a more appropriate product.

Limestone Tiles Sealed With Brown Wood Sealer before restoration in Tewksbury

You probably can’t appreciate how bad the tiles looked from the photograph above but if you look at the indicated area under the kitchen units where the kick boards have been removed you can really see how the brown stain in the wood sealer has darkened the look of the tile.

Removing Old Sealers from Limestone Kitchen Floor

On the first day I prepared the area by removing the kick boards from the underneath the kitchen units so they wouldn't get affected by the cleaning process and started wetting the floor with water. The water lubricates the burnishing process whereby coarse diamond encrusted pads are applied to the floor with a buffing machine. We started the process using a very coarse 100 grit milling pad to remove the wood sealer before moving onto the finer pads from 200 grit, 400 grit, 800 grit and finally 1500 grit pad building the finish of the floor as we progressed. The floor is rinsed with water between pads and the slurry is removed using a wet vacuum. This burnishing process took up all of the first day so the next day I returned to focus on the edges I had missed and the grout lines, being a relatively small format tile for Limestone there was a lot of grout to cover. I tacked the grout lines with Remove and Go which is a powerful stripper and cleaning agent which is applied along the grout line and then scrubbed in with a narrow stiff brush before being rinsed away with water. The edges were treated with a set of small six inch milling pads fitted to a hand held buffing machine in a similar process as on the first day.

Sealing a Limestone Tiled Floor

On the third and final day the floor was spray burnished which a process is involving a very fine 3,000 grit floor burnishing pad and a little water spayed onto the floor during the application. This process really tightens up the pores in the stone and restores its appearance. After making sure the floor was free of any lose grit I then proceeded to seal the Limestone with Tile Doctor Ultra Seal which is a natural look sealer that doesn’t alter the appearance of the stone but penetrates into the pores of the stone to protect it from within. I left it to dry for an hour then buffed the floor with a white buffing pad before apply a second coat. This was also left to dry for an hour before running the buffing pad over for a last time.

Limestone Tiles Sealed With Brown Wood Sealer After restoration in Tewksbury

It took a fair amount of work to get the floor looking back the way it was meant to be but I’m very pleased with the outcome and more importantly my customer was really happy.

Limestone Tiles Sealed With Brown Wood Sealer After restoration in Tewksbury


Source: Limestone Cleaning and Sealing Service in Gloucestershire

Sunday, July 16, 2017

Putting the shine back on a Slate floor in Gloucester

This Slate tiled floor in the hallway of a property in Gloucester had been laid 28 years ago, but during this time had received no proper maintenance. The property owner used to clean the tiles once a week using a steam cleaner to little effect.

Slate tiled hallway floor Before Cleaning Gloucester

In fact, we don’t normally recommend steam cleaning sealed surfaces as it will erode the sealer prematurely. After countless years of steam cleaning, I was confident that any traces of old sealer on this floor would be non-existent at this point. This is, of course, a problem because a lack of sealer exposes the stone to ingrained dirt and stains. The effects of this are shown in the photos below: as you can see, the Slate had completely lost its lustre and naturally colourful patina.

Slate tiled hallway floor Before Cleaning Gloucester

I was asked by the property owner to provide this Slate tiled hallway with the restoration that was so long overdue, so I travelled to the house in Gloucester, a city situated near the Welsh border and between the Cotswolds and the Forest of Dean.

Cleaning a Dirty Slate Tiled Hallway

I started the restoration by mixing a strong solution of Tile Doctor Remove and Go combined with Tile Doctor NanoTech HBU. These two products serve different purposes. Remove and Go is a stripper designed to break down any traces of old sealer that might still have existed, as well as any paints and adhesive markings; NanoTech HBU is a potent cleaner which contains nano-sized cleaning particles that penetrate deep into the stone to get underneath tough dirt and stains to dissolve and lift them out. This cleaning solution was spread over the floor and left to dwell for 30 minutes, before being scrubbed in using a black scrubbing pad fitted to a buffing machine. A thick black slurry resulted from this process and this needed to be removed using a wet vacuum.

Slate tiled hallway floor During Cleaning Gloucester

Next, I repeated this cleaning process using Tile Doctor Pro Clean, our reliable alkaline cleaner, to provide a more thorough clean for the tiles and grout. The slurry was once again removed using a wet vacuum, before I then rinsed the whole floor with fresh water to remove any traces of chemicals. When satisfied with outcome of the cleaning process, I left the floor to dry overnight.

Sealing a Slate Tiled Hallway

Upon arriving back at the property, the next day, I ran some quick moisture tests to check that the floor was dry. Thankfully, there were no damp issues and I was able to seal the tiles using four coats of Tile Doctor Seal and Go, leaving each coat to dry before applying the next. Seal and Go is a water based sealer (so no smell as it dries) which adds durable stain resistance and a low-sheen finish that brings out the best in the slate.

Slate tiled hallway floor After Cleaning Gloucester

The customer’s reaction to the outcome of the restoration was fantastic. She never expected the floor to turn out so beautifully and was very pleased.

Slate tiled hallway floor After Cleaning Gloucester


Source: Slate Tile Cleaning and Sealing Service in Gloucester

Tuesday, May 16, 2017

Terrazzo Tiled Hallway Polished in South Wales

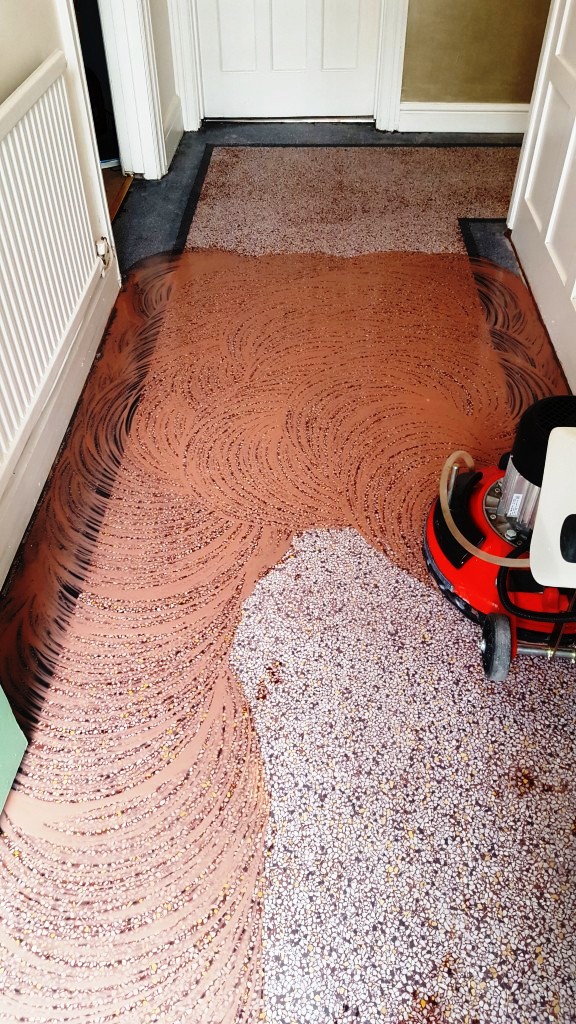
Terrazzo is a quite a bit different from the natural stone floors we most commonly work with. It's a type of flooring material that was made popular by Venetian builders in Italy in the 1920s, but is ultimately descended from styles of design that date back hundreds of years. A typical Terrazzo floor consists of chips of marble or granite set in concrete and polished to result in a smooth surface. This Terrazzo floor, installed in the hallway of a property in Bridgend, South Wales, was in Read more...

Dirty Terrazzo Floor Deep Cleaned, Burnished and Sealed in Bridgend

Terrazzo is a quite a bit different from the natural stone floors we most commonly work with. It's a type of flooring material that was made popular by Venetian builders in Italy in the 1920s, but is ultimately descended from styles of design that date back hundreds of years. A typical Terrazzo floor consists of chips of marble or granite set in concrete and polished to result in a smooth surface. This Terrazzo floor, installed in the hallway of a property in Bridgend, South Wales, was in Read more...

To read more on this topic click here

Monday, May 15, 2017

Removing Vinyl Glue From Terrazzo Tiles

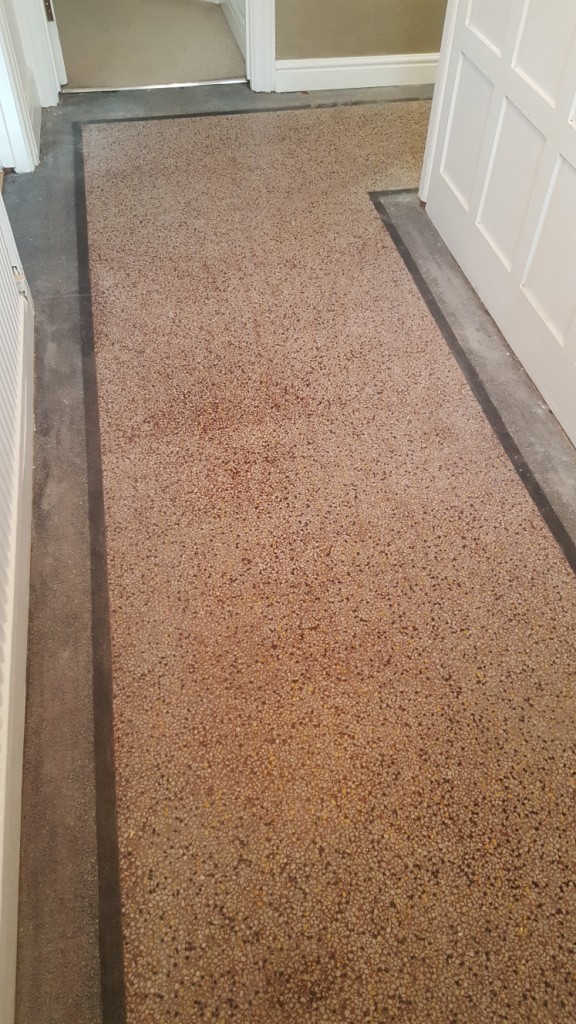
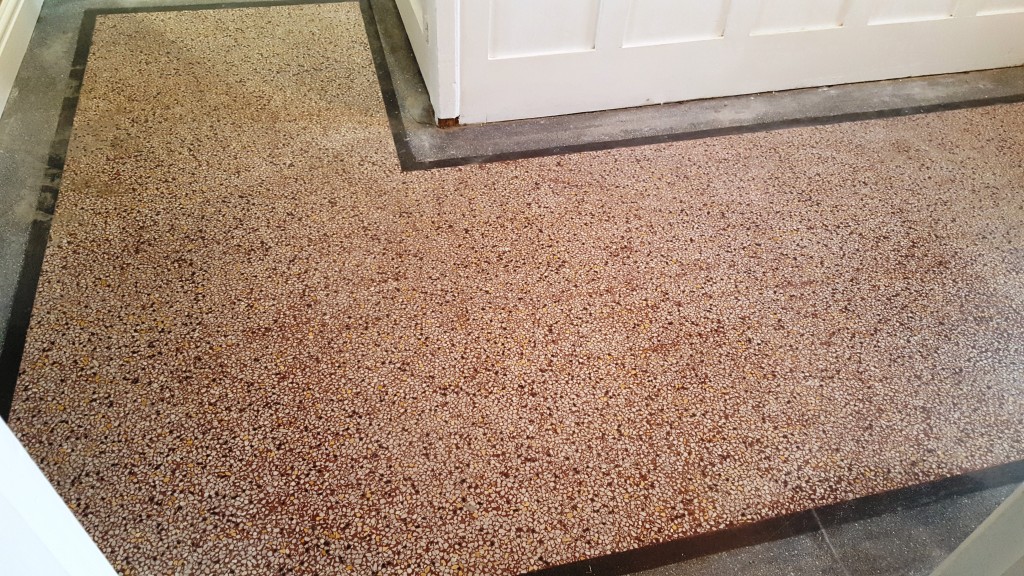
Terrazzo is a quite a bit different from the natural stone floors we most commonly work with. It’s a type of flooring material that was made popular by Venetian builders in Italy in the 1920s, but is ultimately descended from styles of design that date back hundreds of years. A typical Terrazzo floor consists of chips of marble or granite set in concrete and polished to result in a smooth surface. This Terrazzo floor, installed in the hallway of a property in Bridgend, South Wales, was in relatively good physical condition, but it had clearly lost its shine due to the build-up of dirt and muck over the years. In fact, it was first installed in around 1940! The owner was keen to have it rejuvenated to its best possible condition, so they asked me to come in to see what I could do.

Old terrazzo hallway floor before polishing Bridgend Old terrazzo hallway floor before polishing Bridgend

Cleaning and Burnishing a Dirty Terrazzo Tiled Floor

My first course of action was to apply Tile Doctor Pro Clean liberally across the floor and leave it to dwell for a short period. This is a high alkaline cleaner that is designed to deal with light to moderate soil build-up, and to strip away any old sealer remaining on the floor. I scrubbed the product in using a black pad fitted to a rotary machine and vacuumed up the resulting cleaning with a wet-vac machine. Next, to restore the shine to the floor, I undertook a process known as burnishing, which involves the application of diamond encrusted polishing pads. We will typically start with a Coarse grit pad to level off any uneven areas of the floor and grind down any particularly stubborn marks and stains. Then, we gradually refine the polish on the floor using Medium and Fine grit pads. A small amount of water is used as lubrication with each pad. After I had finished applying the first three pads in our four-pad system, I gave the floor a thorough rinse and left it to dry overnight.

Old terrazzo hallway floor during polishing Bridgend

Sealing a Terrazzo Tiled Floor

I returned to the property the next day and immediately ran some damp tests to check for excess moisture issues, which one might expect with an old floor like this one. Thankfully, the floor proved dry – and I could finish the burnishing process with the fourth and final Very Fine diamond encrusted burnishing pad, which achieved a beautiful shine finish. Finally, I sealed the floor with three coats of Tile Doctor Colour Grow, an impregnating sealer which provides robust protection and enhances the coloured patterns in the Terrazzo.

Old terrazzo hallway floor after polishing Bridgend Old terrazzo hallway floor after polishing Bridgend

As you can see from the photos above, the floor is looking so much more colourful and bright after a deep clean, polish and a fresh seal. The customer was over the moon!


Source: Terrazzo Tile Cleaning and Restoration in South Wales

Tuesday, May 2, 2017

Damaged Flagstone Tiled Floor Deep Cleaned and Sealed in Grange-over-Sands

This customer in Grange-over-Sands, a town on the Morecambe Bay, contacted us because an oven cleaning company had spilt a strong cleaning solution onto their Sandstone Flagstone Kitchen tiles, damaging them. The customer hadn't realised the damage until after the oven company had been paid, and because nothing had been said at the time the cleaning company unfortunately wouldn't accept responsibility. When we arrived at the property, we were asked to do a spot clean on the affected tiles, Read more...

To read more on this topic click here

Restoring an Acid Damanged Wet Room Floor in London

All carbonate materials, including those used in building and construction, are sensitive to acid deposition. A common example of this is the reaction that occurs when you combine bicarbonate of soda and vinegar. Another example of a material affected by this is Limestone, which is often used as Read more...

Restoring Flagstones Damaged by Strong Cleaning Products

This customer in Grange-over-Sands, a town on the Morecambe Bay, contacted us because an oven cleaning company had spilt a strong cleaning solution onto their Sandstone Flagstone Kitchen tiles, damaging them. The customer hadn't realised the damage until after the oven company had been paid, and because nothing had been said at the time the cleaning company unfortunately wouldn't accept responsibility. When we arrived at the property, we were asked to do a spot clean on the affected tiles, Read more...

Acid-Damaged Limestone Tiles Restored to New in Wapping

All carbonate materials, including those used in building and construction, are sensitive to acid deposition. A common example of this is the reaction that occurs when you combine bicarbonate of soda and vinegar. Another example of a material affected by this is Limestone, which is often used as tiled flooring. When exposed to acidic products, the damage caused to Limestone tiles is both material and aesthetic, and many property owners who suffer this kind of damage assume that they are Read more...

Dealing with Flagstones Damaged by Strong Cleaning Products in Cumbria

This customer in Grange-over-Sands, a town on the Morecambe Bay, contacted us because an oven cleaning company had spilt a strong cleaning solution onto their Sandstone Flagstone Kitchen tiles, damaging them. The customer hadn’t realised the damage until after the oven company had been paid, and because nothing had been said at the time the cleaning company unfortunately wouldn’t accept responsibility. When we arrived at the property, we were asked to do a spot clean on the affected tiles, however to do so would have resulted in a patchy finish compared to the rest of the floor. However, we could see that the rest of the floor was well overdue a deep clean and the sealer was past its best. So, we suggested the best course of action was to deep clean and reseal the whole floor to ensure a consistent finish across the tiles.


Flagstone Floor Grange Over Sands Before Cleaning Flagstone Floor Grange Over Sands Before Cleaning


Cleaning a Damaged Flagstone Tiled Floor

The customer agreed to the work, and we started on the same day. To begin, we used a Coarse 200 grit diamond encrusted burnishing pad fitted to a heavy weight buffing machine to grind away the damaged layer of stone. This worked well on about 90% of the area, but the harder to reach spots needed a chemical clean, so Tile Doctor Oxy-Gel cleaner was applied. This is an alkaline-based gel cleaner that is effective for neutralising acidic stains. The product was left to dwell for 30 minutes and then scrubbed into the tiles, before being rinsed away. Following this, we extracted the dirty solution off the tiles using a wet vacuum.

Sealing a Flagstone Tiled Floor

Since we used quite a lot of water to rinse away the chemically-infused cleaning solution, we had to leave the floor to dry overnight before we could seal it. This is really important because excess moisture can cloud the sealer and damage its performance. Arriving back at the property the next day, we ran some damp tests. Once satisfied that the tiles could be sealed, we applied four coats of Tile Doctor Seal and Go. This sealer provides an aesthetically pleasing, low-sheen finish and is fully breathable. Most of the old Flagstone tiled floors found in properties don't have a damp proof membrane installed underneath them, so a sealer which allows for moisture vapour transmission is essential.


Flagstone Floor Grange Over Sands After Cleaning Flagstone Floor Grange Over Sands After Cleaning


The customer was very happy with the work, not only because we restored the condition of the damaged tiles, but also because we were able to drastically improve the overall appearance of the floor. We recommended that the customer use Tile Doctor Stone Soap as a regular aftercare cleaner. This product not only cleans the stone, but adds to the natural stone patina by maintaining and enhancing its shine.


Source: Tile, Stone and Grout Cleaning and Restoration in Cumbria

Saturday, April 29, 2017

Amtico Kitchen Floor Cleaned and Sealed in Lancashire

Photographs below from the maintenance of Amtico Vinyl Floor Tiles in the kitchen of a house in the village of Heysham which is famous for its ferry port that has links to the Isle of Man and Ireland. This Vinyl wasn't that dirty but it was starting to lose its sheen and when this happens it's Read more...

Friday, April 28, 2017

Deep Cleaning Kitchen and Bathroom Vinyl Floors in Worcester Park

When I discuss tile cleaning with customers they normally think of the ceramic or stone tiles you find in Tile shops. Interestingly our equipment, products and techniques also work well on other hard surfaces as well including Vinyl floor tiles. Things brings me nicely onto this customer in the Read more...

Monday, April 24, 2017

Newly Installed Travertine Tiled Floor Polished and Sealed in Polegate

Travertine is known on the international market for being very distinctive in character and very durable, making it a very popular choice for tiled flooring in properties worldwide. However, the stone does require regular professional maintenance and polishing to keep it looking it top shape. I recently visited a nice property in Polegate, a town not too far away from the seaside resort of Eastbourne, in which a large Travertine tiled floor had been recently installed in the lounge and Read more...

Unfinished Travertine Floor Polished and Transformed in East Sussex

Travertine is known on the international market for being very distinctive in character and very durable, making it a very popular choice for tiled flooring in properties worldwide. However, the stone does require regular professional maintenance and polishing to keep it looking it top shape. I Read more...

Tuesday, April 4, 2017

Amtico Vinyl Floor Tiles Cleaned and Sealed in a Heysham Kitchen

Photographs below from the maintenance of Amtico Vinyl Floor Tiles in the kitchen of a house in the village of Heysham which is famous for its ferry port that has links to the Isle of Man and Ireland. This Vinyl wasn't that dirty but it was starting to lose its sheen and when this happens it's an indication that the sealer has started to wear down leaving it looking patchy in the high traffic areas. Once the sealer has failed then dirt will start to accumulate making it look less appealing, Read more...

Tuesday, March 28, 2017

Quarry Tiles From the 1850s Rejuvenated at a Church in Tewkesbury

Tewkesbury, the town and civil parish in Gloucestershire, is famous for the Tewkesbury Abbey, a Norman abbey church dating back to the 7th century so it has a lot of history and some very old buildings. Although not one of the oldest buildings in the town I was recently called to a small church in Tewksbury to restore the Quarry tiled entrance way dating back to the 1850s. The tiles had become very heavily ingrained with pigeon droppings, paint, cement, and general dirt over the years - and Read more...

Monday, March 27, 2017

Restoring Quarry Tiled Steps at a Gloucestershire Church

Tewkesbury, the town and civil parish in Gloucestershire, is famous for the Tewkesbury Abbey, a Norman abbey church dating back to the 7th century so it has a lot of history and some very old buildings. Although not one of the oldest buildings in the town I was recently called to a small church Read more...