Showing posts with label removing glue. Show all posts

Monday, February 1, 2021

How to Restore Old Quarry Tiles Covered by Vinyl

The owner of this property in the South London suburb of Cheam got in touch about restoring a Quarry tiled floor that had been covered with Vinyl tiles. After surveying the floor, it became clear that some of the original Quarry tiled floor was missing and had been replaced with concrete before covering with Vinyl.
     
Vinyl Covered Quarry Tiled Floor Before Restoration Cheam Vinyl Covered Quarry Tiled Floor Before Restoration Cheam

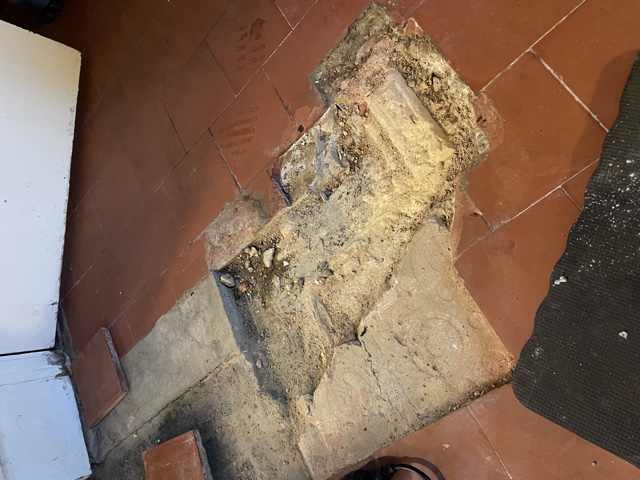
To fully restore the Quarry tiles floor, it would therefore be necessary to dig out the concrete sections and tile with matching quarry tiles which had been supplied by the client. Once done we would then need to renovate both the old and the new sections of floor and seal them to achieve a consistent appearance. I was also asked to dig out an old matwell and prepare it for a new mat as part of the work.  

This was a large job, but following a site visit I was able to provide my client with an accurate price and arranged a time to carry the work out which would take five days.
    

Removing Vinyl Tiles

The first part of the job was to lift the existing Vinyl tiles which had been laid on top of the Quarry tiles. I used a heat gun to help loosen the adhesive and then assisted with a steamer scrubbed Tile Doctor HBU Nanotech stripper into the floor to remove the glue and bitumen from the surface of the newly exposed Quarry tiles.
    
Vinyl Covered Quarry Tiled Floor During Restoration Cheam Vinyl Covered Quarry Tiled Floor During Restoration Cheam


Restoring the Appearance of a Quarry Tiled Floor

The soiled solution was extracted with a wet vacuum and I followed up by giving the Quarry tiles an acid rinse using Tile Doctor Acid Gel. The Gel is applied to the tiles and then scrubbed in with a Black pad fitted to a rotary machine. This process removes old traces of cement and grout from the quarry tiles and further cleans them up. After this the floor was rinsed thoroughly and the soil extracted with a wet vacuum.
   
Vinyl Covered Quarry Tiled Floor During Restoration Cheam Vinyl Covered Quarry Tiled Floor During Restoration Cheam

The next focus was on digging out the concrete areas mentioned earlier and then preparing the subfloor for tiling with self-levelling compound, which of course needs time to set. Once ready the replacement tiles were fixed in place making cuts as necessary and placing them to follow the original floor pattern. This may sound quite this sound straight forward, but this part of the job took some time to complete. The floor was left for a couple of days so the new tiles could set and the whole area could dry out before sealing.

 
Vinyl Covered Quarry Tiled Floor After Cleaning Cheam


Sealing a Quarry Tiled Hallway Floor

I returned later to seal all the Quarry tiles with Tile Doctor Colour Grow which brings out the deep Orange colours in the tiles whilst adding protection from staining and ingrained dirt. This sealer works by occupying the pores in the tile so dirt cannot become ingrained there. Four coats of sealer where applied across the whole floor leaving a nice matt finish that was consistent across the whole floor.

Vinyl Covered Quarry Tiled Floor After Sealing Cheam Vinyl Covered Quarry Tiled Floor After Sealing Cheam

Before leaving I discussed with the client the best way to maintain the floor in the future and recommended the use of Tile Doctor Neutral Tile Cleaner which is a pH neutral cleaner. This is important as its gentle enough to use frequently and won’t strip off the newly applied sealer like many household floor cleaners will. Its supplied in concentrated form so a small amount of cleaner goes a long way.

The client was delighted with the results, they were very pleased to see the back of the tired Vinyl floor and pleased the floor now looked consistent throughout.

Wednesday, December 5, 2018

Restoring an Old Terrazzo Hallway Floor in Newmarket

The owner of an older property in Newmarket got in contact with us about restoring his Victorian Terrazzo Tiled Hallway. We like to do a site survey to ascertain the condition of the floor and give the client a fixed price for the works, so we organised a time to pop over and look at the floor.

Adhesive Covered Victorian Terrazzo Hallway Before Cleaning Newmarket Adhesive Covered Victorian Terrazzo Hallway Before Cleaning Newmarket

The floor had taken a battering over the years and was completely unrecognisable after being completely covered up with carpet that had been secured in place with a lot of adhesive. Removing the glue and restoring an old floor like this is a difficult task but something we are familiar with and we were confident it could be restored to a reasonable standard. We discussed with the client the process and agreed a price to carry out the restoration.


Cleaning and restoring a Victorian Terrazzo Tiled Hallway Floor

The first day consisted of adding protection to the wooden skirting and then carefully scraping off as much excess adhesive as possible. To remove the rest of the glue a thick coat of Tile Doctor Nano Tech HBU remover was applied. I had tried applying this product on the floor first, but it struggled to make any impact given the huge amount of adhesive that was present. Incidentally HBU stands for Heavy Build-Up which pretty much described the problem with the floor. I left the HBU to dwell for about fifteen minutes, scrubbed it in and then rinsed off the soil with water and extracted with a wet vacuum.

To finish the job, I then repeated the process with a coat of Tile Doctor Remove and Go which was scrubbed it in to the floor to release the last bits of adhesive. Again, the floor was rinsed with water and the soil extracted with a wet vacuum. The floor was then inspected to ensure all the adhesive had been removed and stubborn areas were spot treated using a mixture of techniques until I was happy.

Removing the adhesive was hard work and took up the whole of the first day but was well worth the effort as the Terrazzo was now visible and the end goal was in sight. So, returning the next day we proceeded to build on the restoration by honing and polishing the Terrazzo with 100 through to 3000-grit diamond encrusted burnishing pads. They are applied in sequence i.e. 100, 200, 400, 800, 1500 and finally 3000 grit, using water to lubricate and then more rinsing and extracting between each pad.

With the glue was removed and the Terrazzo renovated a large crack was clearly visible across part of the hallway floor, whilst it’s not possible to repair this without taking up the floor I was able to improve its’ appearance by applying a matching filler to the cracks whilst the floor dried.


Sealing a Victorian Terrazzo Tiled Hallway Floor

The final stage was the application of an impregnating sealer. We selected to use Tile Doctor Colour Grow which is a colour enhancing product that soaks into the pores of the stone protecting it from within. It had been some time since the Terrazzo had been sealed so it took more coats then usual to properly seal the floor.

Adhesive Covered Victorian Terrazzo Hallway After Cleaning Newmarket Adhesive Covered Victorian Terrazzo Hallway After Cleaning Newmarket

As you can see the floor looked a lot better once completed, the client was very happy with the final result and left the following feedback:-

”We knew that restoring our Victorian Terrazzo floor was going to be a very difficult job, so we were heartened when Tom was so positive about doing a good job and his quotation was very reasonable. He tackled the work very professionally, always turned up on time, explained exactly what he was doing and minimised our inconvenience. We are delighted with the finished job (at the quoted price!) and would have no hesitation in recommending Tom to anyone who needs a similar service.”
Des B, Newmarket

Adhesive Covered Victorian Terrazzo Hallway After Cleaning Newmarket


Source: Terrazzo Tile Cleaning and Sealing Service in Newmarket

Tuesday, February 6, 2018

Renovating Victorian Tiled Hallway Oxford

The Victorian tiled hallway shown below had until recently been covered by carpet and was in surprisingly good condition for its age which is a testament to the durability of these floors. My client who lives in Oxford had managed to remove most of the glue that had been used to secure the carpet to the tile but found it had left an imprint on the floor. Unable to take the restoration any further we were asked to remove the ground in grime and seal the floor.

Carpet Covered Victorian Tiled Floor Before Cleaning Oxford


Restoring Victorian Quarry Tiles

My first task was to remove what was left of the carpet adhesive primarily with the aid of scraper which was used carefully along the edges. This removed the thicker parts of the glue but needed more work to remove all the traces; so a 50 grit disc fitted to a handheld machine was run around the edges of the whole floor to complete the job removing the residue and dirt in the process. I then used a 50 grit milling pad attached to a rotary floor machine to remove the ground in grime and clean the whole floor. The floor was then rinsed with water to remove the soil that was generated afterwards and then the process repeated this with a 100 grit and 200 grit milling pad to fully restore the appearance of the tile. This process took up most of the day so before leaving I gave the floor an acid wash using a mild dilution of Tile Doctor Grout Clean-up and then followed this with a good rinse and final clean with Tile Doctor Neutral Cleaner.


Sealing Victorian Tiles

Having finished cleaning the floor I left it to dry off completely for three days to ensure it was bone dry before returning to seal it. To seal I applied Tile Doctor Colour Grow which is an impregnating sealer that protects the tile from within by occupying the pores in the clay, it also enhances the natural colours in the tile in the process and leaves a matt finish.

Carpet Covered Victorian Tiled Floor After Cleaning Oxford

The finished floor looks a lot brighter now it’s now free of all the dirt and glue marks, the new sealer will also ensure it’s easy to clean and keeps its appearance for some time to come.


Source: Victorian Tile Cleaning and Renovation Service in Oxfordshire